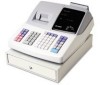
XE-A202 Operation Manual in English and Spanish
Page 2
... unit. These limits are located on the right side of the FCC Rules. Note: This equipment has been tested and found to comply with the instruction manual, may cause harmful interference to cause harmful interference in accordance with the limits for a Class A digital device, pursuant to correct the interference at his own...
... unit. These limits are located on the right side of the FCC Rules. Note: This equipment has been tested and found to comply with the instruction manual, may cause harmful interference to cause harmful interference in accordance with the limits for a Class A digital device, pursuant to correct the interference at his own...
XE-A202 Operation Manual in English and Spanish
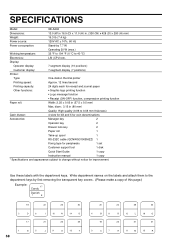
Page 70
... mm thickness) Cash drawer: 4 slots for bill and 5 for coin denominations Accessories: Manager key 2 Operator key 2 Drawer lock key 2 Paper roll 1 Take-up spool 1 RS-232C cable (QCNWG3190BHZZ) 1 Fixing tape for peripherals 1 set Customer support tool 1 disk Quick Start Guide 1 copy Instruction manual 1 copy * Specifications and appearance subject to 40 °C) Electronics: LSI (CPU...
... mm thickness) Cash drawer: 4 slots for bill and 5 for coin denominations Accessories: Manager key 2 Operator key 2 Drawer lock key 2 Paper roll 1 Take-up spool 1 RS-232C cable (QCNWG3190BHZZ) 1 Fixing tape for peripherals 1 set Customer support tool 1 disk Quick Start Guide 1 copy Instruction manual 1 copy * Specifications and appearance subject to 40 °C) Electronics: LSI (CPU...
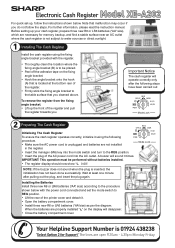
Quick Installation Guide
Page 1
Model XE-A202 For quick set the mode switch to REG position. • Lift the rear of the register. • Firmly stick the fixing angle bracket to the procedure shown below . Note that malfunction may occur if you cleaned above. Important Notice The cash register will operate ...For further information, please read the instruction manual. Before setting up , follow the steps. Wait at the bottom rear of the printer cover and detach it using the fixing angle bracket provided with the power cord connected and set -up your cash register, prepare three new R6 or LR6...
Model XE-A202 For quick set the mode switch to REG position. • Lift the rear of the register. • Firmly stick the fixing angle bracket to the procedure shown below . Note that malfunction may occur if you cleaned above. Important Notice The cash register will operate ...For further information, please read the instruction manual. Before setting up , follow the steps. Wait at the bottom rear of the printer cover and detach it using the fixing angle bracket provided with the power cord connected and set -up your cash register, prepare three new R6 or LR6...
Quick Installation Guide
Page 4
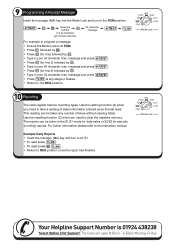
... 24 character max. TL/NS REG OPX/Z MGR X1/Z1 X2/Z2 PGM Mode Lock 10 Reporting The cash register has two reporting types. Use the resetting function (Z) when you need to clear the registers memory. message and press #/TM/ST . • Press 3 (for line 3) followed by . • Type in your 24 character... into the Mode Lock and turn to X1/Z1. • To read press TL/NS . • To reset press TL/NS . • Return to the instruction manual.
... 24 character max. TL/NS REG OPX/Z MGR X1/Z1 X2/Z2 PGM Mode Lock 10 Reporting The cash register has two reporting types. Use the resetting function (Z) when you need to clear the registers memory. message and press #/TM/ST . • Press 3 (for line 3) followed by . • Type in your 24 character... into the Mode Lock and turn to X1/Z1. • To read press TL/NS . • To reset press TL/NS . • Return to the instruction manual.


