
Operation Manual
Page 1
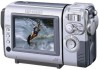
Please retain this product, record on the line below the model number and serial number which are located on the bottom of the unit. Important For assistance in reporting the theft or loss of Demo mode. Model No.: Serial No.: • See page 57 for use of this information. Advanced Features Appendix Operation References Preparation Basic Operations Useful Features LIQUID CRYSTAL DISPLAY CAMCORDER MODEL VL-NZ50U OPERATION MANUAL Please read this operation manual carefully before using the camcorder.
Please retain this product, record on the line below the model number and serial number which are located on the bottom of the unit. Important For assistance in reporting the theft or loss of Demo mode. Model No.: Serial No.: • See page 57 for use of this information. Advanced Features Appendix Operation References Preparation Basic Operations Useful Features LIQUID CRYSTAL DISPLAY CAMCORDER MODEL VL-NZ50U OPERATION MANUAL Please read this operation manual carefully before using the camcorder.
Operation Manual
Page 2
... NOT REMOVE COVER. Disposal of these materials may be replaced, obtain the same type of adapter from SHARP. BATTERY DISPOSAL CONTAINS LITHIUM-ION RECHARGEABLE BATTERY. Thank you for Consumers in the literature accompanying this operation manual to familiarize yourself with the camcorder's features, so that can cause dangerous electric shocks. Please read... SERVICING TO QUALIFIED SERVICE PERSONNEL. CONTACT LOCAL AGENCIES FOR INFORMATION ON RECYCLING AND DISPOSAL PLANS IN YOUR AREA. Important Information for purchasing this camcorder from a SHARP service center of your dealer.
... NOT REMOVE COVER. Disposal of these materials may be replaced, obtain the same type of adapter from SHARP. BATTERY DISPOSAL CONTAINS LITHIUM-ION RECHARGEABLE BATTERY. Thank you for Consumers in the literature accompanying this operation manual to familiarize yourself with the camcorder's features, so that can cause dangerous electric shocks. Please read... SERVICING TO QUALIFIED SERVICE PERSONNEL. CONTACT LOCAL AGENCIES FOR INFORMATION ON RECYCLING AND DISPOSAL PLANS IN YOUR AREA. Important Information for purchasing this camcorder from a SHARP service center of your dealer.

Operation Manual
Page 6
... of the arrow completely until it locks into the DC input jack (2). • The charge indicator lights up. Quick Operation Guide Please consult this operation manual further for details on the camcorder (1), and slide the battery pack in the direction of your camcorder.
... of the arrow completely until it locks into the DC input jack (2). • The charge indicator lights up. Quick Operation Guide Please consult this operation manual further for details on the camcorder (1), and slide the battery pack in the direction of your camcorder.
Operation Manual
Page 13
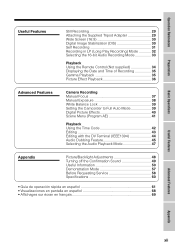
Operation References Preparation Basic Operations Useful Features Still Recording 29 Attaching the Supplied Tripod Adapter 29 Wide Screen (16:9 30 Digital Image Stabilization (DIS 30 Self Recording 31 Recording in LP (Long Play Recording) Mode 32 Selecting the 16-bit Audio Recording ... Time of Recording 35 Gamma Playback 35 Picture Effect Playback 36 Advanced Features Camera Recording Manual Focus 37 Manual Exposure 38 White Balance Lock 39 Setting the Camcorder to Full Auto Mode 39 Digital Picture Effects 40 Scene Menu (Program AE 41 Playback Using the Time Code 42 Editing...
Operation References Preparation Basic Operations Useful Features Still Recording 29 Attaching the Supplied Tripod Adapter 29 Wide Screen (16:9 30 Digital Image Stabilization (DIS 30 Self Recording 31 Recording in LP (Long Play Recording) Mode 32 Selecting the 16-bit Audio Recording ... Time of Recording 35 Gamma Playback 35 Picture Effect Playback 36 Advanced Features Camera Recording Manual Focus 37 Manual Exposure 38 White Balance Lock 39 Setting the Camcorder to Full Auto Mode 39 Digital Picture Effects 40 Scene Menu (Program AE 41 Playback Using the Time Code 42 Editing...

Operation Manual
Page 16
Operation References Operation References Rear view GAMMA/ BRIGHTER button [pp. 25, 26, 35] FADE button [p. 27] SET button [p. 22] RECord START/STOP button [p. 16] STILL button [p. 29] Power switch (CAMERA/VCR select switch) [pp. 16, 19] Speaker MENU button [pp. 5, 22] MANUAL button [p. 5] Bottom view Battery release [p. 7] Wrist strap loop [p. 14] Tripod adapter socket [p. 29] Battery mounting surface [p. 7] 3
Operation References Operation References Rear view GAMMA/ BRIGHTER button [pp. 25, 26, 35] FADE button [p. 27] SET button [p. 22] RECord START/STOP button [p. 16] STILL button [p. 29] Power switch (CAMERA/VCR select switch) [pp. 16, 19] Speaker MENU button [pp. 5, 22] MANUAL button [p. 5] Bottom view Battery release [p. 7] Wrist strap loop [p. 14] Tripod adapter socket [p. 29] Battery mounting surface [p. 7] 3

Operation Manual
Page 18
... TT I NG 1 P I T E BA L . RE T URN RE T URN 3 0 min Menu screen Indicators off Each time you press the MANUAL button, the screen changes as shown below . Indicators on /off 5 Operation References Operation References Manual screens MANUAL button Each time you press the MENU button, the screen changes as shown below . • The example screens...
... TT I NG 1 P I T E BA L . RE T URN RE T URN 3 0 min Menu screen Indicators off Each time you press the MANUAL button, the screen changes as shown below . Indicators on /off 5 Operation References Operation References Manual screens MANUAL button Each time you press the MENU button, the screen changes as shown below . • The example screens...
Operation Manual
Page 30
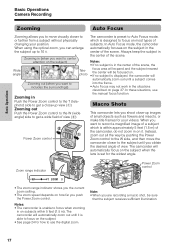
... optical zoom, you can enlarge the subject up to the subject until you obtain the desired angle of a subject which is unable to use the manual focus function. Zoom range indicator Power Zoom control W T Z OOM 3 • The zoom range indicator shows you the current zoom setting. • The ... Zooming out (when you want to focus on the subject. • See page 24 for the widest angle. In these situations, use the digital zoom. In Auto Focus mode, the camcorder automatically focuses on how far you push the Power Zoom control. Zooming out Push the Power Zoom control...
... optical zoom, you can enlarge the subject up to the subject until you obtain the desired angle of a subject which is unable to use the manual focus function. Zoom range indicator Power Zoom control W T Z OOM 3 • The zoom range indicator shows you the current zoom setting. • The ... Zooming out (when you want to focus on the subject. • See page 24 for the widest angle. In these situations, use the digital zoom. In Auto Focus mode, the camcorder automatically focuses on how far you push the Power Zoom control. Zooming out Push the Power Zoom control...
Operation Manual
Page 34
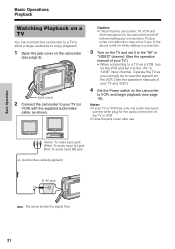
...; If your TV (or VCR) with the supplied audio/video cable, as you normally do to view the signal from the VCR. (See the operation manuals of your TV.) • When connecting to a TV via a VCR, turn on the VCR and set it to the "AV" or "LINE" input channel. POWER... to be used are turned off before making a connection. 3 Turn on the TV and set it to the "AV" or "VIDEO" channel. (See the operation manual of the above is left on while making any connections. Picture noise or malfunction may occur if any of your TV and VCR.) 4 Set the...
...; If your TV (or VCR) with the supplied audio/video cable, as you normally do to view the signal from the VCR. (See the operation manuals of your TV.) • When connecting to a TV via a VCR, turn on the VCR and set it to the "AV" or "LINE" input channel. POWER... to be used are turned off before making a connection. 3 Turn on the TV and set it to the "AV" or "VIDEO" channel. (See the operation manual of the above is left on while making any connections. Picture noise or malfunction may occur if any of your TV and VCR.) 4 Set the...

Operation Manual
Page 36
... center. To turn off the recording guide Set the GUIDE ON/OFF switch to help you cannot change the recording guide. Note: • When using manual focus, you with surrounding background. UUsesfuel ffeuatlurFeseatures CCaammeeraraReRceocrdoinrdging Displaying the Recording Guide This function helps you decide on the recording guide Set the GUIDE ON...
... center. To turn off the recording guide Set the GUIDE ON/OFF switch to help you cannot change the recording guide. Note: • When using manual focus, you with surrounding background. UUsesfuel ffeuatlurFeseatures CCaammeeraraReRceocrdoinrdging Displaying the Recording Guide This function helps you decide on the recording guide Set the GUIDE ON...

Operation Manual
Page 39
... camcorder in this case. G AMMA AU T O 3 0 min To cancel the gain-up function to record a brighter picture. Gain-up When you are possible when using manual exposure (see page 38). • Gain-up function cannot be used in a bright location. To obtain a brighter picture Press the GAMMA/BRIGHTER button again. •...
... camcorder in this case. G AMMA AU T O 3 0 min To cancel the gain-up function to record a brighter picture. Gain-up When you are possible when using manual exposure (see page 38). • Gain-up function cannot be used in a bright location. To obtain a brighter picture Press the GAMMA/BRIGHTER button again. •...

Operation Manual
Page 50
...the SET button while the focus setting screen is too dark. FOCUS AUTO 2 Adjust the Power Zoom control to frame the subject as you can manually adjust the focus by pressing l or m, even if the focus setting screen is not displayed. Background is closer than approximately 5 feet (1.5 m).... able to focus correctly if the subject is too bright. Fast-speed shutter being shot through a dirty or wet window. AAddvavncaednFceaetudresFeatures CCaammeeraraReRceocrdoinrdging Manual Focus Auto Focus may not be able to focus on the subject in the same scene. Set the zoom control to wide angle,...
...the SET button while the focus setting screen is too dark. FOCUS AUTO 2 Adjust the Power Zoom control to frame the subject as you can manually adjust the focus by pressing l or m, even if the focus setting screen is not displayed. Background is closer than approximately 5 feet (1.5 m).... able to focus correctly if the subject is too bright. Fast-speed shutter being shot through a dirty or wet window. AAddvavncaednFceaetudresFeatures CCaammeeraraReRceocrdoinrdging Manual Focus Auto Focus may not be able to focus on the subject in the same scene. Set the zoom control to wide angle,...

Operation Manual
Page 51
... exposure setting screen is displayed. The adjustment range is from +5 (least light) to correct the exposure level. In this case, use the manual exposure function to L5 (most light). Subject is too bright against background. • Decrease the exposure level to record a clear image. However... and background, you may not be able to allow more light through the lens. 1 In CAMERA mode, press the MANUAL button until the normal screen appears. Manual Exposure The camcorder is preset to select the desired exposure level. • The number shown is the selected exposure level....
... exposure setting screen is displayed. The adjustment range is from +5 (least light) to correct the exposure level. In this case, use the manual exposure function to L5 (most light). Subject is too bright against background. • Decrease the exposure level to record a clear image. However... and background, you may not be able to allow more light through the lens. 1 In CAMERA mode, press the MANUAL button until the normal screen appears. Manual Exposure The camcorder is preset to select the desired exposure level. • The number shown is the selected exposure level....

Operation Manual
Page 52
... thereafter. MA NU A L WH I T E BAL. Lock the White Balance if the Auto White Balance does not work properly. 1 In CAMERA mode, press the MANUAL button until the normal screen appears. 39 White paper or white cloth To return to Full Auto mode To easily record good-quality images, perform... camera shooting in Manual mode. Advanced Features 3 Press the SET button to set the camcorder to Full Auto mode. AUTO WH I T E BAL. L OCK Note: • If you ...
... thereafter. MA NU A L WH I T E BAL. Lock the White Balance if the Auto White Balance does not work properly. 1 In CAMERA mode, press the MANUAL button until the normal screen appears. 39 White paper or white cloth To return to Full Auto mode To easily record good-quality images, perform... camera shooting in Manual mode. Advanced Features 3 Press the SET button to set the camcorder to Full Auto mode. AUTO WH I T E BAL. L OCK Note: • If you ...

Operation Manual
Page 63
... the shot. Note: • It may suffer. Tips on birthday cake at 8 inches (20 cm) (10-15) 10 Candlelight Note: • The figures in Focus manually when you the center. Indoors, however, artificial lighting is brighter than the subject, the subject often becomes too dark. Position the subject in the chart...
... the shot. Note: • It may suffer. Tips on birthday cake at 8 inches (20 cm) (10-15) 10 Candlelight Note: • The figures in Focus manually when you the center. Indoors, however, artificial lighting is brighter than the subject, the subject often becomes too dark. Position the subject in the chart...
Operation Manual
Page 71
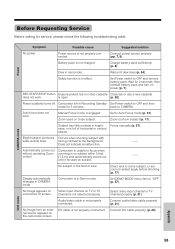
...calling for 2 seconds, then reinstall battery pack and turn on power (p. 7). Wait for service, please check the following troubleshooting table. Focus manually (p. 37). No subject in Demo mode. Set DEMO MODE menu item to widest angle before shooting (p. 17). Safety function is not ... not work . Display automatically changes in effect. Video input channel on the camcorder screen. Wait until it focuses on close subject. Manual Focus mode is not properly connected. Zoom used on subject. -- Select video input channel or TV channel properly (p. 21). Camcorder ...
...calling for 2 seconds, then reinstall battery pack and turn on power (p. 7). Wait for service, please check the following troubleshooting table. Focus manually (p. 37). No subject in Demo mode. Set DEMO MODE menu item to widest angle before shooting (p. 17). Safety function is not ... not work . Display automatically changes in effect. Video input channel on the camcorder screen. Wait until it focuses on close subject. Manual Focus mode is not properly connected. Zoom used on subject. -- Select video input channel or TV channel properly (p. 21). Camcorder ...

