

UX-305 Operation Manual
Page 3
... Key Dialing: 8 numbers Speed Dialing: 80 numbers Initial starter roll (included with fax machine): 32 ft. (10 m) roll (approx. 30 letter-size pages) Replacement roll: UX-3CR 98 ft. (30 m) roll (two rolls in Sharp special mode, excluding time for choosing a Sharp facsimile! Introduction Welcome, and thank you for protocol signals (i.e., ITU-T phase C ...lettersize pages) 10 sheets max. 512 KB (approx. 30 average pages) 9600 bps with automatic fallback to 7200, 4800, or 2400 bps Approx. 15 seconds (Sharp special mode) TEL/FAX/A.M. (Note: A.M. The features and specifications of your new...
... Key Dialing: 8 numbers Speed Dialing: 80 numbers Initial starter roll (included with fax machine): 32 ft. (10 m) roll (approx. 30 letter-size pages) Replacement roll: UX-3CR 98 ft. (30 m) roll (two rolls in Sharp special mode, excluding time for choosing a Sharp facsimile! Introduction Welcome, and thank you for protocol signals (i.e., ITU-T phase C ...lettersize pages) 10 sheets max. 512 KB (approx. 30 average pages) 9600 bps with automatic fallback to 7200, 4800, or 2400 bps Approx. 15 seconds (Sharp special mode) TEL/FAX/A.M. (Note: A.M. The features and specifications of your new...

UX-305 Operation Manual
Page 6
If you may be a remote risk of facsimile messages. • This facsimile machine is not designed for use a telephone to use the fax machine in the vicinity of the leak. • The power outlet must be installed near the equipment and must be easily accessible. • Use caution ...
If you may be a remote risk of facsimile messages. • This facsimile machine is not designed for use a telephone to use the fax machine in the vicinity of the leak. • The power outlet must be installed near the equipment and must be easily accessible. • Use caution ...

UX-305 Operation Manual
Page 7
... 7 A Look at the Operation Panel 8 Connections 10 Loading the Imaging Film 16 Loading Printing Paper 21 Entering Your Name and Fax Number 24 Setting the Date and Time 27 Selecting the Reception Mode 30 Volume Adjustment 31 2 Sending Documents 33 Transmittable Documents 33 Loading... the Document 35 Resolution and Contrast 37 Sending a Fax by Normal Dialing 39 Sending a Fax by Automatic Dialing 41 3 Receiving Documents 50 Using FAX Mode 50 Using TEL Mode 51 4 Making Copies 56 5 Making Telephone Calls 59 6 ...
... 7 A Look at the Operation Panel 8 Connections 10 Loading the Imaging Film 16 Loading Printing Paper 21 Entering Your Name and Fax Number 24 Setting the Date and Time 27 Selecting the Reception Mode 30 Volume Adjustment 31 2 Sending Documents 33 Transmittable Documents 33 Loading... the Document 35 Resolution and Contrast 37 Sending a Fax by Normal Dialing 39 Sending a Fax by Automatic Dialing 41 3 Receiving Documents 50 Using FAX Mode 50 Using TEL Mode 51 4 Making Copies 56 5 Making Telephone Calls 59 6 ...
UX-305 Operation Manual
Page 8
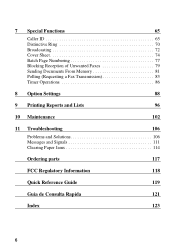
7 Special Functions 65 Caller ID 65 Distinctive Ring 70 Broadcasting 72 Cover Sheet 74 Batch Page Numbering 77 Blocking Reception of Unwanted Faxes 79 Sending Documents From Memory 81 Polling (Requesting a Fax Transmission 83 Timer Operations 86 8 Option Settings 88 9 Printing Reports and Lists 96 10 Maintenance 102 11 Troubleshooting 106 Problems and Solutions 106 Messages and Signals 111 Clearing Paper Jams 114 Ordering parts 117 FCC Regulatory Information 118 Quick Reference Guide 119 Guia de Consulta Rapida 121 Index 123 6
7 Special Functions 65 Caller ID 65 Distinctive Ring 70 Broadcasting 72 Cover Sheet 74 Batch Page Numbering 77 Blocking Reception of Unwanted Faxes 79 Sending Documents From Memory 81 Polling (Requesting a Fax Transmission 83 Timer Operations 86 8 Option Settings 88 9 Printing Reports and Lists 96 10 Maintenance 102 11 Troubleshooting 106 Problems and Solutions 106 Messages and Signals 111 Clearing Paper Jams 114 Ordering parts 117 FCC Regulatory Information 118 Quick Reference Guide 119 Guia de Consulta Rapida 121 Index 123 6

UX-305 Operation Manual
Page 10
... to adjust the resolution and contrast before sending or copying a document. 8 A Look at the Operation Panel A Look at the Operation Panel 12 3 45 6 78 TEL FAX 1 GHI 4 PQRS 7 ABC 2 JKL 5 TUV 8 DEF 3 MNO 6 WXYZ 9 SPEED DIAL REDIAL HOLD/ SEARCH A.M. 01 02 03 SPEAKER 04 05 06 07 08/POLL 0 RECEPTION VOLUME...
... to adjust the resolution and contrast before sending or copying a document. 8 A Look at the Operation Panel A Look at the Operation Panel 12 3 45 6 78 TEL FAX 1 GHI 4 PQRS 7 ABC 2 JKL 5 TUV 8 DEF 3 MNO 6 WXYZ 9 SPEED DIAL REDIAL HOLD/ SEARCH A.M. 01 02 03 SPEAKER 04 05 06 07 08/POLL 0 RECEPTION VOLUME...

UX-305 Operation Manual
Page 11
... HOLD/SEARCH key Press this key to search for an automatic dialing number, or, during a phone conversation, press this key to hear the line and fax tones through the speaker when sending a document. At any other times. 7 FUNCTION key Press this key to select various special functions. 8 Panel release Grasp ...this finger hold and pull toward you to open the operation panel. 9 Number keys Use these keys to dial a fax or voice number automatically. (Note that you must pick up the handset to talk with the other party on hold. 11 SPEAKER key Press this...
... HOLD/SEARCH key Press this key to search for an automatic dialing number, or, during a phone conversation, press this key to hear the line and fax tones through the speaker when sending a document. At any other times. 7 FUNCTION key Press this key to select various special functions. 8 Panel release Grasp ...this finger hold and pull toward you to open the operation panel. 9 Number keys Use these keys to dial a fax or voice number automatically. (Note that you must pick up the handset to talk with the other party on hold. 11 SPEAKER key Press this...

UX-305 Operation Manual
Page 15
...This procedure is described in Chapter 8, Option Settings. 13 If you are on a pulse dial (rotary) line, you must reset Option Setting 12 (Fax Signal Receive) to NO in Chapter 8, Option Settings. • If you must set for pulse dialing by changing Option Setting 8. TSEELT. Do not ..., you intend to prevent transmission and reception errors. SET jack! LINE. TLEINLE. This procedure is described in order to use a computer fax modem on the back of the line cord into the TEL. Installation Connections Telephone line cord Insert one end of the machine marked TEL. 1....
...This procedure is described in Chapter 8, Option Settings. 13 If you are on a pulse dial (rotary) line, you must reset Option Setting 12 (Fax Signal Receive) to NO in Chapter 8, Option Settings. • If you must set for pulse dialing by changing Option Setting 8. TSEELT. Do not ..., you intend to prevent transmission and reception errors. SET jack! LINE. TLEINLE. This procedure is described in order to use a computer fax modem on the back of the line cord into the TEL. Installation Connections Telephone line cord Insert one end of the machine marked TEL. 1....

UX-305 Operation Manual
Page 17
TSEELT. SET jack on the fax. ♦ To connect an answering machine to the TEL. SET jack. TLEINLE. 15 1. Installation Connections Extension phone (optional) If desired, you can connect an extension phone to your fax, see Chapter 6, Answering Machine Hookup. 1 Remove the seal covering the TEL. SET jack. 2 Connect the extension phone line to the TEL.
TSEELT. SET jack on the fax. ♦ To connect an answering machine to the TEL. SET jack. TLEINLE. 15 1. Installation Connections Extension phone (optional) If desired, you can connect an extension phone to your fax, see Chapter 6, Answering Machine Hookup. 1 Remove the seal covering the TEL. SET jack. 2 Connect the extension phone line to the TEL.

UX-305 Operation Manual
Page 18
... and pulling up. 2 Pull the green release on the right side of Sharp UX-3CR imaging film. One roll can print about 100 letter-size pages. Note: If there is paper in the fax applies heat to the imaging film to transfer ink to load or replace the film. Loading the Imaging Film Loading... the Imaging Film Your fax uses a roll of imaging film included with your fax can print about 30 letter-size pages.
... and pulling up. 2 Pull the green release on the right side of Sharp UX-3CR imaging film. One roll can print about 100 letter-size pages. Note: If there is paper in the fax applies heat to the imaging film to transfer ink to load or replace the film. Loading the Imaging Film Loading... the Imaging Film Your fax uses a roll of imaging film included with your fax can print about 30 letter-size pages.

UX-305 Operation Manual
Page 24
... have loaded legal paper, you must change the paper size setting to accumulate in the output tray. Note: When receiving faxes or copying documents, do not allow a large number of received faxes to the date and time display. LETTER LEGAL 1 or 2 The display will show : PAPER SIZE SET Press 1 to select LETTER... or 2 to select LEGAL. This may obstruct the outlet and cause paper jams. 5 The fax has been set at the factory to scale the size of pages to legal. Press these keys: FUNCTION 6 The display will show : COPY CUT-OFF...
... have loaded legal paper, you must change the paper size setting to accumulate in the output tray. Note: When receiving faxes or copying documents, do not allow a large number of received faxes to the date and time display. LETTER LEGAL 1 or 2 The display will show : PAPER SIZE SET Press 1 to select LETTER... or 2 to select LEGAL. This may obstruct the outlet and cause paper jams. 5 The fax has been set at the factory to scale the size of pages to legal. Press these keys: FUNCTION 6 The display will show : COPY CUT-OFF...

UX-305 Operation Manual
Page 25
STOP 23 Depending on the type of paper you have loaded, you may find that you obtain better print quality by changing the setting to print at normal contrast. Press these keys: FUNCTION 6 The display will show : PRINT CONTRAST Press 1 to select NORMAL or 2 to the date and time display. NORMAL LIGHT 1 or 2 The display will show : PAPER SIZE SET Press the STOP key to return to select LIGHT. 1. Installation Loading Printing Paper 6 Your fax has been set at the factory to LIGHT.
STOP 23 Depending on the type of paper you have loaded, you may find that you obtain better print quality by changing the setting to print at normal contrast. Press these keys: FUNCTION 6 The display will show : PRINT CONTRAST Press 1 to select NORMAL or 2 to the date and time display. NORMAL LIGHT 1 or 2 The display will show : PAPER SIZE SET Press the STOP key to return to select LIGHT. 1. Installation Loading Printing Paper 6 Your fax has been set at the factory to LIGHT.

UX-305 Operation Manual
Page 26
... you need to set the date and time as explained in the following section to enter your name and the telephone number of your fax messages. 3 key 123 456 789 0 # key STOP key FUNCTION key START/MEMORY key Note: The imaging film and printing paper must be entered. 1 Press these...will automatically appear at the top of your fax, you send. Important! Once you send. Entering Your Name and Fax Number Entering Your Name and Fax Number Before you can be loaded before your name and fax number can begin using your fax. Enter your name and fax number here and set the date and ...
... you need to set the date and time as explained in the following section to enter your name and the telephone number of your fax messages. 3 key 123 456 789 0 # key STOP key FUNCTION key START/MEMORY key Note: The imaging film and printing paper must be entered. 1 Press these...will automatically appear at the top of your fax, you send. Important! Once you send. Entering Your Name and Fax Number Entering Your Name and Fax Number Before you can be loaded before your name and fax number can begin using your fax. Enter your name and fax number here and set the date and ...

UX-305 Operation Manual
Page 27
...: ENTER YOUR NAME Cursor: A dark square mark in memory. The new number will show : ENTER FAX # 4 Enter your fax number by pressing the number keys. 1. Installation Entering Your Name and Fax Number 2 Press the # key twice: The display will replace the old number. Up to enter the... fax number in the display that indicates where a number or letter will show : OWN NUMBER SET 3 Press the START/MEMORY key. Example: ...
...: ENTER YOUR NAME Cursor: A dark square mark in memory. The new number will show : ENTER FAX # 4 Enter your fax number by pressing the number keys. 1. Installation Entering Your Name and Fax Number 2 Press the # key twice: The display will replace the old number. Up to enter the... fax number in the display that indicates where a number or letter will show : OWN NUMBER SET 3 Press the START/MEMORY key. Example: ...

UX-305 Operation Manual
Page 28
Example: SHARP = 7 7 7 7 7 4 4 4 2 2 7 7 7 7 SPEAKER 7 7 A = J = S = B = K = T = C = L = U = D = M = V = E = N = W = F = O = X = G = P = Y = H = Q = Z = I = R = SPACE = ABC DEF SPEED DIAL Press this key to move OPER the cursor to the left. SPEAKER Press this key ...• To enter two letters in succession that require the same key, press the SPEAKER key after entering the first letter. Entering Your Name and Fax Number 6 Enter your name in memory. Press either key repeatedly to select + p one of the following symbols: 7 Press the START/MEMORY key...
Example: SHARP = 7 7 7 7 7 4 4 4 2 2 7 7 7 7 SPEAKER 7 7 A = J = S = B = K = T = C = L = U = D = M = V = E = N = W = F = O = X = G = P = Y = H = Q = Z = I = R = SPACE = ABC DEF SPEED DIAL Press this key to move OPER the cursor to the left. SPEAKER Press this key ...• To enter two letters in succession that require the same key, press the SPEAKER key after entering the first letter. Entering Your Name and Fax Number 6 Enter your name in memory. Press either key repeatedly to select + p one of the following symbols: 7 Press the START/MEMORY key...

UX-305 Operation Manual
Page 29
Installation Setting the Date and Time The date and time appear in the display and reports, and are printed at the top of every page you fax. The display will show : DATE & TIME SET Note: The fax is Year 2000 compliant. 27 1. Setting the Date and Time 3 key * key 123 456 789 0 FUNCTION key STOP key START/MEMORY key Note: The imaging film and printing paper must be loaded before the date and time can be set. 1 Press these keys: FUNCTION 3 The display will show : ENTRY MODE * 2 Press the key four times.
Installation Setting the Date and Time The date and time appear in the display and reports, and are printed at the top of every page you fax. The display will show : DATE & TIME SET Note: The fax is Year 2000 compliant. 27 1. Setting the Date and Time 3 key * key 123 456 789 0 FUNCTION key STOP key START/MEMORY key Note: The imaging film and printing paper must be loaded before the date and time can be set. 1 Press these keys: FUNCTION 3 The display will show : ENTRY MODE * 2 Press the key four times.

UX-305 Operation Manual
Page 32
.... Selecting the Reception Mode Selecting the Reception Mode Your fax has three modes for receiving incoming calls and faxes: TEL mode: Select this mode only if you have connected an answering machine to the fax (see Chapter 6). The fax machine will automatically answer all calls on using A.M. mode... only want to receive both phone calls and faxes on your fax machine. A.M. For more information on four rings and receive incoming faxes. Select this mode when you go out to receive faxes on the line connected to the fax machine. TEL FAX FEB 1 10:30 A.M. Setting the reception...
.... Selecting the Reception Mode Selecting the Reception Mode Your fax has three modes for receiving incoming calls and faxes: TEL mode: Select this mode only if you have connected an answering machine to the fax (see Chapter 6). The fax machine will automatically answer all calls on using A.M. mode... only want to receive both phone calls and faxes on your fax machine. A.M. For more information on four rings and receive incoming faxes. Select this mode when you go out to receive faxes on the line connected to the fax machine. TEL FAX FEB 1 10:30 A.M. Setting the reception...

UX-305 Operation Manual
Page 37
... document face down and push it gently into the machine. The top edge of several large or thick pages which must be placed in Sending a Fax by Normal Dialing. RESOLUTION 35 Do not try to send or copy more than 10 pages, place the additional pages gently and carefully in the...
... document face down and push it gently into the machine. The top edge of several large or thick pages which must be placed in Sending a Fax by Normal Dialing. RESOLUTION 35 Do not try to send or copy more than 10 pages, place the additional pages gently and carefully in the...

UX-305 Operation Manual
Page 40
... can be adjusted. 2 Press the RESOLUTION key one or more times until the desired resolution and contrast settings appear in SUPER FINE resolution, the receiving fax machine must also have that resolution.
... can be adjusted. 2 Press the RESOLUTION key one or more times until the desired resolution and contrast settings appear in SUPER FINE resolution, the receiving fax machine must also have that resolution.

UX-305 Operation Manual
Page 41
... number of the receiving machine by pressing the number keys. ♦ If a person answers, you can talk with them through the handset before sending the fax. (If you pressed the SPEAKER key, you must pick up the handset to talk.) ♦ Normal Dialing allows you pick up the handset or press... key. Listen for the dial tone. The display will show: READY TO SEND • Set the resolution and/or contrast if desired. Sending Documents Sending a Fax by Normal Dialing Sending a Fax by Normal Dialing With Normal Dialing, you to listen to the line and make sure the other...
... number of the receiving machine by pressing the number keys. ♦ If a person answers, you can talk with them through the handset before sending the fax. (If you pressed the SPEAKER key, you must pick up the handset to talk.) ♦ Normal Dialing allows you pick up the handset or press... key. Listen for the dial tone. The display will show: READY TO SEND • Set the resolution and/or contrast if desired. Sending Documents Sending a Fax by Normal Dialing Sending a Fax by Normal Dialing With Normal Dialing, you to listen to the line and make sure the other...

UX-305 Operation Manual
Page 42
... . • When transmission is ready to press their Start key (if you used it is completed, the fax will beep once. This causes the receiving machine to speak with them to receive. 40 Sending a Fax by Normal Dialing 4 Wait for the connection. Depending on the setting of Normal Dialing. Replace the handset...
... . • When transmission is ready to press their Start key (if you used it is completed, the fax will beep once. This causes the receiving machine to speak with them to receive. 40 Sending a Fax by Normal Dialing 4 Wait for the connection. Depending on the setting of Normal Dialing. Replace the handset...


