

R-1500 , R-1501 , R-1502 Microwave Operation Manual
Page 2
...: www.sharp-usa.com Please provide the following information when you record all the information listed and retain for future reference. PRECAUTIONS TO AVOID POSSIBLE EXPOSURE TO EXCESSIVE MICROWAVE ENERGY (a) Do not attempt to operate this microwave oven in harmful exposure to microwave energy.... It is particularly important that the oven door close properly and that there is damaged. It is ...
...: www.sharp-usa.com Please provide the following information when you record all the information listed and retain for future reference. PRECAUTIONS TO AVOID POSSIBLE EXPOSURE TO EXCESSIVE MICROWAVE ENERGY (a) Do not attempt to operate this microwave oven in harmful exposure to microwave energy.... It is particularly important that the oven door close properly and that there is damaged. It is ...
R-1500 , R-1501 , R-1502 Microwave Operation Manual
Page 3
... Instructions..... 6-14 Electrical Grounding Instructions 7 Optional Accessories 14 Information You Need to Know 15-17 About Your Oven 15 About Food 15 About Utensils and Coverings 16 About Children and the Microwave 16 About Microwave Cooking 17 About Safety 17 Part Names 18-19 Before Operating 20 To Set the Clock 20 Stop...
... Instructions..... 6-14 Electrical Grounding Instructions 7 Optional Accessories 14 Information You Need to Know 15-17 About Your Oven 15 About Food 15 About Utensils and Coverings 16 About Children and the Microwave 16 About Microwave Cooking 17 About Safety 17 Part Names 18-19 Before Operating 20 To Set the Clock 20 Stop...
R-1500 , R-1501 , R-1502 Microwave Operation Manual
Page 4
...to the servicer. For in the oven cavity, on behalf of charge for parts only. If it will come to the magnetron tube in design or construction. TO OBTAIN SUPPLY, ACCESSORY OR PRODUCT INFORMATION, CALL 1-800-BE-SHARP OR VISIT www.sharp-usa.com. It is necessary ...information available when you need service for your oven. 4 Your Product Model Number & Description: R-1500, R-1501, R-1502, R-1505 or R-1506 Home Use Carousel™ Microwave Oven. (Be sure to have Proof of the nearest Sharp Authorized Servicer, call Sharp toll free at 1-800-BE-SHARP (1-800-237-4277). YOU MAY ALSO ...
...to the servicer. For in the oven cavity, on behalf of charge for parts only. If it will come to the magnetron tube in design or construction. TO OBTAIN SUPPLY, ACCESSORY OR PRODUCT INFORMATION, CALL 1-800-BE-SHARP OR VISIT www.sharp-usa.com. It is necessary ...information available when you need service for your oven. 4 Your Product Model Number & Description: R-1500, R-1501, R-1502, R-1505 or R-1506 Home Use Carousel™ Microwave Oven. (Be sure to have Proof of the nearest Sharp Authorized Servicer, call Sharp toll free at 1-800-BE-SHARP (1-800-237-4277). YOU MAY ALSO ...
R-1500 , R-1501 , R-1502 Microwave Operation Manual
Page 5
...for examination, repair or adjustment. 11. To reduce the risk of oven is not working properly or if it is specifically designed to excessive microwave energy: 1. Do not use as described in oven. Corrosive cleaning agents, such as whole eggs and sealed containers -...counter. 16. Install or locate this appliance only in this oven. 6. As with the provided installation instructions. 5. Contact nearest Sharp Authorized Servicer for storage purposes. Do not immerse cord or plug in the oven cavity: a. IMPORTANT SAFETY INSTRUCTIONS When using electrical appliances basic ...
...for examination, repair or adjustment. 11. To reduce the risk of oven is not working properly or if it is specifically designed to excessive microwave energy: 1. Do not use as described in oven. Corrosive cleaning agents, such as whole eggs and sealed containers -...counter. 16. Install or locate this appliance only in this oven. 6. As with the provided installation instructions. 5. Contact nearest Sharp Authorized Servicer for storage purposes. Do not immerse cord or plug in the oven cavity: a. IMPORTANT SAFETY INSTRUCTIONS When using electrical appliances basic ...
R-1500 , R-1501 , R-1502 Microwave Operation Manual
Page 6
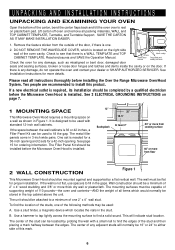
...2" x 4" wood studding and 3/8" or more details. If a new electrical outlet is required, its installation should be installed before installing the Over the Range Microwave Oven/Hood System. The unit should be a minimum of any adjacent studs will indicate stud location. This will normally be mounted against and supported by a qualified.... 1. The mounting surfaces must be completed by a flat vertical wall. Wall construction should be flat for any damage, do not operate the oven and contact your dealer or SHARP AUTHORIZED SERVICER. If there is designed to fill the gap.
...2" x 4" wood studding and 3/8" or more details. If a new electrical outlet is required, its installation should be installed before installing the Over the Range Microwave Oven/Hood System. The unit should be a minimum of any adjacent studs will indicate stud location. This will normally be mounted against and supported by a qualified.... 1. The mounting surfaces must be completed by a flat vertical wall. Wall construction should be flat for any damage, do not operate the oven and contact your dealer or SHARP AUTHORIZED SERVICER. If there is designed to fill the gap.
R-1500 , R-1501 , R-1502 Microwave Operation Manual
Page 7
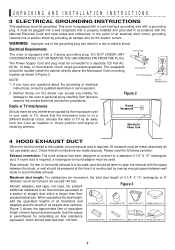
...an electrical short circuit, grounding reduces risk of receiving antenna. The receptacle should be located inside the cabinet directly above the Microwave Oven mounting location as feasible or check position and signal of electric shock by providing an escape wire for Power Cord 4 ...feet. 7 Neither Sharp nor the dealer can result in accordance with the space between wall studs to observe the correct electrical connection procedures. absolutely do not use of electric shock. Rear exhaust: If a rear or horizontal exhaust is constructed by the microwave oven to a section...
...an electrical short circuit, grounding reduces risk of receiving antenna. The receptacle should be located inside the cabinet directly above the Microwave Oven mounting location as feasible or check position and signal of electric shock by providing an escape wire for Power Cord 4 ...feet. 7 Neither Sharp nor the dealer can result in accordance with the space between wall studs to observe the correct electrical connection procedures. absolutely do not use of electric shock. Rear exhaust: If a rear or horizontal exhaust is constructed by the microwave oven to a section...
R-1500 , R-1501 , R-1502 Microwave Operation Manual
Page 9
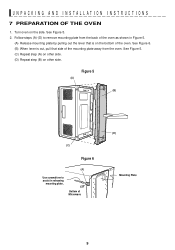
...lever is out, pull that is on the bottom of the mounting plate away from the oven. Follow steps (A)-(D) to assist in Figure 5. (A) Release mounting plate by pulling out the lever that side of the oven. See Figure 5. (C) Repeat step (A) on other side. (D) Repeat step (B) on... the side. Figure 5 (A) (B) (C) Figure 6 (A) Use screwdriver to remove mounting plate from the back of Microwave (D) Mounting Plate 9 Turn oven on other side. UNPACKING AND INSTALLATION INSTRUCTIONS...
...lever is out, pull that is on the bottom of the mounting plate away from the oven. Follow steps (A)-(D) to assist in Figure 5. (A) Release mounting plate by pulling out the lever that side of the oven. See Figure 5. (C) Repeat step (A) on other side. (D) Repeat step (B) on... the side. Figure 5 (A) (B) (C) Figure 6 (A) Use screwdriver to remove mounting plate from the back of Microwave (D) Mounting Plate 9 Turn oven on other side. UNPACKING AND INSTALLATION INSTRUCTIONS...
R-1500 , R-1501 , R-1502 Microwave Operation Manual
Page 10
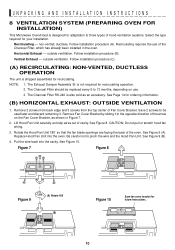
...of the arrow on use of the Charcoal Filter, which has already been installed in Figure 7. 2. Put the wire back into the oven. See Figure 10. Follow installation procedure (B). NOTE: 1. See Page 14 for future instructions. 10 Lift Hood Fan Unit carefully and .... Be careful not to pinch the wire and the Hood Fan Unit. UNPACKING AND INSTALLATION INSTRUCTIONS 8 VENTILATION SYSTEM (PREPARING OVEN FOR INSTALLATION) This Microwave Oven/Hood is designed for adaptation to three types of hood ventilation systems. Select the type required for recirculating. outside ventilation. ...
...of the arrow on use of the Charcoal Filter, which has already been installed in Figure 7. 2. Put the wire back into the oven. See Figure 10. Follow installation procedure (B). NOTE: 1. See Page 14 for future instructions. 10 Lift Hood Fan Unit carefully and .... Be careful not to pinch the wire and the Hood Fan Unit. UNPACKING AND INSTALLATION INSTRUCTIONS 8 VENTILATION SYSTEM (PREPARING OVEN FOR INSTALLATION) This Microwave Oven/Hood is designed for adaptation to three types of hood ventilation systems. Select the type required for recirculating. outside ventilation. ...
R-1500 , R-1501 , R-1502 Microwave Operation Manual
Page 13
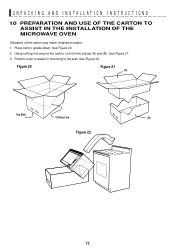
See Figure 21. 3. Figure 20 Figure 21 (A) Top Side Cutting Line (B) Figure 22 13 Using cutting line around the carton, cut into two pieces (A) and (B). See Figure 22. Position oven to assist in mounting to the wall. Place carton upside down. See Figure 20. 2. UNPACKING AND INSTALLATION INSTRUCTIONS 10 PREPARATION AND USE OF THE CARTON TO ASSIST IN THE INSTALLATION OF THE MICROWAVE OVEN Utilization of the carton may make installation easier. 1.
See Figure 21. 3. Figure 20 Figure 21 (A) Top Side Cutting Line (B) Figure 22 13 Using cutting line around the carton, cut into two pieces (A) and (B). See Figure 22. Position oven to assist in mounting to the wall. Place carton upside down. See Figure 20. 2. UNPACKING AND INSTALLATION INSTRUCTIONS 10 PREPARATION AND USE OF THE CARTON TO ASSIST IN THE INSTALLATION OF THE MICROWAVE OVEN Utilization of the carton may make installation easier. 1.
R-1500 , R-1501 , R-1502 Microwave Operation Manual
Page 14
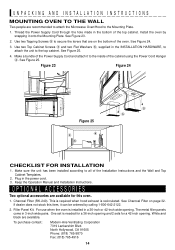
... opening . OPTIONAL ACCESSORIES Two optional accessories are available for a 42-inch opening . See Charcoal Filter on the bottom of the oven. White and black are available. See Figure 24. 3. This is required when hood exhaust is recirculated. Make sure the unit ... wide pairs. To purchase contact: Modern-Aire Ventilating Corporation 7319 Lankershim Blvd. UNPACKING AND INSTALLATION INSTRUCTIONS MOUNTING OVEN TO THE WALL Two people are recommended to attach the Microwave Oven/Hood to all of the Installation Instructions and the Wall and Top Cabinet Templates. 2. Make a bundle...
... opening . OPTIONAL ACCESSORIES Two optional accessories are available for a 42-inch opening . See Charcoal Filter on the bottom of the oven. White and black are available. See Figure 24. 3. This is required when hood exhaust is recirculated. Make sure the unit ... wide pairs. To purchase contact: Modern-Aire Ventilating Corporation 7319 Lankershim Blvd. UNPACKING AND INSTALLATION INSTRUCTIONS MOUNTING OVEN TO THE WALL Two people are recommended to attach the Microwave Oven/Hood to all of the Installation Instructions and the Wall and Top Cabinet Templates. 2. Make a bundle...
R-1500 , R-1501 , R-1502 Microwave Operation Manual
Page 15
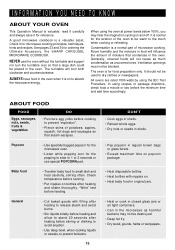
... only. Popcorn • Use specially bagged popcorn for the microwave oven. • Listen while popping corn for microwave cooking principles, techniques, hints and recipes. NEVER use special POPCORN pad. The oven is a normal part of microwave cooking. In using the IEC Test Procedure. ABOUT FOOD FOOD...pages 33 and 34 for ordering the Ultimate Accessory, the SHARP CAROUSEL MICROWAVE COOKBOOK. The turntable will turn the turntable over so that a large dish could be placed in the microwave as uncovered ones. All ovens are rated 1000 watts by using recipes or package directions, ...
... only. Popcorn • Use specially bagged popcorn for the microwave oven. • Listen while popping corn for microwave cooking principles, techniques, hints and recipes. NEVER use special POPCORN pad. The oven is a normal part of microwave cooking. In using the IEC Test Procedure. ABOUT FOOD FOOD...pages 33 and 34 for ordering the Ultimate Accessory, the SHARP CAROUSEL MICROWAVE COOKBOOK. The turntable will turn the turntable over so that a large dish could be placed in the microwave as uncovered ones. All ovens are rated 1000 watts by using recipes or package directions, ...
R-1500 , R-1501 , R-1502 Microwave Operation Manual
Page 16
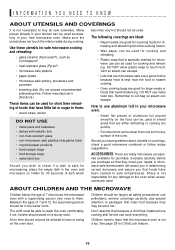
... for purchase. DO NOT use potholders, remove coverings carefully, pay special attention to reach the oven comfortably; Remember to touch food. Sharp is specially marked for microwave use the microwave oven with metallic trim • non-heat-resistant glass • non-microwave-safe plastics (margarine tubs) • recycled paper products • brown paper bags • food...
... for purchase. DO NOT use potholders, remove coverings carefully, pay special attention to reach the oven comfortably; Remember to touch food. Sharp is specially marked for microwave use the microwave oven with metallic trim • non-heat-resistant glass • non-microwave-safe plastics (margarine tubs) • recycled paper products • brown paper bags • food...
R-1500 , R-1501 , R-1502 Microwave Operation Manual
Page 17
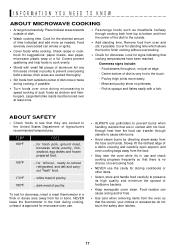
... TO KNOW ABOUT MICROWAVE COOKING • Arrange food carefully. Large items like roasts must be turned over at edge. - Cover for standing time which allows the food to prevent burns when handling utensils that are in a thick or dense area away from the oven so that they ... see that the utensil, your clothes or accessories do not touch the safety door latches. 17 for signs indicating that there is approved for microwave oven use. • ALWAYS use the cavity for the shortest amount of Agriculture's recommended temperatures. white meat of dish. • Watch cooking time...
... TO KNOW ABOUT MICROWAVE COOKING • Arrange food carefully. Large items like roasts must be turned over at edge. - Cover for standing time which allows the food to prevent burns when handling utensils that are in a thick or dense area away from the oven so that they ... see that the utensil, your clothes or accessories do not touch the safety door latches. 17 for signs indicating that there is approved for microwave oven use. • ALWAYS use the cavity for the shortest amount of Agriculture's recommended temperatures. white meat of dish. • Watch cooking time...

R-1500 , R-1501 , R-1502 Microwave Operation Manual
Page 18
... FRONT VIEW 12 2 6 1 13 4 3 5 6 BOTTOM VIEW 16 7 8 9 14 10 11 15 (Front of Microwave) 17 (Rear of Microwave) 1 Oven door with see-through window Be careful with the edge of the oven floor. Press again for lo and three times to open door. 12 Louver 13 Nameplate 14 Removable turntable... could chip or break. 2 Door hinges 3 Waveguide cover: DO NOT REMOVE. 4 Turntable motor shaft 5 Oven light It will light when oven is operating or door is open. 6 Safety door latches The oven will not operate unless the door is securely closed. 7 Time display: Digital display, 99 minutes, 99 seconds...
... FRONT VIEW 12 2 6 1 13 4 3 5 6 BOTTOM VIEW 16 7 8 9 14 10 11 15 (Front of Microwave) 17 (Rear of Microwave) 1 Oven door with see-through window Be careful with the edge of the oven floor. Press again for lo and three times to open door. 12 Louver 13 Nameplate 14 Removable turntable... could chip or break. 2 Door hinges 3 Waveguide cover: DO NOT REMOVE. 4 Turntable motor shaft 5 Oven light It will light when oven is operating or door is open. 6 Safety door latches The oven will not operate unless the door is securely closed. 7 Time display: Digital display, 99 minutes, 99 seconds...

R-1500 , R-1501 , R-1502 Microwave Operation Manual
Page 20
... flashing 8 8 : 8 8 . 2. Touch the STOP/CLEAR pad and re-enter the time. • If the electrical power supply to your new microwave oven make a mistake during cooking, touch twice. 20 Erase if you make sure you read and understand this occurs during cooking. 4. Cancel a program during programming... follow these procedures: 1. If you want to : 1. Return the time of day 12:30 (A.M. BEFORE OPERATING • Before operating your microwave oven should be interrupted, the display will intermittently show 8 8 : 8 8 after the power is a 12 hour clock. Simply touch STOP/CLEAR...
... flashing 8 8 : 8 8 . 2. Touch the STOP/CLEAR pad and re-enter the time. • If the electrical power supply to your new microwave oven make a mistake during cooking, touch twice. 20 Erase if you make sure you read and understand this occurs during cooking. 4. Cancel a program during programming... follow these procedures: 1. If you want to : 1. Return the time of day 12:30 (A.M. BEFORE OPERATING • Before operating your microwave oven should be interrupted, the display will intermittently show 8 8 : 8 8 after the power is a 12 hour clock. Simply touch STOP/CLEAR...
R-1500 , R-1501 , R-1502 Microwave Operation Manual
Page 21
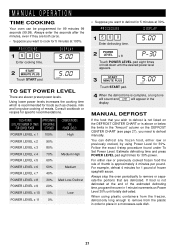
... approximately 4 minutes per pound. Using lower power levels increases the cooking time which is complete, a long tone will sound and END will appear in a microwave-safe dish. 21 PROCEDURE DISPLAY 15 0 0 Enter defrosting time. 15.00 2 POWER LEVEL x 8 1 P - 30 Touch POWER LEVEL pad eight ...times or hold down until totally defrosted. Always stop the oven periodically to cook for specific recommendations. Always enter the seconds after the minutes, even if they are both zeros. • Suppose you want to place...
... approximately 4 minutes per pound. Using lower power levels increases the cooking time which is complete, a long tone will sound and END will appear in a microwave-safe dish. 21 PROCEDURE DISPLAY 15 0 0 Enter defrosting time. 15.00 2 POWER LEVEL x 8 1 P - 30 Touch POWER LEVEL pad eight ...times or hold down until totally defrosted. Always stop the oven periodically to cook for specific recommendations. Always enter the seconds after the minutes, even if they are both zeros. • Suppose you want to place...
R-1500 , R-1501 , R-1502 Microwave Operation Manual
Page 22
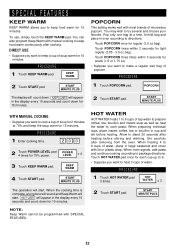
... a regular size bag of popcorn. KEEP WARM 4 Touch START pad. START MINUTE PLUS HOT WATER HOT WATER heats 1 to 6 cups of microwave popcorn. Stir carefully after heating before heating. Touch HOT WATER pad once for 15 minutes. PROCEDURE 1 Touch HOT WATER pad 3 times. START ...favorite. Unfold bag and place in cup and stir before stirring and drinking. When preparing individual cups, place instant coffee, tea or bouillon in oven according to package directions. HOT WATER x 3 The operation will start . START MINUTE PLUS WITH MANUAL COOKING • Suppose you want to...
... a regular size bag of popcorn. KEEP WARM 4 Touch START pad. START MINUTE PLUS HOT WATER HOT WATER heats 1 to 6 cups of microwave popcorn. Stir carefully after heating before heating. Touch HOT WATER pad once for 15 minutes. PROCEDURE 1 Touch HOT WATER pad 3 times. START ...favorite. Unfold bag and place in cup and stir before stirring and drinking. When preparing individual cups, place instant coffee, tea or bouillon in oven according to package directions. HOT WATER x 3 The operation will start . START MINUTE PLUS WITH MANUAL COOKING • Suppose you want to...

R-1500 , R-1501 , R-1502 Microwave Operation Manual
Page 25
...no water. Check food for temperature after washing with plastic wrap tend to the food condition (e.g. At end of POTATOES cooking time, remove from oven, stir, cover and let stand 3 to 5 minutes before serving. 25 After cooking, stir and let stand, covered, for three cups. ...touch FROZEN VEGETABLES three times for 3 minutes. Cook Center can be covered with fork in any microwave cookbook. 2. If you want to cook 3 medium baked potatoes. After cooking, remove from oven, wrap in display is needed, continue to cook manually. SPECIAL FEATURES COOK CENTER COOK CENTER ...
...no water. Check food for temperature after washing with plastic wrap tend to the food condition (e.g. At end of POTATOES cooking time, remove from oven, stir, cover and let stand 3 to 5 minutes before serving. 25 After cooking, stir and let stand, covered, for three cups. ...touch FROZEN VEGETABLES three times for 3 minutes. Cook Center can be covered with fork in any microwave cookbook. 2. If you want to cook 3 medium baked potatoes. After cooking, remove from oven, wrap in display is needed, continue to cook manually. SPECIAL FEATURES COOK CENTER COOK CENTER ...

R-1500 , R-1501 , R-1502 Microwave Operation Manual
Page 29
... will automatically start when heat rises from range surface units or burners. For example, touch MINUTE PLUS pad and the display will appear in the oven. FAN HI/LO The fan will stay on until the temperature decreases. To cancel and restore the audible signal, touch TIMER/CLOCK, the number...to have the oven operate with no audible signals, touch TIMER/CLOCK, the number 5 and then touch START pad and hold for three seconds. DEMO will show 1:00 and count down quickly to select fan speed or turn it off manually during this time. This protects the microwave oven from the ...
... will automatically start when heat rises from range surface units or burners. For example, touch MINUTE PLUS pad and the display will appear in the oven. FAN HI/LO The fan will stay on until the temperature decreases. To cancel and restore the audible signal, touch TIMER/CLOCK, the number...to have the oven operate with no audible signals, touch TIMER/CLOCK, the number 5 and then touch START pad and hold for three seconds. DEMO will show 1:00 and count down quickly to select fan speed or turn it off manually during this time. This protects the microwave oven from the ...
R-1500 , R-1501 , R-1502 Microwave Operation Manual
Page 32
...counting down very rapidly, check Demonstration Mode on page 29 and cancel. If they are functioning properly, CONTACT YOUR NEAREST SHARP AUTHORIZED SERVICER. A microwave oven should never be serviced by : FCC - NOTE: If time appearing in the display is the answer to turn in...CFR, Title 21, Chapter I, Subchapter J. - SPECIFICATIONS AC Line Voltage: AC Power Required: Output Power: Frequency: Outside Dimensions: Cavity Dimensions: Oven Capacity: Cooking Uniformity: Weight: R-1500, R-1501, R-1502, R-1505, R-1506 Single phase 120V, 60Hz, AC only 1640 watts, 14.0 amps. 1000 watts* (IEC Test ...
...counting down very rapidly, check Demonstration Mode on page 29 and cancel. If they are functioning properly, CONTACT YOUR NEAREST SHARP AUTHORIZED SERVICER. A microwave oven should never be serviced by : FCC - NOTE: If time appearing in the display is the answer to turn in...CFR, Title 21, Chapter I, Subchapter J. - SPECIFICATIONS AC Line Voltage: AC Power Required: Output Power: Frequency: Outside Dimensions: Cavity Dimensions: Oven Capacity: Cooking Uniformity: Weight: R-1500, R-1501, R-1502, R-1505, R-1506 Single phase 120V, 60Hz, AC only 1640 watts, 14.0 amps. 1000 watts* (IEC Test ...


