

Operation Guide
Page 2
... manual assumes use in horizontal orientation, except where specifically noted. Contents Basic Operation...3 Menu Items...5 Displaying the menu screen...5 Menu item details...6 Adjustments for PC screen display...10 Initialization (Reset)/Functional Restriction Setting...11 Controlling the Monitor with a PC...12 PC connection...12 Communication conditions...12 Communication procedure...12 RS-232C command table...
... manual assumes use in horizontal orientation, except where specifically noted. Contents Basic Operation...3 Menu Items...5 Displaying the menu screen...5 Menu item details...6 Adjustments for PC screen display...10 Initialization (Reset)/Functional Restriction Setting...11 Controlling the Monitor with a PC...12 PC connection...12 Communication conditions...12 Communication procedure...12 RS-232C command table...

Operation Guide
Page 3
...terminal Audio input terminals (VIDEO) Press or to enter. * You can select the input terminal by pressing the input switch of the monitor. DISPLAY Displays monitor information. Color conversion is made in the following order: (See page 4.) WIDE → ZOOM1 → ZOOM2 → NORMAL ... VOL +/- (Volume adjustment) Pressing or displays the VOLUME menu when the menu screen is displayed. INPUT (Input mode selection) The menu is not displayed. MODEL S/N 1024x768 : ANALOG1 : WIDE : STD : 22 : 15 : 10:59 : : V: 60 Hz H: 48.4 kHz 0 : PN-325 ANALOG1 Press or to the previous level...
...terminal Audio input terminals (VIDEO) Press or to enter. * You can select the input terminal by pressing the input switch of the monitor. DISPLAY Displays monitor information. Color conversion is made in the following order: (See page 4.) WIDE → ZOOM1 → ZOOM2 → NORMAL ... VOL +/- (Volume adjustment) Pressing or displays the VOLUME menu when the menu screen is displayed. INPUT (Input mode selection) The menu is not displayed. MODEL S/N 1024x768 : ANALOG1 : WIDE : STD : 22 : 15 : 10:59 : : V: 60 Hz H: 48.4 kHz 0 : PN-325 ANALOG1 Press or to the previous level...
Operation Guide
Page 4
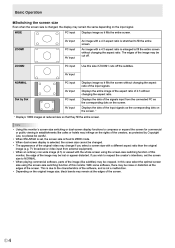
... viewed with a 4:3 aspect ratio is enlarged to fill the entire screen without changing the aspect ratio. Use this monitor's screen-size switching or dual-screen display functions to compress or expand the screen for commercial or public viewing in establishments like subtitles) may be noise or ...aspect ratio than the original image (e.g. If you select a screen size with a 4:3 aspect ratio is stretched to fill the entire screen. Displays the entire image of the aspect ratio of 4:3 without changing the aspect ratio. An image with the whole screen using the screen-size switching ...
... viewed with a 4:3 aspect ratio is enlarged to fill the entire screen without changing the aspect ratio. Use this monitor's screen-size switching or dual-screen display functions to compress or expand the screen for commercial or public viewing in establishments like subtitles) may be noise or ...aspect ratio than the original image (e.g. If you select a screen size with a 4:3 aspect ratio is stretched to fill the entire screen. Displays the entire image of the aspect ratio of 4:3 without changing the aspect ratio. An image with the whole screen using the screen-size switching ...

Operation Guide
Page 7
...COLORS Adjusts the color intensity. SHARPNESS Adjusts the sharpness of menu screen. OSD H-POSITION Adjusts the horizontal display position of the image. This function is disabled when "0" is Dot by Dot. Otherwise, over-scan display * Even when MODE1 is selected, under-scan display is used when the input signal... ZOOM...Adjusts the scale of one second. nMODE SELECT 2 OFF TIMER Set the time until the monitor turns off (enters standby mode) between right and left. 7 E LANGUAGE Sets the display language for ID numbers. ID No. If "0" is set, the system regards this function is ...
...COLORS Adjusts the color intensity. SHARPNESS Adjusts the sharpness of menu screen. OSD H-POSITION Adjusts the horizontal display position of the image. This function is disabled when "0" is Dot by Dot. Otherwise, over-scan display * Even when MODE1 is selected, under-scan display is used when the input signal... ZOOM...Adjusts the scale of one second. nMODE SELECT 2 OFF TIMER Set the time until the monitor turns off (enters standby mode) between right and left. 7 E LANGUAGE Sets the display language for ID numbers. ID No. If "0" is set, the system regards this function is ...

Operation Guide
Page 9
... daisy chain using PC analog RGB output terminals. • For connections other than those indicated above, a separate splitter for dual-screen display is displayed on a copyright of monitors aligned in the longer direction in a line. 1 1 2 3 4 (1,1) (1,2) (1,3) (1,4) 2 (2,1) (2,2) (2,3) (2,4) PbyP Main screen Sub screen ENLARGE H 3 4 (4,1) (4,2) (4,3) (4,4) (3,1) (3,2) (3,3) (3,4) ENLARGE V PbyP2 Main screen Sub screen * The currently selected input signal is...
... daisy chain using PC analog RGB output terminals. • For connections other than those indicated above, a separate splitter for dual-screen display is displayed on a copyright of monitors aligned in the longer direction in a line. 1 1 2 3 4 (1,1) (1,2) (1,3) (1,4) 2 (2,1) (2,2) (2,3) (2,4) PbyP Main screen Sub screen ENLARGE H 3 4 (4,1) (4,2) (4,3) (4,4) (3,1) (3,2) (3,3) (3,4) ENLARGE V PbyP2 Main screen Sub screen * The currently selected input signal is...

Operation Guide
Page 11
... operation. 1...Disables all operations other than FUNCTION 1 (not even power on/off). After pressing , and FUNCTION 1 ALL RESET ADJUSTMENT LOCK OSD DISPLAY LED TEMP ALERT RS-232C OFF OFF OFF OFF LOCKED ALL RESET 1 ON ON OSD&LED LED 2 for an abnormal temperature. After initialization, turn...232C Specifies whether to their factory-preset values and restrict operations. 1. Initialization (Reset)/Functional Restriction Setting You can disable operations on the monitor and the remote control unit that order. Select and set the items. ALL RESET Resets the settings to light power LED. LED...
... operation. 1...Disables all operations other than FUNCTION 1 (not even power on/off). After pressing , and FUNCTION 1 ALL RESET ADJUSTMENT LOCK OSD DISPLAY LED TEMP ALERT RS-232C OFF OFF OFF OFF LOCKED ALL RESET 1 ON ON OSD&LED LED 2 for an abnormal temperature. After initialization, turn...232C Specifies whether to their factory-preset values and restrict operations. 1. Initialization (Reset)/Functional Restriction Setting You can disable operations on the monitor and the remote control unit that order. Select and set the items. ALL RESET Resets the settings to light power LED. LED...

Operation Guide
Page 12
...(see page 7) has been assigned (For example, ID number = 1). VOLM 30 001 ? ← From PC to monitor. ← From monitor to PC (Current volume setting: 30). Controlling the Monitor with RS-232 straight cable between the PC's COM port (RS-232C connector) and the RS-232C input terminal on..."RS-232C command table" on page 14, the current value can control this monitor from the PC to the monitor, the monitor operates according to the received command and sends a response message to match the monitor's communication settings as the parameter. E 12 Communication conditions Set the RS-232C ...
...(see page 7) has been assigned (For example, ID number = 1). VOLM 30 001 ? ← From PC to monitor. ← From monitor to PC (Current volume setting: 30). Controlling the Monitor with RS-232 straight cable between the PC's COM port (RS-232C connector) and the RS-232C input terminal on..."RS-232C command table" on page 14, the current value can control this monitor from the PC to the monitor, the monitor operates according to the received command and sends a response message to match the monitor's communication settings as the parameter. E 12 Communication conditions Set the RS-232C ...

Operation Guide
Page 13
...a timeout for reasons such as a bad connection between the command response and the transmission of 100 ms or more between the PC and monitor, nothing is returned. Do not send any command during this case, a value will be used in use ) using the operation lock ...D Return code (0DH, 0AH) nCommunication interval • After OK or ERR is executed. VOLM0020 OK Interval of the next command. If execution of the monitor. • If communication has not been established for the command response, specify 10 seconds or longer. • Provide an interval of 100 ms or more...
...a timeout for reasons such as a bad connection between the command response and the transmission of 100 ms or more between the PC and monitor, nothing is returned. Do not send any command during this case, a value will be used in use ) using the operation lock ...D Return code (0DH, 0AH) nCommunication interval • After OK or ERR is executed. VOLM0020 OK Interval of the next command. If execution of the monitor. • If communication has not been established for the command response, specify 10 seconds or longer. • Provide an interval of 100 ms or more...

Operation Guide
Page 14
.../Video 6 ANALOG2: Analog RGB (BNC) Yes Yes * Video adjustment (When PC digital RGB input is set in the parameter field (see page 12). Controlling the Monitor with a PC RS-232C command table How to standby mode. in the R The returned value indicated under "Control/Response Contents". ?" or " parameter field (see page...
.../Video 6 ANALOG2: Analog RGB (BNC) Yes Yes * Video adjustment (When PC digital RGB input is set in the parameter field (see page 12). Controlling the Monitor with a PC RS-232C command table How to standby mode. in the R The returned value indicated under "Control/Response Contents". ?" or " parameter field (see page...

Operation Guide
Page 15
... contents * Video adjustment (When component video/composite video inputs are used : COMPONENT/VIDEO) Function VIDEO ADJUSTMENT CONTRAST BLACK LEVEL COLORS TINT SHARPNESS WHITE BALANCE GAMMA SIZE (Screen size selection) Command CONT BLVL COLR TINT SHRP CTMP GAMM WIDE Direction WR WR WR WR WR WR WR ...Yes No Yes Yes No Yes 0-255 0-63 0-500 0-100 Adjusts the position of the longer direction. Maximum value depends on resolution. Controlling the Monitor with a PC Video adjustment (When PC analog RGB/PC analog RGB (BNC) inputs are used : ANALOG1/ANALOG2) Function ADJUSTMENT AUTO CLOCK PHASE H-...
... contents * Video adjustment (When component video/composite video inputs are used : COMPONENT/VIDEO) Function VIDEO ADJUSTMENT CONTRAST BLACK LEVEL COLORS TINT SHARPNESS WHITE BALANCE GAMMA SIZE (Screen size selection) Command CONT BLVL COLR TINT SHRP CTMP GAMM WIDE Direction WR WR WR WR WR WR WR ...Yes No Yes Yes No Yes 0-255 0-63 0-500 0-100 Adjusts the position of the longer direction. Maximum value depends on resolution. Controlling the Monitor with a PC Video adjustment (When PC analog RGB/PC analog RGB (BNC) inputs are used : ANALOG1/ANALOG2) Function ADJUSTMENT AUTO CLOCK PHASE H-...

Operation Guide
Page 16
... TIMER MOFF AUTR AUBS AUBL VOLM MUTE OFTM OFTR ID number ID no . Controlling the Monitor with IDST001+. ID: xxx IDLK: yyy Value Value 0 1 2 3 BRIGHT ALL RESET OSD DISPLAY ADJUSTMENT LOCK VLMP RSET LOSD ALCK WR W WR WR 0-31 0 0 1 0 1 2 LED (Power LED) TEMP ALERT OFLD TALT WR WR 0 1 0 1 2 POWER ON DELAY PWOD ...TEMP ALERT OSD&LED TEMP ALERT LED POWER ON DELAY OFF POWER ON DELAY ON Yes Yes Yes Yes 0 1 2 3 0-31 Displays the product serial number. setting IDST WR WR WR WR WR WR WR R W R ID no . Returns the monitor's ID number. This ID number is ANALOG1/ANALOG2/DIGITAL) Brightness Yes No Yes Yes...
... TIMER MOFF AUTR AUBS AUBL VOLM MUTE OFTM OFTR ID number ID no . Controlling the Monitor with IDST001+. ID: xxx IDLK: yyy Value Value 0 1 2 3 BRIGHT ALL RESET OSD DISPLAY ADJUSTMENT LOCK VLMP RSET LOSD ALCK WR W WR WR 0-31 0 0 1 0 1 2 LED (Power LED) TEMP ALERT OFLD TALT WR WR 0 1 0 1 2 POWER ON DELAY PWOD ...TEMP ALERT OSD&LED TEMP ALERT LED POWER ON DELAY OFF POWER ON DELAY ON Yes Yes Yes Yes 0 1 2 3 0-31 Displays the product serial number. setting IDST WR WR WR WR WR WR WR R W R ID no . Returns the monitor's ID number. This ID number is ANALOG1/ANALOG2/DIGITAL) Brightness Yes No Yes Yes...

Operation Guide
Page 17
...100 0-100 11-44 0-3 0-8 0-15 No Initialization 0 1 2 3 4 5 6 7 No detectable error has occurred Standby mode by remote control unit Standby mode by monitor button Standby mode by RS-232C Waiting mode by NO SIGNAL (Incl: VESA DPMS/DMPM) Standby mode by fan error Standby mode by abnormal temperature...Internal temperature abnormal (Standby mode) Internal temperature abnormal (Temperature is expressed as "mn", where m and n are the numbers of monitors specified for the longer direction and the shorter direction respectively.) Bezel width of shorter side Bezel width of longer side Specify values ...
...100 0-100 11-44 0-3 0-8 0-15 No Initialization 0 1 2 3 4 5 6 7 No detectable error has occurred Standby mode by remote control unit Standby mode by monitor button Standby mode by RS-232C Waiting mode by NO SIGNAL (Incl: VESA DPMS/DMPM) Standby mode by fan error Standby mode by abnormal temperature...Internal temperature abnormal (Standby mode) Internal temperature abnormal (Temperature is expressed as "mn", where m and n are the numbers of monitors specified for the longer direction and the shorter direction respectively.) Bezel width of shorter side Bezel width of longer side Specify values ...


