
LC-26D42U-W | LC-26D43U Operation Manual
Page 7
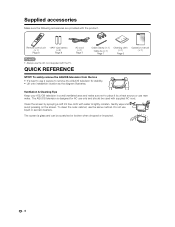
...'s best to use only and should be scratched or broken when dropped or impacted. 6 Supplied accessories Make sure the following accessories are provided with the TV. Remote control unit (g1) Page 8 "AAA" size battery (g2) Page 8 AC cord (g1) Page 7 Cable Clamp (g1) Cable tie (g1) Page 7 Cleaning cloth (g1) Page 5 Operation...
...'s best to use only and should be scratched or broken when dropped or impacted. 6 Supplied accessories Make sure the following accessories are provided with the TV. Remote control unit (g1) Page 8 "AAA" size battery (g2) Page 8 AC cord (g1) Page 7 Cable Clamp (g1) Cable tie (g1) Page 7 Cleaning cloth (g1) Page 5 Operation...
LC-26D42U-W | LC-26D43U Operation Manual
Page 9
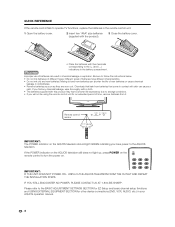
...batteries can cause a rash. Please refer to turn the power on the AQUOS television should light GREEN indicating you will not be using the remote control unit for other device connections (DVD, VCR, AUDIO, etc.) in old batteries. • Remove batteries as soon as they are ...worn out. IF YOU STILL ENCOUNTER NO POWER, PLEASE CONTACT US AT 1-800-BE-SHARP. QUICK REFERENCE If the remote control fails to operate TV functions, replace the batteries in the remote control unit. 1 Open the battery cover. 2 Insert two "AAA" size batteries (supplied with the product...
...batteries can cause a rash. Please refer to turn the power on the AQUOS television should light GREEN indicating you will not be using the remote control unit for other device connections (DVD, VCR, AUDIO, etc.) in old batteries. • Remove batteries as soon as they are ...worn out. IF YOU STILL ENCOUNTER NO POWER, PLEASE CONTACT US AT 1-800-BE-SHARP. QUICK REFERENCE If the remote control fails to operate TV functions, replace the batteries in the remote control unit. 1 Open the battery cover. 2 Insert two "AAA" size batteries (supplied with the product...
LC-26D42U-W | LC-26D43U Operation Manual
Page 10
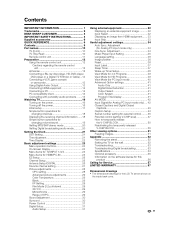
...Contents IMPORTANT INFORMATION 1 Trademarks 2 DEAR SHARP CUSTOMER 3 IMPORTANT SAFETY INSTRUCTIONS 3 Supplied accessories 6 QUICK REFERENCE 6 Contents 9 Part names 10 TV (Front 10 TV (Top/Rear 10 Remote control unit 11 Preparation 12 Using the remote control unit 12 Cautions regarding the remote control unit 12 Antennas 12 Connecting ...the LCD TV set are shown on the software license for this product 56 Calling for Service 57 LIMITED WARRANTY 57 Dimensional drawings • The dimensional drawings for HDMI/PC-IN 24 EZ Setup 25 Channel Setup 25 Antenna Setup-DIGITAL 26 ...
...Contents IMPORTANT INFORMATION 1 Trademarks 2 DEAR SHARP CUSTOMER 3 IMPORTANT SAFETY INSTRUCTIONS 3 Supplied accessories 6 QUICK REFERENCE 6 Contents 9 Part names 10 TV (Front 10 TV (Top/Rear 10 Remote control unit 11 Preparation 12 Using the remote control unit 12 Cautions regarding the remote control unit 12 Antennas 12 Connecting ...the LCD TV set are shown on the software license for this product 56 Calling for Service 57 LIMITED WARRANTY 57 Dimensional drawings • The dimensional drawings for HDMI/PC-IN 24 EZ Setup 25 Channel Setup 25 Antenna Setup-DIGITAL 26 ...
LC-26D42U-W | LC-26D43U Operation Manual
Page 11
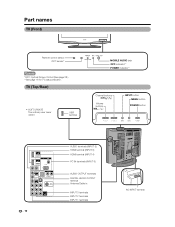
Part names TV (Front) Remote control sensor OPC sensor* *OPC: Optical Picture Control (See page 28.) **See page 16 for TV status indicator. USB terminal MOBILE AUDIO jack OPC indicator** POWER indicator** Channel buttons (CHs/r) Volume buttons (VOLl/k) INPUT button MENU button POWER button AUDIO terminals (... (INPUT 4) PC IN terminals (INPUT 6) AUDIO OUTPUT terminals DIGITAL AUDIO OUTPUT terminal Antenna/Cable in INPUT 3 terminals INPUT 2 terminals INPUT 1 terminals AC INPUT terminal 10 TV (Top/Rear) • SOFT UPDATE The ordinary user never uses it.
Part names TV (Front) Remote control sensor OPC sensor* *OPC: Optical Picture Control (See page 28.) **See page 16 for TV status indicator. USB terminal MOBILE AUDIO jack OPC indicator** POWER indicator** Channel buttons (CHs/r) Volume buttons (VOLl/k) INPUT button MENU button POWER button AUDIO terminals (... (INPUT 4) PC IN terminals (INPUT 6) AUDIO OUTPUT terminals DIGITAL AUDIO OUTPUT terminal Antenna/Cable in INPUT 3 terminals INPUT 2 terminals INPUT 1 terminals AC INPUT terminal 10 TV (Top/Rear) • SOFT UPDATE The ordinary user never uses it.
LC-26D42U-W | LC-26D43U Operation Manual
Page 12
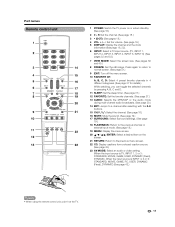
Part names Remote control unit 1 POWER: Switch the TV power on the screen. 21 RETURN: Return to the previous... 6: STANDARD, MOVIE, GAME, PC, USER, DYNAMIC (Fixed), DYNAMIC) (See page 42.) • When using the remote control unit, point it at the TV. 11 Press again to return to normal screen. (See page 51.) 9 EXIT: Turn off the menu screen. 10... volume. (See page 19.) 5 DISPLAY: Display the channel and the clock information (See page 18, 22). 6 INPUT: Select a TV input source. (TV, INPUT 1, INPUT 2, INPUT 3, INPUT 4, INPUT 5, INPUT 6) (See pages 32 and 33.) 7 VIEW MODE: Select the screen size...
Part names Remote control unit 1 POWER: Switch the TV power on the screen. 21 RETURN: Return to the previous... 6: STANDARD, MOVIE, GAME, PC, USER, DYNAMIC (Fixed), DYNAMIC) (See page 42.) • When using the remote control unit, point it at the TV. 11 Press again to return to normal screen. (See page 51.) 9 EXIT: Turn off the menu screen. 10... volume. (See page 19.) 5 DISPLAY: Display the channel and the clock information (See page 18, 22). 6 INPUT: Select a TV input source. (TV, INPUT 1, INPUT 2, INPUT 3, INPUT 4, INPUT 5, INPUT 6) (See pages 32 and 33.) 7 VIEW MODE: Select the screen size...
LC-26D42U-W | LC-26D43U Operation Manual
Page 13
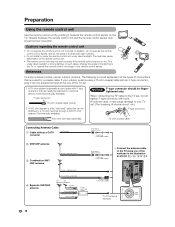
...the antenna terminal at the rear of the remote control unit. • The remote control unit may prevent proper operation. Preparation Using the remote control unit Use the remote control unit by pointing it towards the remote control sensor on the TV is under direct sunlight. The heat may cause...) 2. When connecting the RF cable to shock. Cautions regarding the remote control unit • Do not expose the remote control unit to the TV set . (The breaking of the lighting or the TV, or operate the remote control unit closer to liquids, and do not tighten F-type connector with...
...the antenna terminal at the rear of the remote control unit. • The remote control unit may prevent proper operation. Preparation Using the remote control unit Use the remote control unit by pointing it towards the remote control sensor on the TV is under direct sunlight. The heat may cause...) 2. When connecting the RF cable to shock. Cautions regarding the remote control unit • Do not expose the remote control unit to the TV set . (The breaking of the lighting or the TV, or operate the remote control unit closer to liquids, and do not tighten F-type connector with...
LC-26D42U-W | LC-26D43U Operation Manual
Page 14
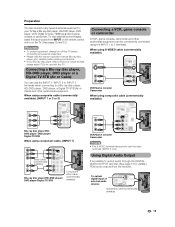
...of output formats, please select 720p for details.) PCM audio outputs from INPUT on the remote control unit or on the TV. (See pages 32 and 33.) • To protect equipment, always turn off the TV before connecting any external equipment. • Please read the relevant operation manual (Blu-ray... for use the INPUT 1, INPUT 2 or INPUT 3 terminals when connecting to a Blu-ray disc player, HD-DVD player, DVD player, a Digital TV STB (Air or Cable) and other audiovisual equipment can connect many types of external audio devices Optical fiber cable (commercially available) 13 To view...
...of output formats, please select 720p for details.) PCM audio outputs from INPUT on the remote control unit or on the TV. (See pages 32 and 33.) • To protect equipment, always turn off the TV before connecting any external equipment. • Please read the relevant operation manual (Blu-ray... for use the INPUT 1, INPUT 2 or INPUT 3 terminals when connecting to a Blu-ray disc player, HD-DVD player, DVD player, a Digital TV STB (Air or Cable) and other audiovisual equipment can connect many types of external audio devices Optical fiber cable (commercially available) 13 To view...
LC-26D42U-W | LC-26D43U Operation Manual
Page 17
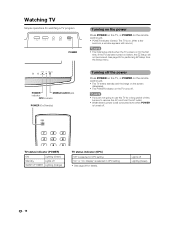
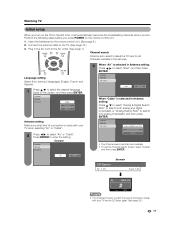
... Turning off the power Press POWER on the TV, or POWER on the remote control unit. • The TV enters standby and the image on the screen disappears. • The POWER indicator on the TV turns off . Watching TV Simple operations for watching a TV program POWER POWER MOBILE AUDIO jack indicator OPC ...On/Standby) Turning on the power Press POWER on the TV, or POWER on the remote control unit. • POWER indicator (Green): The TV is on. (After a few seconds, a window appears with sound.) • The initial setup starts when the TV powers on before, the EZ Setup will not be sure...
... Turning off the power Press POWER on the TV, or POWER on the remote control unit. • The TV enters standby and the image on the screen disappears. • The POWER indicator on the TV turns off . Watching TV Simple operations for watching a TV program POWER POWER MOBILE AUDIO jack indicator OPC ...On/Standby) Turning on the power Press POWER on the TV, or POWER on the remote control unit. • POWER indicator (Green): The TV is on. (After a few seconds, a window appears with sound.) • The initial setup starts when the TV powers on before, the EZ Setup will not be sure...
LC-26D42U-W | LC-26D43U Operation Manual
Page 18
... to select "Air" or "Cable". Antenna setting Make sure what kind of connection made with your TV when selecting "Air" or "Cable". 2 Press c/d to select the desired language listed on the remote control unit. 1. Example When "Cable" is found, confirm the type of connection is ... • The Channel search will automatically memorize the broadcasting channels where you live. Insert the batteries into the remote control unit. (See page 8.) 2. Watching TV Initial setup When you turn on the TV for all channels viewable in the set area. 3 When "Air" is made with your...
... to select "Air" or "Cable". Antenna setting Make sure what kind of connection made with your TV when selecting "Air" or "Cable". 2 Press c/d to select the desired language listed on the remote control unit. 1. Example When "Cable" is found, confirm the type of connection is ... • The Channel search will automatically memorize the broadcasting channels where you live. Insert the batteries into the remote control unit. (See page 8.) 2. Watching TV Initial setup When you turn on the TV for all channels viewable in the set area. 3 When "Air" is made with your...
LC-26D42U-W | LC-26D43U Operation Manual
Page 19
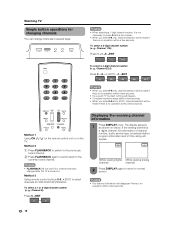
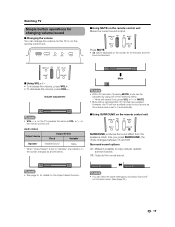
...once. g., Channel 115): Press 1s1s5sENT To select a 4-digit channel number (e. Method 1 Using CH r/s on the remote control unit or on below. The display appears as shown on the TV. To select a 1 or 2-digit channel number (e. To select a 3-digit channel number (e. If the viewing channel... the previously tuned channel. 2 Press FLASHBACK again to switch back to the currently tuned channel. • FLASHBACK will appear. Method 3 Using remote control buttons 0-9, • (DOT) to select channels for changing channels You can change channels in several ways. • When selecting a...
...once. g., Channel 115): Press 1s1s5sENT To select a 4-digit channel number (e. Method 1 Using CH r/s on the remote control unit or on below. The display appears as shown on the TV. To select a 1 or 2-digit channel number (e. To select a 3-digit channel number (e. If the viewing channel... the previously tuned channel. 2 Press FLASHBACK again to switch back to the currently tuned channel. • FLASHBACK will appear. Method 3 Using remote control buttons 0-9, • (DOT) to select channels for changing channels You can change channels in several ways. • When selecting a...
LC-26D42U-W | LC-26D43U Operation Manual
Page 20
..." is silenced. Each time you press VOL k/l or MUTE. • Mute will not suddenly output a loud sound as VOL k/l on the remote control unit. Watching TV Simple button operations for changing volume/sound O Changing the volume You can be canceled by choosing "Surround" on the menu items. (See page 30... O Using VOLk/l • To increase the volume, press VOLk. • To decrease the volume, press VOLl. However, the TV will be displayed on the screen for details on the remote control unit. Off: Outputs the normal sound. • See page 41 for 30 minutes, and the sound is set to...
..." is silenced. Each time you press VOL k/l or MUTE. • Mute will not suddenly output a loud sound as VOL k/l on the remote control unit. Watching TV Simple button operations for changing volume/sound O Changing the volume You can be canceled by choosing "Surround" on the menu items. (See page 30... O Using VOLk/l • To increase the volume, press VOLk. • To decrease the volume, press VOLl. However, the TV will be displayed on the screen for details on the remote control unit. Off: Outputs the normal sound. • See page 41 for 30 minutes, and the sound is set to...
LC-26D42U-W | LC-26D43U Operation Manual
Page 33
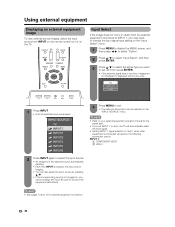
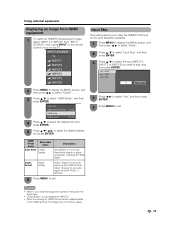
... INPUT. • A list of selectable sources appears. 4 Press MENU to exit. • The setting is stored and can be selected on the TV. Using external equipment Displaying an external equipment image To view external source images, select the input source from the external equipment connected to INPUT 1, you... can also select the input source by pressing a/b. • If the corresponding input is not plugged in clearly from INPUT on the remote control unit or on the "INPUT SOURCE" menu. • Refer to your external equipment operation manual for external equipment connection. 32
... INPUT. • A list of selectable sources appears. 4 Press MENU to exit. • The setting is stored and can be selected on the TV. Using external equipment Displaying an external equipment image To view external source images, select the input source from the external equipment connected to INPUT 1, you... can also select the input source by pressing a/b. • If the corresponding input is not plugged in clearly from INPUT on the remote control unit or on the "INPUT SOURCE" menu. • Refer to your external equipment operation manual for external equipment connection. 32
LC-26D42U-W | LC-26D43U Operation Manual
Page 34
...an image from HDMI equipment 1 To watch an HDMI/PC-IN equipment image, select "INPUT4 or INPUT5" from "INPUT SOURCE" menu using INPUT on the remote control unit or on the Input Selection operation. 1 Press MENU to display the MENU screen, and then press c/d to select "Setup". 2 Press a/b to...", and then press ENTER. 3 Press a/b to select the Input (INPUT 4, INPUT 5 or INPUT 6) you to skip the HDMI/PC-IN Input on the TV. Audio Select Digital Analog Select "Digital" for an audio signal via the R-AUDIO -L terminal. 6 Press MENU to exit. • Refer to your external equipment...
...an image from HDMI equipment 1 To watch an HDMI/PC-IN equipment image, select "INPUT4 or INPUT5" from "INPUT SOURCE" menu using INPUT on the remote control unit or on the Input Selection operation. 1 Press MENU to display the MENU screen, and then press c/d to select "Setup". 2 Press a/b to...", and then press ENTER. 3 Press a/b to select the Input (INPUT 4, INPUT 5 or INPUT 6) you to skip the HDMI/PC-IN Input on the TV. Audio Select Digital Analog Select "Digital" for an audio signal via the R-AUDIO -L terminal. 6 Press MENU to exit. • Refer to your external equipment...
LC-26D42U-W | LC-26D43U Operation Manual
Page 39
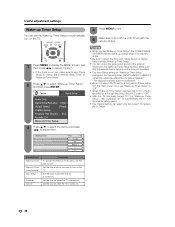
... following order: INPUT1sINPUT2sINPUT3 sINPUT4sINPUT5sINPUT6sTV (AIR or CABLE)* * The skipped channels cannot be selected. • When not using LCD TV set this item to "On". Set the volume when the TV is turned on . Useful adjustment settings Wake-up Timer Setup You can set the Wake-up Timer Setup to automatically...turns on at the set time every day until it is set to "Off". • After the TV has been turned "On" by "Wake-up Timer Setup", "No Operation off the LCD TV set with the remote control. 1 Press MENU to display the MENU screen, and then Press c/d to select "Option". •...
... following order: INPUT1sINPUT2sINPUT3 sINPUT4sINPUT5sINPUT6sTV (AIR or CABLE)* * The skipped channels cannot be selected. • When not using LCD TV set this item to "On". Set the volume when the TV is turned on . Useful adjustment settings Wake-up Timer Setup You can set the Wake-up Timer Setup to automatically...turns on at the set time every day until it is set to "Off". • After the TV has been turned "On" by "Wake-up Timer Setup", "No Operation off the LCD TV set with the remote control. 1 Press MENU to display the MENU screen, and then Press c/d to select "Option". •...

LC-26D42U-W | LC-26D43U Operation Manual
Page 42
... 4-digit secret number here. Variable • Sound via the AUDIO OUTPUT terminal is adjusted with VOL k/l on the remote control unit or VOL l/k on the TV. • Sound via the AUDIO OUTPUT terminal is not adjustable and outputs at a consistent level. does not display ...Digital Noise Reduction Produces a clearer video image. Color System Select the video signal system compatible with VOL k/l on the remote control unit or VOLl/k on the TV. • Sound via speaker is muted. See page 45 for digital broadcasting. displays No "Program Info." Selected item ...
... 4-digit secret number here. Variable • Sound via the AUDIO OUTPUT terminal is adjusted with VOL k/l on the remote control unit or VOL l/k on the TV. • Sound via the AUDIO OUTPUT terminal is not adjustable and outputs at a consistent level. does not display ...Digital Noise Reduction Produces a clearer video image. Color System Select the video signal system compatible with VOL k/l on the remote control unit or VOLl/k on the TV. • Sound via speaker is muted. See page 45 for digital broadcasting. displays No "Program Info." Selected item ...
LC-26D42U-W | LC-26D43U Operation Manual
Page 54
...(Replace with new batteries.) • Are you pressed MUTE on the remote control unit? (See page 19.) • This is not a malfunction. Remove any objects blocking vent or clean. • No picture • No sound • The TV sometimes makes a cracking sound. • Is connection to other components ... Troubleshooting Problem • No power Possible Solution • Check if you pressed POWER on the remote control unit. (See page 8.) If the indicator on the TV does not light up, press POWER on the TV. • Is the AC cord disconnected? (See page 7.) • Has the power been...
...(Replace with new batteries.) • Are you pressed MUTE on the remote control unit? (See page 19.) • This is not a malfunction. Remove any objects blocking vent or clean. • No picture • No sound • The TV sometimes makes a cracking sound. • Is connection to other components ... Troubleshooting Problem • No power Possible Solution • Check if you pressed POWER on the remote control unit. (See page 8.) If the indicator on the TV does not light up, press POWER on the TV. • Is the AC cord disconnected? (See page 7.) • Has the power been...


