LC-22DV17U Operation Manual
Page 10
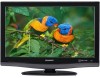
....sharpusa.com/SharpDirect. Gently wipe and avoid pressing on the bottom of the TV. 2 Insert and tighten the 3 screws into the 3 holes on the screen. Remote control unit "AA" size battery (X1) (X2) Page 10 Page 10 AC cord (X1) Page 9 Cable Tie (X1) Page 9 Screw (X3) Page 8 Operation... the frame or screen, please use . 2 Remove the covering sheet of the stand may result in single (00Z-LCD-CLOTH) or triple (00Z-LCD- Approved cleaning cloths are available directly from Sharp in the TV falling over the base area to lay the TV on. Incorrect installation of the stand. 1 Insert...
....sharpusa.com/SharpDirect. Gently wipe and avoid pressing on the bottom of the TV. 2 Insert and tighten the 3 screws into the 3 holes on the screen. Remote control unit "AA" size battery (X1) (X2) Page 10 Page 10 AC cord (X1) Page 9 Cable Tie (X1) Page 9 Screw (X3) Page 8 Operation... the frame or screen, please use . 2 Remove the covering sheet of the stand may result in single (00Z-LCD-CLOTH) or triple (00Z-LCD- Approved cleaning cloths are available directly from Sharp in the TV falling over the base area to lay the TV on. Incorrect installation of the stand. 1 Insert...
LC-22DV17U Operation Manual
Page 12
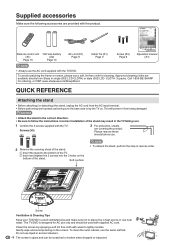
... batteries as soon as they are worn out. IF YOU STILL ENCOUNTER NO POWER, PLEASE CONTACT US AT 1-800-BE-SHARP. 10 If you will not be using the remote control unit for an extended period of batteries can shorten the life of new batteries or cause chemical leakage in the... battery compartment. NOTE Improper use of time, remove batteries from batteries that leak from it. Remote control sensor 17" (5 m) 30° 30° IMPORTANT: The POWER indicator on . Mixing old and new batteries can result in contact with their...
... batteries as soon as they are worn out. IF YOU STILL ENCOUNTER NO POWER, PLEASE CONTACT US AT 1-800-BE-SHARP. 10 If you will not be using the remote control unit for an extended period of batteries can shorten the life of new batteries or cause chemical leakage in the... battery compartment. NOTE Improper use of time, remove batteries from batteries that leak from it. Remote control sensor 17" (5 m) 30° 30° IMPORTANT: The POWER indicator on . Mixing old and new batteries can result in contact with their...

LC-22DV17U Operation Manual
Page 13
...SHARP CUSTOMER 3 IMPORTANT SAFETY INSTRUCTIONS 3 Disc 6 Discs which can be played back 6 Discs which cannot be played back 6 Title/Chapter/Track 6 Handling discs 7 Supplied accessories 8 QUICK REFERENCE 8 Attaching the stand 8 Contents 11 Part names 12 TV/DVD (Front 12 TV/DVD (Rear 12 TV/DVD (Left 12 Remote...TV Guidelines 21 Voluntary movie rating system (MPAA 21 Canadian rating systems 22 Canadian English ratings 22 Canadian French ratings 22 How to temporarily release the V-Chip block ..... 22 Other convenience functions 23 Menu operation buttons 23 Quick guide for MENU ...
...SHARP CUSTOMER 3 IMPORTANT SAFETY INSTRUCTIONS 3 Disc 6 Discs which can be played back 6 Discs which cannot be played back 6 Title/Chapter/Track 6 Handling discs 7 Supplied accessories 8 QUICK REFERENCE 8 Attaching the stand 8 Contents 11 Part names 12 TV/DVD (Front 12 TV/DVD (Rear 12 TV/DVD (Left 12 Remote...TV Guidelines 21 Voluntary movie rating system (MPAA 21 Canadian rating systems 22 Canadian English ratings 22 Canadian French ratings 22 How to temporarily release the V-Chip block ..... 22 Other convenience functions 23 Menu operation buttons 23 Quick guide for MENU ...
LC-22DV17U Operation Manual
Page 14
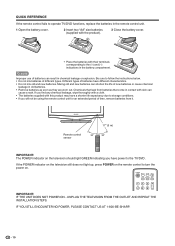
Part names TV/DVD (Front) TV/DVD (Left) EJECT button Remote control sensor POWER indicator Channel Channel Volume (VOL buttons /▲/▶PLAY button /▼/
Part names TV/DVD (Front) TV/DVD (Left) EJECT button Remote control sensor POWER indicator Channel Channel Volume (VOL buttons /▲/▶PLAY button /▼/
LC-22DV17U Operation Manual
Page 15
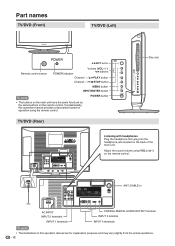
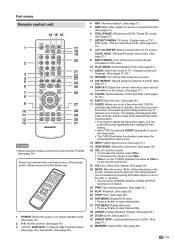
... unit 14 15 16 1 17 18 19 20 2 21 3 22 4 23 5 24 6 25 7 26 8 9 27 10 28 11 29 12 30 13 31 NOTE • When using the remote control unit, point it at the TV/DVD. (See page 10.) There is silenced. SLOW / : Reverse/Forward -slow motion. (See page 27.) 9 EXIT... channel (or input source) information on the screen, and the sound is a protective film covering the face of the remote control. on the remote control unit. 21 CH / : Select the channel. (See page 16.) 22 MUTE: Mute the sound. on the TV/DVD operates the same as VOL+/- Display menu of DVD. (See...
... unit 14 15 16 1 17 18 19 20 2 21 3 22 4 23 5 24 6 25 7 26 8 9 27 10 28 11 29 12 30 13 31 NOTE • When using the remote control unit, point it at the TV/DVD. (See page 10.) There is silenced. SLOW / : Reverse/Forward -slow motion. (See page 27.) 9 EXIT... channel (or input source) information on the screen, and the sound is a protective film covering the face of the remote control. on the remote control unit. 21 CH / : Select the channel. (See page 16.) 22 MUTE: Mute the sound. on the TV/DVD operates the same as VOL+/- Display menu of DVD. (See...

LC-22DV17U Operation Manual
Page 16
...) • Connect the antenna cable to the TV using one of the methods in an area with an F-type connector, plug it towards the remote control sensor on the TV/DVD is generally a round cable with F-type connector that are used for a coaxial cable. A 75-ohm system is...) 75-ohm coaxial cable Connecting Antenna Cable ① Cable without tools (Commercially available). If your TV set. (The breaking of the remote control unit. • The remote control unit may prevent proper operation. If tools are used , it may cause damage to your outdoor antenna uses a 75-ohm coaxial cable...
...) • Connect the antenna cable to the TV using one of the methods in an area with an F-type connector, plug it towards the remote control sensor on the TV/DVD is generally a round cable with F-type connector that are used for a coaxial cable. A 75-ohm system is...) 75-ohm coaxial cable Connecting Antenna Cable ① Cable without tools (Commercially available). If your TV set. (The breaking of the remote control unit. • The remote control unit may prevent proper operation. If tools are used , it may cause damage to your outdoor antenna uses a 75-ohm coaxial cable...

LC-22DV17U Operation Manual
Page 17
... TV tuner, HDMI equipment, game console, camcorder or other external equipment. Terminal on the TV/DVD INPUT 1 Cable AV cable (commercially available) Terminal on the remote control. Connecting to the HDMI terminal, the image may not come in clearly. • When using an HDMI-DVI conversion adapter/cable, use INPUT 3 and...
... TV tuner, HDMI equipment, game console, camcorder or other external equipment. Terminal on the TV/DVD INPUT 1 Cable AV cable (commercially available) Terminal on the remote control. Connecting to the HDMI terminal, the image may not come in clearly. • When using an HDMI-DVI conversion adapter/cable, use INPUT 3 and...
LC-22DV17U Operation Manual
Page 18
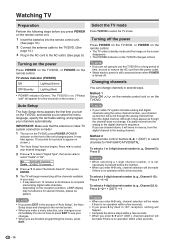
... 5): Press 5 NOTE • When selecting a 1-digit channel number, it will be made if there is no operation within a few seconds. 16 g., Channel 22.1): Press 2g2g • (DOT) g1 NOTE • When you enter 0-9 only, channel selection will move in reverse, from the analog to the digital channel in...menu appears the first time you turn on the TV/DVD, press POWER (POWER indicator on the front of the unit changes green. Method 2 Using remote control buttons 0-9, • (DOT) to select the TV mode. Watching TV Preparation Perform the following steps before the number. • When you ...
... 5): Press 5 NOTE • When selecting a 1-digit channel number, it will be made if there is no operation within a few seconds. 16 g., Channel 22.1): Press 2g2g • (DOT) g1 NOTE • When you enter 0-9 only, channel selection will move in reverse, from the analog to the digital channel in...menu appears the first time you turn on the TV/DVD, press POWER (POWER indicator on the front of the unit changes green. Method 2 Using remote control buttons 0-9, • (DOT) to select the TV mode. Watching TV Preparation Perform the following steps before the number. • When you ...
LC-22DV17U Operation Manual
Page 25
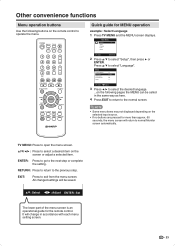
... Language Video Label Auto Shut Off Reset >> English >> Off >> : Select : Adjust 3 Press ◀/▶ to select the desired language. ...on the following buttons on the remote control to select "Language". NOTE • Some menu items may not displayed depending on the screen or adjust a selected item. Press to open the menu... next step or complete the setting. ENTER: Press to go to the previous step. EXIT: Press to normal Monitor screen automatically. Quick guide for the remote control.
... Language Video Label Auto Shut Off Reset >> English >> Off >> : Select : Adjust 3 Press ◀/▶ to select the desired language. ...on the following buttons on the remote control to select "Language". NOTE • Some menu items may not displayed depending on the screen or adjust a selected item. Press to open the menu... next step or complete the setting. ENTER: Press to go to the previous step. EXIT: Press to normal Monitor screen automatically. Quick guide for the remote control.
LC-22DV17U Operation Manual
Page 27
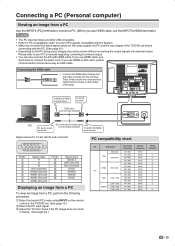
... VGA cable. Connecting a PC (Personal computer) Viewing an image from a PC, perform the following procedure. ① Select the Input4 (PC) mode using INPUT on the remote control or the TV/DVD set before connecting with HDMI cable. Please refer to your PC's manuals regarding converting to "PC compatibility chart" for a list...
... VGA cable. Connecting a PC (Personal computer) Viewing an image from a PC, perform the following procedure. ① Select the Input4 (PC) mode using INPUT on the remote control or the TV/DVD set before connecting with HDMI cable. Please refer to your PC's manuals regarding converting to "PC compatibility chart" for a list...

LC-22DV17U Operation Manual
Page 28
... and place it is turned off the power Press POWER on the TV/DVD, or POWER on the remote control. • The TV/DVD enters standby mode and the image on the screen disappears. •...AC outlet. (See page 9.) Turning on the power Press POWER on the TV/DVD, or POWER on the remote control. • POWER indicator (Green): The TV/DVD is placed into the disc slot, and the playback ...PLAY. • A "Prohibition" symbol " " may appear at this , be sure to press POWER on your remote control once the movie is completed. • There may be a slight delay between the button is inserted during some...
... and place it is turned off the power Press POWER on the TV/DVD, or POWER on the remote control. • The TV/DVD enters standby mode and the image on the screen disappears. •...AC outlet. (See page 9.) Turning on the power Press POWER on the TV/DVD, or POWER on the remote control. • POWER indicator (Green): The TV/DVD is placed into the disc slot, and the playback ...PLAY. • A "Prohibition" symbol " " may appear at this , be sure to press POWER on your remote control once the movie is completed. • There may be a slight delay between the button is inserted during some...

LC-22DV17U Operation Manual
Page 33
.... • Press ENTER. Select "Clear Program" and press ENTER. RETURN: Press to return to the normal screen. 31 Press to select a desired item on the remote control to operate the menu. MP3/WMA/JPEG and Audio CD operation Function setup Repeat playback (CD) 1 In the file browser, press to select "Repeat...
.... • Press ENTER. Select "Clear Program" and press ENTER. RETURN: Press to return to the normal screen. 31 Press to select a desired item on the remote control to operate the menu. MP3/WMA/JPEG and Audio CD operation Function setup Repeat playback (CD) 1 In the file browser, press to select "Repeat...
LC-22DV17U Operation Manual
Page 35
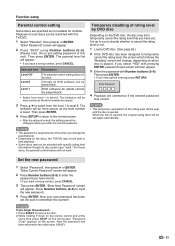
... will be encoded with Number buttons (0-9). Selected item Description Level Off Level 8 Level 1 The parental control setting does not function. While holding 7 down on the remote control and at the same time press STOP on the screen. Be sure to the normal screen. • After the rating is ejected. Function setup...
... will be encoded with Number buttons (0-9). Selected item Description Level Off Level 8 Level 1 The parental control setting does not function. While holding 7 down on the remote control and at the same time press STOP on the screen. Be sure to the normal screen. • After the rating is ejected. Function setup...
LC-22DV17U Operation Manual
Page 37
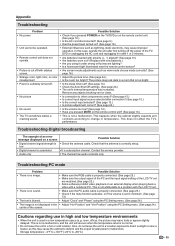
... the service provider. • The channel has audio contents only. Storage temperature: -4°F to +140°F (-20°C to a problem with the LCD TV set. • There is no image. • Make sure the RGB cable is properly connected. (See page 25.) • Make sure the ... the antenna cable. This is not attributable to +60°C) 35 Appendix Troubleshooting Problem • No power • Unit cannot be operated. • Remote control unit does not operate. • Picture is cut off/with sidebar screen. • Strange color, light color, or color misalignment • Power...
... the service provider. • The channel has audio contents only. Storage temperature: -4°F to +140°F (-20°C to a problem with the LCD TV set. • There is no image. • Make sure the RGB cable is properly connected. (See page 25.) • Make sure the ... the antenna cable. This is not attributable to +60°C) 35 Appendix Troubleshooting Problem • No power • Unit cannot be operated. • Remote control unit does not operate. • Picture is cut off/with sidebar screen. • Strange color, light color, or color misalignment • Power...
LC-22DV17U Operation Manual
Page 38
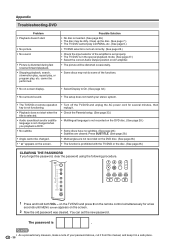
...place. 36 The password is inserted. (See page 26.) • The disc may not do some of your stereo system. • The TV/DVD or remote operation key is not functioning. • Playback does not start . • No picture. • No sound. • Picture is distorted during fast reverse... forget the password, clear the password using the following procedure. 1 Press and hold both VOL - on the TV/DVD and press 0 on the remote control simultaneously for several minutes, then replug it in the special playback mode. (See page 27.) • Select the correct Audio Output position on ...
...place. 36 The password is inserted. (See page 26.) • The disc may not do some of your stereo system. • The TV/DVD or remote operation key is not functioning. • Playback does not start . • No picture. • No sound. • Picture is distorted during fast reverse... forget the password, clear the password using the following procedure. 1 Press and hold both VOL - on the TV/DVD and press 0 on the remote control simultaneously for several minutes, then replug it in the special playback mode. (See page 27.) • Select the correct Audio Output position on ...


