
Operation Manual
Page 10
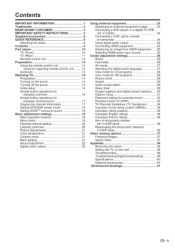
Contents iMPORTANT iNFORMATiON 1 Trademarks 2 DEAR SHARP CUSTOMER 3 iMPORTANT SAFETY iNSTRUCTiONS 3 Supplied accessories 6 QUICK REFERENCE 6 Attaching the stand 6 Contents 9 Part names 10 TV (Front 10 TV (Rear 11 Remote control unit 12 ... digital audio output 24 Connecting HDMI equipment 25 Displaying an image from HDMI equipment ...... 25 Selecting HDMI audio input source 25 Useful adjustment settings 26 Reset 26 Input label 26 AV mode 27 Selecting the digital audio language 27 View mode for 4:3 programs 28 View mode for HD programs 28 Picture scroll 28...
Contents iMPORTANT iNFORMATiON 1 Trademarks 2 DEAR SHARP CUSTOMER 3 iMPORTANT SAFETY iNSTRUCTiONS 3 Supplied accessories 6 QUICK REFERENCE 6 Attaching the stand 6 Contents 9 Part names 10 TV (Front 10 TV (Rear 11 Remote control unit 12 ... digital audio output 24 Connecting HDMI equipment 25 Displaying an image from HDMI equipment ...... 25 Selecting HDMI audio input source 25 Useful adjustment settings 26 Reset 26 Input label 26 AV mode 27 Selecting the digital audio language 27 View mode for 4:3 programs 28 View mode for HD programs 28 Picture scroll 28...
Operation Manual
Page 20
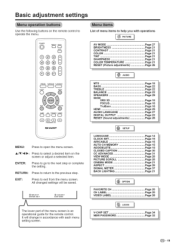
Basic adjustment settings Use the following buttons on the remote control to operate the menu, ,dF,
Basic adjustment settings Use the following buttons on the remote control to operate the menu, ,dF,
Operation Manual
Page 22
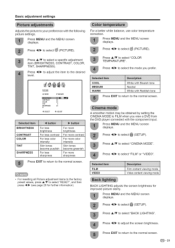
... * For resetting all Picture adjustment items to the factory preset values, press A/T to select "RESET", and then press 4/1_ (see page 26 for improved picture clarity. Press 4/t_ to select _ (SETUP). Press MENU and the MENU screen displays. Basic adjustment settings Adjusts the picture ...to the normal screen. Press A/V to select "CINEMA MODE". Press A/Y to select a specific adjustment item (BRIGHTNESS, CONTRAST, COLOR, TINT, SHARPNESS). Press EXIT to return to adjust the screen brightness. Press 4/t_ to FILM when you prefer. FILM VIDEO Film content viewing mode Video ...
... * For resetting all Picture adjustment items to the factory preset values, press A/T to select "RESET", and then press 4/1_ (see page 26 for improved picture clarity. Press 4/t_ to select _ (SETUP). Press MENU and the MENU screen displays. Basic adjustment settings Adjusts the picture ...to the normal screen. Press A/V to select "CINEMA MODE". Press A/Y to select a specific adjustment item (BRIGHTNESS, CONTRAST, COLOR, TINT, SHARPNESS). Press EXIT to return to adjust the screen brightness. Press 4/t_ to FILM when you prefer. FILM VIDEO Film content viewing mode Video ...
Operation Manual
Page 23
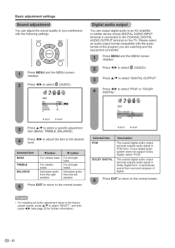
... A/V to select "PCM" or "DOLBY DIGITAL". to select "DIGITAL OUTPUT". Press 4/t_ to adjust the item to select "RESET", and then press 4/1_ (see page 26 for further information). = 22 Please select an audio output format compatible with the following settings. Press MENU and the MENU screen displays. The coaxial digital...
... A/V to select "PCM" or "DOLBY DIGITAL". to select "DIGITAL OUTPUT". Press 4/t_ to adjust the item to select "RESET", and then press 4/1_ (see page 26 for further information). = 22 Please select an audio output format compatible with the following settings. Press MENU and the MENU screen displays. The coaxial digital...
Operation Manual
Page 27
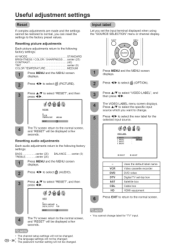
... return to select "RESET", and then _ress 4/1_. Press A/V to the following factory settings: AV MODE STANDARD BRIGHTNESS / COLOR / SHARPNESS .....center (25) CONTRAST 40) TINT center (0) COLOR TEMPERATURE MEDIUM Press MENU and the MENU screen displays. Resetting picture adjustments Each picture ...adjustments return to the normal screen, and "RESET" will not be changed. (_ = 26, The password number setting wilt not be changed . • The language settings will be displayed a few seconds. SLEEP MENU Press ...
... return to select "RESET", and then _ress 4/1_. Press A/V to the following factory settings: AV MODE STANDARD BRIGHTNESS / COLOR / SHARPNESS .....center (25) CONTRAST 40) TINT center (0) COLOR TEMPERATURE MEDIUM Press MENU and the MENU screen displays. Resetting picture adjustments Each picture ...adjustments return to the normal screen, and "RESET" will not be changed. (_ = 26, The password number setting wilt not be changed . • The language settings will be displayed a few seconds. SLEEP MENU Press ...
Operation Manual
Page 41
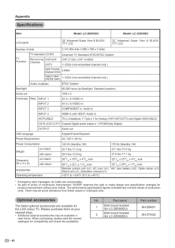
...part of policy of continuous improvement, SHARP reserves the right to make design and specification changes for LC-32SH20U) AN-26AG1 AN-37AG2 = 40 The listed optional accessories are nominal values of production units. Appendix Item Model: LC-26SH20U Model: LC-32SH20U LCD panel 26" Advanced Super View & BLACK ... purchasing, please read the newest catalogue for compatibility and check the availability. 1 Wall mount bracket (for LC-26SH20U) Wall mount bracket 2 (for product improvement without prior notice. There may be some deviations from these values in individual units.
...part of policy of continuous improvement, SHARP reserves the right to make design and specification changes for LC-32SH20U) AN-26AG1 AN-37AG2 = 40 The listed optional accessories are nominal values of production units. Appendix Item Model: LC-26SH20U Model: LC-32SH20U LCD panel 26" Advanced Super View & BLACK ... purchasing, please read the newest catalogue for compatibility and check the availability. 1 Wall mount bracket (for LC-26SH20U) Wall mount bracket 2 (for product improvement without prior notice. There may be some deviations from these values in individual units.


