Operation Manual
Page 1
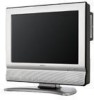
...,. REFER SERVICING TO QUALIFIED SERVICE PERSONNEL. The numbers are located at the rear of loss or theft, please record the TV/DVD's model and serial numbers in the space provided. LC-26DV20U COMBINATION LIQUID CRYSTAL TELEVISION AND DVD/CD PLAYER OPERATION MANUAL • The illustrations and on-screen displays in this operation manual...
...,. REFER SERVICING TO QUALIFIED SERVICE PERSONNEL. The numbers are located at the rear of loss or theft, please record the TV/DVD's model and serial numbers in the space provided. LC-26DV20U COMBINATION LIQUID CRYSTAL TELEVISION AND DVD/CD PLAYER OPERATION MANUAL • The illustrations and on-screen displays in this operation manual...
Operation Manual
Page 6
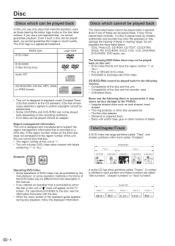
..., CD-ROM, CD-TEXT, CD-EXTRA, SACD, PD, DVD-ROM, SVCD, CVD, VCD, DVD-RAM, DVD+R/RW, DVD audio, etc. cause serious damage to the TV/DVD. • Irregular shaped discs such as those in hearing range. Media type DVD-Video DVD-R/RW (Video format only) Audio CD* Logo mark video... this unit. • Compatibility of this unit is prohibited by mistake, extensively loud sounds may blow the speakers or may be played back on the TV screen. Do not playback the discs listed below logo marks on a DVD disc. A number is designed to playback music Compact Discs (CD) that conform to...
..., CD-ROM, CD-TEXT, CD-EXTRA, SACD, PD, DVD-ROM, SVCD, CVD, VCD, DVD-RAM, DVD+R/RW, DVD audio, etc. cause serious damage to the TV/DVD. • Irregular shaped discs such as those in hearing range. Media type DVD-Video DVD-R/RW (Video format only) Audio CD* Logo mark video... this unit. • Compatibility of this unit is prohibited by mistake, extensively loud sounds may blow the speakers or may be played back on the TV screen. Do not playback the discs listed below logo marks on a DVD disc. A number is designed to playback music Compact Discs (CD) that conform to...
Operation Manual
Page 8
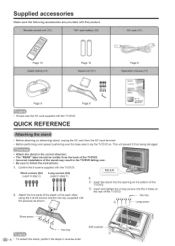
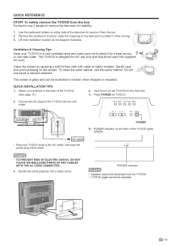
... performing work spread cushioning over . 1. Confirm the 8 screws supplied with the product. over the base area to lay the TV/DVD on. Supplied accessories Make sure the following accessories are provided with the TV/DVD. Page 10 Page 10 Page 9 Page 9 % Page 8 • Always use the AC cord supplied with the product... the 4 holes on the bottom of the stand unit to follow the instructions. Short screws (X4) (used in step 2) Long screws (X4) (used in the TV/DVD falling • Be sure to each other using the 4 short screws and the hex key (supplied with the...
... performing work spread cushioning over . 1. Confirm the 8 screws supplied with the product. over the base area to lay the TV/DVD on. Supplied accessories Make sure the following accessories are provided with the TV/DVD. Page 10 Page 10 Page 9 Page 9 % Page 8 • Always use the AC cord supplied with the product... the 4 holes on the bottom of the stand unit to follow the instructions. Short screws (X4) (used in step 2) Long screws (X4) (used in the TV/DVD falling • Be sure to each other using the 4 short screws and the hex key (supplied with the...
Operation Manual
Page 9
... with supplied ,< _---q-__ _'" i' ®,_ AC cord. VKeenteilapytioonuTr&VC/DleaVniiDnngawTipeslvl entilateadreaandmakesurenotoplaceitbyaheast ource i_ _- Gently wipe and avoid pressing on TV/DVD. A) Press POWER on the screen. indicator on either side of the television to remove it while moving. 3. however, keep ...your antenna to lightly moisten. Connect the AC plug for AC use liquid or aerosol cleaners. \ \ I // The screen is designed for the TV/DVD into the wall outlet. VOg + V CH /_ __ INPUT POWER o_ POWER B) POWER GREEN. Clean the screen by spraying a soft ...
... with supplied ,< _---q-__ _'" i' ®,_ AC cord. VKeenteilapytioonuTr&VC/DleaVniiDnngawTipeslvl entilateadreaandmakesurenotoplaceitbyaheast ource i_ _- Gently wipe and avoid pressing on TV/DVD. A) Press POWER on the screen. indicator on either side of the television to remove it while moving. 3. however, keep ...your antenna to lightly moisten. Connect the AC plug for AC use liquid or aerosol cleaners. \ \ I // The screen is designed for the TV/DVD into the wall outlet. VOg + V CH /_ __ INPUT POWER o_ POWER B) POWER GREEN. Clean the screen by spraying a soft ...
Operation Manual
Page 10
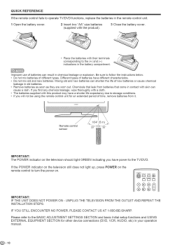
..., etc) in your operation manual. If the POWER indicator on the television still does not light up, press POWER on the remote control to the TV/DVD. chemical skin can result in chemical leakage or explosion. Q=I0 Different types of batteries can L I Remote control sensor 16'4" (5 m) 30 °...UNPLUG THE TELEVISION FROM THE OUTLET AND REPEAT THE INSTALLATION STEPS, IF YOU STILL ENCOUNTER NO POWER, PLEASE CONTACT US AT 1-800-BE-SHARP. Improper use of batteries have power to turn the power on the television should light GREEN indicating you find any chemical leakage, wipe ...
..., etc) in your operation manual. If the POWER indicator on the television still does not light up, press POWER on the remote control to the TV/DVD. chemical skin can result in chemical leakage or explosion. Q=I0 Different types of batteries can L I Remote control sensor 16'4" (5 m) 30 °...UNPLUG THE TELEVISION FROM THE OUTLET AND REPEAT THE INSTALLATION STEPS, IF YOU STILL ENCOUNTER NO POWER, PLEASE CONTACT US AT 1-800-BE-SHARP. Improper use of batteries have power to turn the power on the television should light GREEN indicating you find any chemical leakage, wipe ...
Operation Manual
Page 11
...SHARP CUSTOMER 3 iMPORTANT SAFETY iNSTRUCTiONS 3 DiSC 6 Discs which can be played back 6 Discs which cannot be played back 6 Title/Chapter/Track 6 Handling discs 7 Supplied accessories 8 QUICK REFERENCE 8 Attaching the stand 8 Contents 11 Part names 12 TV/DVD (Front 12 TV/DVD (Right 12 TV...external equipment 25 Displaying an external equipment image .......... 25 Connecting a digital TV STB (Air or Cable) ....... 26 Connecting a VCR, game console or camcorder, 26 Using digital audio output 26 Connecting HDMI equipment 27 Displaying an image from HDMI equipment ...... 27 ...
...SHARP CUSTOMER 3 iMPORTANT SAFETY iNSTRUCTiONS 3 DiSC 6 Discs which can be played back 6 Discs which cannot be played back 6 Title/Chapter/Track 6 Handling discs 7 Supplied accessories 8 QUICK REFERENCE 8 Attaching the stand 8 Contents 11 Part names 12 TV/DVD (Front 12 TV/DVD (Right 12 TV...external equipment 25 Displaying an external equipment image .......... 25 Connecting a digital TV STB (Air or Cable) ....... 26 Connecting a VCR, game console or camcorder, 26 Using digital audio output 26 Connecting HDMI equipment 27 Displaying an image from HDMI equipment ...... 27 ...

Operation Manual
Page 12
V CR /N iNPUT POWER Volume _ = ' __[_ button s (VO L-l+ _ _NtPtoUT Channel buttons (CH v/A) POWER button Disc slot POWER Remote control sensor POWER indicator* *See page 16 for TV/DVD status indicator. Q-12 VOL 4- Part names PLAY (p) button SKiP (|44/_,-_) buttons STOP (m) button EJECT (_,) button SKiP --
V CR /N iNPUT POWER Volume _ = ' __[_ button s (VO L-l+ _ _NtPtoUT Channel buttons (CH v/A) POWER button Disc slot POWER Remote control sensor POWER indicator* *See page 16 for TV/DVD status indicator. Q-12 VOL 4- Part names PLAY (p) button SKiP (|44/_,-_) buttons STOP (m) button EJECT (_,) button SKiP --
Operation Manual
Page 14
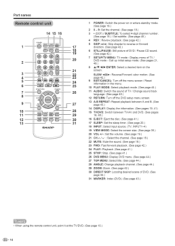
...: Turn off the menu screen / Reset information in the menu. 10 PLAY MODE: Select playback mode. (See page 44.) 11 AUDIO: Switch the sound of TV / Change sound track language. (See page 45.) 12 RETURN: Turn off the DVD setup menu screen. 13 A-B REPEAT: Repeat playback between A and B. (See page 43... the sound. (See page 19.) 23 FWD: Fast forward playback. (See page 42.) 24 PLAY: Playback. (See page 41.) 25 STOP: Stop. (See page 41.) 26 DVD MENU: Display DVD menu. (See page 44.) 27 TOP MENU: Select title. (See page 44.) 28 ANGLE: Change playback channel. (See page 44.) 29...
...: Turn off the menu screen / Reset information in the menu. 10 PLAY MODE: Select playback mode. (See page 44.) 11 AUDIO: Switch the sound of TV / Change sound track language. (See page 45.) 12 RETURN: Turn off the DVD setup menu screen. 13 A-B REPEAT: Repeat playback between A and B. (See page 43... the sound. (See page 19.) 23 FWD: Fast forward playback. (See page 42.) 24 PLAY: Playback. (See page 41.) 25 STOP: Stop. (See page 41.) 26 DVD MENU: Display DVD menu. (See page 44.) 27 TOP MENU: Select title. (See page 44.) 28 ANGLE: Change playback channel. (See page 44.) 29...
Operation Manual
Page 15
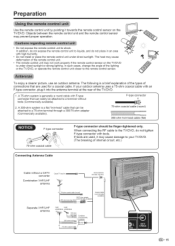
... that can easily be finger-tightened only. To enjoy a clearer picture, use an outdoor antenna. f 1. F-type connector 2. If your TV/DVD. (The breaking of internal circuit, etc.) Cable without tools (Commercially available). Objects between the remote control unit and the remote control ...for a coaxial cable. If tools are used , it may cause damage to a terminal without a CATV converter Combination VHF/UHF antenna Cable TV leadqn _ Home Antenna terminal (75-ohm) o 75_ohm coaxial cable (round) 300/75-0hm adapter Coaxial came (commercially available; Preparation Use ...
... that can easily be finger-tightened only. To enjoy a clearer picture, use an outdoor antenna. f 1. F-type connector 2. If your TV/DVD. (The breaking of internal circuit, etc.) Cable without tools (Commercially available). Objects between the remote control unit and the remote control ...for a coaxial cable. If tools are used , it may cause damage to a terminal without a CATV converter Combination VHF/UHF antenna Cable TV leadqn _ Home Antenna terminal (75-ohm) o 75_ohm coaxial cable (round) 300/75-0hm adapter Coaxial came (commercially available; Preparation Use ...

Operation Manual
Page 16
... power is still consumed even when POWER is turned off after 15 minutes. (TV mode only.) (_)- 16 POWER indicator TV/DVD status indicator (POWER) ON Lighting (Green) OFF/Standby Lighting (Red) POWER On/Standby) TV/DVD CD CD CD @@@ TV MENU -- ®@0 Q SKIP REV FWD SKIP STILL/PAUSE PLAY CSD S[TUP... mode and the image on the screen disappears. • The POWER indicator on the remote control unit. 1. Watching TV Simple operations for a few seconds on the screen.) Press TV/DVD to the TV/DVD. (See page 15.) 3. Plug in the AC cord to the AC outlet. (See page 9.) Press POWER...
... power is still consumed even when POWER is turned off after 15 minutes. (TV mode only.) (_)- 16 POWER indicator TV/DVD status indicator (POWER) ON Lighting (Green) OFF/Standby Lighting (Red) POWER On/Standby) TV/DVD CD CD CD @@@ TV MENU -- ®@0 Q SKIP REV FWD SKIP STILL/PAUSE PLAY CSD S[TUP... mode and the image on the screen disappears. • The POWER indicator on the remote control unit. 1. Watching TV Simple operations for a few seconds on the screen.) Press TV/DVD to the TV/DVD. (See page 15.) 3. Plug in the AC cord to the AC outlet. (See page 9.) Press POWER...

Operation Manual
Page 17
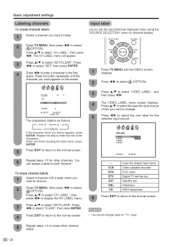
...minutes to complete memorizing digital cable channels, please be patient, Skipping stored channel You can set correct date and time manually. Press TV MENU and the MENU screen displays. Press A/Y to select "AUTO CH MEMORY" SETUP LANGUAGE CLOCKSET AIRJCABLE ADD/DELETE V ENGLISH CABLE... _):SELECT I_):ADJUST Press 4/_. "ADDING • To remove all the channels available in your TV/DVD when selecting "AIR" or "CABLE". Press "_/_ to add. Press A/Y to select "ADD/DELETE", and then press 4/_. After setting the...
...minutes to complete memorizing digital cable channels, please be patient, Skipping stored channel You can set correct date and time manually. Press TV MENU and the MENU screen displays. Press A/Y to select "AUTO CH MEMORY" SETUP LANGUAGE CLOCKSET AIRJCABLE ADD/DELETE V ENGLISH CABLE... _):SELECT I_):ADJUST Press 4/_. "ADDING • To remove all the channels available in your TV/DVD when selecting "AIR" or "CABLE". Press "_/_ to add. Press A/Y to select "ADD/DELETE", and then press 4/_. After setting the...
Operation Manual
Page 18
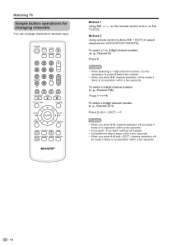
...select a 3-digit channel number (e. g., Channel 115): Press 1->1 ->5 To select a 4-digit channel number (e. Watching TV You can change channels in several ways. POWER CD_ DISPLAY TV/DVD EJECT SLEEP VIEWMODE INPUT CD CD CD ®®® SUBTITLE MUTE ®®O Q SKIP REV FWD ... (EE) STILL/PAUSE PLAY STOP CSD K?K) SETUP/TVMENU DVD MENU AUDIO PLAYMOSEANGLE ZOOM O@DO RETURNA-BREPEAT MARKERDIRECTSNIP SHA, RP Method 1 Using CH ^/v TV/DVD. g., Channel 22.1): Press 2->2-> • (DOT) ->1 • When you enter 0-9, channel selection will be made if there is no ...
...select a 3-digit channel number (e. g., Channel 115): Press 1->1 ->5 To select a 4-digit channel number (e. Watching TV You can change channels in several ways. POWER CD_ DISPLAY TV/DVD EJECT SLEEP VIEWMODE INPUT CD CD CD ®®® SUBTITLE MUTE ®®O Q SKIP REV FWD ... (EE) STILL/PAUSE PLAY STOP CSD K?K) SETUP/TVMENU DVD MENU AUDIO PLAYMOSEANGLE ZOOM O@DO RETURNA-BREPEAT MARKERDIRECTSNIP SHA, RP Method 1 Using CH ^/v TV/DVD. g., Channel 22.1): Press 2->2-> • (DOT) ->1 • When you enter 0-9, channel selection will be made if there is no ...
Operation Manual
Page 19
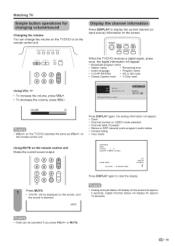
... digital information will appear. on the screen for approx. 10 seconds. • Mute can change the volume on the TV/DVD or on the remote control unit. Watching TV Changing the volume You can be displayed the sound is silenced. Press DISPLAY again, the analog information will appear. •...-. or MUTE. (_=19 on the remote control unit. Press DISPLAY to clear the display. • Analog channel status will display on the TV/DVD operates the same as VOL+/- Clock Channel number or VIDEO mode selected Channel label (if preset) Stereo or SAP (second audio program) audio...
... digital information will appear. on the screen for approx. 10 seconds. • Mute can change the volume on the TV/DVD or on the remote control unit. Watching TV Changing the volume You can be displayed the sound is silenced. Press DISPLAY again, the analog information will appear. •...-. or MUTE. (_=19 on the remote control unit. Press DISPLAY to clear the display. • Analog channel status will display on the TV/DVD operates the same as VOL+/- Clock Channel number or VIDEO mode selected Channel label (if preset) Stereo or SAP (second audio program) audio...
Operation Manual
Page 20
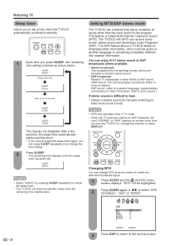
...SAP sound. SAP sound: Listen to standby. Press SLEEP. • The remaining time displays timer has been set a time when the TV/DVD automatically switches to a second language, supplementary commentary or other information, which could be highlighted. when the sleep SOLhEOE7Prn 1 • ...8226; Stereo broadcasts View programs like live sporting events, shows and concerts in dynamic stereo sound. • SAP broadcasts Receive TV broadcasts in another language or something completely different like weather information. SETUP/TVMENU DVD MENU AUDIO PLAYMODEANGLE ZOOM Changing MTS You ...
...SAP sound. SAP sound: Listen to standby. Press SLEEP. • The remaining time displays timer has been set a time when the TV/DVD automatically switches to a second language, supplementary commentary or other information, which could be highlighted. when the sleep SOLhEOE7Prn 1 • ...8226; Stereo broadcasts View programs like live sporting events, shows and concerts in dynamic stereo sound. • SAP broadcasts Receive TV broadcasts in another language or something completely different like weather information. SETUP/TVMENU DVD MENU AUDIO PLAYMODEANGLE ZOOM Changing MTS You ...
Operation Manual
Page 21
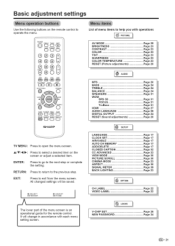
...settings will change in accordance with i PICTURE operations AV MODE Page 29 BRIGHTNESS Page 23 CONTRAST Page 23 COLOR Page 23 TINT Page 23 SHARPNESS Page 23 COLOR TEMPERATURE Page 23 RESET (Picture adjustments Page 28 I® AUO,O MTS Page 20 BASS Page 24 TREBLE Page 24 ... REV FWD SKIP STILL/PAUSE PLAY 5D GD SETVP/TMVENU STOP C_ DVOMENU AUDIO PLAYMODE ANGLE ZOOM (:Z9C:) CE:)C:) RETURN A-BREPEAT MARKERDIRESTSKIP _ CD CD C} SHARP TV MENU: Press to select a desired item on the remote control to the next step or complete the setting. List of the menu screen is an...
...settings will change in accordance with i PICTURE operations AV MODE Page 29 BRIGHTNESS Page 23 CONTRAST Page 23 COLOR Page 23 TINT Page 23 SHARPNESS Page 23 COLOR TEMPERATURE Page 23 RESET (Picture adjustments Page 28 I® AUO,O MTS Page 20 BASS Page 24 TREBLE Page 24 ... REV FWD SKIP STILL/PAUSE PLAY 5D GD SETVP/TMVENU STOP C_ DVOMENU AUDIO PLAYMODE ANGLE ZOOM (:Z9C:) CE:)C:) RETURN A-BREPEAT MARKERDIRESTSKIP _ CD CD C} SHARP TV MENU: Press to select a desired item on the remote control to the next step or complete the setting. List of the menu screen is an...
Operation Manual
Page 22
...:SELECT _ :ADJUST ENTER: SET The characters rotation as follows: F_-0 9---Azq "_ + _ SPACE _" If the character which you want appears on the screen. Press TV MENU, then press "_/1_ to select i_i(OPTION). to enter a character in the first space. The CH LABEL menu will appear. to select "CLEAR", then... to enter the rest of the characters. Repeat this step to select _ (OPTION). When you want to erase other channels. Repeat steps 1-5 for "TV" input. You can assign a label to display the CH LABEL menu. To erase channel labels Select a channel with a label which you want to ...
...:SELECT _ :ADJUST ENTER: SET The characters rotation as follows: F_-0 9---Azq "_ + _ SPACE _" If the character which you want appears on the screen. Press TV MENU, then press "_/1_ to select i_i(OPTION). to enter a character in the first space. The CH LABEL menu will appear. to select "CLEAR", then... to enter the rest of the characters. Repeat this step to select _ (OPTION). When you want to erase other channels. Repeat steps 1-5 for "TV" input. You can assign a label to display the CH LABEL menu. To erase channel labels Select a channel with a label which you want to ...

Operation Manual
Page 23
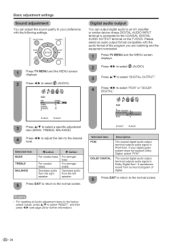
...Press A/Y to select "CINEMA MODE". Press 4/1_ to adjust the item to select a specific adjustment item (BRIGHTNESS, CONTRAST, COLOR, TINT, SHARPNESS). Press TV MENU and the MENU screen displays. Press A/V to the desired level. For resetting all Picture adjustment items to the factory preset values, press... A/V to your preference with the component input, Press TV MENU and the MENU screen displays, Press 4/1_ to adjust the screen brightness. Basic adjustment settings Adjusts the picture to select "...
...Press A/Y to select "CINEMA MODE". Press 4/1_ to adjust the item to select a specific adjustment item (BRIGHTNESS, CONTRAST, COLOR, TINT, SHARPNESS). Press TV MENU and the MENU screen displays. Press A/V to the desired level. For resetting all Picture adjustment items to the factory preset values, press... A/V to your preference with the component input, Press TV MENU and the MENU screen displays, Press 4/1_ to adjust the screen brightness. Basic adjustment settings Adjusts the picture to select "...
Operation Manual
Page 24
... _ (AUDIO). It reproduces sound from the left speaker Press EXIT to return to the COAXIAL DIGITAL AUDIO OUTPUT terminal on the TV/DVD. Basic adjustment settings You can output digital audio to an AV amplifier or similar device whose DIGITAL AUDIO INPUT terminal is connected... select #_ (AUDIO). Please select an audio output format compatible with the following settings, SETUP/TVMENU DVDMENU Press TV MENU and the MENU screen displays, Press 4/1_ to the desired level. Press TV MENU and the MENU screen displays. Press "_/1_ to select a specific adjustment item (BASS, TREBLE, BALANCE)....
... _ (AUDIO). It reproduces sound from the left speaker Press EXIT to return to the COAXIAL DIGITAL AUDIO OUTPUT terminal on the TV/DVD. Basic adjustment settings You can output digital audio to an AV amplifier or similar device whose DIGITAL AUDIO INPUT terminal is connected... select #_ (AUDIO). Please select an audio output format compatible with the following settings, SETUP/TVMENU DVDMENU Press TV MENU and the MENU screen displays, Press 4/1_ to the desired level. Press TV MENU and the MENU screen displays. Press "_/1_ to select a specific adjustment item (BASS, TREBLE, BALANCE)....
Operation Manual
Page 25
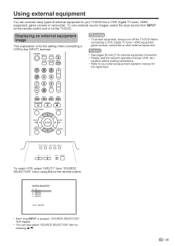
...; Each time INPUT is for the signal type. POWER CDCD_ DISPLAY TV/DVD EJECT SLEEP VIEWMODE INPUT CDCD ®@@®@®0 • To protect equipment, always turn off the TV/DVD before connecting a VCR, Digital TV tuner, HDMI equipment, game console, camcorder or other external equipment. ...• See pages 26 and 27 for external equipment connection. • Please read the relevant operation ...
...; Each time INPUT is for the signal type. POWER CDCD_ DISPLAY TV/DVD EJECT SLEEP VIEWMODE INPUT CDCD ®@@®@®0 • To protect equipment, always turn off the TV/DVD before connecting a VCR, Digital TV tuner, HDMI equipment, game console, camcorder or other external equipment. ...• See pages 26 and 27 for external equipment connection. • Please read the relevant operation ...
Operation Manual
Page 26
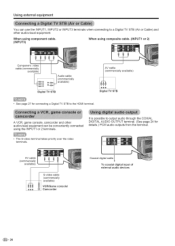
... connected using composite cable. (INPUT1 or 2) Component video cable (commercially available) Audio cable (commercially available) Digital TV STB AV cable (commercially available) @@@ Digital TV STB • See page 27 for details.) PCM audio outputs from the terminal. • The S-video terminal... (commercially available) VCR/Game Camcorder console/ Coaxial digital cable To coaxial digital input of external audio devices (_)= 26 It is possible to a Digital TV STB (Air or Cable) and other audiovisual equipment can use the INPUT1, INPUT2 or INPUT3 terminals when connecting ...
... connected using composite cable. (INPUT1 or 2) Component video cable (commercially available) Audio cable (commercially available) Digital TV STB AV cable (commercially available) @@@ Digital TV STB • See page 27 for details.) PCM audio outputs from the terminal. • The S-video terminal... (commercially available) VCR/Game Camcorder console/ Coaxial digital cable To coaxial digital input of external audio devices (_)= 26 It is possible to a Digital TV STB (Air or Cable) and other audiovisual equipment can use the INPUT1, INPUT2 or INPUT3 terminals when connecting ...


