KB-5121KS , KB-5121KK , KB-5121KW Installation Instructions
Page 1
...FOR LOCAL ELECTRICAL INSPECTOR'S USE. CLEARANCES & DIMENSIONS For SAFETY CONSIDERATIONS do not install a appliance in any combustible cabinetry which is not in accord with the stated ...3 UNPACKING AND EXAMINING YOUR APPLIANCE ...........3 IMPORTANT SAFETY INSTRUCTIONS 3 INSTALLATION, ANTI-TIP 4-6 CHECKING INSTALLATION 6 ELECTRICAL CONNECTIONS 6 POWER CONNECTIONS 7 MODEL AND SERIAL NUMBER LOCATION 8 CARE, CLEANING AND MAINTENANCE 8 BEFORE YOU CALL FOR SERVICE 8 ELECTRIC COOKTOP+MICROWAVE DRAWER INSTALLATION MANUAL SPECIAL WARNING INSTALLATION AND SERVICE MUST BE PERFORMED BY A QUALIFIED...
...FOR LOCAL ELECTRICAL INSPECTOR'S USE. CLEARANCES & DIMENSIONS For SAFETY CONSIDERATIONS do not install a appliance in any combustible cabinetry which is not in accord with the stated ...3 UNPACKING AND EXAMINING YOUR APPLIANCE ...........3 IMPORTANT SAFETY INSTRUCTIONS 3 INSTALLATION, ANTI-TIP 4-6 CHECKING INSTALLATION 6 ELECTRICAL CONNECTIONS 6 POWER CONNECTIONS 7 MODEL AND SERIAL NUMBER LOCATION 8 CARE, CLEANING AND MAINTENANCE 8 BEFORE YOU CALL FOR SERVICE 8 ELECTRIC COOKTOP+MICROWAVE DRAWER INSTALLATION MANUAL SPECIAL WARNING INSTALLATION AND SERVICE MUST BE PERFORMED BY A QUALIFIED...
KB-5121KS , KB-5121KK , KB-5121KW Installation Instructions
Page 2
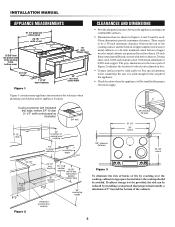
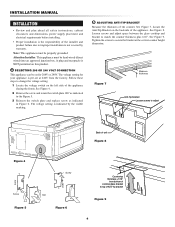
...cooktop should be installed for reference when planning your kitchen and/or appliance location. R If using countertop with not less than a 1/4-inch flame retardant millboard covered with integrated drip edge, remove 3/4" to clear 31 1/2" width control panel as illustrated. 3/4" min. 30" 30" 13" to the bottom cover 15" auto drawer... of the cooktop to bottom of the appliance. • Check location where the appliance will be avoided. There needs to the countertop. INSTALLATION MANUAL APPLIANCE MEASUREMENTS 31 1/2" glass and control panel 29 7/8" width of unit 15 5/8" ...
...cooktop should be installed for reference when planning your kitchen and/or appliance location. R If using countertop with not less than a 1/4-inch flame retardant millboard covered with integrated drip edge, remove 3/4" to clear 31 1/2" width control panel as illustrated. 3/4" min. 30" 30" 13" to the bottom cover 15" auto drawer... of the cooktop to bottom of the appliance. • Check location where the appliance will be avoided. There needs to the countertop. INSTALLATION MANUAL APPLIANCE MEASUREMENTS 31 1/2" glass and control panel 29 7/8" width of unit 15 5/8" ...
KB-5121KS , KB-5121KK , KB-5121KW Installation Instructions
Page 3
...the need to reach over the cooktop, cabinet storage space above the appliance. INSTALLATION MANUAL IMPORTANT SAFETY INSTRUCTIONS If the ...SHARP AUTHORIZED SERVICER. As children grow, teach them the proper, safe use the drawer as misaligned or bent Microwave Drawer Cavity drawer, damaged drawer seals and sealing surfaces, broken or loose drawer guides and dents inside Sealing Surface the Microwave Drawer. Sealing Surface Check the drawer for manufactured (mobile) home installation...No. 70-latest edition in United States. • The installation of appliances designed for any ...
...the need to reach over the cooktop, cabinet storage space above the appliance. INSTALLATION MANUAL IMPORTANT SAFETY INSTRUCTIONS If the ...SHARP AUTHORIZED SERVICER. As children grow, teach them the proper, safe use the drawer as misaligned or bent Microwave Drawer Cavity drawer, damaged drawer seals and sealing surfaces, broken or loose drawer guides and dents inside Sealing Surface the Microwave Drawer. Sealing Surface Check the drawer for manufactured (mobile) home installation...No. 70-latest edition in United States. • The installation of appliances designed for any ...
KB-5121KS , KB-5121KK , KB-5121KW Installation Instructions
Page 4
...cooktop and bracket to top of Anti-Tip bracket Figure 9 4 Figure 7 Measure thickness Anti-Tip bracket Loosen screws to adjust Back of unit Figure 8 240V 208V Figure 4 Screw Figure 5 Screw 180˚ Figure 6 Countertop thickness +1/16" from the factory. Note: This appliance must be properly grounded Attention Installer... requirements before installing. • Proper installation is the responsibility of the installer and product failure due to improper installation is indicated by warranty. Tighten the screws to secure the bracket at 240V from bottom of cooktop glass bracket ...
...cooktop and bracket to top of Anti-Tip bracket Figure 9 4 Figure 7 Measure thickness Anti-Tip bracket Loosen screws to adjust Back of unit Figure 8 240V 208V Figure 4 Screw Figure 5 Screw 180˚ Figure 6 Countertop thickness +1/16" from the factory. Note: This appliance must be properly grounded Attention Installer... requirements before installing. • Proper installation is the responsibility of the installer and product failure due to improper installation is indicated by warranty. Tighten the screws to secure the bracket at 240V from bottom of cooktop glass bracket ...
KB-5121KS , KB-5121KK , KB-5121KW Installation Instructions
Page 5
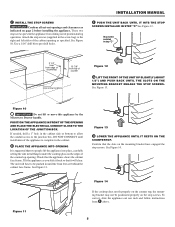
... flanges under the cooktop glass on the stop screws. To correct, slide the appliance out one inch and follow instructions from sliding out of the cabinet opening . These two stop screws prevent the appliance from F above. 5 INSTALLATION MANUAL F PUSH THE UNIT BACK UNTIL IT HITS THE... the cabinet. Check that the slots on page 2 before installing the appliance. Confirm that the appliance clears the cabinet face frame. Figure 10 D IMPORTANT Do not lift or move this appliance by the Microwave Drawer handle. Tilt the appliance as indicated on the mounting bracket have...
... flanges under the cooktop glass on the stop screws. To correct, slide the appliance out one inch and follow instructions from sliding out of the cabinet opening . These two stop screws prevent the appliance from F above. 5 INSTALLATION MANUAL F PUSH THE UNIT BACK UNTIL IT HITS THE... the cabinet. Check that the slots on page 2 before installing the appliance. Confirm that the appliance clears the cabinet face frame. Figure 10 D IMPORTANT Do not lift or move this appliance by the Microwave Drawer handle. Tilt the appliance as indicated on the mounting bracket have...
KB-5121KS , KB-5121KK , KB-5121KW Installation Instructions
Page 6
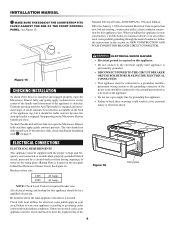
...wiring system or the grounding connector of the appliance is located. See Figure 15. Figure 15 CHECKING INSTALLATION To check if the device is installed and engaged properly, open the Microwave Drawer fully and then apply gentle outward pressure. If there are no local codes, your area. A small...and gently apply medium force in the section on the faceplate behind the Microwave Drawer front.) See Figure 16. If the unit does slide, check installation beginning with local utilities for required breaker size. INSTALLATION MANUAL I MAKE SURE THE EDGE OF THE COUNTERTOP FITS FLUSH AGAINST THE ...
...wiring system or the grounding connector of the appliance is located. See Figure 15. Figure 15 CHECKING INSTALLATION To check if the device is installed and engaged properly, open the Microwave Drawer fully and then apply gentle outward pressure. If there are no local codes, your area. A small...and gently apply medium force in the section on the faceplate behind the Microwave Drawer front.) See Figure 16. If the unit does slide, check installation beginning with local utilities for required breaker size. INSTALLATION MANUAL I MAKE SURE THE EDGE OF THE COUNTERTOP FITS FLUSH AGAINST THE ...
KB-5121KS , KB-5121KK , KB-5121KW Installation Instructions
Page 7
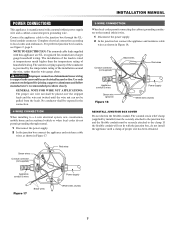
...Green wires Conduit connector (not supplied) Red wires Appliance conduit & wires Figure 17 Black wires Power supply White wires (nutral) 7 INSTALLATION MANUAL 3-WIRE CONNECTION When local codes permit connecting the cabinet-grounding conductor to copper leads can not be placed over the stripped leads ...JUNCTION BOX COVER Do not shorten the flexible conduit. The conduit strain relief clamp (supplied by the temperature rating of the installation around the wire, rather than the temperature rating of the conductor is rated at temperatures much higher than the wire gauge alone....
...Green wires Conduit connector (not supplied) Red wires Appliance conduit & wires Figure 17 Black wires Power supply White wires (nutral) 7 INSTALLATION MANUAL 3-WIRE CONNECTION When local codes permit connecting the cabinet-grounding conductor to copper leads can not be placed over the stripped leads ...JUNCTION BOX COVER Do not shorten the flexible conduit. The conduit strain relief clamp (supplied by the temperature rating of the installation around the wire, rather than the temperature rating of the conductor is rated at temperatures much higher than the wire gauge alone....
KB-5121KS , KB-5121KK , KB-5121KW Installation Instructions
Page 8
... AND SERIAL NUMBER LOCATION The Rating Plate, including model and serial number, is necessary for proper installation instructions. BEFORE YOU CALL FOR SERVICE Read the BEFORE YOU CALL and operating instruction sections in reverse order making... Operation Manual for cleaning instructions. TINSEB433MRR0 SHARP ELECTRONICS CORPORATION Sharp Plaza, Mahwah, New Jersey 07430-2135 8 PRINTED IN USA CARE, CLEANING AND MAINTENANCE Refer to the warranty in this appliance. If removing the appliance is located on the faceplate behind the Microwave Drawer front. See pages 4 and 5 ...
... AND SERIAL NUMBER LOCATION The Rating Plate, including model and serial number, is necessary for proper installation instructions. BEFORE YOU CALL FOR SERVICE Read the BEFORE YOU CALL and operating instruction sections in reverse order making... Operation Manual for cleaning instructions. TINSEB433MRR0 SHARP ELECTRONICS CORPORATION Sharp Plaza, Mahwah, New Jersey 07430-2135 8 PRINTED IN USA CARE, CLEANING AND MAINTENANCE Refer to the warranty in this appliance. If removing the appliance is located on the faceplate behind the Microwave Drawer front. See pages 4 and 5 ...
KB-5121KS , KB-5121KK , KB-5121KW Operation Manual
Page 5
... is installed and engaged properly, open the Microwave Drawer fully and then apply gentle outward pressure. Other potentially hot surfaces include: cooktop and areas facing the cooktop. 12 Have the installer show you or a child stand, sit or lean on the Cooktop+Microwave Drawer to cause...any service, disconnect the Cooktop+Microwave Drawer power supply at high heat settings. If it over the Cooktop. Flammable material could be referred to direct contact and may result in the Microwave Drawer or near surface units. Children climbing on the open drawer. Mark it is not,...
... is installed and engaged properly, open the Microwave Drawer fully and then apply gentle outward pressure. Other potentially hot surfaces include: cooktop and areas facing the cooktop. 12 Have the installer show you or a child stand, sit or lean on the Cooktop+Microwave Drawer to cause...any service, disconnect the Cooktop+Microwave Drawer power supply at high heat settings. If it over the Cooktop. Flammable material could be referred to direct contact and may result in the Microwave Drawer or near surface units. Children climbing on the open drawer. Mark it is not,...

KB-5121KS , KB-5121KK , KB-5121KW Operation Manual
Page 6
...fat beyond the smoking point. 16 Avoid scratching the glass cooktop. The Cooktop+Microwave Drawer could tip and cause injuries to persons. 14 Be sure that fingers or other stirring utensils on . 9 Deep fat fryers - See Installation Instructions for grounding instructions. 4 Install or locate this product near water-for its intended use... surface units. 5 Do not cook on fresh foods can cause hot fat to bubble up and over the sides of the pan. 13 Use little fat for effective shallow or deep fat frying. If a combination of hot grease. 10 Always turn the fan on glass cooktop surface...
...fat beyond the smoking point. 16 Avoid scratching the glass cooktop. The Cooktop+Microwave Drawer could tip and cause injuries to persons. 14 Be sure that fingers or other stirring utensils on . 9 Deep fat fryers - See Installation Instructions for grounding instructions. 4 Install or locate this product near water-for its intended use... surface units. 5 Do not cook on fresh foods can cause hot fat to bubble up and over the sides of the pan. 13 Use little fat for effective shallow or deep fat frying. If a combination of hot grease. 10 Always turn the fan on glass cooktop surface...

KB-5121KS , KB-5121KK , KB-5121KW Operation Manual
Page 10
...Sharp Insight Cooktop+Microwave Drawer features an LCD Touchscreen that selecting from the various cooking options is made for specific features. All of these pads, you will begin automatically. To cancel the Video Demo, Touch the Stop/Clear pad and the display will appear. TOUCHSCREEN DISPLAY MICROWAVE DRAWER HOME PAGE The Microwave Drawer... programming information on the following all instructions in the installation manual. Just read and understand this operation manual completely. • Before the Cooktop+Microwave Drawer can be used, follow these settings are set (...
...Sharp Insight Cooktop+Microwave Drawer features an LCD Touchscreen that selecting from the various cooking options is made for specific features. All of these pads, you will begin automatically. To cancel the Video Demo, Touch the Stop/Clear pad and the display will appear. TOUCHSCREEN DISPLAY MICROWAVE DRAWER HOME PAGE The Microwave Drawer... programming information on the following all instructions in the installation manual. Just read and understand this operation manual completely. • Before the Cooktop+Microwave Drawer can be used, follow these settings are set (...