HT-SL70 | HT-SL75 Operation Manual
Page 3
... or theft, please record below the model number and serial number which can radiate radio frequency energy and, if not installed and used in a residential installation. However, there is a U.S. Special Notes CAUTION: TO REDUCE THE RISK OF ELECTRIC SHOCK, DO NOT REMOVE COVER ...help. ENERGY STAR® is no guarantee that to constitute a risk of important operating and maintenance (servicing) instructions in a particular installation. HDMI, the HDMI Logo, and High-Definition Multimedia Interface are located on a circuit different from that interference will not occur in...
... or theft, please record below the model number and serial number which can radiate radio frequency energy and, if not installed and used in a residential installation. However, there is a U.S. Special Notes CAUTION: TO REDUCE THE RISK OF ELECTRIC SHOCK, DO NOT REMOVE COVER ...help. ENERGY STAR® is no guarantee that to constitute a risk of important operating and maintenance (servicing) instructions in a particular installation. HDMI, the HDMI Logo, and High-Definition Multimedia Interface are located on a circuit different from that interference will not occur in...
HT-SL70 | HT-SL75 Operation Manual
Page 4
... Information 15) Power Sources - Upon completion of any kind into this product, please read the following instructions when installing, operating and cleaning the product. When installing an outside antenna system should not be sure to follow the manufacturer's instructions. Do not place the product on ... may result in damage and will often require extensive work by the manufacturer or sold with them might be sure to install the product according to qualified service personnel. Important Safety Instructions Electricity is used to perform many useful functions, but it can...
... Information 15) Power Sources - Upon completion of any kind into this product, please read the following instructions when installing, operating and cleaning the product. When installing an outside antenna system should not be sure to follow the manufacturer's instructions. Do not place the product on ... may result in damage and will often require extensive work by the manufacturer or sold with them might be sure to install the product according to qualified service personnel. Important Safety Instructions Electricity is used to perform many useful functions, but it can...
HT-SL70 | HT-SL75 Operation Manual
Page 8
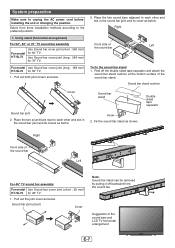
... to unplug the AC power cord before installing the unit or changing the position. Right Front side of the sound bar stand. Fix the sound bar stand as below. Sound bar stand cushion Cover Sound bar stand Double sided tape separator Sound bar joint 2. HT-SL75 Use Sound bar cover joint (long : ... Use Sound bar cover joint (short : 369 mm) For model for 52" TV. 1. For model Use Sound bar cover joint (long : 188 mm) HT-SL70 for 60" TV. Peel off backward from three installation methods according to each other and slot in the sound bar joint and its cover as below. E-7
... to unplug the AC power cord before installing the unit or changing the position. Right Front side of the sound bar stand. Fix the sound bar stand as below. Sound bar stand cushion Cover Sound bar stand Double sided tape separator Sound bar joint 2. HT-SL75 Use Sound bar cover joint (long : ... Use Sound bar cover joint (short : 369 mm) For model for 52" TV. 1. For model Use Sound bar cover joint (long : 188 mm) HT-SL70 for 60" TV. Peel off backward from three installation methods according to each other and slot in the sound bar joint and its cover as below. E-7
HT-SL70 | HT-SL75 Operation Manual
Page 10
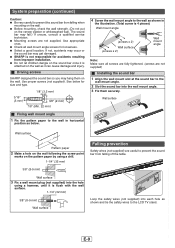
...(screws are not supplied. See below for looseness. ● Select a good location. Driving screws SHARP designed the sound bar so you may fall.) If unsure, consult a qualified service technician. ● Mounting screws are not supplied) Installing the sound bar 1 Align the wall mount slot at the sound bar to the wall... mount angle. 2 Slot the sound bar into each hole as shown and tie the safety wires to prevent the sound bar from improper installation. ● Do not let children dangle on the sound bar once it is attached on the wall as below. 4 Screw the wall mount ...
...(screws are not supplied. See below for looseness. ● Select a good location. Driving screws SHARP designed the sound bar so you may fall.) If unsure, consult a qualified service technician. ● Mounting screws are not supplied) Installing the sound bar 1 Align the wall mount slot at the sound bar to the wall... mount angle. 2 Slot the sound bar into each hole as shown and tie the safety wires to prevent the sound bar from improper installation. ● Do not let children dangle on the sound bar once it is attached on the wall as below. 4 Screw the wall mount ...
HT-SL70 | HT-SL75 Operation Manual
Page 11
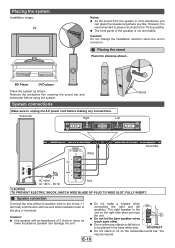
... face the unit. ● Do not let the bare speaker wires touch each other. ● Do not allow any connections. Placing the system Installation image: TV Notes: ● As the sound from the system is omni-directional, you can damage the unit. ● Do not make a... mistake when connecting the right and left speakers. Caution: Do not change the installation direction when the unit is turned on the subwoofer/sound bar. System connections SUBWOOFER SYSTEM ACTIVE SUBWOOFER SYSTEM HT-SL70 ACTIVE SUBHWT-OSLO7F0ER SYSTEM Make sure to unplug the AC power cord before using ...
... face the unit. ● Do not let the bare speaker wires touch each other. ● Do not allow any connections. Placing the system Installation image: TV Notes: ● As the sound from the system is omni-directional, you can damage the unit. ● Do not make a... mistake when connecting the right and left speakers. Caution: Do not change the installation direction when the unit is turned on the subwoofer/sound bar. System connections SUBWOOFER SYSTEM ACTIVE SUBWOOFER SYSTEM HT-SL70 ACTIVE SUBHWT-OSLO7F0ER SYSTEM Make sure to unplug the AC power cord before using ...

