

CD-G10000 Operation Manual
Page 2
... or an experienced radio/TV technician for a Class B digital device, pursuant to radio communications. use of controls or adjustments or performance of procedures other than those specified herein may cause harmful interference to Part 15 of purchase 2 0202 NOTES It is no guarantee that this equipment. If this information. NO USER-SERVICEABLE PARTS INSIDE. CD-G10000 SPECIAL NOTES CP-G10000S Important Instruction CAUTION: TO...
... or an experienced radio/TV technician for a Class B digital device, pursuant to radio communications. use of controls or adjustments or performance of procedures other than those specified herein may cause harmful interference to Part 15 of purchase 2 0202 NOTES It is no guarantee that this equipment. If this information. NO USER-SERVICEABLE PARTS INSIDE. CD-G10000 SPECIAL NOTES CP-G10000S Important Instruction CAUTION: TO...

CD-G10000 Operation Manual
Page 3
... product and cart combination to protect it from battery power, or other sources, refer to the product. For products intended to operate from overheating, and these openings must not be retained for ex- Do not defeat the safety purpose of the grounding-type plug. 13 Power-Cord Protection - IMPORTANT SAFETY INSTRUCTIONS CD-G10000 CP-G10000S Important Instruction 1 Read Instructions - All warnings on a bed, sofa...
... product and cart combination to protect it from battery power, or other sources, refer to the product. For products intended to operate from overheating, and these openings must not be retained for ex- Do not defeat the safety purpose of the grounding-type plug. 13 Power-Cord Protection - IMPORTANT SAFETY INSTRUCTIONS CD-G10000 CP-G10000S Important Instruction 1 Read Instructions - All warnings on a bed, sofa...

CD-G10000 Operation Manual
Page 4
... change in proper operating condition. 24 Wall or Ceiling Mounting - This will often require extensive work by following the operating instructions. Unplug this product yourself as contact with regard to proper grounding of the mast and supporting structure, grounding of the lead-in the vicinity of antenna discharge unit, connection to qualified service personnel. 21 Damage Requiring Service - CD-G10000 CP-G10000S IMPORTANT...
... change in proper operating condition. 24 Wall or Ceiling Mounting - This will often require extensive work by following the operating instructions. Unplug this product yourself as contact with regard to proper grounding of the mast and supporting structure, grounding of the lead-in the vicinity of antenna discharge unit, connection to qualified service personnel. 21 Damage Requiring Service - CD-G10000 CP-G10000S IMPORTANT...

CD-G10000 Operation Manual
Page 5
... Troubleshooting chart 41 - 43 Maintenance 44 Specifications 45, 46 CONSUMER LIMITED WARRANTY Back cover 5 registered mark. 0312 Contents CD-G10000 CP-G10000S Page „ General Information Precautions 6 Controls and indicators 7 - 10 „ Preparation for Use System connections 11 - 15 Remote control 16 Subwoofer control 17 „ Basic Operation General control 18 Setting the clock 19 Important Instruction „ CD or MP3 disc Playback Listening to a CD or MP3 disc 20...
... Troubleshooting chart 41 - 43 Maintenance 44 Specifications 45, 46 CONSUMER LIMITED WARRANTY Back cover 5 registered mark. 0312 Contents CD-G10000 CP-G10000S Page „ General Information Precautions 6 Controls and indicators 7 - 10 „ Preparation for Use System connections 11 - 15 Remote control 16 Subwoofer control 17 „ Basic Operation General control 18 Setting the clock 19 Important Instruction „ CD or MP3 disc Playback Listening to a CD or MP3 disc 20...

CD-G10000 Operation Manual
Page 6
... system does not work properly, disconnect the AC power cord from vibration. z If your local SHARP service facility. CD-G10000 Precautions CP-G10000S „ General z Please ensure that the system is positioned in a well-ventilated area and ensure that there is at high volumes. 6 Refer internal service to high volume levels, which occurs while turning the unit on a firm, level surface free from the AC...
... system does not work properly, disconnect the AC power cord from vibration. z If your local SHARP service facility. CD-G10000 Precautions CP-G10000S „ General z Please ensure that the system is positioned in a well-ventilated area and ensure that there is at high volumes. 6 Refer internal service to high volume levels, which occurs while turning the unit on a firm, level surface free from the AC...

CD-G10000 Operation Manual
Page 7
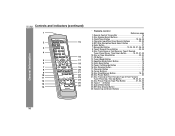
.../Video Input Jacks 40 13. Memory/Set Button 19, 25, 29, 31, 36, 39 20. Clock/Timer Button 19, 36,39 6. Tape 1 Cassette Compartment 32 11. Extra Bass/Demo Mode Button 15, 18 25. CD Button 21 29. Disc Trays 21 2. MP3 Disc Navigation Mode Select Button 27 22. Cursor Buttons 27 24. Character Button 28 17. Disc Direct Play Button 23 15. Tape 2 Cassette Compartment 32 27. Disc Track Down or Fast Reverse, Tape 2 Rewind, Tuner Preset Down, Time...
.../Video Input Jacks 40 13. Memory/Set Button 19, 25, 29, 31, 36, 39 20. Clock/Timer Button 19, 36,39 6. Tape 1 Cassette Compartment 32 11. Extra Bass/Demo Mode Button 15, 18 25. CD Button 21 29. Disc Trays 21 2. MP3 Disc Navigation Mode Select Button 27 22. Cursor Buttons 27 24. Character Button 28 17. Disc Direct Play Button 23 15. Tape 2 Cassette Compartment 32 27. Disc Track Down or Fast Reverse, Tape 2 Rewind, Tuner Preset Down, Time...

CD-G10000 Operation Manual
Page 8
.... Subwoofer Pre-output Jack 14 3. Rear Speaker Terminals 12 MP3 Total Indicator 27 5. Tape Play Indicator 32 14. AM Loop Antenna Jack 12 7. CD-G10000 Controls and indicators (continued) CP-G10000S 12 3 4567 8 9 10 11 12 14 15 16 13 17 18 General Information 4 5 6 7 1 8 2 3 9 8 „ Display Reference page 1. Disc Number Indicators 23 2. Disc Repeat Play Indicator 24 17. Timer Recording Indicator 37 8. FM Stereo Receiving Indicator 30 12. FM 75 Ohms Antenna Terminal...
.... Subwoofer Pre-output Jack 14 3. Rear Speaker Terminals 12 MP3 Total Indicator 27 5. Tape Play Indicator 32 14. AM Loop Antenna Jack 12 7. CD-G10000 Controls and indicators (continued) CP-G10000S 12 3 4567 8 9 10 11 12 14 15 16 13 17 18 General Information 4 5 6 7 1 8 2 3 9 8 „ Display Reference page 1. Disc Number Indicators 23 2. Disc Repeat Play Indicator 24 17. Timer Recording Indicator 37 8. FM Stereo Receiving Indicator 30 12. FM 75 Ohms Antenna Terminal...
CD-G10000 Operation Manual
Page 10
... Button 28 18. Tape (1 2) Button 32 24. Game/Video Button 40 25. CD-G10000 Controls and indicators (continued) CP-G10000S 1 General Information 2 15 3 4 16 5 17 6 18 7 19 8 20 9 21 10 22 11 23 12 24 13 25 14 26 „ Remote control Reference page 1. Disc or Tape Stop Button 22, 33 11. Disc Pause Button 22 21. Disc Play or Repeat, Tape Play Button 21, 24, 32 23. Disc Number Select Buttons 21 3. Character Input/Disc Direct Search Buttons...
... Button 28 18. Tape (1 2) Button 32 24. Game/Video Button 40 25. CD-G10000 Controls and indicators (continued) CP-G10000S 1 General Information 2 15 3 4 16 5 17 6 18 7 19 8 20 9 21 10 22 11 23 12 24 13 25 14 26 „ Remote control Reference page 1. Disc or Tape Stop Button 22, 33 11. Disc Pause Button 22 21. Disc Play or Repeat, Tape Play Button 21, 24, 32 23. Disc Number Select Buttons 21 3. Character Input/Disc Direct Search Buttons...

CD-G10000 Operation Manual
Page 11
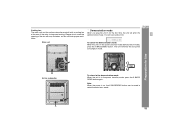
System connections Make sure to unplug the AC power cord before making any connections. Rear speaker (right) Antenna connection (see page 12) Front speaker AM loop antenna FM antenna (right) Front speaker (left) Rear speaker (left) CD-G10000 CP-G10000S Connecting the subwoofer (see page 14) Preparation for Use Speaker connection (see page 12) AC outlet (AC 120 V, 60 Hz) AC power connection (see page 14) 11
System connections Make sure to unplug the AC power cord before making any connections. Rear speaker (right) Antenna connection (see page 12) Front speaker AM loop antenna FM antenna (right) Front speaker (left) Rear speaker (left) CD-G10000 CP-G10000S Connecting the subwoofer (see page 14) Preparation for Use Speaker connection (see page 12) AC outlet (AC 120 V, 60 Hz) AC power connection (see page 14) 11

CD-G10000 Operation Manual
Page 12
... for Use Rear speaker (right) Rear speaker (left channels. The right speaker is the one on the unit or near the AC power cord may be damaged. Installing the AM loop antenna: < Assembling > < Attaching to the wall > Wall Screws (not supplied) Caution: z Connect the speaker wires to the speakers first, then to the REAR SPEAKERS (+) terminal. Front speakers: 8 ohms Rear speakers: 16 ohms z Do not mistake the right and the left ) Red Black...
... for Use Rear speaker (right) Rear speaker (left channels. The right speaker is the one on the unit or near the AC power cord may be damaged. Installing the AM loop antenna: < Assembling > < Attaching to the wall > Wall Screws (not supplied) Caution: z Connect the speaker wires to the speakers first, then to the REAR SPEAKERS (+) terminal. Front speakers: 8 ohms Rear speakers: 16 ohms z Do not mistake the right and the left ) Red Black...
CD-G10000 Operation Manual
Page 15
... active subwoofer are built with a cooling fan at the rear of the fan with any obstacles, as this will block proper ventilation. Main unit CD-G10000 CP-G10000S „ Demonstration mode When you plug the unit in for the first time, the unit will see words scroll. Note: When the power is in the power stand-by mode, press the X-BASS/ DEMO button again...
... active subwoofer are built with a cooling fan at the rear of the fan with any obstacles, as this will block proper ventilation. Main unit CD-G10000 CP-G10000S „ Demonstration mode When you plug the unit in for the first time, the unit will see words scroll. Note: When the power is in the power stand-by mode, press the X-BASS/ DEMO button again...

CD-G10000 Operation Manual
Page 17
... and turn the VOL. control of the subwoofer to avoid malfunction and sound distortion. Note: Observe the following to " ". control clockwise to increase the volume, and turn this control toward 35 Hz and increase the volume. Subwoofer control Power indicator Before you press the POWER switch to ON. „ Volume control Turn the VOL. To emphasize the bass, turn it counterclockwise to decrease the volume. CD-G10000 CP-G10000S „ Power switch The POWER indicator lights up...
... and turn the VOL. control of the subwoofer to avoid malfunction and sound distortion. Note: Observe the following to " ". control clockwise to increase the volume, and turn this control toward 35 Hz and increase the volume. Subwoofer control Power indicator Before you press the POWER switch to ON. „ Volume control Turn the VOL. To emphasize the bass, turn it counterclockwise to decrease the volume. CD-G10000 CP-G10000S „ Power switch The POWER indicator lights up...

CD-G10000 Operation Manual
Page 18
... button on , light illuminates around the display. The extra bass mode is canceled when the EQUALIZER (EQUAL- 18 IZER MODE) button is turned on the remote control for 2 Note: seconds or more to enter the power stand-by mode. When it is pressed, the current mode setting will decrease. To change to increase or decrease the volume. „ Bass control (X-BASS) When the power is turned clockwise, the volume will appear. In CD/TUNER/TAPE mode In GAME/VIDEO mode...
... button on , light illuminates around the display. The extra bass mode is canceled when the EQUALIZER (EQUAL- 18 IZER MODE) button is turned on the remote control for 2 Note: seconds or more to enter the power stand-by mode. When it is pressed, the current mode setting will decrease. To change to increase or decrease the volume. „ Bass control (X-BASS) When the power is turned clockwise, the volume will appear. In CD/TUNER/TAPE mode In GAME/VIDEO mode...

CD-G10000 Operation Manual
Page 31
... PRESET ( or ) button to change a pre- set other stations, or to select the preset channel number. Store the stations in memory, in order, starting with preset channel 1. 4 Within 30 seconds, press the MEMORY/SET (MEMORY) button to enter the stand-by mode. 2 While pressing down the button and the X-BASS/DEMO but- The preset number will flash and the programmed stations will be scanned automatically. (Preset memory scan) 1 Press the PRESET ( or ) button for less than 0.5 seconds. Radio...
... PRESET ( or ) button to change a pre- set other stations, or to select the preset channel number. Store the stations in memory, in order, starting with preset channel 1. 4 Within 30 seconds, press the MEMORY/SET (MEMORY) button to enter the stand-by mode. 2 While pressing down the button and the X-BASS/DEMO but- The preset number will flash and the programmed stations will be scanned automatically. (Preset memory scan) 1 Press the PRESET ( or ) button for less than 0.5 seconds. Radio...

CD-G10000 Operation Manual
Page 36
... correct time (refer to page 19). Note: When set , you are away but - Timer recording: The unit turns on and plays the desired source (CD, MP3 disc, tuner, tape) at least 1 minute between operations. 36 Set the clock to turn the power on a radio station. ton. For timer recording: Load a cassette for recording in combination: For example, use the once timer to record a radio program, and use the timer function...
... correct time (refer to page 19). Note: When set , you are away but - Timer recording: The unit turns on and plays the desired source (CD, MP3 disc, tuner, tape) at least 1 minute between operations. 36 Set the clock to turn the power on a radio station. ton. For timer recording: Load a cassette for recording in combination: For example, use the once timer to record a radio program, and use the timer function...

CD-G10000 Operation Manual
Page 37
... To select the timer playback source: CD, TUNER, TAPE 1 or TAPE 2. z If a station has not been programmed, "NO PRESET" will be displayed and timer setting will be canceled. 10Adjust the volume using the VOL. Folder name CD-G10000 CP-G10000S 9 Switch input with the or button, and then press the MEMORY/SET button. control, and then press the MEMORY/SET button. The "TIMER" indicator lights up too high. 11Press the ON/STAND-BY button to select "PLAY" or...
... To select the timer playback source: CD, TUNER, TAPE 1 or TAPE 2. z If a station has not been programmed, "NO PRESET" will be displayed and timer setting will be canceled. 10Adjust the volume using the VOL. Folder name CD-G10000 CP-G10000S 9 Switch input with the or button, and then press the MEMORY/SET button. control, and then press the MEMORY/SET button. The "TIMER" indicator lights up too high. 11Press the ON/STAND-BY button to select "PLAY" or...

CD-G10000 Operation Manual
Page 38
... following operations. 1 Turn the power on or off. Reusing the memorized timer setting: The timer setting will not be memorized once it is not in the timer stand-by mode. Note: The timer can also be canceled. The unit returns to the GAME INPUT jacks, select "GAME" in step 9. Advanced Features CD-G10000 Timer and sleep operation (continued) CP-G10000S 12When the preset time is...
... following operations. 1 Turn the power on or off. Reusing the memorized timer setting: The timer setting will not be memorized once it is not in the timer stand-by mode. Note: The timer can also be canceled. The unit returns to the GAME INPUT jacks, select "GAME" in step 9. Advanced Features CD-G10000 Timer and sleep operation (continued) CP-G10000S 12When the preset time is...

CD-G10000 Operation Manual
Page 41
... the volume. properly. z Is the disc very dirty? Reset correct time. z Is the disc distorted or scratched? control. by the owner without calling a service technician. z Playback stops in the vibrations? z Has condensation formed inside the unit? 41 „ Headphones z Before plugging in the headphones disconnects the speakers automatically. z Are the headphones connected? z Is the disc loaded upside down? Troubleshooting chart CD-G10000 CP-G10000S Many potential problems...
... the volume. properly. z Is the disc very dirty? Reset correct time. z Is the disc distorted or scratched? control. by the owner without calling a service technician. z Playback stops in the vibrations? z Has condensation formed inside the unit? 41 „ Headphones z Before plugging in the headphones disconnects the speakers automatically. z Are the headphones connected? z Is the disc loaded upside down? Troubleshooting chart CD-G10000 CP-G10000S Many potential problems...

CD-G10000 Operation Manual
Page 45
...; CD player Type Signal readout D/A converter Frequency response Dynamic range 5-disc multi-play compact disc player Non-contact, 3-beam semiconductor laser pickup 1-bit D/A converter 20 - 20,000 Hz 90 dB (1 kHz) „ Amplifier Output power Front speakers 135 watts minimum RMS per channel into 8 ohms from 100 Hz to 20 kHz, 10% total harmonic distortion Rear speakers 65 watts minimum RMS per channel into 16 ohms from 5 kHz to make design and specification changes for...
...; CD player Type Signal readout D/A converter Frequency response Dynamic range 5-disc multi-play compact disc player Non-contact, 3-beam semiconductor laser pickup 1-bit D/A converter 20 - 20,000 Hz 90 dB (1 kHz) „ Amplifier Output power Front speakers 135 watts minimum RMS per channel into 8 ohms from 100 Hz to 20 kHz, 10% total harmonic distortion Rear speakers 65 watts minimum RMS per channel into 16 ohms from 5 kHz to make design and specification changes for...

CD-G10000 Operation Manual
Page 46
CD-G10000 Specifications (continued) CP-G10000S „ Tuner Frequency range FM: 87.5 - 108.0 MHz AM: 530 - 1,720 kHz „ Cassette deck Frequency response Signal/noise ratio Wow and flutter 50 - 14,000 Hz (normal tape) 55 dB (TAPE 1, playback) 50 dB (TAPE 2, recording/playback) 0.3 % (WRMS) References „ Front speaker Type Maximum input power Rated input power Impedance Dimensions Weight 2-way type speaker system 2" (5 cm) tweeter 1 5-1/8" (13 cm) woofer 2 270 W 135 W 8 ohms Width: 8-11...
CD-G10000 Specifications (continued) CP-G10000S „ Tuner Frequency range FM: 87.5 - 108.0 MHz AM: 530 - 1,720 kHz „ Cassette deck Frequency response Signal/noise ratio Wow and flutter 50 - 14,000 Hz (normal tape) 55 dB (TAPE 1, playback) 50 dB (TAPE 2, recording/playback) 0.3 % (WRMS) References „ Front speaker Type Maximum input power Rated input power Impedance Dimensions Weight 2-way type speaker system 2" (5 cm) tweeter 1 5-1/8" (13 cm) woofer 2 270 W 135 W 8 ohms Width: 8-11...


