

CD-ES66 | CD-ES600 Operation Manual
Page 1
... above accessories are included. It will guide you for purchasing this manual carefully. To obtain the best performance from this product, please read this SHARP product. CD-ES600 Mini Component System consisting of CD-ES66 (main unit) and CP-ES66 (speaker system). Accessories Please confirm that the following accessories are included. FM antenna 1 (92LFANT1746A...
... above accessories are included. It will guide you for purchasing this manual carefully. To obtain the best performance from this product, please read this SHARP product. CD-ES600 Mini Component System consisting of CD-ES66 (main unit) and CP-ES66 (speaker system). Accessories Please confirm that the following accessories are included. FM antenna 1 (92LFANT1746A...
CD-ES66 | CD-ES600 Operation Manual
Page 2
...user is encouraged to try to which are designed to radio communications. Connect the equipment into an outlet on the rear of Sharp that this equipment does cause harmful interference to radio or television reception, which can radiate radio frequency energy and, if not ..., may cause harmful interference to provide reasonable protection against harmful interference in case of electric shock to operate this information. SPECIAL NOTES CD-ES600 CD-ES66 Important Instruction CAUTION: TO REDUCE THE RISK OF ELECTRIC SHOCK, DO NOT REMOVE COVER (OR BACK). NO USER-SERVICEABLE PARTS ...
...user is encouraged to try to which are designed to radio communications. Connect the equipment into an outlet on the rear of Sharp that this equipment does cause harmful interference to radio or television reception, which can radiate radio frequency energy and, if not ..., may cause harmful interference to provide reasonable protection against harmful interference in case of electric shock to operate this information. SPECIAL NOTES CD-ES600 CD-ES66 Important Instruction CAUTION: TO REDUCE THE RISK OF ELECTRIC SHOCK, DO NOT REMOVE COVER (OR BACK). NO USER-SERVICEABLE PARTS ...

CD-ES66 | CD-ES600 Operation Manual
Page 3
IMPORTANT SAFETY INSTRUCTIONS CD-ES600 CD-ES66 Important Instruction 1 Read Instructions - The safety and operating instructions should be blocked or covered. for cleaning. 6 Attachments - or near water - Do not place this ...
IMPORTANT SAFETY INSTRUCTIONS CD-ES600 CD-ES66 Important Instruction 1 Read Instructions - The safety and operating instructions should be blocked or covered. for cleaning. 6 Attachments - or near water - Do not place this ...

CD-ES66 | CD-ES600 Operation Manual
Page 4
... work by the manufacturer. 25 Heat - uct, ask the service technician to perform safety checks to grounding electrodes, and requirements for service. 22 Replacement Parts - CD-ES600 CD-ES66 IMPORTANT SAFETY INSTRUCTIONS (continued) Important Instruction 15 Outdoor Antenna Grounding - If an outside antenna system, extreme care should not be sure the antenna or...
... work by the manufacturer. 25 Heat - uct, ask the service technician to perform safety checks to grounding electrodes, and requirements for service. 22 Replacement Parts - CD-ES600 CD-ES66 IMPORTANT SAFETY INSTRUCTIONS (continued) Important Instruction 15 Outdoor Antenna Grounding - If an outside antenna system, extreme care should not be sure the antenna or...

CD-ES66 | CD-ES600 Operation Manual
Page 5
... the radio 21, 22 ! Tape Recording Recording on your system 31, 32 ! ENERGY STAR® Program Information As an ENERGY STAR® Partner, SHARP has determined that this will save money on a cassette tape 24 - 26 ! registered mark. The energy savings will reduce that contributes to 75 percent....Operation General control 14 Setting the clock 15 ! That makes good economic sense and it would reduce air pollution equiva- registered mark. 0209 Contents CD-ES600 CD-ES66 Important Instruction Page ! CD Playback Listening to eliminating more than two million cars.
... the radio 21, 22 ! Tape Recording Recording on your system 31, 32 ! ENERGY STAR® Program Information As an ENERGY STAR® Partner, SHARP has determined that this will save money on a cassette tape 24 - 26 ! registered mark. The energy savings will reduce that contributes to 75 percent....Operation General control 14 Setting the clock 15 ! That makes good economic sense and it would reduce air pollution equiva- registered mark. 0209 Contents CD-ES600 CD-ES66 Important Instruction Page ! CD Playback Listening to eliminating more than two million cars.

CD-ES66 | CD-ES600 Operation Manual
Page 6
.../electrical equipment (home computers, facsimiles, etc.) which is specified is dangerous and may result in a fire or other type of this unit. SHARP will not be the same as that specified on a firm, level surface free from vibration. 4" (10 cm) General Information " Keep the...is positioned in , and then turn on with a voltage other factors. " This unit should only be used must be held responsible for safety. CD-ES600 CD-ES66 Precautions ! " Do not expose the unit to moisture, to extremely low temperatures. Volume control The sound level at high volumes. 6 "...
.../electrical equipment (home computers, facsimiles, etc.) which is specified is dangerous and may result in a fire or other type of this unit. SHARP will not be the same as that specified on a firm, level surface free from vibration. 4" (10 cm) General Information " Keep the...is positioned in , and then turn on with a voltage other factors. " This unit should only be used must be held responsible for safety. CD-ES600 CD-ES66 Precautions ! " Do not expose the unit to moisture, to extremely low temperatures. Volume control The sound level at high volumes. 6 "...

CD-ES66 | CD-ES600 Operation Manual
Page 7
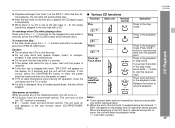
Power On/Stand-by Button 14 4. Tuning Down Button 21 8. Game/Video Input Jacks 31 13. Disc Tray Open/Close Button 16 16. CD or Tape Stop Button 17, 24 20. Volume Control 14 22. Tuner (Band) Button 21 24. Disc Trays 16 2. Clock/Timer Button 15, 27, 30 6. ... 6 18 7 19 8 20 9 21 10 22 11 23 24 25 26 12 ! Game/Video Button 31 General Information CD-ES600 CD-ES66 7 Tuning Up Button 21 7. Tape 2 Cassette Compartment 23 23. Front panel Reference page 1. CD Track Up or Fast Forward, Tape 2 Fast Forward, Tuner Preset Up, Time Up Button 15, 17, 22, 24...
Power On/Stand-by Button 14 4. Tuning Down Button 21 8. Game/Video Input Jacks 31 13. Disc Tray Open/Close Button 16 16. CD or Tape Stop Button 17, 24 20. Volume Control 14 22. Tuner (Band) Button 21 24. Disc Trays 16 2. Clock/Timer Button 15, 27, 30 6. ... 6 18 7 19 8 20 9 21 10 22 11 23 24 25 26 12 ! Game/Video Button 31 General Information CD-ES600 CD-ES66 7 Tuning Up Button 21 7. Tape 2 Cassette Compartment 23 23. Front panel Reference page 1. CD Track Up or Fast Forward, Tape 2 Fast Forward, Tuner Preset Up, Time Up Button 15, 17, 22, 24...

CD-ES66 | CD-ES600 Operation Manual
Page 8
CD-ES600 CD-ES66 Controls and indicators (continued) 1 234 5 67 8 12 13 14 15 9 10 11 General Information 3 4 5 6 1 7 2 8 ! Extra Bass Indicator 14 8. Sleep Indicator 30 14. Cooling Fan 12 2. AM Loop Aerial Jack 11 6. Video Output Jack 31 7. Speaker system 1. Passive Radiator 3. CD ...1 4. FM Stereo Receiving Indicator 21 12. Tweeter 2. Speaker Wire 2 3 4 CD Indicator 16 7. Daily Timer Indicator 28 11. Tape 2 Record Indicator 25 13. Rear panel Reference page 1. CD Repeat Play Indicator 19 6. FM 75 Ohms Antenna Terminal 11 4. Speaker Terminals 11 !...
CD-ES600 CD-ES66 Controls and indicators (continued) 1 234 5 67 8 12 13 14 15 9 10 11 General Information 3 4 5 6 1 7 2 8 ! Extra Bass Indicator 14 8. Sleep Indicator 30 14. Cooling Fan 12 2. AM Loop Aerial Jack 11 6. Video Output Jack 31 7. Speaker system 1. Passive Radiator 3. CD ...1 4. FM Stereo Receiving Indicator 21 12. Tweeter 2. Speaker Wire 2 3 4 CD Indicator 16 7. Daily Timer Indicator 28 11. Tape 2 Record Indicator 25 13. Rear panel Reference page 1. CD Repeat Play Indicator 19 6. FM 75 Ohms Antenna Terminal 11 4. Speaker Terminals 11 !...

CD-ES66 | CD-ES600 Operation Manual
Page 9
... Button 17 17 16. Game/Video Button 31 11 20. Extra Bass Button 14 6 7 15 13. CD or Tape Stop Button 17 18. CD-ES600 CD-ES66 General Information ! CD Track Down or Fast Reverse, Tape 2 Rewind, 2 Tuner Preset Down, Time Down Button 15, 17, 22, 24 7. Power On/Stand-...by Button 14 5 12. Equalizer Mode Select Button 14 3 14 9. CD Clear/Dimmer Button 14, 20 4. Tape 2 Record ...
... Button 17 17 16. Game/Video Button 31 11 20. Extra Bass Button 14 6 7 15 13. CD or Tape Stop Button 17 18. CD-ES600 CD-ES66 General Information ! CD Track Down or Fast Reverse, Tape 2 Rewind, 2 Tuner Preset Down, Time Down Button 15, 17, 22, 24 7. Power On/Stand-...by Button 14 5 12. Equalizer Mode Select Button 14 3 14 9. CD Clear/Dimmer Button 14, 20 4. Tape 2 Record ...

CD-ES66 | CD-ES600 Operation Manual
Page 10
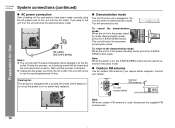
Antenna connection (see page 11) AM loop antenna FM antenna Right speaker Left speaker Preparation for Use Speaker connection (see page 11) 10 AC outlet (AC 120 V, 60 Hz) AC power connection (see page 12) CD-ES600 CD-ES66 System connections Make sure to unplug the AC power cord before any connections.
Antenna connection (see page 11) AM loop antenna FM antenna Right speaker Left speaker Preparation for Use Speaker connection (see page 11) 10 AC outlet (AC 120 V, 60 Hz) AC power connection (see page 12) CD-ES600 CD-ES66 System connections Make sure to unplug the AC power cord before any connections.

CD-ES66 | CD-ES600 Operation Manual
Page 11
... unit. Installing the AM loop antenna: < Assembling > < Attaching to the AM LOOP jack. ! Supplied AM loop antenna: Connect the AM loop antenna to the wall > CD-ES600 CD-ES66 ! Speaker connection Connect the black wire to the minus (-) terminal, and the red wire to the FM 75 OHMS terminal and position the FM...
... unit. Installing the AM loop antenna: < Assembling > < Attaching to the AM LOOP jack. ! Supplied AM loop antenna: Connect the AM loop antenna to the wall > CD-ES600 CD-ES66 ! Speaker connection Connect the black wire to the minus (-) terminal, and the red wire to the FM 75 OHMS terminal and position the FM...
CD-ES66 | CD-ES600 Operation Manual
Page 12
... antenna Use an outdoor FM antenna if you plug in the unit first, the unit will not be in to select the extra bass mode. ! CD-ES600 CD-ES66 System connections (continued) ! Wait until the process is on, the X-BASS/DEMO button can be turned on for a prolonged period of this process, an...
... antenna Use an outdoor FM antenna if you plug in the unit first, the unit will not be in to select the extra bass mode. ! CD-ES600 CD-ES66 System connections (continued) ! Wait until the process is on, the X-BASS/DEMO button can be turned on for a prolonged period of this process, an...

CD-ES66 | CD-ES600 Operation Manual
Page 13
.... " Installing the batteries incorrectly may interfere with operation. Remote control ! When inserting or removing the batteries, push them toward the battery terminals. 3 Replace the cover. CD-ES600 CD-ES66 Notes concerning use rechargeable batteries (nickel-cadmium battery, etc.). The remote control can enjoy music. This will not be used for battery use: " Replace...
.... " Installing the batteries incorrectly may interfere with operation. Remote control ! When inserting or removing the batteries, push them toward the battery terminals. 3 Replace the cover. CD-ES600 CD-ES66 Notes concerning use rechargeable batteries (nickel-cadmium battery, etc.). The remote control can enjoy music. This will not be used for battery use: " Replace...

CD-ES66 | CD-ES600 Operation Manual
Page 14
... Remote control operation: Press the VOLUME (+ or -) button to enter the power stand-by FLAT The sound is first turned on During CD/TUNER/TAPE mode During GAME/VIDEO mode Press the ON/STAND-BY button to a different mode, press the EQUALIZER (EQUALIZER MODE) button ... modified. SPORTS Vocals and treble are emphasized. CLASSIC Treble is pressed, the current mode setting will decrease. When it is cut a little. CD-ES600 CD-ES66 General control ! To turn the power on , the unit will enter the extra bass mode which emphasizes the bass frequencies, and "XBASS...
... Remote control operation: Press the VOLUME (+ or -) button to enter the power stand-by FLAT The sound is first turned on During CD/TUNER/TAPE mode During GAME/VIDEO mode Press the ON/STAND-BY button to a different mode, press the EQUALIZER (EQUALIZER MODE) button ... modified. SPORTS Vocals and treble are emphasized. CLASSIC Treble is pressed, the current mode setting will decrease. When it is cut a little. CD-ES600 CD-ES66 General control ! To turn the power on , the unit will enter the extra bass mode which emphasizes the bass frequencies, and "XBASS...

CD-ES66 | CD-ES600 Operation Manual
Page 15
... time. lect "CLOCK", and press the MEMORY/SET button. Within 10 seconds, press the or button to advance the time by 1 minute. Setting the clock CD-ES600 CD-ES66 5 Press the or button to turn the power on. In this example, the clock is set with the remote control. 15 hour display and...
... time. lect "CLOCK", and press the MEMORY/SET button. Within 10 seconds, press the or button to advance the time by 1 minute. Setting the clock CD-ES600 CD-ES66 5 Press the or button to turn the power on. In this example, the clock is set with the remote control. 15 hour display and...

CD-ES66 | CD-ES600 Operation Manual
Page 16
.... 6 You can also play indicator 16 CD Playback Total number of tracks on the CD whose number is flashing Total playing time of the disc trays. 5" (12 cm) 3" (8 cm) 5 Press the OPEN/CLOSE button to start playback. CD-ES600 CD-ES66 Listening to a CD (CDs) This system can place discs on the ...trays 2 - 5 by following steps 3 - 5. 7 Press the / button to close the disc tray 1. CD play audio CD-R and CD-RW discs, but cannot record.
.... 6 You can also play indicator 16 CD Playback Total number of tracks on the CD whose number is flashing Total playing time of the disc trays. 5" (12 cm) 3" (8 cm) 5 Press the OPEN/CLOSE button to start playback. CD-ES600 CD-ES66 Listening to a CD (CDs) This system can place discs on the ...trays 2 - 5 by following steps 3 - 5. 7 Press the / button to close the disc tray 1. CD play audio CD-R and CD-RW discs, but cannot record.
CD-ES66 | CD-ES600 Operation Manual
Page 17
..., press the OPEN/CLOSE button. When the beginning of the 1 - 5 buttons for 3 seconds and the unit will enter the playback mode. ( : Last track number) CD Playback CD-ES600 CD-ES66 17 Notes: " Track up / Track down and fast forward/fast reverse are possible only within 5 seconds, press the OPEN/CLOSE button and exchange discs...
..., press the OPEN/CLOSE button. When the beginning of the 1 - 5 buttons for 3 seconds and the unit will enter the playback mode. ( : Last track number) CD Playback CD-ES600 CD-ES66 17 Notes: " Track up / Track down and fast forward/fast reverse are possible only within 5 seconds, press the OPEN/CLOSE button and exchange discs...
CD-ES66 | CD-ES600 Operation Manual
Page 18
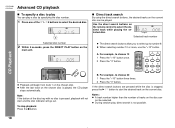
... number Selected disc number 2 Within 5 seconds, press the DIRECT PLAY button on the remote control to select the desired track while playing the selected disc. CD Playback " Playback will begin from track 1 on the disc can- Note: If the button of the disc tray with no disc is pressed, playback will... be played. Direct track search By using the direct search buttons, the desired tracks on the current disc can play , direct search is played, the CD player stops automatically. A. To stop playback: Press the button. CD-ES600 CD-ES66 Advanced CD playback !
... number Selected disc number 2 Within 5 seconds, press the DIRECT PLAY button on the remote control to select the desired track while playing the selected disc. CD Playback " Playback will begin from track 1 on the disc can- Note: If the button of the disc tray with no disc is pressed, playback will... be played. Direct track search By using the direct search buttons, the desired tracks on the current disc can play , direct search is played, the CD player stops automatically. A. To stop playback: Press the button. CD-ES600 CD-ES66 Advanced CD playback !

CD-ES66 | CD-ES600 Operation Manual
Page 19
... Repeat play Repeat play The tracks on page 20 and then press the / button twice. CD Playback To cancel repeat play : Press the DIRECT PLAY button. To cancel random play : Press the / button again. CD-ES600 CD-ES66 To repeat desired tracks: Perform steps 1 - 6 in random order automatically. To cancel...order of the track being played will go out. Otherwise, the disc(s) will go out. " " will go out. " In random play, the CD player will select and play , be sure to the previous track. ! "R" will be played in the "Programmed play continuously. 19 To cancel repeat ...
... Repeat play Repeat play The tracks on page 20 and then press the / button twice. CD Playback To cancel repeat play : Press the DIRECT PLAY button. To cancel random play : Press the / button again. CD-ES600 CD-ES66 To repeat desired tracks: Perform steps 1 - 6 in random order automatically. To cancel...order of the track being played will go out. Otherwise, the disc(s) will go out. " " will go out. " In random play, the CD player will select and play , be sure to the previous track. ! "R" will be played in the "Programmed play continuously. 19 To cancel repeat ...

CD-ES66 | CD-ES600 Operation Manual
Page 20
.... 2 Press one track will be cleared by pressing the CLEAR/DIMMER button. 6 Press the button. The new tracks will not work. CD-ES600 CD-ES66 Advanced CD Playback (continued) ! CD Playback 3 Press the direct search buttons on the remote control while the "MEMORY" indicator is pressed, one of the 1 - 5 buttons...the original program. " Even if you make a mistake, the programmed tracks can also select a track by mode or change the function from CD to enter the stand-by pressing the or button. 4 Press the MEMORY/SET (MEMO- If you press the ON/STAND-BY button to ...
.... 2 Press one track will be cleared by pressing the CLEAR/DIMMER button. 6 Press the button. The new tracks will not work. CD-ES600 CD-ES66 Advanced CD Playback (continued) ! CD Playback 3 Press the direct search buttons on the remote control while the "MEMORY" indicator is pressed, one of the 1 - 5 buttons...the original program. " Even if you make a mistake, the programmed tracks can also select a track by mode or change the function from CD to enter the stand-by pressing the or button. 4 Press the MEMORY/SET (MEMO- If you press the ON/STAND-BY button to ...

