

CDBA250|CDBA2600 Operation Manual
Page 2
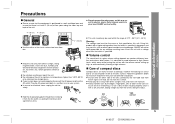
... interference by turning the equipment off and on, the user is no guarantee that to persons. z Increase the separation between the equipment and receiver. z Connect the equipment into an outlet on the rear of the following measures: z Reorient or relocate the receiving antenna. z Consult the dealer or an experienced radio/TV technician for a Class B digital device, pursuant to Part 15...
... interference by turning the equipment off and on, the user is no guarantee that to persons. z Increase the separation between the equipment and receiver. z Connect the equipment into an outlet on the rear of the following measures: z Reorient or relocate the receiving antenna. z Consult the dealer or an experienced radio/TV technician for a Class B digital device, pursuant to Part 15...

CDBA250|CDBA2600 Operation Manual
Page 3
.... 70-1984, provides information with its installation, use can perform many useful functions. EXAMPLE OF ANTENNA GROUNDING AS PER NATIONAL ELECTRICAL CODE ANTENNA LEAD IN WIRE G R O U N D CLAMP ELECTRIC SERVICE EQUIPMENT NEC - Care should be taken so that described in the operating instructions or as marked on or pinched by qualified service personnel when: A The power-supply cord or the plug has been damaged; or B Objects...
.... 70-1984, provides information with its installation, use can perform many useful functions. EXAMPLE OF ANTENNA GROUNDING AS PER NATIONAL ELECTRICAL CODE ANTENNA LEAD IN WIRE G R O U N D CLAMP ELECTRIC SERVICE EQUIPMENT NEC - Care should be taken so that described in the operating instructions or as marked on or pinched by qualified service personnel when: A The power-supply cord or the plug has been damaged; or B Objects...
CDBA250|CDBA2600 Operation Manual
Page 4
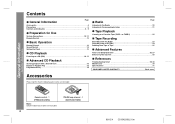
... for Use System Connections 10, 11 Remote Control 12 „ Basic Operation General Control 13 Sound Control 14 Setting the Clock 15 „ CD Playback Listening to a CD (CDs 16, 17 „ Advanced CD Playback Starting playback with a desired track 18 Repeat or Random Play 18 Programmed Play 19 Page „ Radio Listening to the Radio 20 Listening to the memorized station 21 „ Tape Playback Listening to a Cassette Tape (TAPE 1 or TAPE...
... for Use System Connections 10, 11 Remote Control 12 „ Basic Operation General Control 13 Sound Control 14 Setting the Clock 15 „ CD Playback Listening to a CD (CDs 16, 17 „ Advanced CD Playback Starting playback with a desired track 18 Repeat or Random Play 18 Programmed Play 19 Page „ Radio Listening to the Radio 20 Listening to the memorized station 21 „ Tape Playback Listening to a Cassette Tape (TAPE 1 or TAPE...
CDBA250|CDBA2600 Operation Manual
Page 5
.... NO YES correct 5 01/02/27 CD-BA250(U)1.fm z Do not place anything on the CDs can occur due to your local SHARP service facility. 4" (10 cm) 4" (10 cm) 4" (10 cm) z Use the unit on this unit with the volume control setting up high, or while continually listening at a given volume setting depends on the disc surface. Using this surface. z In case of...
.... NO YES correct 5 01/02/27 CD-BA250(U)1.fm z Do not place anything on the CDs can occur due to your local SHARP service facility. 4" (10 cm) 4" (10 cm) 4" (10 cm) z Use the unit on this unit with the volume control setting up high, or while continually listening at a given volume setting depends on the disc surface. Using this surface. z In case of...
CDBA250|CDBA2600 Operation Manual
Page 6
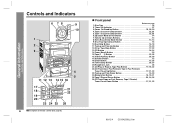
.../4 CD-BA250(U)1.fm General Information - Tape 1 Cassette Compartment 22, 25 6. Disc Tray 16 2. Controls and Indicators 6 78 9 10 1 2 3 4 5 11 12 13 14 15 16 17 18 21 22 19 20 23 24 25 26 6 Description of remote control (See page 8.) „ Front panel Reference page 1. Power On/Stand-by Button 15, 26, 30 4. Volume Up or Down Buttons 14 8. Extra Bass/Demo Mode Button 13, 14 9. Equalizer Mode Select Button...
.../4 CD-BA250(U)1.fm General Information - Tape 1 Cassette Compartment 22, 25 6. Disc Tray 16 2. Controls and Indicators 6 78 9 10 1 2 3 4 5 11 12 13 14 15 16 17 18 21 22 19 20 23 24 25 26 6 Description of remote control (See page 8.) „ Front panel Reference page 1. Power On/Stand-by Button 15, 26, 30 4. Volume Up or Down Buttons 14 8. Extra Bass/Demo Mode Button 13, 14 9. Equalizer Mode Select Button...

CDBA250|CDBA2600 Operation Manual
Page 8
CD Pause Button 17 4. Tape 1 Play Button 22 8. Other buttons can be operated both on the remote control only. Remote Control Transmitter 12 2. General Information - Controls and Indicators - CD Track Down or Fast Reverse Button 17 6. Disc Number Select Buttons 16, 19, 24 3. Equalizer Mode Select Button 14 10.Tape 2 Record Pause Button 23, 24, 25 11.CD Button 16, 24 12.Tuner (Band) Button 20 13.Power On/Stand-by Button 12, 26, 30 14.Extra Bass Button 14 15.CD Stop Button 17...
CD Pause Button 17 4. Tape 1 Play Button 22 8. Other buttons can be operated both on the remote control only. Remote Control Transmitter 12 2. General Information - Controls and Indicators - CD Track Down or Fast Reverse Button 17 6. Disc Number Select Buttons 16, 19, 24 3. Equalizer Mode Select Button 14 10.Tape 2 Record Pause Button 23, 24, 25 11.CD Button 16, 24 12.Tuner (Band) Button 20 13.Power On/Stand-by Button 12, 26, 30 14.Extra Bass Button 14 15.CD Stop Button 17...

CDBA250|CDBA2600 Operation Manual
Page 13
General Control „ Demonstration mode The first time the unit is plugged, the unit will disappear. The demonstration mode will be used to select the extra bass mode. „ Display brightness (2 levels) You can switch the display brightness by mode, press the X-BASS/DEMO button again. Note: When the power is in the power stand-by mode (demonstration mode), press the XBASS/DEMO button. Dimmed Brightened 13 00/12/4 CD-BA250(U)2.fm Basic Operation - General Control - To cancel...
General Control „ Demonstration mode The first time the unit is plugged, the unit will disappear. The demonstration mode will be used to select the extra bass mode. „ Display brightness (2 levels) You can switch the display brightness by mode, press the X-BASS/DEMO button again. Note: When the power is in the power stand-by mode (demonstration mode), press the XBASS/DEMO button. Dimmed Brightened 13 00/12/4 CD-BA250(U)2.fm Basic Operation - General Control - To cancel...
CDBA250|CDBA2600 Operation Manual
Page 14
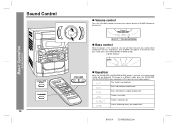
...To change to increase the volume and the VOLUME decreasing. Sound Control 14 „ Volume control Press the VOLUME button to a different mode, press the EQUALIZER (EQUALIZER MODE) button repeatedly until the desired sound mode appears. To cancel the extra bass mode, press the X-BASS/DEMO (X-BASS) button. The sound is reduced a lot. Treble is pressed, the current mode setting will appear. X-BASS indicator „ Equalizer When the EQUALIZER (EQUALIZER MODE) button is cut a little. Basic Operation - Sound Control - Vocals (midrange tones) are emphasized. 00/12/4 CD...
...To change to increase the volume and the VOLUME decreasing. Sound Control 14 „ Volume control Press the VOLUME button to a different mode, press the EQUALIZER (EQUALIZER MODE) button repeatedly until the desired sound mode appears. To cancel the extra bass mode, press the X-BASS/DEMO (X-BASS) button. The sound is reduced a lot. Treble is pressed, the current mode setting will appear. X-BASS indicator „ Equalizer When the EQUALIZER (EQUALIZER MODE) button is cut a little. Basic Operation - Sound Control - Vocals (midrange tones) are emphasized. 00/12/4 CD...
CDBA250|CDBA2600 Operation Manual
Page 15
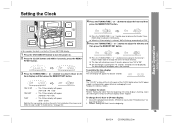
... to change automatically to "PM". 5 Press the TUNING/TIME ( or ) button to turn the power on page 30 for about 5 seconds. Note: The "CLOCK" or time will flash at the push of the CLOCK button when the AC power supply is set when the unit is first installed or it has been reset. (Refer to advance the time by 1 minute. Setting the Clock - Basic Operation - hour display...
... to change automatically to "PM". 5 Press the TUNING/TIME ( or ) button to turn the power on page 30 for about 5 seconds. Note: The "CLOCK" or time will flash at the push of the CLOCK button when the AC power supply is set when the unit is first installed or it has been reset. (Refer to advance the time by 1 minute. Setting the Clock - Basic Operation - hour display...

CDBA250|CDBA2600 Operation Manual
Page 17
... will be played. Notes: z You can locate the desired portion on the display and CD operation will open , wait until the desired track number appears. z When the end of the next track: Press the PRESET button for less than 0.5 seconds during fast forward, "END" will appear on a single disc only. z Do not turn the power on the remote control. z If a disc is reached...
... will be played. Notes: z You can locate the desired portion on the display and CD operation will open , wait until the desired track number appears. z When the end of the next track: Press the PRESET button for less than 0.5 seconds during fast forward, "END" will appear on a single disc only. z Do not turn the power on the remote control. z If a disc is reached...

CDBA250|CDBA2600 Operation Manual
Page 20
Listening to the Radio 20 Sound Control (See page 14.) 1 Press the ON/STAND-BY button to turn the power on. 2 Press the TUNER (BAND) button repeatedly to select the desired frequency band (FM or AM). 3 Press the TUNING/TIME ( or ) button to tune in to the desired station. Auto tuning: When the TUNING/TIME button is pressed for more than 0.5 seconds, scanning will start automatically and the tuner will stop at...
Listening to the Radio 20 Sound Control (See page 14.) 1 Press the ON/STAND-BY button to turn the power on. 2 Press the TUNER (BAND) button repeatedly to select the desired frequency band (FM or AM). 3 Press the TUNING/TIME ( or ) button to tune in to the desired station. Auto tuning: When the TUNING/TIME button is pressed for more than 0.5 seconds, scanning will start automatically and the tuner will stop at...
CDBA250|CDBA2600 Operation Manual
Page 21
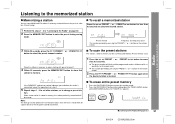
.../SET button to enter the stand-by mode. 2 Press the ON/STAND-BY button while holding down the TUNER (BAND) button and X-BASS/DEMO button until "TUNER CL" appears. tion. Note: The backup function protects the memorized stations for a few hours should there be scanned automatically. (Preset memory scan) 1 Press the PRESET or PRESET button for more than Preset channel Frequency and frequency band This can be a power failure or the AC power cord...
.../SET button to enter the stand-by mode. 2 Press the ON/STAND-BY button while holding down the TUNER (BAND) button and X-BASS/DEMO button until "TUNER CL" appears. tion. Note: The backup function protects the memorized stations for a few hours should there be scanned automatically. (Preset memory scan) 1 Press the PRESET or PRESET button for more than Preset channel Frequency and frequency band This can be a power failure or the AC power cord...
CDBA250|CDBA2600 Operation Manual
Page 23
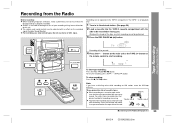
...sound controls can be operated in to the desired station. (See page 20.) 2 Load a cassette into the TAPE 2 cassette compartment with the side to the Radio (See page 20.) 23 00/12/4 CD-BA250(U)3.fm Recording can be adjusted with adhe- To resume recording, press the / (TAPE 2 ) button. Do not use only normal tapes. Erase-prevention tab of the tape, on the recorded signal (Variable Sound Monitor... an AM station, move the AM loop antenna. Wind past the leader of cassette tapes: z When recording on Tape Recording - Side A Tab for side B z To protect the recorded sound, remove the...
...sound controls can be operated in to the desired station. (See page 20.) 2 Load a cassette into the TAPE 2 cassette compartment with the side to the Radio (See page 20.) 23 00/12/4 CD-BA250(U)3.fm Recording can be adjusted with adhe- To resume recording, press the / (TAPE 2 ) button. Do not use only normal tapes. Erase-prevention tab of the tape, on the recorded signal (Variable Sound Monitor... an AM station, move the AM loop antenna. Wind past the leader of cassette tapes: z When recording on Tape Recording - Side A Tab for side B z To protect the recorded sound, remove the...

CDBA250|CDBA2600 Operation Manual
Page 24
... or the end of the 1 - 3 buttons on which was being played at that time, and stop automatically. Wind past the leader of the tape is started from a CD (CDs) - z Recording is reached while recording, the CD player will start recording. To stop . Note: When the end of the tape, on the remote control to select the disc to be recorded first. 5 Press the...
... or the end of the 1 - 3 buttons on which was being played at that time, and stop automatically. Wind past the leader of the tape is started from a CD (CDs) - z Recording is reached while recording, the CD player will start recording. To stop . Note: When the end of the tape, on the remote control to select the disc to be recorded first. 5 Press the...

CDBA250|CDBA2600 Operation Manual
Page 26
... station. 3 Adjust the volume using the VOLUME buttons. To select the timer playback source: CD, TUNER (BAND) or TAPE (1 2). Timer recording: The unit turns on and plays the desired source (CD, tuner, tape) at the preset time. For timer recording: Load a cassette for timer recording. Display the white " " for timer playback and the red " " for recording in to select timer playback or timer recording. Sleep operation: The radio, compact disc and cassette tape can all be played. To select...
... station. 3 Adjust the volume using the VOLUME buttons. To select the timer playback source: CD, TUNER (BAND) or TAPE (1 2). Timer recording: The unit turns on and plays the desired source (CD, tuner, tape) at the preset time. For timer recording: Load a cassette for timer recording. Display the white " " for timer playback and the red " " for recording in to select timer playback or timer recording. Sleep operation: The radio, compact disc and cassette tape can all be played. To select...

CDBA250|CDBA2600 Operation Manual
Page 27
.../SET button. 4 Your system will enter the stand-by mode. Listening to the VIDEO/AUX jacks, select "VIDEO/AUX" in timer playback. If you select TUNER, it reaches the volume you were listening at before the sleep operation finishes. However, another unit connected to the Radio (See page 20.) 27 00/12/4 CD-BA250(U)3.fm Note: Once the sleep time is reached, playback or recording will not be turned...
.../SET button. 4 Your system will enter the stand-by mode. Listening to the VIDEO/AUX jacks, select "VIDEO/AUX" in timer playback. If you select TUNER, it reaches the volume you were listening at before the sleep operation finishes. However, another unit connected to the Radio (See page 20.) 27 00/12/4 CD-BA250(U)3.fm Note: Once the sleep time is reached, playback or recording will not be turned...

CDBA250|CDBA2600 Operation Manual
Page 28
.../STAND-BY button to turn the power on a tape 1 Insert a cassette in the TAPE 2 cassette compartment. 2 Press the VIDEO/AUX button. 3 Press the REC PAUSE ( ) button. 4 Press the / (TAPE 2 ) button. 5 Play the VCR, DVD, etc. „ Headphones z Before plugging in the headphones disconnects the speakers automatically. Adjust the volume using video equipment, connect the audio output to this unit away from VCR, DVD, etc. 1 Use a connection cord to the VIDEO/ AUX jacks. When using the VOLUME buttons. 28 00/12/4 CD-BA250(U)3.fm Advanced...
.../STAND-BY button to turn the power on a tape 1 Insert a cassette in the TAPE 2 cassette compartment. 2 Press the VIDEO/AUX button. 3 Press the REC PAUSE ( ) button. 4 Press the / (TAPE 2 ) button. 5 Play the VCR, DVD, etc. „ Headphones z Before plugging in the headphones disconnects the speakers automatically. Adjust the volume using video equipment, connect the audio output to this unit away from VCR, DVD, etc. 1 Use a connection cord to the VIDEO/ AUX jacks. When using the VOLUME buttons. 28 00/12/4 CD-BA250(U)3.fm Advanced...

CDBA250|CDBA2600 Operation Manual
Page 29
... 30.) z Is the volume level set to the power stand-by the owner without calling a service technician. Troubleshooting Chart - z Are the speaker wires disconnected? „ CD player Symptom Possible cause z Playback does not start. z Is the FM/AM loop antenna placed properly? Possible cause z Is the erase-protection tab removed? Possible cause z Is the AC power cord of a track. z Does the remote control sensor receive strong light? „ Condensation...
... 30.) z Is the volume level set to the power stand-by the owner without calling a service technician. Troubleshooting Chart - z Are the speaker wires disconnected? „ CD player Symptom Possible cause z Playback does not start. z Is the FM/AM loop antenna placed properly? Possible cause z Is the erase-protection tab removed? Possible cause z Is the AC power cord of a track. z Does the remote control sensor receive strong light? „ Condensation...

CDBA250|CDBA2600 Operation Manual
Page 30
..., timer settings, tuner preset, and CD program. „ Before transporting the unit 1 Press the ON/STAND-BY button to turn the power on. 3 If neither step 1 nor 2 restores the unit, do the following : Press the ON/STAND-BY button to ensure proper operation of the CD player, preventative maintenance (cleaning of playing/recording time by using a commercial tape head demagnetizer. Make sure that "NO DISC" is displayed. 5 Press...
..., timer settings, tuner preset, and CD program. „ Before transporting the unit 1 Press the ON/STAND-BY button to turn the power on. 3 If neither step 1 nor 2 restores the unit, do the following : Press the ON/STAND-BY button to ensure proper operation of the CD player, preventative maintenance (cleaning of playing/recording time by using a commercial tape head demagnetizer. Make sure that "NO DISC" is displayed. 5 Press...
CDBA250|CDBA2600 Operation Manual
Page 31
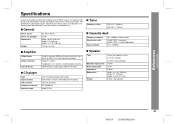
...% total harmonic distortion Speakers: 6 ohms Headphones: 16 - 50 ohms (recommended: 32 ohms) Video/Auxiliary (audio signal): 500 mV/47 kohms „ CD player Type Signal readout D/A converter Frequency response Dynamic range 3-disc multi-play compact disc player Non-contact, 3-beam semiconductor laser pickup 1-bit D/A converter 20 - 20,000 Hz 90 dB (1 kHz) „ Tuner Frequency range FM: 87.5 - 108 MHz AM: 530 - 1,720 kHz „ Cassette deck Frequency response Signal/noise ratio Wow and...
...% total harmonic distortion Speakers: 6 ohms Headphones: 16 - 50 ohms (recommended: 32 ohms) Video/Auxiliary (audio signal): 500 mV/47 kohms „ CD player Type Signal readout D/A converter Frequency response Dynamic range 3-disc multi-play compact disc player Non-contact, 3-beam semiconductor laser pickup 1-bit D/A converter 20 - 20,000 Hz 90 dB (1 kHz) „ Tuner Frequency range FM: 87.5 - 108 MHz AM: 530 - 1,720 kHz „ Cassette deck Frequency response Signal/noise ratio Wow and...


