
Instructions for Use
Page 2
Contents Important safety instructions 2 The freePORT systems 3 Delivery includes 4 EM 1 receiver 4 SK 2 bodypack transmitter 6 SKM 3 radio microphone 8 Setting up the system 9 Care and maintenance 10 If problems occur 11 Accessories and variants 11 Specifications of the freePORT systems 12 Connector assignment 13 Manufacturer declarations 14 Warranty 14 CE Declaration of high-quality electro-acoustic equipment have designed this field. Over half a century of...
Contents Important safety instructions 2 The freePORT systems 3 Delivery includes 4 EM 1 receiver 4 SK 2 bodypack transmitter 6 SKM 3 radio microphone 8 Setting up the system 9 Care and maintenance 10 If problems occur 11 Accessories and variants 11 Specifications of the freePORT systems 12 Connector assignment 13 Manufacturer declarations 14 Warranty 14 CE Declaration of high-quality electro-acoustic equipment have designed this field. Over half a century of...
Instructions for Use
Page 3
... for longer periods of the freePORT systems" on page 12). only operated within the permissible temperature range, - y Only use the supplied mains unit. Important safety instructions y Read this instruction manual in a safe place. y Refer all instructions. y WARNING: To reduce the risk of power source specified in any heat sources. y Only use attachments/accessories specified by Sennheiser. 2 y Ensure that the mains unit is required if the...
... for longer periods of the freePORT systems" on page 12). only operated within the permissible temperature range, - y Only use the supplied mains unit. Important safety instructions y Read this instruction manual in a safe place. y Refer all instructions. y WARNING: To reduce the risk of power source specified in any heat sources. y Only use attachments/accessories specified by Sennheiser. 2 y Ensure that the mains unit is required if the...

Instructions for Use
Page 4
... other users, the transmitter should be operated simultaneously y Reliable transmission technology y Diversity technology for minimizing dropouts in the reception y Adjustable squelch for eliminating RF interference y Rugged housings y Crystal-clear reception due to 693 MHz) is intended for use after switch-on microphone is ideal for connecting musical instruments (e.g. guitar) which have four factorypreset frequencies for direct channel selection - ready for immediate use solely in use...
... other users, the transmitter should be operated simultaneously y Reliable transmission technology y Diversity technology for minimizing dropouts in the reception y Adjustable squelch for eliminating RF interference y Rugged housings y Crystal-clear reception due to 693 MHz) is intended for use after switch-on microphone is ideal for connecting musical instruments (e.g. guitar) which have four factorypreset frequencies for direct channel selection - ready for immediate use solely in use...
Instructions for Use
Page 5
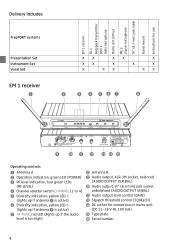
... 1 receiver SK 2 bodypack transmitter SKM 3 radio microphone Mains unit (NTxy) ME 2 clip-on microphone ¼" (6.3 mm) jack cable Stand mount Instructions for use Delivery includes FreePORT systems Presentation Set Instrument Set Vocal Set EM 1 receiver ³ XX XX X XX X X X X XX XX ᕢ » Operating controls ³ Antenna A · Operation indication, green LED (POWER) » RF level indication, four green LEDs (RF LEVEL) ¿ Channel selector switch CHANNEL (1 to 4) ´ Diversity indication, yellow LED A (lights up if antenna...
... 1 receiver SK 2 bodypack transmitter SKM 3 radio microphone Mains unit (NTxy) ME 2 clip-on microphone ¼" (6.3 mm) jack cable Stand mount Instructions for use Delivery includes FreePORT systems Presentation Set Instrument Set Vocal Set EM 1 receiver ³ XX XX X XX X X X X XX XX ᕢ » Operating controls ³ Antenna A · Operation indication, green LED (POWER) » RF level indication, four green LEDs (RF LEVEL) ¿ Channel selector switch CHANNEL (1 to 4) ´ Diversity indication, yellow LED A (lights up if antenna...
Instructions for Use
Page 6
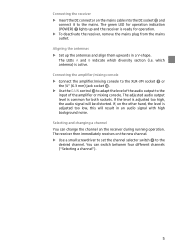
The adjusted audio output level is common for operation indication (POWER) · lights up the antennas and align them upwards in an audio signal with high background noise. Aligning the antennas ̈ Set up and the receiver is adjusted too low, this will be distorted. If the level is active. which diversity section (i.e. Selecting and changing a channel You can switch between four different channels ("Selecting a channel"). 5 Connecting the amplifier/mixing...
The adjusted audio output level is common for operation indication (POWER) · lights up the antennas and align them upwards in an audio signal with high background noise. Aligning the antennas ̈ Set up and the receiver is adjusted too low, this will be distorted. If the level is active. which diversity section (i.e. Selecting and changing a channel You can switch between four different channels ("Selecting a channel"). 5 Connecting the amplifier/mixing...

Instructions for Use
Page 7
...; MIC/INST slide switch ¶ Serial number º Channel selector switch CH (1 to 4) ¾ Sensitivity control GAIN µ Type plate ¸ Belt clip · Inserting/replacing the battery We recommend powering the bodypack transmitter by first sliding the battery compartment cover in the direction of the arrow. SK 2 bodypack transmitter Operating controls ³ ON/OFF button · Operation and battery status indication, red LED » Microphone/instrument input, 3.5 mm jack socket (lockable) ¿ Antenna (can...
...; MIC/INST slide switch ¶ Serial number º Channel selector switch CH (1 to 4) ¾ Sensitivity control GAIN µ Type plate ¸ Belt clip · Inserting/replacing the battery We recommend powering the bodypack transmitter by first sliding the battery compartment cover in the direction of the arrow. SK 2 bodypack transmitter Operating controls ³ ON/OFF button · Operation and battery status indication, red LED » Microphone/instrument input, 3.5 mm jack socket (lockable) ¿ Antenna (can...
Instructions for Use
Page 8
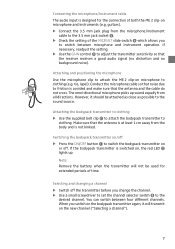
... the battery when the transmitter will transmit on microphone and instruments (e.g. If necessary, readjust the setting. ̈ Use the GAIN control ¾ to the sound source. When you switch on the bodypack transmitter again, it should be used for the connection of both the ME 2 clip-on the new channel ("Selecting a channel"). 7 Selecting and changing a channel ̈ Switch off . Connecting the microphone/instrument cable The audio input is designed for extended periods of time. However...
... the battery when the transmitter will transmit on microphone and instruments (e.g. If necessary, readjust the setting. ̈ Use the GAIN control ¾ to the sound source. When you switch on the bodypack transmitter again, it should be used for the connection of both the ME 2 clip-on the new channel ("Selecting a channel"). 7 Selecting and changing a channel ̈ Switch off . Connecting the microphone/instrument cable The audio input is designed for extended periods of time. However...
Instructions for Use
Page 9
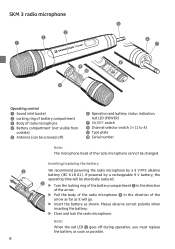
..., red LED (POWER) ¶ ON/OFF switch º Channel selector switch CH (1 to 4) ¾ Type plate µ Serial number Note: The microphone head of the arrow as far as it will go. ̈ Insert the battery as possible. 8 Inserting/replacing the battery We recommend powering the radio microphone by a rechargeable 9 V battery, the operating time will be drastically reduced. ̈ Turn the locking ring of the battery compartment · in the direction...
..., red LED (POWER) ¶ ON/OFF switch º Channel selector switch CH (1 to 4) ¾ Type plate µ Serial number Note: The microphone head of the arrow as far as it will go. ̈ Insert the battery as possible. 8 Inserting/replacing the battery We recommend powering the radio microphone by a rechargeable 9 V battery, the operating time will be drastically reduced. ̈ Turn the locking ring of the battery compartment · in the direction...
Instructions for Use
Page 10
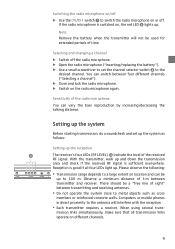
... links operate on different channels. 9 If the radio microphone is sufficient everywhere. Sensitivity of sight" between four different channels ("Selecting a channel"). ̈ Close and lock the radio microphone. ̈ Switch on or off the radio microphone. ̈ Open the radio microphone ("Inserting/replacing the battery"). ̈ Use a small screwdriver to 100 m. With the transmitter, walk up . Computers or mobile phones in direct proximity to metal objects such as follows: Setting up . y Each transmitter...
... links operate on different channels. 9 If the radio microphone is sufficient everywhere. Sensitivity of sight" between four different channels ("Selecting a channel"). ̈ Close and lock the radio microphone. ̈ Switch on or off the radio microphone. ̈ Open the radio microphone ("Inserting/replacing the battery"). ̈ Use a small screwdriver to 100 m. With the transmitter, walk up . Computers or mobile phones in direct proximity to metal objects such as follows: Setting up . y Each transmitter...
Instructions for Use
Page 11
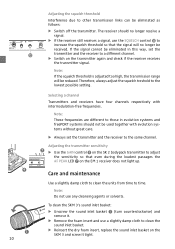
... the units from time to time. Note: These frequencies are different to those in this way, set the transmitter and the receiver to the same channel. Adjusting the transmitter sensitivity ¶ ̈ Use the GAIN control ¾ on the SK 2 bodypack transmitter to adjust the sensitivity so that the signal will be received. Adjusting the squelch threshold Interference due to other transmission links can be used together with intermodulation-free frequencies. To...
... the units from time to time. Note: These frequencies are different to those in this way, set the transmitter and the receiver to the same channel. Adjusting the transmitter sensitivity ¶ ̈ Use the GAIN control ¾ on the SK 2 bodypack transmitter to adjust the sensitivity so that the signal will be received. Adjusting the squelch threshold Interference due to other transmission links can be used together with intermodulation-free frequencies. To...
Instructions for Use
Page 12
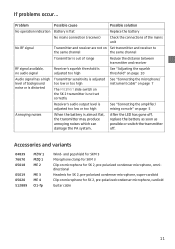
... channel Transmitter is out of range Reduce the distance between transmitter and receiver RF signal available, no audio signal Receiver's squelch threshold is adjusted too high See "Adjusting the squelch threshold" on page 10 Audio signal has a high level of background noise or is distorted Transmitter sensitivity is adjusted too low or too high The MIC/INST slide switch on the SK 2 transmitter is not set correctly See "Connecting the microphone/ instrument cable" on page 7 Receiver's audio output...
... channel Transmitter is out of range Reduce the distance between transmitter and receiver RF signal available, no audio signal Receiver's squelch threshold is adjusted too high See "Adjusting the squelch threshold" on page 10 Audio signal has a high level of background noise or is distorted Transmitter sensitivity is adjusted too low or too high The MIC/INST slide switch on the SK 2 transmitter is not set correctly See "Connecting the microphone/ instrument cable" on page 7 Receiver's audio output...

Instructions for Use
Page 13
....90 MHz) Range C : 742.5 to 744.5 MHz (742.65 - 743.35 - 743.85 - 744.45 MHz) Range E: 863 to 865 MHz (863.10 - 863.70 - 864.10 - 864.90 MHz) 2 MHz > 95 dB(A) < 1 % -10 bis +45 °C / 95 relative humidity Individual components EM 1 SK 2 SKM 3 receiver bodypack transmitter radio microphone Power supply 12V DCNOM/100 mA 9 V PP3 battery 9 V PP3 battery Operating time -
....90 MHz) Range C : 742.5 to 744.5 MHz (742.65 - 743.35 - 743.85 - 744.45 MHz) Range E: 863 to 865 MHz (863.10 - 863.70 - 864.10 - 864.90 MHz) 2 MHz > 95 dB(A) < 1 % -10 bis +45 °C / 95 relative humidity Individual components EM 1 SK 2 SKM 3 receiver bodypack transmitter radio microphone Power supply 12V DCNOM/100 mA 9 V PP3 battery 9 V PP3 battery Operating time -
Instructions for Use
Page 14
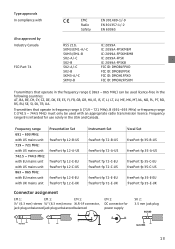
.... Frequency range B is intended for power supply + 21 3 NC/GN D SK 2: 3.5 mm jack plug NC/GND Instr./MIC 13 Type approvals In compliance with UK mains unit Presentation Set freePort fp 12-B-US freePort fp 12-A-US freePort fp 12-C-EU freePort fp 12-C-US freePort fp 12-E-EU freePort fp 12-E-UK Instrument Set freePort fp 72-B-US freePort fp 72-A-US freePort fp 72-C-EU freePort fp 72-C-US freePort...
.... Frequency range B is intended for power supply + 21 3 NC/GN D SK 2: 3.5 mm jack plug NC/GND Instr./MIC 13 Type approvals In compliance with UK mains unit Presentation Set freePort fp 12-B-US freePort fp 12-A-US freePort fp 12-C-EU freePort fp 12-C-US freePort fp 12-E-EU freePort fp 12-E-UK Instrument Set freePort fp 72-B-US freePort fp 72-A-US freePort fp 72-C-EU freePort fp 72-C-US freePort...

Instructions for Use
Page 15
... www.sennheiser.com. WEEE Declaration Your Sennheiser product was developed and manufactured with the instructions, may cause undesired operation. Batteries or rechargeable batteries The supplied batteries or rechargeable batteries can be disposed of separately from that to operate this equipment not expressly approved by one or more of the following measures: y Reorient or relocate the receiving antenna. However, there is in a particular installation.
... www.sennheiser.com. WEEE Declaration Your Sennheiser product was developed and manufactured with the instructions, may cause undesired operation. Batteries or rechargeable batteries The supplied batteries or rechargeable batteries can be disposed of separately from that to operate this equipment not expressly approved by one or more of the following measures: y Reorient or relocate the receiving antenna. However, there is in a particular installation.

Instructions for Use
Page 16
KG Am Labor 1 30900 Wedemark, Germany www.sennheiser.com Printed in Taiwan Publ. 08/08 514013/ A05 Sennheiser electronic GmbH & Co.
KG Am Labor 1 30900 Wedemark, Germany www.sennheiser.com Printed in Taiwan Publ. 08/08 514013/ A05 Sennheiser electronic GmbH & Co.


