

Manual
Page 1
V657 INSTRUCTIONS BEDIENUNGSANLEITUNG INSTRUCTIONS ISTRUZIONI INSTRUCCIONES INSTRUÇÕES (P. 3) (S. 16) (P. 29) (P. 42) (P. 55) (P. 68) (81 ท) Cal.
V657 INSTRUCTIONS BEDIENUNGSANLEITUNG INSTRUCTIONS ISTRUZIONI INSTRUCCIONES INSTRUÇÕES (P. 3) (S. 16) (P. 29) (P. 42) (P. 55) (P. 68) (81 ท) Cal.
Manual
Page 3
ENEnGgLliIsShH CONTENTS Page ADJUSTING THE HAND POSITION 5 TIME/CALENDAR SETTING 6 STOPWATCH ...7 TACHYMETER ...9 NOTES ON USING THE WATCH 11 BATTERY CHANGE ...13 SPECIFICATIONS ...15 6 For the care of your watch, see "TO PRESERVE THE QUALITY OF YOUR WATCH" in the attached Worldwide Guarantee and Instruction Booklet. 3
ENEnGgLliIsShH CONTENTS Page ADJUSTING THE HAND POSITION 5 TIME/CALENDAR SETTING 6 STOPWATCH ...7 TACHYMETER ...9 NOTES ON USING THE WATCH 11 BATTERY CHANGE ...13 SPECIFICATIONS ...15 6 For the care of your watch, see "TO PRESERVE THE QUALITY OF YOUR WATCH" in the attached Worldwide Guarantee and Instruction Booklet. 3
Manual
Page 4
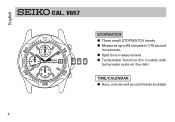
V657 STOPWATCH q Three small STOPWATCH hands q Measures up to 60 minutes in 1/10 second increments. q Split time measurement 6 q Tachymeter function (for models with tachymeter scale on the dial) TIME/CALENDAR q Hour, minute and second hands and date 4 English CAL.
V657 STOPWATCH q Three small STOPWATCH hands q Measures up to 60 minutes in 1/10 second increments. q Split time measurement 6 q Tachymeter function (for models with tachymeter scale on the dial) TIME/CALENDAR q Hour, minute and second hands and date 4 English CAL.
Manual
Page 5
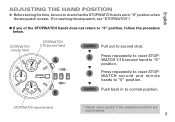
.... STOPWATCH second hand * Hands move quickly if the respective buttons are in to "0" position. Push back in "0" position when the stopwatch is reset. (For resetting the stopwatch, see "STOPWATCH") q If any of the STOPWATCH hands does not return to "0" position, follow the procedure below. STOPWATCH minute hand STOPWATCH 1/10 second hand A « « B CROWN w A w B w CROWN Pull out to "0" position. Press repeatedly to reset STOPWATCH second and minute hands to second click. English ADJUSTING THE HAND POSITION q Before setting the time...
.... STOPWATCH second hand * Hands move quickly if the respective buttons are in to "0" position. Push back in "0" position when the stopwatch is reset. (For resetting the stopwatch, see "STOPWATCH") q If any of the STOPWATCH hands does not return to "0" position, follow the procedure below. STOPWATCH minute hand STOPWATCH 1/10 second hand A « « B CROWN w A w B w CROWN Pull out to "0" position. Press repeatedly to reset STOPWATCH second and minute hands to second click. English ADJUSTING THE HAND POSITION q Before setting the time...
Manual
Page 6
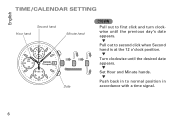
English TIME/CALENDAR SETTING Hour hand Second hand Minute hand «« 6 « Date CROWN Pull out to first click and turn clockwise until the desired date appears. w Set Hour and Minute hands. w Push back in to second click when Second hand is at the 12 o'clock position. w Pull out to normal position in accordance with a time signal. 6 w Turn clockwise until the previous day's date appears.
English TIME/CALENDAR SETTING Hour hand Second hand Minute hand «« 6 « Date CROWN Pull out to first click and turn clockwise until the desired date appears. w Set Hour and Minute hands. w Push back in to second click when Second hand is at the 12 o'clock position. w Pull out to normal position in accordance with a time signal. 6 w Turn clockwise until the previous day's date appears.
Manual
Page 7
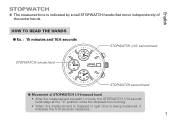
HOW TO READ THE HANDS q Ex. : 15 minutes and 10.6 seconds STOPWATCH 1/10 second hand STOPWATCH minute hand STOPWATCH second hand q Movement of STOPWATCH 1/10 second hand • After the measurement exceeds 1 minute, the STOPWATCH 1/10 second hand stays at the "0" position while the stopwatch is counting. • When the measurement is stopped or split time is indicated by small STOPWATCH hands that move independently of the center hands. English STOPWATCH q The measured time is being measured, it indicates the 1/10 seconds measured. 7
HOW TO READ THE HANDS q Ex. : 15 minutes and 10.6 seconds STOPWATCH 1/10 second hand STOPWATCH minute hand STOPWATCH second hand q Movement of STOPWATCH 1/10 second hand • After the measurement exceeds 1 minute, the STOPWATCH 1/10 second hand stays at the "0" position while the stopwatch is counting. • When the measurement is stopped or split time is indicated by small STOPWATCH hands that move independently of the center hands. English STOPWATCH q The measured time is being measured, it indicates the 1/10 seconds measured. 7

Manual
Page 8
English STOPWATCH OPERATION A Start / Stop / Restart Standard measurement B Reset / Split / Split release A START w A STOP w B RESET Accumulated elapsed time measurement A w A w A A w START STOP RESTART STOP w B RESET * Restart and stop of A w B w B A w w B split time can be repeated by pressing button A. Split time measurement * Measurement and release of the stopwatch can be repeated by START SPLIT SPLIT STOP RESET pressing button B. 8 RELEASE
English STOPWATCH OPERATION A Start / Stop / Restart Standard measurement B Reset / Split / Split release A START w A STOP w B RESET Accumulated elapsed time measurement A w A w A A w START STOP RESTART STOP w B RESET * Restart and stop of A w B w B A w w B split time can be repeated by pressing button A. Split time measurement * Measurement and release of the stopwatch can be repeated by START SPLIT SPLIT STOP RESET pressing button B. 8 RELEASE
Manual
Page 9
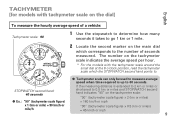
... number on the tachymeter scale indicates the average speed per hour. * For the models with tachymeter scale on the dial] To measure the hourly average speed of seconds measured. English TACHYMETER [for models with the tachymeter scale around the small dial at the 6 o'clock position, read the tachymeter scale which the STOPWATCH second hand points to the number of a vehicle: Tachymeter scale: 90 1 Use the stopwatch...
... number on the tachymeter scale indicates the average speed per hour. * For the models with tachymeter scale on the dial] To measure the hourly average speed of seconds measured. English TACHYMETER [for models with the tachymeter scale around the small dial at the 6 o'clock position, read the tachymeter scale which the STOPWATCH second hand points to the number of a vehicle: Tachymeter scale: 90 1 Use the stopwatch...
Manual
Page 10
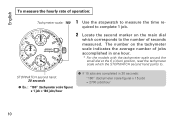
The number on the main dial which the STOPWATCH second hand points to. English To measure the hourly rate of operation: Tachymeter scale: 180 1 Use the stopwatch to measure the time required to complete 1 job. 2 Locate the second marker on the tachymeter scale indicates the average number of jobs accomplished in 20 seconds: "180" (tachymeter scale figure) x 15 jobs = 2700 jobs/hour 10 STOPWATCH second hand: 20 seconds q Ex. : "180...
The number on the main dial which the STOPWATCH second hand points to. English To measure the hourly rate of operation: Tachymeter scale: 180 1 Use the stopwatch to measure the time required to complete 1 job. 2 Locate the second marker on the tachymeter scale indicates the average number of jobs accomplished in 20 seconds: "180" (tachymeter scale figure) x 15 jobs = 2700 jobs/hour 10 STOPWATCH second hand: 20 seconds q Ex. : "180...
Manual
Page 11
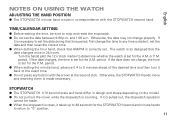
... the exact time. TIME/CALENDAR SETTING q Before setting the time, be made necessary. If it back to set the date and then reset the correct time. q When setting the minute hand, advance it 4 to any button with the STOPWATCH second hand. Otherwise, the date may not change the time to 5 minutes ahead of the desired time and then turn it is set the date between 9:00 p.m. English NOTES ON USING THE WATCH ADJUSTING THE HAND POSITION q The STOPWATCH minute hand moves in...
... the exact time. TIME/CALENDAR SETTING q Before setting the time, be made necessary. If it back to set the date and then reset the correct time. q When setting the minute hand, advance it 4 to any button with the STOPWATCH second hand. Otherwise, the date may not change the time to 5 minutes ahead of the desired time and then turn it is set the date between 9:00 p.m. English NOTES ON USING THE WATCH ADJUSTING THE HAND POSITION q The STOPWATCH minute hand moves in...
Manual
Page 12
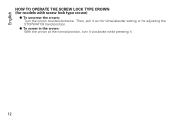
English HOW TO OPERATE THE SCREW LOCK TYPE CROWN (for adjusting the STOPWATCH hand position. Then, pull it . 12 q To screw in the crown: With the crown at the normal position, turn it clockwise while pressing it out for time/calendar setting or for models with screw lock type crown) q To unscrew the crown: Turn the crown counterclockwise.
English HOW TO OPERATE THE SCREW LOCK TYPE CROWN (for adjusting the STOPWATCH hand position. Then, pull it . 12 q To screw in the crown: With the crown at the normal position, turn it clockwise while pressing it out for time/calendar setting or for models with screw lock type crown) q To unscrew the crown: Turn the crown counterclockwise.
Manual
Page 13
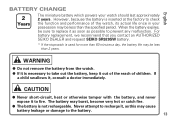
... SEIKO SR920SW battery. * If the stopwatch is inserted at the factory to check the function and performance of children. If a child swallows it out of the reach of the watch, its actual life once in your watch . q The battery is necessary to prevent any malfunction. However, because the battery is used for more than 60 minutes a day, the battery life may be sure to replace...
... SEIKO SR920SW battery. * If the stopwatch is inserted at the factory to check the function and performance of children. If a child swallows it out of the reach of the watch, its actual life once in your watch . q The battery is necessary to prevent any malfunction. However, because the battery is used for more than 60 minutes a day, the battery life may be sure to replace...
Manual
Page 14
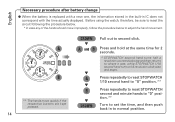
..., follow the procedure below to adjust the hand movement. Before using the watch, therefore, be sure to where it was, while STOPWATCH 1/10 second hand turns a full revolution clockwise and stops. English Necessary procedure after battery change q When the battery is replaced with a new one, the information stored in the built-in to second click. B w CROWN Press repeatedly to reset STOPWATCH second and minute hands to "0" position.** Turn to set the time, and then push back...
..., follow the procedure below to adjust the hand movement. Before using the watch, therefore, be sure to where it was, while STOPWATCH 1/10 second hand turns a full revolution clockwise and stops. English Necessary procedure after battery change q When the battery is replaced with a new one, the information stored in the built-in to second click. B w CROWN Press repeatedly to reset STOPWATCH second and minute hands to "0" position.** Turn to set the time, and then push back...
Manual
Page 15
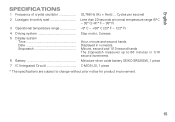
...; C ~ 35° C) (41° F ~ 95° F) 3 Operational temperature range 5° C ~ +50° C (23° F ~ 122° F) 4 Driving system 5 Display system Time Date Stopwatch Step motor, 3 pieces Hour, minute and second hands Displayed in 1/10 second increments. 6 Battery Miniature silver oxide battery SEIKO SR920SW, 1 piece 7 IC (Integrated Circuit C-MOS-LSI, 1 piece * The specifications are subject to 60 minutes in numerals. English SPECIFICATIONS 1 Frequency of crystal oscillator 32,768 Hz (Hz = Hertz ...
...; C ~ 35° C) (41° F ~ 95° F) 3 Operational temperature range 5° C ~ +50° C (23° F ~ 122° F) 4 Driving system 5 Display system Time Date Stopwatch Step motor, 3 pieces Hour, minute and second hands Displayed in 1/10 second increments. 6 Battery Miniature silver oxide battery SEIKO SR920SW, 1 piece 7 IC (Integrated Circuit C-MOS-LSI, 1 piece * The specifications are subject to 60 minutes in numerals. English SPECIFICATIONS 1 Frequency of crystal oscillator 32,768 Hz (Hz = Hertz ...
Parts Catalog
Page 1
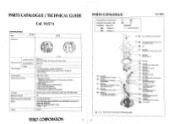
..., Matsushita SR920SW Battery life is approximately 2 years. Voltage: 1.65V 0 jewel SEIKO CORPORATION 1 PARTS CATALOGUE Disassembling procedure Figs. Al Outside diameter Movement size Casing diameter Height Time indication Driving system Additional mechanism Loss/gain Regulation system Measuring gate by quartz tester Battery Jewels (X 1.0) 029.5 mm 26.0 mm between 3 o'clock and 9 o'clock sides 028.8 mm 3.7 mm • Three hands (hour, minute and second) • Chronograph hands (minute, second and 1/10 second) • Date calendar Step motor (3 pcs.) • Stopwatch function •...
..., Matsushita SR920SW Battery life is approximately 2 years. Voltage: 1.65V 0 jewel SEIKO CORPORATION 1 PARTS CATALOGUE Disassembling procedure Figs. Al Outside diameter Movement size Casing diameter Height Time indication Driving system Additional mechanism Loss/gain Regulation system Measuring gate by quartz tester Battery Jewels (X 1.0) 029.5 mm 26.0 mm between 3 o'clock and 9 o'clock sides 028.8 mm 3.7 mm • Three hands (hour, minute and second) • Chronograph hands (minute, second and 1/10 second) • Date calendar Step motor (3 pcs.) • Stopwatch function •...
Parts Catalog
Page 2
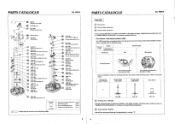
... cases, Check thecase number and refer to "CASING PARTS CATALOGUE" to indicate the hands installation height. Discrimi- PARTS CATALOGUE Cal. V657A Remarks: g Hour wheel O Fourth wheel and pinion O Center wheel and pinion Those parts specified above are determined based on the extreme right. V657A watch has numerals printed on Standard type 2 Dial Movement MIN Printed position 0 to choose a corresponding winding stem. 26 Switch spring 4246 342 Use...
... cases, Check thecase number and refer to "CASING PARTS CATALOGUE" to indicate the hands installation height. Discrimi- PARTS CATALOGUE Cal. V657A Remarks: g Hour wheel O Fourth wheel and pinion O Center wheel and pinion Those parts specified above are determined based on the extreme right. V657A watch has numerals printed on Standard type 2 Dial Movement MIN Printed position 0 to choose a corresponding winding stem. 26 Switch spring 4246 342 Use...
Parts Catalog
Page 3
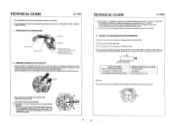
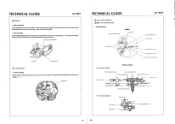
... procedure below . Hands to be installed Hour, minute and second hands Chronograph 1/10 secor.d hand Chronograph minute and second hands Positions M which hands are kept pressed. 4, Turn the crown to set the desired time and push the crown back in the illustration below. (When checking the current consumption, short-circuit with power supplied from an external source.) 0® ti0NIPICA MEI W. TECHNICAL GUIDE Cal. VS57A • The explanation here is used, place the movements on a flat...
... procedure below . Hands to be installed Hour, minute and second hands Chronograph 1/10 secor.d hand Chronograph minute and second hands Positions M which hands are kept pressed. 4, Turn the crown to set the desired time and push the crown back in the illustration below. (When checking the current consumption, short-circuit with power supplied from an external source.) 0® ti0NIPICA MEI W. TECHNICAL GUIDE Cal. VS57A • The explanation here is used, place the movements on a flat...
Parts Catalog
Page 4
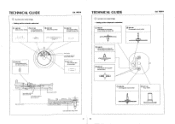
... Hour wheel J TECHNICAL GUIDE 0 Auxiliary train wheel bridge • Setting position (calendar mechanism) (8) 0806 368 13 0737 891 Date corrector wheel Intermediate wheel for date corrector holder O 0817 368 Intermediate date driving wheel LI__ 1 TECHNICAL GUIDE 0 Auxiliary train wheel bridge • Setting position (Stopwatch mechanism) O 0886 002 Intermediate chronograph minute wheel and pinion (B) O 0902 006 Chronograph minute wheel O 0886 001 Intermediate chronograph minute wheel and pinion (A) CO 0885 357 Intermediate chronograph second wheel Cal...
... Hour wheel J TECHNICAL GUIDE 0 Auxiliary train wheel bridge • Setting position (calendar mechanism) (8) 0806 368 13 0737 891 Date corrector wheel Intermediate wheel for date corrector holder O 0817 368 Intermediate date driving wheel LI__ 1 TECHNICAL GUIDE 0 Auxiliary train wheel bridge • Setting position (Stopwatch mechanism) O 0886 002 Intermediate chronograph minute wheel and pinion (B) O 0902 006 Chronograph minute wheel O 0886 001 Intermediate chronograph minute wheel and pinion (A) CO 0885 357 Intermediate chronograph second wheel Cal...
Parts Catalog
Page 5
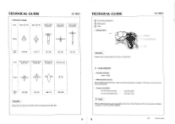
... Third wheel and pinion Filth wheel and pinion (A) ■ ---------- Minute wheel and pinion - TECHNICAL GUIDE Cal. Then push the battery clamp so that the hooking portion catches the main plate securely. V657A • Third wheel and pinion Setting wheel Step rotor (B) O O ---- Filth wheel and pinion (RI 9 to remove Using tweezers, catch the protrusion of MHO 0 00 • 0 •...
... Third wheel and pinion Filth wheel and pinion (A) ■ ---------- Minute wheel and pinion - TECHNICAL GUIDE Cal. Then push the battery clamp so that the hooking portion catches the main plate securely. V657A • Third wheel and pinion Setting wheel Step rotor (B) O O ---- Filth wheel and pinion (RI 9 to remove Using tweezers, catch the protrusion of MHO 0 00 • 0 •...
Parts Catalog
Page 6
... pinion Setting wheel Shape Parts No. _ 0701 890 0701 357 0261 176 0281 890 Remarks: Reassemble the step rotor (B) with conductive tweezers. 11 12 95.1 Printed in Japan TECHNICAL GUIDE Cal. Yoko IV. VALUE CHECKING • Coil block resistance 1.9Ki2 2.3Kt2 • Measuring time accuracy When measuring time accuracy, make sure that the contact spring of the circuit block and battery connection...
... pinion Setting wheel Shape Parts No. _ 0701 890 0701 357 0261 176 0281 890 Remarks: Reassemble the step rotor (B) with conductive tweezers. 11 12 95.1 Printed in Japan TECHNICAL GUIDE Cal. Yoko IV. VALUE CHECKING • Coil block resistance 1.9Ki2 2.3Kt2 • Measuring time accuracy When measuring time accuracy, make sure that the contact spring of the circuit block and battery connection...


