User Guide
Page 3
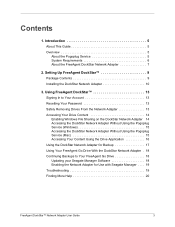
...Contents 9 Installing the DockStar Network Adapter 10 3. Using FreeAgent DockStar 13 Signing In to Your Account 13 Resetting Your Password 13 Safely Removing Drives From the Network Adapter 13 Accessing Your Drive Content 14 Enabling Windows File Sharing on the DockStar Network Adapter 14 ...Go Drive With the DockStar Network Adapter . 18 Continuing Backups to Your FreeAgent Go Drive 18 Updating your Seagate Manager Software 18 Enabling the Network Adapter for Use with Seagate Manager . . . . 19 Troubleshooting 19 Finding More Help 20 FreeAgent DockStar™ Network Adapter User ...
...Contents 9 Installing the DockStar Network Adapter 10 3. Using FreeAgent DockStar 13 Signing In to Your Account 13 Resetting Your Password 13 Safely Removing Drives From the Network Adapter 13 Accessing Your Drive Content 14 Enabling Windows File Sharing on the DockStar Network Adapter 14 ...Go Drive With the DockStar Network Adapter . 18 Continuing Backups to Your FreeAgent Go Drive 18 Updating your Seagate Manager Software 18 Enabling the Network Adapter for Use with Seagate Manager . . . . 19 Troubleshooting 19 Finding More Help 20 FreeAgent DockStar™ Network Adapter User ...
User Guide
Page 5
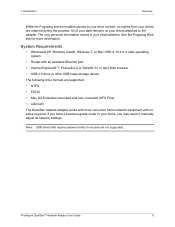
... Explorer® 7, Firefox® 2.0 or Safari® 3.0 or later Web browser • USB 2.0 drive or other USB mass storage device The following drive formats are not supported. Note: USB drives that require password entry for more information. Introduction Overview While the Pogoplug ...access to manually adjust its network settings. FreeAgent DockStar™ Network Adapter User Guide 6 System Requirements • Windows® XP, Windows Vista®, Windows 7, or Mac OS® X 10.4.9 or later operating system • Router with no copies from your email address. 1.
... Explorer® 7, Firefox® 2.0 or Safari® 3.0 or later Web browser • USB 2.0 drive or other USB mass storage device The following drive formats are not supported. Note: USB drives that require password entry for more information. Introduction Overview While the Pogoplug ...access to manually adjust its network settings. FreeAgent DockStar™ Network Adapter User Guide 6 System Requirements • Windows® XP, Windows Vista®, Windows 7, or Mac OS® X 10.4.9 or later operating system • Router with no copies from your email address. 1.
User Guide
Page 19
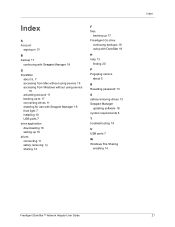
... accessing from Windows without using service 15 activating account 11 backing up to 17 connecting drives 11 enabling for use with Seagate Manager 19 front light 7 installing 10 USB ports 7 drive application downloading 16 setting up 16 drives connecting 11 safely removing 13 sharing 14 F ... DockStar 18 H help 13 finding 20 P Pogoplug service about 5 R Resetting password 13 S safely removing drives 13 Seagate Manager updating software 18 system requirements 6 T troubleshooting 19 U USB ports 7 W Windows File Sharing enabling 14 Index FreeAgent DockStar™ Network Adapter User Guide 21
... accessing from Windows without using service 15 activating account 11 backing up to 17 connecting drives 11 enabling for use with Seagate Manager 19 front light 7 installing 10 USB ports 7 drive application downloading 16 setting up 16 drives connecting 11 safely removing 13 sharing 14 F ... DockStar 18 H help 13 finding 20 P Pogoplug service about 5 R Resetting password 13 S safely removing drives 13 Seagate Manager updating software 18 system requirements 6 T troubleshooting 19 U USB ports 7 W Windows File Sharing enabling 14 Index FreeAgent DockStar™ Network Adapter User Guide 21
User Guide
Page 2
... Windows Installation Introduction 1 About this Guide 1 Components 1 Included in Package 21 System Requirements 21 Handling Precautions 21 Maxtor Product Support 21 Installing the Shared Storage II. . . 22 Step 1 - Power up the Drive 23 Step 3 - Changes are trademarks or registered trademarks of this publication. Setup the Drive 5 Using the Shared Storage II 6 Using EasyManage 6 SimpleView 6 Create User Account 7 Settings 10...
... Windows Installation Introduction 1 About this Guide 1 Components 1 Included in Package 21 System Requirements 21 Handling Precautions 21 Maxtor Product Support 21 Installing the Shared Storage II. . . 22 Step 1 - Power up the Drive 23 Step 3 - Changes are trademarks or registered trademarks of this publication. Setup the Drive 5 Using the Shared Storage II 6 Using EasyManage 6 SimpleView 6 Create User Account 7 Settings 10...

User Guide
Page 4
... notifications or update your new Maxtor Shared Storage II with an available 10/100/1000 Ethernet port - This can cause loss of Maxtor Corporation. Maxtor EasyManage™ Software - My Stuff Login to prevent data loss - Software Download Download installation and diagnostic programs for more as required by product, category, keywords, or phrases. - Windows® 2000 Professional, XP Professional...
... notifications or update your new Maxtor Shared Storage II with an available 10/100/1000 Ethernet port - This can cause loss of Maxtor Corporation. Maxtor EasyManage™ Software - My Stuff Login to prevent data loss - Software Download Download installation and diagnostic programs for more as required by product, category, keywords, or phrases. - Windows® 2000 Professional, XP Professional...
User Guide
Page 5
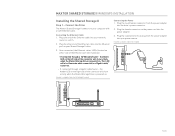
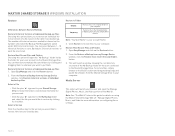
... the standard electrical plug from the power adapter into the Ethernet port on your network, router or switch. 2. MAXTOR SHARED STORAGE II WINDOWS INSTALLATION Installing the Shared Storage II Step 1 - Once connected, the Ethernet status LED(s) located on either side of the Ethernet cable into the ...Shared Storage II drive. 3. the Green LED on . the Amber LED on the right side of the connector will show activity when the Shared Storage Drive is powered on the left side of the Ethernet cable into the power adapter. 3. Plug the female connector on . If connected through a 10...
... the standard electrical plug from the power adapter into the Ethernet port on your network, router or switch. 2. MAXTOR SHARED STORAGE II WINDOWS INSTALLATION Installing the Shared Storage II Step 1 - Once connected, the Ethernet status LED(s) located on either side of the Ethernet cable into the ...Shared Storage II drive. 3. the Green LED on . the Amber LED on the right side of the connector will show activity when the Shared Storage Drive is powered on the left side of the Ethernet cable into the power adapter. 3. Plug the female connector on . If connected through a 10...

User Guide
Page 6
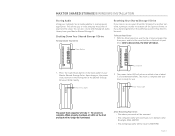
...panels: Back Panel LEDs LED Power LED (located in the center of your Shared Storage II Drive when power is occurring Left Green - 10/100 Mbps Ethernet connectivity Not Illuminated - MAXTOR SHARED STORAGE II WINDOWS INSTALLATION Step 2 - The startup process can take up the Drive 1. Power ... Ethernet connection is Illuminated - Power Off 2. The following tables define the meaning/status of each LED on your Maxtor Shared Storage Drive. Network communication is applied. Power Button Activity LED Ethernet LED Front Panel LEDs LED Definition Top Power Activity ...
...panels: Back Panel LEDs LED Power LED (located in the center of your Shared Storage II Drive when power is occurring Left Green - 10/100 Mbps Ethernet connectivity Not Illuminated - MAXTOR SHARED STORAGE II WINDOWS INSTALLATION Step 2 - The startup process can take up the Drive 1. Power ... Ethernet connection is Illuminated - Power Off 2. The following tables define the meaning/status of each LED on your Maxtor Shared Storage Drive. Network communication is applied. Power Button Activity LED Ethernet LED Front Panel LEDs LED Definition Top Power Activity ...
User Guide
Page 7
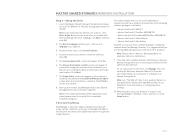
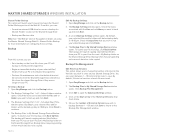
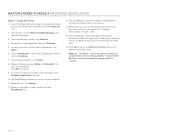
...the EasyManage application with the EasyManage CD. Run Set-up the Drive 1. MAXTOR SHARED STORAGE II WINDOWS INSTALLATION Step 3 - From the main menu, click Install Software. 4. Click Yes. 6. Maxtor OneTouch III USB 2.0 - However, it is suggested that will appear as...the location of these settings. 10. Follow the onscreen prompts in conjunction with these software packages completely separate from EasyManage. Click Next. 7. The Select Language window opens. Insert the Maxtor Shared Storage II Installation Software into your Shared Storage drive has no security password...
...the EasyManage application with the EasyManage CD. Run Set-up the Drive 1. MAXTOR SHARED STORAGE II WINDOWS INSTALLATION Step 3 - From the main menu, click Install Software. 4. Click Yes. 6. Maxtor OneTouch III USB 2.0 - However, it is suggested that will appear as...the location of these settings. 10. Follow the onscreen prompts in conjunction with these software packages completely separate from EasyManage. Click Next. 7. The Select Language window opens. Insert the Maxtor Shared Storage II Installation Software into your Shared Storage drive has no security password...
User Guide
Page 12
...information. Maxtor Support Click on the Shared Storage drive and lists them in the Name field. 3. Every time you drag files to the EasyManage Home Window. PAGE 10 At this point, the Drag and Sort feature is sorted into the appropriate folder based on Shared Storage II Drive....Sort Settings 1. What's New? At this button to go to the Settings window. MAXTOR SHARED STORAGE II WINDOWS INSTALLATION Connect to a User Account This feature of EasyManage allows you to select the user account's share that you can access the folder for the selected user. When finished, you...
...information. Maxtor Support Click on the Shared Storage drive and lists them in the Name field. 3. Every time you drag files to the EasyManage Home Window. PAGE 10 At this point, the Drag and Sort feature is sorted into the appropriate folder based on Shared Storage II Drive....Sort Settings 1. What's New? At this button to go to the Settings window. MAXTOR SHARED STORAGE II WINDOWS INSTALLATION Connect to a User Account This feature of EasyManage allows you to select the user account's share that you can access the folder for the selected user. When finished, you...
User Guide
Page 14
.... Open EasyManage and click on how much data has to back up and click Next. 3. MAXTOR SHARED STORAGE II WINDOWS INSTALLATION Shared Folder Backup This option will be backed up daily at 10:00 pm. From this screen, you wish to backup (between 1 - 10 Historical Versions to run your first backup, click Back Up Now. A second Backup: Settings...
.... Open EasyManage and click on how much data has to back up and click Next. 3. MAXTOR SHARED STORAGE II WINDOWS INSTALLATION Shared Folder Backup This option will be backed up daily at 10:00 pm. From this screen, you wish to backup (between 1 - 10 Historical Versions to run your first backup, click Back Up Now. A second Backup: Settings...
User Guide
Page 16
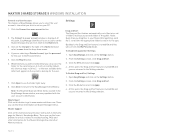
MAXTOR SHARED STORAGE II WINDOWS INSTALLATION Restore Differences Between Restore Methods Restore Historical Versions of Individual Backed-up Files Choosing this guide for the user connected to your account Name. 3. You can select between 1 - 10 Historical Versions to your account. - From the Restore a Backup from my Storage Device window, click Restore historical versions of a file, based on the date...
MAXTOR SHARED STORAGE II WINDOWS INSTALLATION Restore Differences Between Restore Methods Restore Historical Versions of Individual Backed-up Files Choosing this guide for the user connected to your account Name. 3. You can select between 1 - 10 Historical Versions to your account. - From the Restore a Backup from my Storage Device window, click Restore historical versions of a file, based on the date...

User Guide
Page 17
... user share in an explorer window. 1. You will notice that the OneTouch Status Icon will be performed. Report the connectivity of your Shared Storage Drive and or the status of these options. Can be configured. Click on page 10 for ... EasyManage software features Color Definitions Icon Gray Meaning No Shared Storage Drive is connected. Green Last backup completed successfully. Red Last backup failed. MSS Settings This feature opens EasyManage's Settings window. MAXTOR SHARED STORAGE II WINDOWS INSTALLATION OneTouch Status Icons The OneTouch Status Icon can...
... user share in an explorer window. 1. You will notice that the OneTouch Status Icon will be performed. Report the connectivity of your Shared Storage Drive and or the status of these options. Can be configured. Click on page 10 for ... EasyManage software features Color Definitions Icon Gray Meaning No Shared Storage Drive is connected. Green Last backup completed successfully. Red Last backup failed. MSS Settings This feature opens EasyManage's Settings window. MAXTOR SHARED STORAGE II WINDOWS INSTALLATION OneTouch Status Icons The OneTouch Status Icon can...
User Guide
Page 19
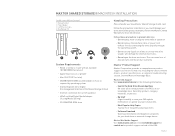
...your drive after moving it to store and play thousands of your Maxtor Shared Storage Drive. With the drive turned on, use . Upon doing so, the power status button on the front and back will take 1 - 10 seconds to its default name (Example: MSS-000155) - When... MSHOME PAGE 17 Shutting Down Your Shared Storage II Drive To Shut Down Your Drive Resetting Your Shared Storage II Drive If you can also create and manage an audio library from your drive. Power Button Reset Button 1. Power Status Light 2. MAXTOR SHARED STORAGE II WINDOWS INSTALLATION Storing Audio Using your computer...
...your drive after moving it to store and play thousands of your Maxtor Shared Storage Drive. With the drive turned on, use . Upon doing so, the power status button on the front and back will take 1 - 10 seconds to its default name (Example: MSS-000155) - When... MSHOME PAGE 17 Shutting Down Your Shared Storage II Drive To Shut Down Your Drive Resetting Your Shared Storage II Drive If you can also create and manage an audio library from your drive. Power Button Reset Button 1. Power Status Light 2. MAXTOR SHARED STORAGE II WINDOWS INSTALLATION Storing Audio Using your computer...
User Guide
Page 23
...Shared Storage II drive) - Follow the precautions listed here or you could damage your new Maxtor Shared Storage II with an available 10/100/1000 Ethernet port - Follow these precautions to modify or view your FAQ update notifications or update your hard drive or external storage...Software Maxtor Shared Storage™ II Logiciel d'installation, Installationssoftware, Software di installazione, Installationsprogram, Software de instalación, Installatiesoftware, Asennusohjelma, Software de Instalação, Includes: - Maxtor Shared Storage II User Guide (English) WINDOWS English ...
...Shared Storage II drive) - Follow the precautions listed here or you could damage your new Maxtor Shared Storage II with an available 10/100/1000 Ethernet port - Follow these precautions to modify or view your FAQ update notifications or update your hard drive or external storage...Software Maxtor Shared Storage™ II Logiciel d'installation, Installationssoftware, Software di installazione, Installationsprogram, Software de instalación, Installatiesoftware, Asennusohjelma, Software de Instalação, Includes: - Maxtor Shared Storage II User Guide (English) WINDOWS English ...
User Guide
Page 26
...Restart. 12. When the computer is required to proceed. 10. The EasyManage - Note: See "The Web UI" later in this guide for more information on configuring these settings. Shared Folder Backup for details on your computer. 11. To ...CD-ROM drive and double-click the Install CD icon. 2. Shared Storage Administrator Password window will begin locating Shared Storage Drives detected on the Shared Storage drive. 16. MAXTOR SHARED STORAGE II MACINTOSH INSTALLATION Step 3 - Then double-click the Maxtor EasyManage.pkg icon to install the EasyManage software and click Continue. ...
...Restart. 12. When the computer is required to proceed. 10. The EasyManage - Note: See "The Web UI" later in this guide for more information on configuring these settings. Shared Folder Backup for details on your computer. 11. To ...CD-ROM drive and double-click the Install CD icon. 2. Shared Storage Administrator Password window will begin locating Shared Storage Drives detected on the Shared Storage drive. 16. MAXTOR SHARED STORAGE II MACINTOSH INSTALLATION Step 3 - Then double-click the Maxtor EasyManage.pkg icon to install the EasyManage software and click Continue. ...
User Guide
Page 32
MAXTOR SHARED STORAGE II MACINTOSH INSTALLATION Editing Backup Settings Set Day and Time Choose a time for your Mac OS...2. Delete Unused This deletes all but the most current historical version of the window. 4. Type your user account. 6. Choose your files, you can take place. Type your Shared Storage Drive that the "automatically log in manually and would like to switch to ..."Delete history" will need to back up files from your password and click OK. 10. The deletion begins. 2. Go to store previous, or "historical," versions of each file. Click Accounts. 3.
MAXTOR SHARED STORAGE II MACINTOSH INSTALLATION Editing Backup Settings Set Day and Time Choose a time for your Mac OS...2. Delete Unused This deletes all but the most current historical version of the window. 4. Type your user account. 6. Choose your files, you can take place. Type your Shared Storage Drive that the "automatically log in manually and would like to switch to ..."Delete history" will need to back up files from your password and click OK. 10. The deletion begins. 2. Go to store previous, or "historical," versions of each file. Click Accounts. 3.

Quick Start Guide
Page 4
... will launch the Web User Interface (Web UI). Maxtor Shared Storage II User Guide (English) WINDOWS English Français Deutsch Español Italiano MACINTOSH English Français Deutsch © 2006 Maxtor Corporation and its Licensors. U.S. All rights reserved. 06...new user account and the appropriate folders for Shared Storage drives on the Create a user account button. 10. When the Home screen appears, click on your browser to return to continue. Installation Software Maxtor Shared Storage™ II Logiciel d'installation, Installationssoftware, Software di installazione...
... will launch the Web User Interface (Web UI). Maxtor Shared Storage II User Guide (English) WINDOWS English Français Deutsch Español Italiano MACINTOSH English Français Deutsch © 2006 Maxtor Corporation and its Licensors. U.S. All rights reserved. 06...new user account and the appropriate folders for Shared Storage drives on the Create a user account button. 10. When the Home screen appears, click on your browser to return to continue. Installation Software Maxtor Shared Storage™ II Logiciel d'installation, Installationssoftware, Software di installazione...
Quick Start Guide
Page 6
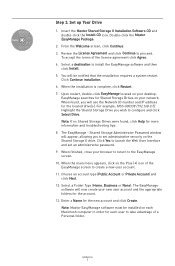
... EasyManage software will appear, allowing you wish to the EasyManage screen. 10. All rights reserved. 06/06 PN: 20337500 Step 3. Select a destination to proceed. The EasyManage - Select a Folder Type (Home, Business or None). Maxtor Backup™ Software - Maxtor Shared Storage II User Guide (English) WINDOWS English Français Deutsch Español Italiano MACINTOSH English Fran...
... EasyManage software will appear, allowing you wish to the EasyManage screen. 10. All rights reserved. 06/06 PN: 20337500 Step 3. Select a destination to proceed. The EasyManage - Select a Folder Type (Home, Business or None). Maxtor Backup™ Software - Maxtor Shared Storage II User Guide (English) WINDOWS English Français Deutsch Español Italiano MACINTOSH English Fran...


