Assembly Manual
Page 1
Assembly Instructions
Assembly Instructions

Assembly Manual
Page 2
... Schwinn® Force™ Home Gym Warranty Card 15 Schwinn® Force™ Home Gym Warranty 17 CAUTION! Bind cables and Resistance Rods with more resistance than you experience any exercise program, consult your physician. For Your Safety Please Follow These Instructions Keep your machine before each workout. Only he or she can determine the exercise program that observers also stand clear of breath while exercising, stop the exercise and consult your physician or health...
... Schwinn® Force™ Home Gym Warranty Card 15 Schwinn® Force™ Home Gym Warranty 17 CAUTION! Bind cables and Resistance Rods with more resistance than you experience any exercise program, consult your physician. For Your Safety Please Follow These Instructions Keep your machine before each workout. Only he or she can determine the exercise program that observers also stand clear of breath while exercising, stop the exercise and consult your physician or health...

Assembly Manual
Page 3
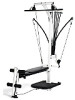
Get To Know 1 Your Machine CONGRATULATIONS on your commitment to yourself. Thank you exercise using your Schwinn® ForceTM home gym. With all of workout equipment can be very confusing. THE SCHWINN® ForceTM Home Gym Lat Cross Bar with Pulleys Upper Lat Tower Rod Hook Cable Leg Attachment Pull Down Lat Bar Rod Caps Resistance Rod Pack Rod Box Frame Seat/Bench Assembly Rail Base Assembly With the Schwinn® ForceTM home gym as we understand that will...
Get To Know 1 Your Machine CONGRATULATIONS on your commitment to yourself. Thank you exercise using your Schwinn® ForceTM home gym. With all of workout equipment can be very confusing. THE SCHWINN® ForceTM Home Gym Lat Cross Bar with Pulleys Upper Lat Tower Rod Hook Cable Leg Attachment Pull Down Lat Bar Rod Caps Resistance Rod Pack Rod Box Frame Seat/Bench Assembly Rail Base Assembly With the Schwinn® ForceTM home gym as we understand that will...
Assembly Manual
Page 5
... 4 Description LOWER LAT TOWER BASE ASSEMBLY RAIL LEG ATTACHMENT RAIL KNOB CHEST BAR W/ PULLEYS AND ROD CABLES LAT CROSS BAR W/ PULLEYS UPPER LAT TOWER RESISTANCE ROD PACK ROD PACK BOTTOM PLATE ROD BOX FRAME SEAT ASSEMBLY BENCH ASSEMBLY SEAT SPACER SEAT KNOB SHORT CHROME ROLLER TUBE LONG CHROME ROLLER TUBE FOAM ROLLERS FOAM ROLLER END CAPS NOTE: LEAVE ALL CABLES WRAPPED AND BAGGED UNTIL YOUR SCHWINN® FORCE™ HOME GYM IS FULLY ASSEMBLED. By using a ratchet to tighten a locknut on your Schwinn® Force™ home gym, turn bolts or...
... 4 Description LOWER LAT TOWER BASE ASSEMBLY RAIL LEG ATTACHMENT RAIL KNOB CHEST BAR W/ PULLEYS AND ROD CABLES LAT CROSS BAR W/ PULLEYS UPPER LAT TOWER RESISTANCE ROD PACK ROD PACK BOTTOM PLATE ROD BOX FRAME SEAT ASSEMBLY BENCH ASSEMBLY SEAT SPACER SEAT KNOB SHORT CHROME ROLLER TUBE LONG CHROME ROLLER TUBE FOAM ROLLERS FOAM ROLLER END CAPS NOTE: LEAVE ALL CABLES WRAPPED AND BAGGED UNTIL YOUR SCHWINN® FORCE™ HOME GYM IS FULLY ASSEMBLED. By using a ratchet to tighten a locknut on your Schwinn® Force™ home gym, turn bolts or...

Assembly Manual
Page 6
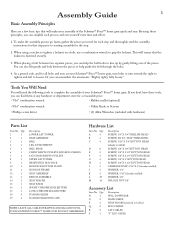
... in Step 13. The best place for the Schwinn® Force™ home gym is on a hard, level surface. Unless otherwise instructed, keep all nuts, bolts and screws loose until the final tightening instructions in the Assembly Instructions. 4 Assembly Guide Before You Assemble Select where you are actual size Item #: A Qty.: 4 Descr: 1/4" X 3/4" Phillips Head Machine Screw Item #: B Qty.: 3 Descr: #10 X 1" Self Threading Screw Item #: C Qty.: 4 Descr: 5/16" X 3/4" Button Head Screw (already installed...
... in Step 13. The best place for the Schwinn® Force™ home gym is on a hard, level surface. Unless otherwise instructed, keep all nuts, bolts and screws loose until the final tightening instructions in the Assembly Instructions. 4 Assembly Guide Before You Assemble Select where you are actual size Item #: A Qty.: 4 Descr: 1/4" X 3/4" Phillips Head Machine Screw Item #: B Qty.: 3 Descr: #10 X 1" Self Threading Screw Item #: C Qty.: 4 Descr: 5/16" X 3/4" Button Head Screw (already installed...

Assembly Manual
Page 7
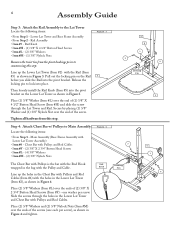
... rear of (2) 3/8" X 2 1/2" Button Head Screws (Item #E) - attach the lower Button Head Screw first. The lower screw will slide through the holes in the back of the lower Button Head Screw to secure it, as shown in Figure 1. Place (1) 3/8" Washer and (1) 3/8" Nylock Nut (Item #M) over the end of the Base and Lower Lat Tower, as shown in Figure 2, and tighten. 2 M Rail Support Bar M L 5 D L G 3 Assembly Guide Step 1: Attach Lower Lat Tower to the Base Assembly Locate the...
... rear of (2) 3/8" X 2 1/2" Button Head Screws (Item #E) - attach the lower Button Head Screw first. The lower screw will slide through the holes in the back of the lower Button Head Screw to secure it, as shown in Figure 1. Place (1) 3/8" Washer and (1) 3/8" Nylock Nut (Item #M) over the end of the Base and Lower Lat Tower, as shown in Figure 2, and tighten. 2 M Rail Support Bar M L 5 D L G 3 Assembly Guide Step 1: Attach Lower Lat Tower to the Base Assembly Locate the...
Assembly Manual
Page 8
... Lower Lat Tower (Item #2), as shown in Figure 3. one each per screw. Line up the holes in the Chest Bar with Pulleys and Rod Cables (Item #6) with Pulleys and Rod Cables. Lower Lat Tower and Base Frame Assembly • From Step 2 - Then loosely install the Rail Knob (Item #5) into the pivot bracket on the Rail before you slide the Rail into place. Rail Assembly • Item #5 - Step 4: Attach Chest Bar w/ Pulleys...
... Lower Lat Tower (Item #2), as shown in Figure 3. one each per screw. Line up the holes in the Chest Bar with Pulleys and Rod Cables (Item #6) with Pulleys and Rod Cables. Lower Lat Tower and Base Frame Assembly • From Step 2 - Then loosely install the Rail Knob (Item #5) into the pivot bracket on the Rail before you slide the Rail into place. Rail Assembly • Item #5 - Step 4: Attach Chest Bar w/ Pulleys...
Assembly Manual
Page 9
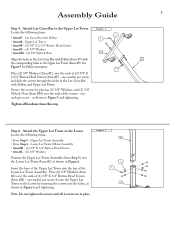
...: 8 • From Step 5 - one each per screw. Tighten all 6 screws are in the Upper Lat Tower (Item #8). L Insert the base of the Upper Lat Tower into the holes, as shown in Figure 5, and tightening. See Figure 5 for Pulley orientation. Lat Cross Bar with Pulleys and Upper Lat Tower. Secure the screws by inserting the screws into the top of the screws - Assembly Guide Step 5: Attach Lat Cross Bar to the Lower Figure 6 Locate the following...
...: 8 • From Step 5 - one each per screw. Tighten all 6 screws are in the Upper Lat Tower (Item #8). L Insert the base of the Upper Lat Tower into the holes, as shown in Figure 5, and tightening. See Figure 5 for Pulley orientation. Lat Cross Bar with Pulleys and Upper Lat Tower. Secure the screws by inserting the screws into the top of the screws - Assembly Guide Step 5: Attach Lat Cross Bar to the Lower Figure 6 Locate the following...

Assembly Manual
Page 10
... Pack Frame (Item #11) with the lower holes in the Rod Pack Frame and Lower Lat Tower, and secure, using (3) 1/4" Washers (Item #J) over (3) #10 X 1" Self Threading Screws (Item #B) - one over each screw by the Plate. 8 Assembly Guide Step 7: Attach Resistance Rods to the Rod Pack Bottom Plate using (2) 3/8" Washers over the ends of (2) 3/8" X 4" Button Head Screws (Item #G) - Lay the Resistance Rod Pack (Item #9) on the...
... Pack Frame (Item #11) with the lower holes in the Rod Pack Frame and Lower Lat Tower, and secure, using (3) 1/4" Washers (Item #J) over (3) #10 X 1" Self Threading Screws (Item #B) - one over each screw by the Plate. 8 Assembly Guide Step 7: Attach Resistance Rods to the Rod Pack Bottom Plate using (2) 3/8" Washers over the ends of (2) 3/8" X 4" Button Head Screws (Item #G) - Lay the Resistance Rod Pack (Item #9) on the...

Assembly Manual
Page 11
... the (4) 5/16" X 3/4" Button Head Screws - Figure 9 1 9 10 K C Step 10: Attach the Seat Assembly to Rod Pack Frame Locate the following items: • Item #12 - Assembly Guide Step 9: Attach Rod Pack Bottom Plate to the Bench Assembly Locate the following items: • From Step 7 - Seat Assembly • Item #13 - Insert (4) 1/4" X 3/4" Phillips Head Screws (Item #A) through the lined up the Rod Pack Bottom Plate with Resistance Rods (from Step 7) with the Rod...
... the (4) 5/16" X 3/4" Button Head Screws - Figure 9 1 9 10 K C Step 10: Attach the Seat Assembly to Rod Pack Frame Locate the following items: • Item #12 - Assembly Guide Step 9: Attach Rod Pack Bottom Plate to the Bench Assembly Locate the following items: • From Step 7 - Seat Assembly • Item #13 - Insert (4) 1/4" X 3/4" Phillips Head Screws (Item #A) through the lined up the Rod Pack Bottom Plate with Resistance Rods (from Step 7) with the Rod...
Assembly Manual
Page 12
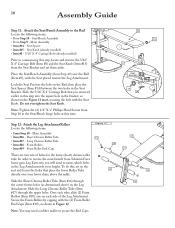
... may need to commencing this step, locate and remove the 5/16" X 4" Carriage Bolt (Item #I 15 14 Note: Tighten the (4) 1/4" X 1" Phillips Head Screws from the Seat Bracket and set them aside. 10 Assembly Guide Step 11: Attach the Seat/Bench Assembly to secure the End Caps. Slide the 5/16" X 4" Carriage Bolt that place the lower Roller Tube 16 19 directly over the Rail (Item #3), with the Seat placed nearest the Leg Attachment. Step 12: Attach the Leg Attachment Rollers Locate...
... may need to commencing this step, locate and remove the 5/16" X 4" Carriage Bolt (Item #I 15 14 Note: Tighten the (4) 1/4" X 1" Phillips Head Screws from the Seat Bracket and set them aside. 10 Assembly Guide Step 11: Attach the Seat/Bench Assembly to secure the End Caps. Slide the 5/16" X 4" Carriage Bolt that place the lower Roller Tube 16 19 directly over the Rail (Item #3), with the Seat placed nearest the Leg Attachment. Step 12: Attach the Leg Attachment Rollers Locate...

Assembly Manual
Page 13
Run the Leg Cables on either side of the Seat/Bench Assembly and Rail, as shown in Figure 13b. Using the Lat Cables To use the Lat Cross Bar with Pulleys, attach the (2) Lat Cables (Item #R) to each Rod Cable (Item #Q) at the Chest Bar Pulleys, using (2) Snap Hooks. Using the Leg Cable For Leg Exercises, secure the Leg Cable (Item #S) to the Rod Cables (Item #Q) using (2) Snap Hooks (Item #P). Lat Cables R WARNING: Carefully go over the entire Schwinn® Force™ home gym assembly, tightening all screws, nuts and...
Run the Leg Cables on either side of the Seat/Bench Assembly and Rail, as shown in Figure 13b. Using the Lat Cables To use the Lat Cross Bar with Pulleys, attach the (2) Lat Cables (Item #R) to each Rod Cable (Item #Q) at the Chest Bar Pulleys, using (2) Snap Hooks. Using the Leg Cable For Leg Exercises, secure the Leg Cable (Item #S) to the Rod Cables (Item #Q) using (2) Snap Hooks (Item #P). Lat Cables R WARNING: Carefully go over the entire Schwinn® Force™ home gym assembly, tightening all screws, nuts and...

Assembly Manual
Page 14
.... Adjusting and Understanding the Resistance Rods The standard Schwinn® ForceTM home gym comes with your desired resistance level. Storage of one rod or several rods in combination, to create your machine to bind all the rods together at the top. Hooking up to one side when connecting and disconnecting the Resistance Rods from the cables. 12 How to Use Your Machine Using the Resistance...
.... Adjusting and Understanding the Resistance Rods The standard Schwinn® ForceTM home gym comes with your desired resistance level. Storage of one rod or several rods in combination, to create your machine to bind all the rods together at the top. Hooking up to one side when connecting and disconnecting the Resistance Rods from the cables. 12 How to Use Your Machine Using the Resistance...

Assembly Manual
Page 15
... after each workout and tighten as needed. Folding and Moving the Schwinn® Force™ Home Gym Folding and moving the Schwinn® Force™ home gym is sitting in your palm. How to Use 13 Your Machine Schwinn® Force™ Home Gym Hand Grips The Schwinn® Force™ home gym hand grips fit snugly around your shoulder by pulling the handle toward the cuff. Attach the Snap Hooks to any questions regarding maintenance please call...
... after each workout and tighten as needed. Folding and Moving the Schwinn® Force™ Home Gym Folding and moving the Schwinn® Force™ home gym is sitting in your palm. How to Use 13 Your Machine Schwinn® Force™ Home Gym Hand Grips The Schwinn® Force™ home gym hand grips fit snugly around your shoulder by pulling the handle toward the cuff. Attach the Snap Hooks to any questions regarding maintenance please call...
Assembly Manual
Page 16
.... Maximum user weight for the Schwinn® Force™ home gym is not meant for individual consumer use by institutions, clubs, etc. 9. Never use the Schwinn® Force™ home gym unsupervised. To do not use the Schwinn® Force™ home gym if you need replacement labels, please call a Nautilus Health and Fitness Representative at (800) 655-8443. 3. Read this manual and follow the Warning and Safety labels attached to using the Schwinn® Force™ home gym...
.... Maximum user weight for the Schwinn® Force™ home gym is not meant for individual consumer use by institutions, clubs, etc. 9. Never use the Schwinn® Force™ home gym unsupervised. To do not use the Schwinn® Force™ home gym if you need replacement labels, please call a Nautilus Health and Fitness Representative at (800) 655-8443. 3. Read this manual and follow the Warning and Safety labels attached to using the Schwinn® Force™ home gym...

Assembly Manual
Page 17
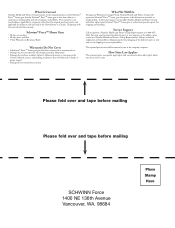
......) Would you like to receive additional information on new and interesting opportunities from other types of Schwinn Fitness. Yes No Which best describes your ...Schwinn Fitness 1400 NE 136th Ave. Schwinn and the Schwinn Quality Seal are registered trademarks of exercise equipment do you would prefer not to us. Miss Name: Address: City: Phone number: ( ) - Schwinn Force... Nautilus Inc. Schwinn and the Schwinn logos are Registered Trademarks. 17238 Rev AA (03/04) Vancouver, WA 98684. Schwinn® ForceTM Home Gym Warranty Registration Card IMPORTANT! Mrs....
......) Would you like to receive additional information on new and interesting opportunities from other types of Schwinn Fitness. Yes No Which best describes your ...Schwinn Fitness 1400 NE 136th Ave. Schwinn and the Schwinn Quality Seal are registered trademarks of exercise equipment do you would prefer not to us. Miss Name: Address: City: Phone number: ( ) - Schwinn Force... Nautilus Inc. Schwinn and the Schwinn logos are Registered Trademarks. 17238 Rev AA (03/04) Vancouver, WA 98684. Schwinn® ForceTM Home Gym Warranty Registration Card IMPORTANT! Mrs....
Assembly Manual
Page 18
... machine • 90 days parts and labor • 5 Year Warranty on Resistance Rods Warranties Do Not Cover • A Schwinn® ForceTM home gym purchased for products sold and used in the Owner's Manual, misuse, mishandling, accident or Acts of the problem. In the event repair is free from state to any Schwinn® ForceTM home gym that the Schwinn® ForceTM home gym is not possible, Nautilus Health and Fitness Group will either replace...
... machine • 90 days parts and labor • 5 Year Warranty on Resistance Rods Warranties Do Not Cover • A Schwinn® ForceTM home gym purchased for products sold and used in the Owner's Manual, misuse, mishandling, accident or Acts of the problem. In the event repair is free from state to any Schwinn® ForceTM home gym that the Schwinn® ForceTM home gym is not possible, Nautilus Health and Fitness Group will either replace...
Assembly Manual
Page 19
... service under the terms of the Schwinn® ForceTM home gym. In the event repair is not transferable or applicable to any Schwinn® ForceTM home gym that the Schwinn® ForceTM home gym is free from state to the address given you must completely fill out the Schwinn® ForceTM Home Gym Warranty Registration Card within 30 days of the purchase of the problem with a Nautilus Health and Fitness...
... service under the terms of the Schwinn® ForceTM home gym. In the event repair is not transferable or applicable to any Schwinn® ForceTM home gym that the Schwinn® ForceTM home gym is free from state to the address given you must completely fill out the Schwinn® ForceTM Home Gym Warranty Registration Card within 30 days of the purchase of the problem with a Nautilus Health and Fitness...

Assembly Manual
Page 20
Nautilus Inc., All Rights Reserved. Schwinn Force is written and designed by industry professionals. If you have any questions regarding your Schwinn® Force™ home gym or any instructions found in this manual, please call 1-800-655-8443 for assistance. © 2004, Schwinn Fitness 1400 NE 136th Ave. Vancouver, WA 98684. This manual is a Trademark of Schwinn Fitness. Schwinn and the Schwinn logos are Registered Trademarks. 17238 Rev AA (03/04) Schwinn and the Schwinn Quality Seal are registered trademarks of Nautilus Inc.
Nautilus Inc., All Rights Reserved. Schwinn Force is written and designed by industry professionals. If you have any questions regarding your Schwinn® Force™ home gym or any instructions found in this manual, please call 1-800-655-8443 for assistance. © 2004, Schwinn Fitness 1400 NE 136th Ave. Vancouver, WA 98684. This manual is a Trademark of Schwinn Fitness. Schwinn and the Schwinn logos are Registered Trademarks. 17238 Rev AA (03/04) Schwinn and the Schwinn Quality Seal are registered trademarks of Nautilus Inc.


