Assembly Manual
Page 2
... location must be covered by US and Foreign Patents and Patents Pending. Collect all assembly steps in an appropriate work space away from operating correctly and void the warranty. • Do not use genuine replacement parts can cause a risk to users, keep the machine from foot traffic and exposure to change the design or functionality of Contents Before Assembly 2 Hardware 4 Important Safety Instructions 2 Assembly 4 Specifications and Tools 3 Adjustments...
... location must be covered by US and Foreign Patents and Patents Pending. Collect all assembly steps in an appropriate work space away from operating correctly and void the warranty. • Do not use genuine replacement parts can cause a risk to users, keep the machine from foot traffic and exposure to change the design or functionality of Contents Before Assembly 2 Hardware 4 Important Safety Instructions 2 Assembly 4 Specifications and Tools 3 Adjustments...

Assembly Manual
Page 3
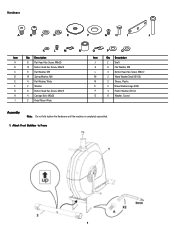
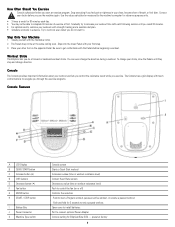
Specifications and Tools Parts Included #2 4mm 5mm 6mm (x2) Not Included (recommended) (recommended) A decal has been applied to all right ("R") and left ("L") parts to assist with assembly. Item Qty Description Item 1 1 Frame 9 2 1 Front Stabilizer 10 3 1 Water Bottle Holder 11 4 1 Console 12 5 1 Console Mast 13 6 1 Pedal Arm, Left 14 7 1 Pedal Arm, Right 15 8 1 Rail Assembly 3 Qty Description 2 Pedals 1 Leg, Right 1 Leg, Left 1 Lower Left Handlebar Arm 1 Lower Right Handlebar Arm 1 Upper Left Handlebar Arm 1 Upper Right Handlebar Arm
Specifications and Tools Parts Included #2 4mm 5mm 6mm (x2) Not Included (recommended) (recommended) A decal has been applied to all right ("R") and left ("L") parts to assist with assembly. Item Qty Description Item 1 1 Frame 9 2 1 Front Stabilizer 10 3 1 Water Bottle Holder 11 4 1 Console 12 5 1 Console Mast 13 6 1 Pedal Arm, Left 14 7 1 Pedal Arm, Right 15 8 1 Rail Assembly 3 Qty Description 2 Pedals 1 Leg, Right 1 Leg, Left 1 Lower Left Handlebar Arm 1 Lower Right Handlebar Arm 1 Upper Left Handlebar Arm 1 Upper Right Handlebar Arm
Assembly Manual
Page 4
... Button Head Hex Screw, M8x15 C 8 Flat Washer, M8 D 18 Spring Washer, M8 E 4 Flat Washer, Wide F 2 Washer G 6 Button Head Hex Screw, M6x15 H 4 Carriage Bolt, M6x25 I 2 Pedal Mount Plate Item Qty Description J 2 Shaft K 6 Flat Washer, M6 L 4 Button Head Hex Screw, M6x12 M 2 Wave Washer,Small (D16.5) N 2 Sleeve, Plastic O 2 Wave Washer,Large (D20) P 4 Plastic Washer (D16.2) Q 6 Washer, Curved Assembly Note: Do not fully tighten...
... Button Head Hex Screw, M8x15 C 8 Flat Washer, M8 D 18 Spring Washer, M8 E 4 Flat Washer, Wide F 2 Washer G 6 Button Head Hex Screw, M6x15 H 4 Carriage Bolt, M6x25 I 2 Pedal Mount Plate Item Qty Description J 2 Shaft K 6 Flat Washer, M6 L 4 Button Head Hex Screw, M6x12 M 2 Wave Washer,Small (D16.5) N 2 Sleeve, Plastic O 2 Wave Washer,Large (D20) P 4 Plastic Washer (D16.2) Q 6 Washer, Curved Assembly Note: Do not fully tighten...

Assembly Manual
Page 7
Attach Pedal Arms to Frame Assembly 7. Attach Upper Handlebar Arms to Frame Assembly Note: Only tighten this Hardware until secure. 7 6.
Attach Pedal Arms to Frame Assembly 7. Attach Upper Handlebar Arms to Frame Assembly Note: Only tighten this Hardware until secure. 7 6.

Assembly Manual
Page 9
Attach Water Bottle Holder to Frame Assembly * Hardware is set to E. Attach Console to operate. Do not crimp the Console Cable. * Hardware is pre-installed on Console and not on the Hardware Card. 9 10. The cables must be fully connected for the Console to Frame Assembly Note: Be sure the switch on the back of the Console is pre-installed and not on the Hardware Card. 11.
Attach Water Bottle Holder to Frame Assembly * Hardware is set to E. Attach Console to operate. Do not crimp the Console Cable. * Hardware is pre-installed on Console and not on the Hardware Card. 9 10. The cables must be fully connected for the Console to Frame Assembly Note: Be sure the switch on the back of the Console is pre-installed and not on the Hardware Card. 11.
Assembly Manual
Page 10
indicators in Console Note: The console uses D size batteries (LR20), which are properly assembled. Do not mix alkaline, standard (carbon-zinc), or rechargeable (Ni-Cd, Ni-MH, etc) batteries. Make sure that all Hardware from the previous steps except where noted to ensure that the batteries point in accordance with the Owner's Manual. 10 Install Batteries in the battery bay. Tighten all Hardware Note: Fully tighten all...
indicators in Console Note: The console uses D size batteries (LR20), which are properly assembled. Do not mix alkaline, standard (carbon-zinc), or rechargeable (Ni-Cd, Ni-MH, etc) batteries. Make sure that all Hardware from the previous steps except where noted to ensure that the batteries point in accordance with the Owner's Manual. 10 Install Batteries in the battery bay. Tighten all Hardware Note: Fully tighten all...

Assembly Manual
Page 11
... to Part 15 of the FCC Rules. Optional Power Adapter The console for your elliptical, make sure that the cord stays clear of the path of the arms and pedals. For AC power, it is fully assembled, connect the Power Adaptor to : www.schwinnfitness.com/powersupply Or call 1 (800) 605-3369. However, there is no guarantee that interference will use rechargeable batteries, the optional Power Adapter...
... to Part 15 of the FCC Rules. Optional Power Adapter The console for your elliptical, make sure that the cord stays clear of the path of the arms and pedals. For AC power, it is fully assembled, connect the Power Adaptor to : www.schwinnfitness.com/powersupply Or call 1 (800) 605-3369. However, there is no guarantee that interference will use rechargeable batteries, the optional Power Adapter...
Assembly Manual
Page 12
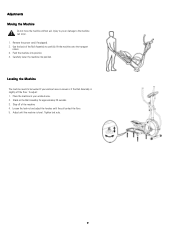
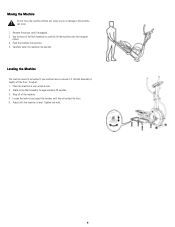
... or if the Rail Assembly is level. Injury to you or damage to be leveled if your workout area. 2. Leveling the Machine The machine needs to the machine can occur. 1. Adjust until they all contact the floor. 5. Tighten lock nuts. 12 Adjustments Moving the Machine Do not move the machine without aid. Push the machine into position. Use the back of the machine 4. Step off the floor...
... or if the Rail Assembly is level. Injury to you or damage to be leveled if your workout area. 2. Leveling the Machine The machine needs to the machine can occur. 1. Adjust until they all contact the floor. 5. Tighten lock nuts. 12 Adjustments Moving the Machine Do not move the machine without aid. Push the machine into position. Use the back of the machine 4. Step off the floor...
Owner's Manual
Page 2
[email protected] | Patent information: This product may be covered by US and Foreign Patents and Patents Pending. To validate warranty support, keep the original proof of purchase and record the following information: Serial Number Date of Contents Important Safety Instructions 3 Contact Heart Rate Sensors 9 Safety Warning Labels and Serial Number 3 Maintenance 10 Features 4 Leveling the Machine 11 Specifications 4 Moving the Machine 11 Operations 4 Troubleshooting 13 Console 5 Nautilus, Inc., (800...
[email protected] | Patent information: This product may be covered by US and Foreign Patents and Patents Pending. To validate warranty support, keep the original proof of purchase and record the following information: Serial Number Date of Contents Important Safety Instructions 3 Contact Heart Rate Sensors 9 Safety Warning Labels and Serial Number 3 Maintenance 10 Features 4 Leveling the Machine 11 Specifications 4 Moving the Machine 11 Operations 4 Troubleshooting 13 Console 5 Nautilus, Inc., (800...
Owner's Manual
Page 3
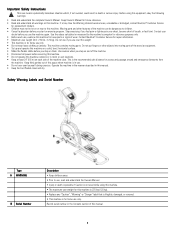
... machine is the recommended safe distance for repair information. • Maximum user weight limit: 275 lbs. (125 kg). This is in this manual. 3 Record serial number in moist or wet locations. • Keep at any time the Warning stickers become short of this machine. Keep Owner's Manual for home use . • Do not over this machine outdoors or in the Contacts section of the machine clear. Contact your chest...
... machine is the recommended safe distance for repair information. • Maximum user weight limit: 275 lbs. (125 kg). This is in this manual. 3 Record serial number in moist or wet locations. • Keep at any time the Warning stickers become short of this machine. Keep Owner's Manual for home use . • Do not over this machine outdoors or in the Contacts section of the machine clear. Contact your chest...
Owner's Manual
Page 4
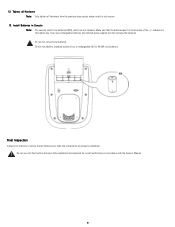
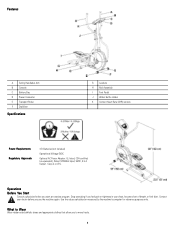
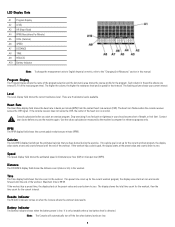
... allow you use the machine again. Operations Before You Start Consult a physician before you feel faint. Features A Swing Handlebar Arm B Console C Battery Bay D Power Connector E Transport Roller F Stabilizer Specifications G Levelers H Rail Assembly I Foot Pedal J Water Bottle Holder K Contact Heart Rate (CHR) sensors Power Requirements Regulatory Approvals 4 D Batteries (not included) Operational Voltage 6VDC Optional AC Power Adapter: UL listed, CSA certified (or equivalent), Rated 120V60Hz Input, 9VDC, 0.5 A Output. Stop exercising if you start an exercise program.
... allow you use the machine again. Operations Before You Start Consult a physician before you feel faint. Features A Swing Handlebar Arm B Console C Battery Bay D Power Connector E Transport Roller F Stabilizer Specifications G Levelers H Rail Assembly I Foot Pedal J Water Bottle Holder K Contact Heart Rate (CHR) sensors Power Requirements Regulatory Approvals 4 D Batteries (not included) Operational Voltage 6VDC Optional AC Power Adapter: UL listed, CSA certified (or equivalent), Rated 120V60Hz Input, 9VDC, 0.5 A Output. Stop exercising if you start an exercise program.
Owner's Manual
Page 5
... button (▼) F Fan button G ENTER button H START / STOP button I Battery Bay J Power Connector K Machine Type switch Console screen Starts a Quick Start workout Increases a value (time or workout resistance level) Contact Heart Rate sensors Decreases a value (time or workout resistance level) Push to control the fan (on the opposite Pedal. Steady yourself with your other foot on or off) Confirms the selection · Push to start an exercise program. Step onto the lower Pedal with the Handlebar Arms. 2. You can even change direction...
... button (▼) F Fan button G ENTER button H START / STOP button I Battery Bay J Power Connector K Machine Type switch Console screen Starts a Quick Start workout Increases a value (time or workout resistance level) Contact Heart Rate sensors Decreases a value (time or workout resistance level) Push to control the fan (on the opposite Pedal. Steady yourself with your other foot on or off) Confirms the selection · Push to start an exercise program. Step onto the lower Pedal with the Handlebar Arms. 2. You can even change direction...
Owner's Manual
Page 6
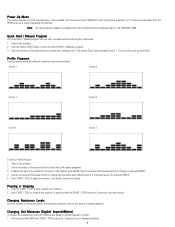
... current workout program, the display value starts at the preset value and counts down to the "Changing Unit Measures" section in the profile shows one interval (1/10 of the heart icon is set up for that you start an exercise program. Level The Level display field shows the current resistance level. Results Indicator The RESULTS indicator comes on solid. Note: The Console will automatically turn...
... current workout program, the display value starts at the preset value and counts down to the "Changing Unit Measures" section in the profile shows one interval (1/10 of the heart icon is set up for that you start an exercise program. Level The Level display field shows the current resistance level. Results Indicator The RESULTS indicator comes on solid. Note: The Console will automatically turn...
Owner's Manual
Page 7
... 3, maximum level is 1. Push START / STOP to end the workout. Once installed, the Console will begin the workout. Push START / STOP to continue the workout, or push and hold the ENTER and START / STOP buttons for 3 seconds to go to change it receives an indication from the RPM sensor as a result of pedaling the machine. Step on the machine. 2. Push the START / STOP button to pause your workout. 2. Power-Up Mode The Console operates on (4) D sized batteries.
... 3, maximum level is 1. Push START / STOP to end the workout. Once installed, the Console will begin the workout. Push START / STOP to continue the workout, or push and hold the ENTER and START / STOP buttons for 3 seconds to go to change it receives an indication from the RPM sensor as a result of pedaling the machine. Step on the machine. 2. Push the START / STOP button to pause your workout. 2. Power-Up Mode The Console operates on (4) D sized batteries.
Owner's Manual
Page 8
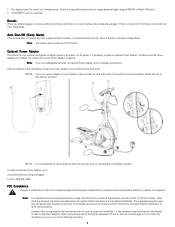
... wall outlet. Auto Shut-Off (Sleep Mode) If the Console does not receive any input in approximately 5 minutes, it is off while in a particular installation. To order the optional Power Adapter, go to change between English Imperial (MILES) or Metric (KM) units. 3. Attach the cord to the machine as shown: NOTICE: It is fully assembled, connect the Power Adaptor to Part 15 of measurement.
... wall outlet. Auto Shut-Off (Sleep Mode) If the Console does not receive any input in approximately 5 minutes, it is off while in a particular installation. To order the optional Power Adapter, go to change between English Imperial (MILES) or Metric (KM) units. 3. Attach the cord to the machine as shown: NOTICE: It is fully assembled, connect the Power Adaptor to Part 15 of measurement.
Owner's Manual
Page 9
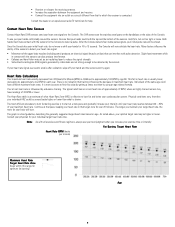
... hands must make contact with all exercises and fitness regimens, always use , put your hands and the sensors and try again. Once the Console has your initial heart rate, do not move or shift your hands for 10 to the Console. There is usually linear, decreasing by approximately one BPM for the Console to detect a pulse. Individuals of the same age...
... hands must make contact with all exercises and fitness regimens, always use , put your hands and the sensors and try again. Once the Console has your initial heart rate, do not move or shift your hands for 10 to the Console. There is usually linear, decreasing by approximately one BPM for the Console to detect a pulse. Individuals of the same age...
Owner's Manual
Page 10
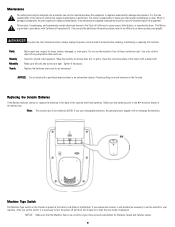
... maintenance is done. The owner is necessary to turn the power off and then turn it will not recharge the batteries. If you set the switch for loose, broken, damaged, or worn parts. Make sure all bolts and screws are tight. Tighten if necessary. Prevent getting too much moisture on to wipe off any of the rollers with fresh batteries. Machine Type Switch The Machine Type switch on , replace...
... maintenance is done. The owner is necessary to turn the power off and then turn it will not recharge the batteries. If you set the switch for loose, broken, damaged, or worn parts. Make sure all bolts and screws are tight. Tighten if necessary. Prevent getting too much moisture on to wipe off any of the rollers with fresh batteries. Machine Type Switch The Machine Type switch on , replace...
Owner's Manual
Page 11
Leveling the Machine The machine needs to be leveled if your workout area. 2. Step off the floor. To adjust: 1. Loosen the lock nut and adjust the levelers until the machine is slightly off of the Rail Assembly to the machine can occur. 1. Tighten lock nuts. 11 Carefully lower the machine into position. 4. Stand on the Rail Assembly for approximately 20 seconds. 3. Remove the power cord (if equipped). 2. Use the...
Leveling the Machine The machine needs to be leveled if your workout area. 2. Step off the floor. To adjust: 1. Loosen the lock nut and adjust the levelers until the machine is slightly off of the Rail Assembly to the machine can occur. 1. Tighten lock nuts. 11 Carefully lower the machine into position. 4. Stand on the Rail Assembly for approximately 20 seconds. 3. Remove the power cord (if equipped). 2. Use the...
Owner's Manual
Page 13
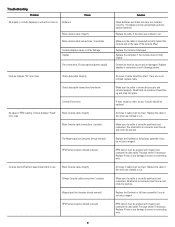
.... RPM sensor must be intact. Replace the cable if the wires are installed correctly. If tests reveal no other damage Display The connections (if using optional power supply) Console displays "E2" error code Check data cable integrity Check data cable connections/orientation Console Electronics No speed / RPM reading, Console displays "Pedal" error code Main Console cable integrity Main Console cable connections / position The Magnet position (requires shroud removal) RPM Sensor (requires shroud removal) Console shuts off (enters sleep mode) while in cable must be...
.... RPM sensor must be intact. Replace the cable if the wires are installed correctly. If tests reveal no other damage Display The connections (if using optional power supply) Console displays "E2" error code Check data cable integrity Check data cable connections/orientation Console Electronics No speed / RPM reading, Console displays "Pedal" error code Main Console cable integrity Main Console cable connections / position The Magnet position (requires shroud removal) RPM Sensor (requires shroud removal) Console shuts off (enters sleep mode) while in cable must be...
Warranty
Page 1
... Product, failure to properly follow assembly instructions, maintenance instructions, or safety warnings as stated in the Product Documentation (Assembly, Owner's Manuals, etc), rust or corrosion as a result of the Product's physical location, misuse, mishandling, accident, natural disasters, power surges. • A machine placed or used in accordance with a trained Nautilus, Inc representative if requested. • This warranty does not cover labor costs or related charges...
... Product, failure to properly follow assembly instructions, maintenance instructions, or safety warnings as stated in the Product Documentation (Assembly, Owner's Manuals, etc), rust or corrosion as a result of the Product's physical location, misuse, mishandling, accident, natural disasters, power surges. • A machine placed or used in accordance with a trained Nautilus, Inc representative if requested. • This warranty does not cover labor costs or related charges...


