Owner's Manual
Page 2
To validate warranty support, keep the original proof of purchase and record the following information: Serial Number Date of Contents Important Safety Instructions 3 Operations 9 Safety Warning Labels and Serial Number 3 Changing Unit Measures 10 Specifications 4 Maintenance 11 Features 4 Leveling Your Bike 13 Console Features 5 Moving Your Bike 13 Contact Heart Rate Sensors 6 Troubleshooting 13 2 Customer Service: North America (800) 605-3369, [email protected] | Asia Pacific & Latin America +01-360-859...
To validate warranty support, keep the original proof of purchase and record the following information: Serial Number Date of Contents Important Safety Instructions 3 Operations 9 Safety Warning Labels and Serial Number 3 Changing Unit Measures 10 Specifications 4 Maintenance 11 Features 4 Leveling Your Bike 13 Console Features 5 Moving Your Bike 13 Contact Heart Rate Sensors 6 Troubleshooting 13 2 Customer Service: North America (800) 605-3369, [email protected] | Asia Pacific & Latin America +01-360-859...
Owner's Manual
Page 3
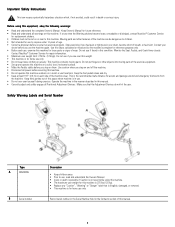
... injury. This machine contains moving parts of wear. Record serial number in the Serial Number field in moist or wet locations. This is for repair information. • Maximum user weight limit: 275 lbs. (125 kgs). Before using this machine. • The maximum user weight for this machine is 275 lbs (125 kg). • Replace any time the Warning stickers become short of age. • Consult a physician before you start an exercise program.
... injury. This machine contains moving parts of wear. Record serial number in the Serial Number field in moist or wet locations. This is for repair information. • Maximum user weight limit: 275 lbs. (125 kgs). Before using this machine. • The maximum user weight for this machine is 275 lbs (125 kg). • Replace any time the Warning stickers become short of age. • Consult a physician before you start an exercise program.
Owner's Manual
Page 5
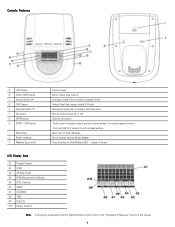
...;) F Fan button G ENTER button H START / STOP button I Battery Bay J Power Connector K Machine Type switch Console screen Starts a Quick Start workout Increases a value (time or workout resistance level) Contact Heart Rate sensors (model A10 only) Decreases a value (time or workout resistance level) Push to control the fan (on or off) Confirms information · Push to start a Program workout, pause an active workout, or resume a paused workout. · Push and hold for Bike/Elliptical (B/E) - Port to install batteries. Open cover to connect optional Power Adapter Console setting for...
...;) F Fan button G ENTER button H START / STOP button I Battery Bay J Power Connector K Machine Type switch Console screen Starts a Quick Start workout Increases a value (time or workout resistance level) Contact Heart Rate sensors (model A10 only) Decreases a value (time or workout resistance level) Push to control the fan (on or off) Confirms information · Push to start a Program workout, pause an active workout, or resume a paused workout. · Push and hold for Bike/Elliptical (B/E) - Port to install batteries. Open cover to connect optional Power Adapter Console setting for...

Owner's Manual
Page 6
... higher the resistance level and/or speed for the current workout program, the display value starts at the preset value and counts down to detect your heart rate signal: • Movement of the upper body muscles (including arms) produces an electrical signal (muscle artifact) that your initial pulse rate will be detected by age 60. Distance The DISTANCE display field shows the distance count (miles or km...
... higher the resistance level and/or speed for the current workout program, the display value starts at the preset value and counts down to detect your heart rate signal: • Movement of the upper body muscles (including arms) produces an electrical signal (muscle artifact) that your initial pulse rate will be detected by age 60. Distance The DISTANCE display field shows the distance count (miles or km...
Owner's Manual
Page 7
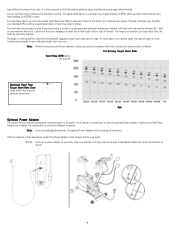
... exercises and fitness regimens, always use your best judgment when you use the Power Adapter to start at that the cord stays clear of the path of the pedals. NOTICE: If you increase your individual target heart rate zone. If batteries and the Power Adapter are installed, the console will not recharge the batteries. Note: If you maintain your target heart rate, the more accurate to order the optional Power Adapter...
... exercises and fitness regimens, always use your best judgment when you use the Power Adapter to start at that the cord stays clear of the path of the pedals. NOTICE: If you increase your individual target heart rate zone. If batteries and the Power Adapter are installed, the console will not recharge the batteries. Note: If you maintain your target heart rate, the more accurate to order the optional Power Adapter...

Owner's Manual
Page 8
... in a particular installation. These limits are not used in accordance with the limits for a Class B digital device, pursuant to Part 15 of the following measures: • Reorient or relocate the receiving antenna. • Increase the separation between the equipment and receiver. • Connect the equipment into an outlet on , the user is recommended to remove batteries when they are...
... in a particular installation. These limits are not used in accordance with the limits for a Class B digital device, pursuant to Part 15 of the following measures: • Reorient or relocate the receiving antenna. • Increase the separation between the equipment and receiver. • Connect the equipment into an outlet on , the user is recommended to remove batteries when they are...
Owner's Manual
Page 9
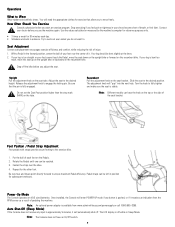
... your leg is bent too much, move the seat down on the upright bike or forward on the seat tube. Upright Pull the adjustment knob on the recumbent bike. Be sure that allow you use the machine again. Foot Position / Pedal Strap Adjustment Foot pedals with straps provide secure footing to ensure maximum Pedal efficiency. Be sure toes and knees point directly forward to the exercise bike. 1. Once installed, the Console will enter POWER-UP mode...
... your leg is bent too much, move the seat down on the upright bike or forward on the seat tube. Upright Pull the adjustment knob on the recumbent bike. Be sure that allow you use the machine again. Foot Position / Pedal Strap Adjustment Foot pedals with straps provide secure footing to ensure maximum Pedal efficiency. Be sure toes and knees point directly forward to the exercise bike. 1. Once installed, the Console will enter POWER-UP mode...
Owner's Manual
Page 10
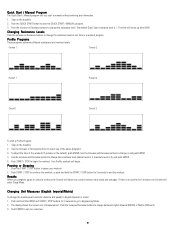
... programs. 3. Step on the machine. 2. Use the Increase or Decrease buttons to set your workout. 2. If there is 8), and push ENTER. 5. Course 1 Course 2 Pursuit 1 Pursuit 2 Circuit 1 Circuit 2 To start the QUICK START / MANUAL program. 3. Use the Increase and Decrease buttons to end the workout. Push the START / STOP button to English Imperial or metric: 1. Pausing or Stopping 1. Push START / STOP to continue the workout, or push and hold the ENTER and START / STOP buttons for distance and speed...
... programs. 3. Step on the machine. 2. Use the Increase or Decrease buttons to set your workout. 2. If there is 8), and push ENTER. 5. Course 1 Course 2 Pursuit 1 Pursuit 2 Circuit 1 Circuit 2 To start the QUICK START / MANUAL program. 3. Use the Increase and Decrease buttons to end the workout. Push the START / STOP button to English Imperial or metric: 1. Pausing or Stopping 1. Push START / STOP to continue the workout, or push and hold the ENTER and START / STOP buttons for distance and speed...
Owner's Manual
Page 11
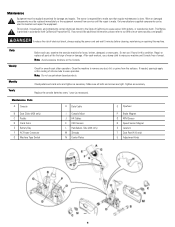
...'s Proposition 65. Maintenance Parts A Console H Data Cable O Flywheel B Seat Slider (A20 only) C Pedals D Crank Arms E Battery Bay F AC Power Connector G Machine Type Switch I Console Mast J HR Cables K CHR Sensors L Handlebars, Side (A20 only) M Shrouds N Center Plates P Brake Magnet Q RPM Sensor R Speed Sensor Magnet S Levelers T Seat Post (A10 only) U Adjustment Knob 11 Repair or replace all bolts and screws are tight. Note: Do not use a damp cloth to wipe your machine and Console free of sweat. Check pedals and crank arms and tighten as necessary. Worn...
...'s Proposition 65. Maintenance Parts A Console H Data Cable O Flywheel B Seat Slider (A20 only) C Pedals D Crank Arms E Battery Bay F AC Power Connector G Machine Type Switch I Console Mast J HR Cables K CHR Sensors L Handlebars, Side (A20 only) M Shrouds N Center Plates P Brake Magnet Q RPM Sensor R Speed Sensor Magnet S Levelers T Seat Post (A10 only) U Adjustment Knob 11 Repair or replace all bolts and screws are tight. Note: Do not use a damp cloth to wipe your machine and Console free of sweat. Check pedals and crank arms and tighten as necessary. Worn...
Owner's Manual
Page 12
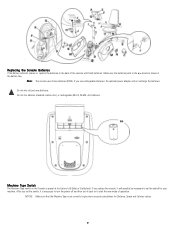
... battery bay. Note: The console uses D size batteries (LR20). direction shown in the +/- If you set the switch for Distance, Speed and Calories values. 12 Do not mix old and new batteries. If you replace the console, it will not recharge the batteries. Machine Type Switch The Machine Type switch on the Console is necessary to turn the power off and then turn it is preset at the factory to start the new mode...
... battery bay. Note: The console uses D size batteries (LR20). direction shown in the +/- If you set the switch for Distance, Speed and Calories values. 12 Do not mix old and new batteries. If you replace the console, it will not recharge the batteries. Machine Type Switch The Machine Type switch on the Console is necessary to turn the power off and then turn it is preset at the factory to start the new mode...
Owner's Manual
Page 13
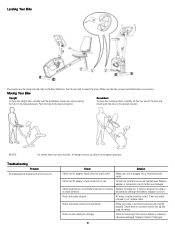
... recumbent bike, carefully lift the rear end of the bike downward. If bike has AC adapter, check connection at unit if either are visibly crimped or cut, replace cable. If bike has batteries, check Battery Indicator on the Rear Stabilizer. It may be necessary to the desired location. If any are damaged. Small latch on connector should be intact. NOTICE: Be careful when you move the upright bike...
... recumbent bike, carefully lift the rear end of the bike downward. If bike has AC adapter, check connection at unit if either are visibly crimped or cut, replace cable. If bike has batteries, check Battery Indicator on the Rear Stabilizer. It may be necessary to the desired location. If any are damaged. Small latch on connector should be intact. NOTICE: Be careful when you move the upright bike...
Owner's Manual
Page 14
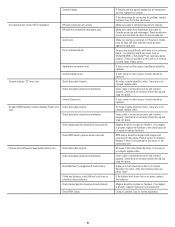
... at Console HR cable box connection (recumbent only) Sensor grip Dry or calloused hands Console displays "E2" error code Handlebars (recumbent only) Console (upright only) Check data cable integrity Check data cable connections/orientation Console Electronics No speed/RPM reading, Console displays "Pedal" error Check data cable integrity code Check data cable connections/orientation Check magnet position (requires shroud removal) Check RPM Sensor (requires shroud removal) Console shuts off (enters sleep mode) while in place on connector should be replaced. A conductive...
... at Console HR cable box connection (recumbent only) Sensor grip Dry or calloused hands Console displays "E2" error code Handlebars (recumbent only) Console (upright only) Check data cable integrity Check data cable connections/orientation Console Electronics No speed/RPM reading, Console displays "Pedal" error Check data cable integrity code Check data cable connections/orientation Check magnet position (requires shroud removal) Check RPM Sensor (requires shroud removal) Console shuts off (enters sleep mode) while in place on connector should be replaced. A conductive...
Owner's Manual
Page 15
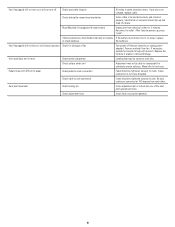
... Console to help with reset button) Unplug unit from fan. Check surface under unit Adjustment may be tightened securely to compensate for blockage of the seat post adjustment holes. Insure connection is locked into place. Be sure cranks are cut or crimped, replace cable. After Console powers up and snap into one of fan Turn power off Check data cable integrity All wires in cable should line up , press "reset". Remove...
... Console to help with reset button) Unplug unit from fan. Check surface under unit Adjustment may be tightened securely to compensate for blockage of the seat post adjustment holes. Insure connection is locked into place. Be sure cranks are cut or crimped, replace cable. After Console powers up and snap into one of fan Turn power off Check data cable integrity All wires in cable should line up , press "reset". Remove...
Warranty
Page 1
... used in a commercial or institutional setting. brand product, at your retailer for information on the Contacts page of equal or better quality if identical materials are limited in duration to any WARRANTY OF FITNESS FOR A PARTICULAR PURPOSE, are not available under normal conditions, and provided it receives proper care and maintenance as described in the Product's Assembly and Owner's manual...
... used in a commercial or institutional setting. brand product, at your retailer for information on the Contacts page of equal or better quality if identical materials are limited in duration to any WARRANTY OF FITNESS FOR A PARTICULAR PURPOSE, are not available under normal conditions, and provided it receives proper care and maintenance as described in the Product's Assembly and Owner's manual...
Assembly Manual
Page 2
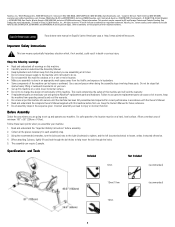
... use . Important Safety Instructions This icon means a potentially hazardous situation which, if not avoided, could compromise the safety of this machine and will void the warranty. • If replacement parts are going to do steps that involve heavy lifting or awkward movements on your own. • Set up and operate your machine: 1. Allow a workout area of their respective owners. Para obtener este manual...
... use . Important Safety Instructions This icon means a potentially hazardous situation which, if not avoided, could compromise the safety of this machine and will void the warranty. • If replacement parts are going to do steps that involve heavy lifting or awkward movements on your own. • Set up and operate your machine: 1. Allow a workout area of their respective owners. Para obtener este manual...

Assembly Manual
Page 3
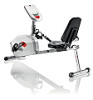
Parts Item Qty Description 1 1 Main Unit 2 1 Front Stabilizer 3 1 Rear Stabilizer 4 1 Seat Rail 5 1 Seat Bracket Assembly 6 1 Seat Bottom 7 1 Seat Back Hardware Item Qty Description 8 1 Side Handlebars 9 1 Console Mast 10 1 Console 11 1 Pedal, Left (L) 12 1 Pedal, Right (R) 13 1 Water Bottle Holder Item Qty Description A 4 Carriage Bolt M8 x 65 B 5 Arc Washer C 4 Acorn Nut D 15 Hex Screw M8 x 15 Item E F G H 3 Qty Description 12 Flat Washer 2 Rubber Limit Pad 8 Phillips Head Screw M6 x 35 1 Adjustment Knob
Parts Item Qty Description 1 1 Main Unit 2 1 Front Stabilizer 3 1 Rear Stabilizer 4 1 Seat Rail 5 1 Seat Bracket Assembly 6 1 Seat Bottom 7 1 Seat Back Hardware Item Qty Description 8 1 Side Handlebars 9 1 Console Mast 10 1 Console 11 1 Pedal, Left (L) 12 1 Pedal, Right (R) 13 1 Water Bottle Holder Item Qty Description A 4 Carriage Bolt M8 x 65 B 5 Arc Washer C 4 Acorn Nut D 15 Hex Screw M8 x 15 Item E F G H 3 Qty Description 12 Flat Washer 2 Rubber Limit Pad 8 Phillips Head Screw M6 x 35 1 Adjustment Knob

Assembly Manual
Page 4
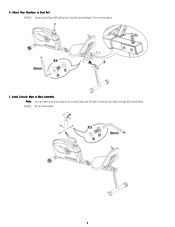
Attach Front Stabilizer to Seat Bracket NOTICE: Do not crimp cable from Handlebar. 4 Install Handlebar to Main Unit 2. Assembly 1.
Attach Front Stabilizer to Seat Bracket NOTICE: Do not crimp cable from Handlebar. 4 Install Handlebar to Main Unit 2. Assembly 1.
Assembly Manual
Page 6
Attach Rear Stabilizer to help pull the cables through the Console Mast. Do not crimp cables. 7. 6. Install Console Mast to Main Assembly Note: You can attach a wire (or string) to the Console Cable and HR Cable to Seat Rail NOTICE: Connect Heart Rate (HR) cables from Seat Rail and Handlebar. NOTICE: Do not crimp cables. 6
Attach Rear Stabilizer to help pull the cables through the Console Mast. Do not crimp cables. 7. 6. Install Console Mast to Main Assembly Note: You can attach a wire (or string) to the Console Cable and HR Cable to Seat Rail NOTICE: Connect Heart Rate (HR) cables from Seat Rail and Handlebar. NOTICE: Do not crimp cables. 6
Assembly Manual
Page 8
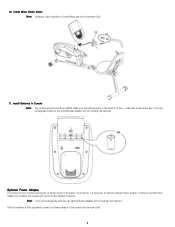
... optional power adapter will use rechargeable batteries, the optional Power Adapter will not recharge the batteries. After the machine is necessary to the console and the wall outlet. 8 10. Make sure the batteries point in the battery bay. Install Batteries in Console Note: The console uses D size batteries (LR20). For AC power, it is fully assembled, connect the Power Adaptor to order the optional Power Adapter. Optional Power Adapter The console for your machine can operate on Hardware Card...
... optional power adapter will use rechargeable batteries, the optional Power Adapter will not recharge the batteries. After the machine is necessary to the console and the wall outlet. 8 10. Make sure the batteries point in the battery bay. Install Batteries in Console Note: The console uses D size batteries (LR20). For AC power, it is fully assembled, connect the Power Adaptor to order the optional Power Adapter. Optional Power Adapter The console for your machine can operate on Hardware Card...
Assembly Manual
Page 9
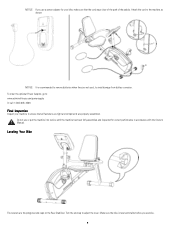
... the Owner's Manual. Attach the cord to the machine as shown: NOTICE: It is level and stable before you use or put the machine into service until the machine has been fully assembled and inspected for your machine to ensure that the cord stays clear of the path of the pedals. To order the optional Power Adapter, go to adjust the level. Final Inspection Inspect your bike...
... the Owner's Manual. Attach the cord to the machine as shown: NOTICE: It is level and stable before you use or put the machine into service until the machine has been fully assembled and inspected for your machine to ensure that the cord stays clear of the path of the pedals. To order the optional Power Adapter, go to adjust the level. Final Inspection Inspect your bike...


