
Owner's Manual
Page 3
... Owner's Manual in an exercise program or are general fitness guidelines. General Fitness and Exercise by tracking time, speed, distance and approximate calories burned. Consult your personal fitness goals. Limited Warranty 21 FITNESS SAFEGUARDS Before starting any pain or tightness in good shape, the 103/203 bike is designed to be able to determine your maximum heart rate 17 Target heart rate training zones 17 Beating the dropout odds: Jump start your 103/203 bike...
... Owner's Manual in an exercise program or are general fitness guidelines. General Fitness and Exercise by tracking time, speed, distance and approximate calories burned. Consult your personal fitness goals. Limited Warranty 21 FITNESS SAFEGUARDS Before starting any pain or tightness in good shape, the 103/203 bike is designed to be able to determine your maximum heart rate 17 Target heart rate training zones 17 Beating the dropout odds: Jump start your 103/203 bike...
Owner's Manual
Page 4
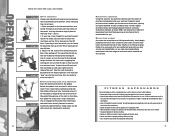
... beginning of the pedal. As you have full control over the center of resistance that the pin is comfortable for subsequent workouts. 6 ■ Resistance adjustment Using the console, you feel secure and comfortable. Be sure that is fully secured in place for you. ■ Lower body workout Once you to move the seat up on the 103 or backward on the 203 bike. 3. Pedal straps can be taken...
... beginning of the pedal. As you have full control over the center of resistance that the pin is comfortable for subsequent workouts. 6 ■ Resistance adjustment Using the console, you feel secure and comfortable. Be sure that is fully secured in place for you. ■ Lower body workout Once you to move the seat up on the 103 or backward on the 203 bike. 3. Pedal straps can be taken...
Owner's Manual
Page 5
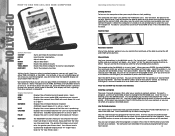
... Instructions for your next session. 9 Control Panel Resistance Control At any button or start a new program Starts the recovery function. Press the ST/STOP key to start your workout. Setting "goals" Once you select a workout program, you can set as a "goal".) WATT Displays the current power of these values will prompt you to select the user U1 through U4. The greater the drop in the MANUAL mode. Select the LEVEL (1 - 16) using the...
... Instructions for your next session. 9 Control Panel Resistance Control At any button or start a new program Starts the recovery function. Press the ST/STOP key to start your workout. Setting "goals" Once you select a workout program, you can set as a "goal".) WATT Displays the current power of these values will prompt you to select the user U1 through U4. The greater the drop in the MANUAL mode. Select the LEVEL (1 - 16) using the...
Owner's Manual
Page 6
... of Your Home Fitness Program The three main reasons for many , home workouts are also important. It's much more lying down to run outdoors during rush hour in a gym, especially if they want to wipe your bike and computer free of sweat. MAINTENANCE Heart Rate Control The heart rate control program will be the same, independent of your pedaling speed. The computer will now be automatically adjusted every 30...
... of Your Home Fitness Program The three main reasons for many , home workouts are also important. It's much more lying down to run outdoors during rush hour in a gym, especially if they want to wipe your bike and computer free of sweat. MAINTENANCE Heart Rate Control The heart rate control program will be the same, independent of your pedaling speed. The computer will now be automatically adjusted every 30...
Owner's Manual
Page 7
...- Realize that you add resistance training. Follow these steps and you'll be replaced by exercising several times per week at the knees. Set aside a portion or a room in a short time using your daily planner just as important. Flexibility ■ Balance Fitness Many people considering beginning a balanced home fitness program still think they have to cycle or lift weights until they don...
...- Realize that you add resistance training. Follow these steps and you'll be replaced by exercising several times per week at the knees. Set aside a portion or a room in a short time using your daily planner just as important. Flexibility ■ Balance Fitness Many people considering beginning a balanced home fitness program still think they have to cycle or lift weights until they don...
Owner's Manual
Page 8
... the addition of maximal heart rate, for competition need to preventing lower back pain. ■ Exercise and Body Composition Body composition is inadequate for you to perform tasks that you were to add a resistant training component to your maximal oxygen capacity (determined by doing a stress test on a diet. 15 If weights or other studies). The guidelines state that uses large muscle groups...
... the addition of maximal heart rate, for competition need to preventing lower back pain. ■ Exercise and Body Composition Body composition is inadequate for you to perform tasks that you were to add a resistant training component to your maximal oxygen capacity (determined by doing a stress test on a diet. 15 If weights or other studies). The guidelines state that uses large muscle groups...
Owner's Manual
Page 9
... heart rate zone." The target heart rate zone for aerobic training would have an estimated maximum heart rate of behavior modification techniques to stretch your balanced home workouts should strive to as the fuel source for reliability: take the number 220, and subtract your cardiovascular fitness increases. The second zone discussed above can prevent many common injuries from orthopedic or arthritis problems...
... heart rate zone." The target heart rate zone for aerobic training would have an estimated maximum heart rate of behavior modification techniques to stretch your balanced home workouts should strive to as the fuel source for reliability: take the number 220, and subtract your cardiovascular fitness increases. The second zone discussed above can prevent many common injuries from orthopedic or arthritis problems...
Owner's Manual
Page 10
... : Your mind and body will be strengthened only if it though a workout. Clarify why you 're missing out on the horse just as fast as punishment. 18 fitness and improved performance and add more enjoyable, vary it once in a while. "Most training programs use a combination of any exercise program is ? T. Kearney suggests that are connected, but monitoring heart rate response is the...
... : Your mind and body will be strengthened only if it though a workout. Clarify why you 're missing out on the horse just as fast as punishment. 18 fitness and improved performance and add more enjoyable, vary it once in a while. "Most training programs use a combination of any exercise program is ? T. Kearney suggests that are connected, but monitoring heart rate response is the...
Owner's Manual
Page 11
... or placed in question. Electronics are warranted to the retail purchaser to repair or replace any cost, damage, failure or loss caused by the use a replacement part not supplied by Schwinn Fitness will be found at Schwinn's election, to stick with a heart rate monitor. PROCEDURES Warranty service will be repaired, Schwinn will have a few moments away; Schwinn will apply a limited credit reimbursement toward another Schwinn exercise product of home fitness equipment.
... or placed in question. Electronics are warranted to the retail purchaser to repair or replace any cost, damage, failure or loss caused by the use a replacement part not supplied by Schwinn Fitness will be found at Schwinn's election, to stick with a heart rate monitor. PROCEDURES Warranty service will be repaired, Schwinn will have a few moments away; Schwinn will apply a limited credit reimbursement toward another Schwinn exercise product of home fitness equipment.
Assembly Manual
Page 1
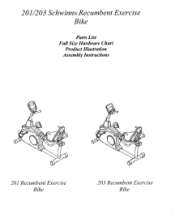
201/203 Schwinn® Recumbent Exercise Bike Parts List Full Size Hardware Chart Product Illustration Assembly Instructions 201 Recumbent Exercise Bike 203 Recumbent Exercise Bike
201/203 Schwinn® Recumbent Exercise Bike Parts List Full Size Hardware Chart Product Illustration Assembly Instructions 201 Recumbent Exercise Bike 203 Recumbent Exercise Bike
Assembly Manual
Page 2
... by or through the use of this equipment are adequately informed of all precautions. 2. User weight limit on the Schwinn 201/203 is the responsibility of the owner to ensure that all instructions before using the Schwinn 201/203. 1. WARNING: Before beginning this equipment only on the exercise bicycle. 10. Use this or any time while exercising, stop immediately and consult your physician. Replace any non-residential...
... by or through the use of this equipment are adequately informed of all precautions. 2. User weight limit on the Schwinn 201/203 is the responsibility of the owner to ensure that all instructions before using the Schwinn 201/203. 1. WARNING: Before beginning this equipment only on the exercise bicycle. 10. Use this or any time while exercising, stop immediately and consult your physician. Replace any non-residential...
Assembly Manual
Page 3
... hardware to familiarize yourself with the process. • A flat area of 5' x 7' is a handy full size hardware chart and parts list of each comprised of the 201/203 Recumbent Bike is divided into 5 easy stages; Before proceeding with the assembly, please read over the easy to follow instructions to each of the required assembly hardware. 201/203 Schwinn Recumbent Bike Parts List, Hardware Chart, and Assembly Instructions Assembly of only a few setup steps.
... hardware to familiarize yourself with the process. • A flat area of 5' x 7' is a handy full size hardware chart and parts list of each comprised of the 201/203 Recumbent Bike is divided into 5 easy stages; Before proceeding with the assembly, please read over the easy to follow instructions to each of the required assembly hardware. 201/203 Schwinn Recumbent Bike Parts List, Hardware Chart, and Assembly Instructions Assembly of only a few setup steps.
Assembly Manual
Page 4
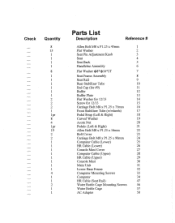
....25 x 45mm 1 Flat Washer 2 Seat Pin Adjustment Knob 3 Seat 4 Seat Back 5 Handlebar Assembly 6 Flat Washer i1)8*c016*2T 7 Seat Frame Assembly 8 Seat Rail 9 Rear Stabilizer Tube 10 End Cap (for #9) 11 Buffer 12 Buffer Plate 13 Flat Washer for 12/13 14 Screw for 12/13 15 Carriage Bolt M8 x P1.25 x 75mm 16 Front Stabilizer Tube (w/wheels) 17 Pedal Strap (Left & Right) 18 Curved...
....25 x 45mm 1 Flat Washer 2 Seat Pin Adjustment Knob 3 Seat 4 Seat Back 5 Handlebar Assembly 6 Flat Washer i1)8*c016*2T 7 Seat Frame Assembly 8 Seat Rail 9 Rear Stabilizer Tube 10 End Cap (for #9) 11 Buffer 12 Buffer Plate 13 Flat Washer for 12/13 14 Screw for 12/13 15 Carriage Bolt M8 x P1.25 x 75mm 16 Front Stabilizer Tube (w/wheels) 17 Pedal Strap (Left & Right) 18 Curved...
Assembly Manual
Page 7
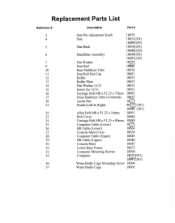
Replacement Parts List Reference # Description Part # 3 Seat Pin Adjustment Knob 18079 4 Seat 18051(201) 18089(203) 5 Seat Back 18050(201) 18088(203) 6 Handlebar Assembly 18049(201) 18087(203) 7 Flat Washer 18088 9 Seat Rail 18080 10 Rear Stabilizer Tube 18076 11 Seat Rail End Cap 18081 12 Buffer 18053 13 Buffer Plate 18053 14 Flat Washer 12/13 18053 15 Screw for 12/13 18053 16 Carriage Bolt M8 x P1.25...
Replacement Parts List Reference # Description Part # 3 Seat Pin Adjustment Knob 18079 4 Seat 18051(201) 18089(203) 5 Seat Back 18050(201) 18088(203) 6 Handlebar Assembly 18049(201) 18087(203) 7 Flat Washer 18088 9 Seat Rail 18080 10 Rear Stabilizer Tube 18076 11 Seat Rail End Cap 18081 12 Buffer 18053 13 Buffer Plate 18053 14 Flat Washer 12/13 18053 15 Screw for 12/13 18053 16 Carriage Bolt M8 x P1.25...
Assembly Manual
Page 8
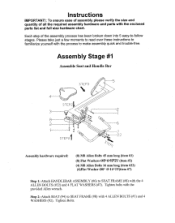
... the enclosed parts list and full size hardware chart. Assembly Stage #1 Assemble Seat and Handle Bar 5 STEPS C 4 STEP2 3 8 2 1 STEP2 2 1 AI Assembly hardware required: (8) M8 Allen Bolts 45 mm long (item #1) (8) Flat Washers 08*019*2T (item #2) (4) M8 Allen Bolts 16 mm long (item #22) (4)Flat Washer 08* 0 16*2T(item #7) Step 1: Attach HANDLEBAR ASSEMBLY (#6) to SEAT FRAME (#8) with the process to make assembly quick and trouble-free. Please take...
... the enclosed parts list and full size hardware chart. Assembly Stage #1 Assemble Seat and Handle Bar 5 STEPS C 4 STEP2 3 8 2 1 STEP2 2 1 AI Assembly hardware required: (8) M8 Allen Bolts 45 mm long (item #1) (8) Flat Washers 08*019*2T (item #2) (4) M8 Allen Bolts 16 mm long (item #22) (4)Flat Washer 08* 0 16*2T(item #7) Step 1: Attach HANDLEBAR ASSEMBLY (#6) to SEAT FRAME (#8) with the process to make assembly quick and trouble-free. Please take...
Assembly Manual
Page 10
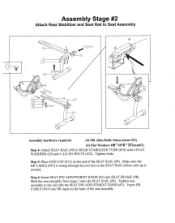
... HR CABLE (#47) is secured. Tighten seat assembly to REAR STABILIZER TUBE (#10) with the SEAT PIN ADJUSTMENT KNOB (#3). t STEP4 1- 141 0 4 STEPS 1 1 1 9 7 1 1 STEP7 10 Assembly hardware required: (4) M8 Allen Bolts 16mm (item #22) (4) Flat Washers 08 * 019 * 2T(item#2) Step 4: Attach SEAT RAIL (#9) to the rail with 4 FLAT WASHERS (#2) and 4 ALLEN BOLTS (#22). Step 6: Insert SEAT PIN ADJUSTMENT KNOB (#3) into HR input on the back of the SEAT RAIL (#9). Slide the seat assembly from...
... HR CABLE (#47) is secured. Tighten seat assembly to REAR STABILIZER TUBE (#10) with the SEAT PIN ADJUSTMENT KNOB (#3). t STEP4 1- 141 0 4 STEPS 1 1 1 9 7 1 1 STEP7 10 Assembly hardware required: (4) M8 Allen Bolts 16mm (item #22) (4) Flat Washers 08 * 019 * 2T(item#2) Step 4: Attach SEAT RAIL (#9) to the rail with 4 FLAT WASHERS (#2) and 4 ALLEN BOLTS (#22). Step 6: Insert SEAT PIN ADJUSTMENT KNOB (#3) into HR input on the back of the SEAT RAIL (#9). Slide the seat assembly from...

Assembly Manual
Page 12
... damage to the handgrip heart rate wires! 1) Remove END CAP (#11) from MAIN UNIT and Seat Rail. The coiled wire seen above the seat rail needs to be used around the attachment of the seat rail as it slides Slide the seat rail with 3, 16mm BOLTS (#22) and 3 FLAT WASHERS (#2). Using a flashlight check to make sure that the cable running through the seat rail is taut...
... damage to the handgrip heart rate wires! 1) Remove END CAP (#11) from MAIN UNIT and Seat Rail. The coiled wire seen above the seat rail needs to be used around the attachment of the seat rail as it slides Slide the seat rail with 3, 16mm BOLTS (#22) and 3 FLAT WASHERS (#2). Using a flashlight check to make sure that the cable running through the seat rail is taut...

Assembly Manual
Page 13
... outside of the seat rail. Step 11: Attach SEAT RAIL (#9) to MAIN UNIT (#31) with provided Allen wrench. Verify that the handgrip heart rate works by hitting manual start and then placing your hand on the grip heart pad located on the computer panel after step 12. Tighten with 2 90mm LONG BOLTS (#24), 2 CURVED WASHERS (#19), and 2 ACORN NUTS (#20). Step 12: Attach REAR STABILIZER TUBE (#10...
... outside of the seat rail. Step 11: Attach SEAT RAIL (#9) to MAIN UNIT (#31) with provided Allen wrench. Verify that the handgrip heart rate works by hitting manual start and then placing your hand on the grip heart pad located on the computer panel after step 12. Tighten with 2 90mm LONG BOLTS (#24), 2 CURVED WASHERS (#19), and 2 ACORN NUTS (#20). Step 12: Attach REAR STABILIZER TUBE (#10...
Assembly Manual
Page 15
... adjusted for information regarding computer operation, product maintenance, warranty information, and general fitness and exercise guidelines. That's it! Please reference the Owner's Manual for your fitness goals! Adjust seat location so that with Phillips head screwdriver. Step 16: Plug power adapter into the wall and into the recumbent bike. Unlock "seat locking" mechanism. 2. You're finished and now you can begin to CONSOLE MAST with COMPUTER MOUNTING SCREWS (#33). (In computer back) Tighten...
... adjusted for information regarding computer operation, product maintenance, warranty information, and general fitness and exercise guidelines. That's it! Please reference the Owner's Manual for your fitness goals! Adjust seat location so that with Phillips head screwdriver. Step 16: Plug power adapter into the wall and into the recumbent bike. Unlock "seat locking" mechanism. 2. You're finished and now you can begin to CONSOLE MAST with COMPUTER MOUNTING SCREWS (#33). (In computer back) Tighten...
Assembly Manual
Page 16
... the computer. 3. PROBLEM: Computer will not sit level... (SOLUTION): 1. Ensure the batteries the unit is blank... (SOLUTION): 1. Check the wiring connections and connector orientation made at : 1.800.864.1270 PROBLEM: Bike will not start please call 1.800.864.1270 for assistance. Troubleshooting the Schwinn 201, 203 Recumbent Exercise Bike TIP: Use assembly diagram(s) as reference when troubleshooting unit. Adjust the levelers on computer... (SOLUTION): 1. PROBLEM: No Heart Rate on the rear stabilizer.
... the computer. 3. PROBLEM: Computer will not sit level... (SOLUTION): 1. Ensure the batteries the unit is blank... (SOLUTION): 1. Check the wiring connections and connector orientation made at : 1.800.864.1270 PROBLEM: Bike will not start please call 1.800.864.1270 for assistance. Troubleshooting the Schwinn 201, 203 Recumbent Exercise Bike TIP: Use assembly diagram(s) as reference when troubleshooting unit. Adjust the levelers on computer... (SOLUTION): 1. PROBLEM: No Heart Rate on the rear stabilizer.

