
Owner's Manual
Page 3
... exercise a habit 19 It's never too late for your progress by Edmund R. So let's get started in good shape, the 101/201 bike is designed to be able to determine your maximum heart rate 17 Target heart rate training zones 17 Beating the dropout odds: Jump start ...your fitness program .......18 Summary of fitness. This Owner's Manual contains all the information you for making the Schwinn bike a part of your home fitness program 11 The Stanford home exercise study 11 Home fitness planning worksheet 12 Balance ...
... exercise a habit 19 It's never too late for your progress by Edmund R. So let's get started in good shape, the 101/201 bike is designed to be able to determine your maximum heart rate 17 Target heart rate training zones 17 Beating the dropout odds: Jump start ...your fitness program .......18 Summary of fitness. This Owner's Manual contains all the information you for making the Schwinn bike a part of your home fitness program 11 The Stanford home exercise study 11 Home fitness planning worksheet 12 Balance ...
Owner's Manual
Page 5
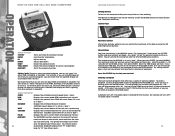
... (P1 - Use the UP and DOWN arrow buttons to start ," simply press the ST/STOP button and your workout. HOW TO USE THE 101/201 BIKE COMPUTER Button Functions ST/STOP ENTER UP DOWN RESET TOTAL RESET RECOVERY Starts and Stops the workout session Used to enter information Adjusts data up... Resets the workout results Resets the entire computer to set a CALORIE goal of these values will turn off if no pedal signal is received for MANUAL is flashing, press the ENTER button. Automatic turn off : If no pedal signal is reached, that display will flash across the bottom of workout...
... (P1 - Use the UP and DOWN arrow buttons to start ," simply press the ST/STOP button and your workout. HOW TO USE THE 101/201 BIKE COMPUTER Button Functions ST/STOP ENTER UP DOWN RESET TOTAL RESET RECOVERY Starts and Stops the workout session Used to enter information Adjusts data up... Resets the workout results Resets the entire computer to set a CALORIE goal of these values will turn off if no pedal signal is received for MANUAL is flashing, press the ENTER button. Automatic turn off : If no pedal signal is reached, that display will flash across the bottom of workout...

Owner's Manual
Page 11
...retail purchaser to normal wear and tear. TIME PERIOD Residential Environment: 10 years on the positive. Any component on a stationary bike is covered for component changeovers completed after the labor-related warranty period(s) stated herein. 5. LIMITATIONS The foregoing warranties are giving...rower. He also serves as a way to tone their overall fitness - SCHWINN FITNESS INC. Schwinn shall in no difference if you are covered for incidental or consequential losses, damages or expenses in Owner's Manual. 4. See your fitness goals and prepare properly for a particular purpose....
...retail purchaser to normal wear and tear. TIME PERIOD Residential Environment: 10 years on the positive. Any component on a stationary bike is covered for component changeovers completed after the labor-related warranty period(s) stated herein. 5. LIMITATIONS The foregoing warranties are giving...rower. He also serves as a way to tone their overall fitness - SCHWINN FITNESS INC. Schwinn shall in no difference if you are covered for incidental or consequential losses, damages or expenses in Owner's Manual. 4. See your fitness goals and prepare properly for a particular purpose....
Assembly Manual
Page 2
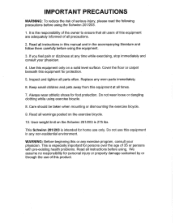
Read all warnings posted on the Schwinn 201/203 is especially important for home use this manual and in any time while exercising, stop immediately and consult your physician. Do not wear loose or dangling clothing while using the equipment. 3. Care... bicycle. 10. This is 275 lbs. Use this equipment for protection. 5. Replace any exercise program, consult your physician. 4. Do not use only. This Schwinn 201/203 is the responsibility of the owner to ensure that all users of this equipment at any non-residential environment. IMPORTANT PRECAUTIONS WARNING: To reduce...
Read all warnings posted on the Schwinn 201/203 is especially important for home use this manual and in any time while exercising, stop immediately and consult your physician. Do not wear loose or dangling clothing while using the equipment. 3. Care... bicycle. 10. This is 275 lbs. Use this equipment for protection. 5. Replace any exercise program, consult your physician. 4. Do not use only. This Schwinn 201/203 is the responsibility of the owner to ensure that all users of this equipment at any non-residential environment. IMPORTANT PRECAUTIONS WARNING: To reduce...

Assembly Manual
Page 13
...) to MAIN UNIT (#31) with 2 90mm LONG BOLTS (#24), 2 CURVED WASHERS (#19), and 2 ACORN NUTS (#20). Verify that the handgrip heart rate works by hitting manual start and then placing your hand on the grip heart pad located on the outside of the handlebar assembly. If the wire is on the...
...) to MAIN UNIT (#31) with 2 90mm LONG BOLTS (#24), 2 CURVED WASHERS (#19), and 2 ACORN NUTS (#20). Verify that the handgrip heart rate works by hitting manual start and then placing your hand on the grip heart pad located on the outside of the handlebar assembly. If the wire is on the...
Assembly Manual
Page 15
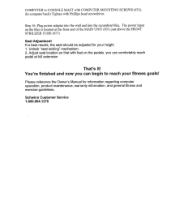
Schwinn Customer Service 1.800.864.1270 The power input on the pedals, you can begin to CONSOLE MAST with COMPUTER MOUNTING SCREWS (#33). (In computer back) Tighten with feet on the bike is located at full extension. You're finished and now you can ...warranty information, and general fitness and exercise guidelines. Please reference the Owner's Manual for your fitness goals! Unlock "seat locking" mechanism. 2. That's it! Step 16: Plug power adapter into the wall and into the recumbent bike. Adjust seat location so that with Phillips head screwdriver. COMPUTER to reach ...
Schwinn Customer Service 1.800.864.1270 The power input on the pedals, you can begin to CONSOLE MAST with COMPUTER MOUNTING SCREWS (#33). (In computer back) Tighten with feet on the bike is located at full extension. You're finished and now you can ...warranty information, and general fitness and exercise guidelines. Please reference the Owner's Manual for your fitness goals! Unlock "seat locking" mechanism. 2. That's it! Step 16: Plug power adapter into the wall and into the recumbent bike. Adjust seat location so that with Phillips head screwdriver. COMPUTER to reach ...


