
Owners Manual
Page 3
... Rear Terminal 9 Top Control 10 Remote Control 11 Operating Range 11 Remote Control Battery Installation 12 Installation 13 Positioning the Projector 13 Adjustable Feet 13 Connecting the AC Power Cord 14 Connecting to a Computer 15 Connecting to Video Equipment 16 Basic ...Lamp Replacement 48 Lamp Replace Counter 49 Appendix 50 Troubleshooting 50 Menu Tree 52 Indicators and Projector Condition 54 Compatible Computer Specifications 55 Technical Specifications 56 Optional Parts 57 Configurations of Terminals 58 PIN Code Number Memo 59 Trademarks Each ...
... Rear Terminal 9 Top Control 10 Remote Control 11 Operating Range 11 Remote Control Battery Installation 12 Installation 13 Positioning the Projector 13 Adjustable Feet 13 Connecting the AC Power Cord 14 Connecting to a Computer 15 Connecting to Video Equipment 16 Basic ...Lamp Replacement 48 Lamp Replace Counter 49 Appendix 50 Troubleshooting 50 Menu Tree 52 Indicators and Projector Condition 54 Compatible Computer Specifications 55 Technical Specifications 56 Optional Parts 57 Configurations of Terminals 58 PIN Code Number Memo 59 Trademarks Each ...
Owners Manual
Page 17
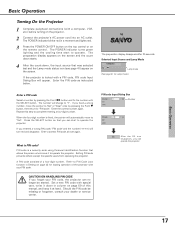
...disappears, you entered a wrong PIN code, "PIN code" and the number will change to operate the projector. Setting PIN code prevents others except the specific users from operating the projector. Enter the correct number again. The POWER indicator turns green lighting and the cooling fans start to ... code as instructed below. 16 The preparation display disappears after 20 seconds. The POWER indicator blinks red in column on the projector. 2 Connect the projector's AC power cord into an AC outlet. Press the SELECT button so that allows the person who knows it at hand...
...disappears, you entered a wrong PIN code, "PIN code" and the number will change to operate the projector. Setting PIN code prevents others except the specific users from operating the projector. Enter the correct number again. The POWER indicator turns green lighting and the cooling fans start to ... code as instructed below. 16 The preparation display disappears after 20 seconds. The POWER indicator blinks red in column on the projector. 2 Connect the projector's AC power cord into an AC outlet. Press the SELECT button so that allows the person who knows it at hand...
Owners Manual
Page 27
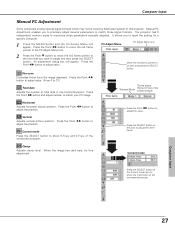
...flicker from the image displayed. Press the Point 7 8 button to memorize those signal formats. Computer Input 27 The projector has 5 independent memory areas to adjust the position. Press the Point 7 8 button to adjust value. (From ... adjust and then press the SELECT button. of the selected Mode. When the image has dark bars, try this projector. Press the Point 7 8 button to move the red frame PC Adjust Menu PC Adjust Menu icon pointer to ... the Point 7 8 button to recall the setting for a specific computer. 1 Press the MENU button and the On-Screen Menu will appear.
...flicker from the image displayed. Press the Point 7 8 button to memorize those signal formats. Computer Input 27 The projector has 5 independent memory areas to adjust the position. Press the Point 7 8 button to adjust value. (From ... adjust and then press the SELECT button. of the selected Mode. When the image has dark bars, try this projector. Press the Point 7 8 button to move the red frame PC Adjust Menu PC Adjust Menu icon pointer to ... the Point 7 8 button to recall the setting for a specific computer. 1 Press the MENU button and the On-Screen Menu will appear.

Owners Manual
Page 33
Component Auto The projector automatically detects incoming video signal, and adjusts itself to select a specific component video signal format among PAL, SECAM, NTSC, NTSC 4.43, PAL-M, and PAL-N. Video System Selection 1 Press the MENU button and the On-... its performance. Video Input 33 PAL / SECAM / NTSC / NTSC4.43 / PAL-M / PAL-N If the projector cannot reproduce proper video image, it is necessary to optimize its performance. Move the pointer to select a specific broadcast signal format among 480i, 575i, 480p, 575p, 720p, 1035i, and 1080i. When Video System is necessary...
Component Auto The projector automatically detects incoming video signal, and adjusts itself to select a specific component video signal format among PAL, SECAM, NTSC, NTSC 4.43, PAL-M, and PAL-N. Video System Selection 1 Press the MENU button and the On-... its performance. Video Input 33 PAL / SECAM / NTSC / NTSC4.43 / PAL-M / PAL-N If the projector cannot reproduce proper video image, it is necessary to optimize its performance. Move the pointer to select a specific broadcast signal format among 480i, 575i, 480p, 575p, 720p, 1035i, and 1080i. When Video System is necessary...

Owners Manual
Page 55
...MAC 13 640 x 480 480p -------- 575p -------- 480i -------- 575i -------- SVGA 1 800 x 600 SVGA 2 800 x 600 SVGA 3 800 x 600 SVGA 4 800 x 600 SVGA 5 800 x 600 SVGA 6 800 x 600 SVGA 7 800 x 600 SVGA 8 800 x 600 SVGA 9 800 x 600 SVGA 10 800 x 600 SVGA 11 800 x 600 MAC 16 832 x 624 XGA 1 1024 ... 720p (HDTV) -------- 1035i (HDTV) -------- 1080i (HDTV) -------- 1080i (HDTV) -------- Appendix Compatible Computer Specifications Basically this projector can accept the signal from all computers with the V, H-Frequency below mentioned and less than 100 MHz of Dot Clock.
...MAC 13 640 x 480 480p -------- 575p -------- 480i -------- 575i -------- SVGA 1 800 x 600 SVGA 2 800 x 600 SVGA 3 800 x 600 SVGA 4 800 x 600 SVGA 5 800 x 600 SVGA 6 800 x 600 SVGA 7 800 x 600 SVGA 8 800 x 600 SVGA 9 800 x 600 SVGA 10 800 x 600 SVGA 11 800 x 600 MAC 16 832 x 624 XGA 1 1024 ... 720p (HDTV) -------- 1035i (HDTV) -------- 1080i (HDTV) -------- 1080i (HDTV) -------- Appendix Compatible Computer Specifications Basically this projector can accept the signal from all computers with the V, H-Frequency below mentioned and less than 100 MHz of Dot Clock.
Owners Manual
Page 56
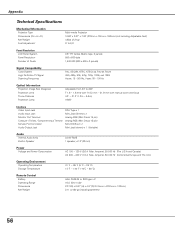
...x 0.91"(H) x 4.8"(D) (51.5mm x 23.2mm x 123mm) 2.11 oz (60 g) (including batteries) 56 Appendix Technical Specifications Mechanical Information Projector Type Dimensions (W x H x D) Net Weight Feet Adjustment Multi-media Projector 10.63" x 3.07" x 7.48" (270mm x 78mm x 190mm) (not including Adjustable Feet) 4.8lbs (2.2 kg)... 0˚ to 8,0˚ Panel Resolution LCD Panel System Panel Resolution Number of Pixels 0.5" TFT Active Matrix ...
...x 0.91"(H) x 4.8"(D) (51.5mm x 23.2mm x 123mm) 2.11 oz (60 g) (including batteries) 56 Appendix Technical Specifications Mechanical Information Projector Type Dimensions (W x H x D) Net Weight Feet Adjustment Multi-media Projector 10.63" x 3.07" x 7.48" (270mm x 78mm x 190mm) (not including Adjustable Feet) 4.8lbs (2.2 kg)... 0˚ to 8,0˚ Panel Resolution LCD Panel System Panel Resolution Number of Pixels 0.5" TFT Active Matrix ...
Owners Manual
Page 57
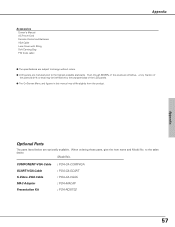
...'s Manual AC Power Cord Remote Control and Batteries VGA Cable Lens Cover with String Soft Carrying Bag PIN Code Label ● The specifications are subject to change without notice. ● LCD panels are manufactured to the sales dealer. Appendix Optional Parts The parts listed below are effective, a tiny fraction of the pixels...
...'s Manual AC Power Cord Remote Control and Batteries VGA Cable Lens Cover with String Soft Carrying Bag PIN Code Label ● The specifications are subject to change without notice. ● LCD panels are manufactured to the sales dealer. Appendix Optional Parts The parts listed below are effective, a tiny fraction of the pixels...