
Owners Manual
Page 3
... 9 Top Control 10 Remote Control 11 Operating Range 11 Remote Control Battery Installation 12 Installation 13 Positioning the Projector 13 Adjustable Feet 13 Connecting the AC Power Cord 14 Connecting to a Computer 15 Connecting to Video Equipment ...Projector 18 Zoom and Focus Adjustment 19 How to Operate the On-Screen Menu 20 Menu Bar 21 Keystone Adjustment 22 Picture Freeze Function 22 No Show Function 22 P-Timer Function 23 Sound Adjustment 23 Computer Input 24 Input Source Selection 24 Computer System Selection 25 Auto PC Adjustment 26 Manual...
... 9 Top Control 10 Remote Control 11 Operating Range 11 Remote Control Battery Installation 12 Installation 13 Positioning the Projector 13 Adjustable Feet 13 Connecting the AC Power Cord 14 Connecting to a Computer 15 Connecting to Video Equipment ...Projector 18 Zoom and Focus Adjustment 19 How to Operate the On-Screen Menu 20 Menu Bar 21 Keystone Adjustment 22 Picture Freeze Function 22 No Show Function 22 P-Timer Function 23 Sound Adjustment 23 Computer Input 24 Input Source Selection 24 Computer System Selection 25 Auto PC Adjustment 26 Manual...
Owners Manual
Page 4
...minimum distances must be used for an extended time, unplug the projector from the projection lens. CAUTION Not for use in a computer room as possible. To the Owner Before operating this projector, read this manual again, check operations and cable connections and try the solutions in ...the "Troubleshooting" section in the end of this manual thoroughly and operate the projector properly. If your projector, and can near the projector, hot air is to operate improperly, read this booklet. Be especially careful that children do ...
...minimum distances must be used for an extended time, unplug the projector from the projection lens. CAUTION Not for use in a computer room as possible. To the Owner Before operating this projector, read this manual again, check operations and cable connections and try the solutions in ...the "Troubleshooting" section in the end of this manual thoroughly and operate the projector properly. If your projector, and can near the projector, hot air is to operate improperly, read this booklet. Be especially careful that children do ...
Owners Manual
Page 17
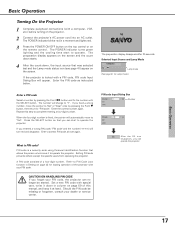
Selected Input Source and Lamp Mode Lamp mode (See page 41 for locking operation of the projector with your PIN code. Repeat this manual, and keep it at hand. Enter a correct PIN code all over again. A PIN code consists of this step to complete entering a four-digit number. Refer ... Point 7 8 button and fix the number with special care, write it to operate. Setting PIN code prevents others except the specific users from operating the projector. Set a new PIN code with the SELECT button. If you entered a wrong PIN code, "PIN code" and the number will turn red and disappear. ...
Selected Input Source and Lamp Mode Lamp mode (See page 41 for locking operation of the projector with your PIN code. Repeat this manual, and keep it at hand. Enter a correct PIN code all over again. A PIN code consists of this step to complete entering a four-digit number. Refer ... Point 7 8 button and fix the number with special care, write it to operate. Setting PIN code prevents others except the specific users from operating the projector. Set a new PIN code with the SELECT button. If you entered a wrong PIN code, "PIN code" and the number will turn red and disappear. ...

Owners Manual
Page 25
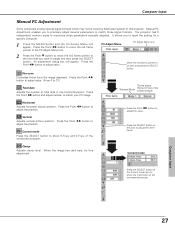
... connected signal conforming to PC Systems provided in this projector, Auto PC Adjustment function works to adjust the projector. ----- Adjustment data can be selected manually. 1 Press the MENU button and the On-Screen Menu will appear. The projector chooses a proper system and displays it. *Mode 1 and SVGA 1 are examples. Press the Point 7 8 buttons to move...
... connected signal conforming to PC Systems provided in this projector, Auto PC Adjustment function works to adjust the projector. ----- Adjustment data can be selected manually. 1 Press the MENU button and the On-Screen Menu will appear. The projector chooses a proper system and displays it. *Mode 1 and SVGA 1 are examples. Press the Point 7 8 buttons to move...

Owners Manual
Page 26
When the image is not provided properly with this projector. Auto PC Adj. 1 Press the MENU button to the Auto PC Adj. Once parameters are required. (p 25, 27, 28) • The Auto PC Adjust cannot ... PC button on page 28. ✔Note: • Fine sync, Total dots and Picture Position of some computers can be fully adjusted with this operation, manual adjustments are memorized, the setting can be operated when 480i, 575i, 480p, 575p, 720p,1035i, or 1080i is provided to automatically adjust Fine sync, Total...
When the image is not provided properly with this projector. Auto PC Adj. 1 Press the MENU button to the Auto PC Adj. Once parameters are required. (p 25, 27, 28) • The Auto PC Adjust cannot ... PC button on page 28. ✔Note: • Fine sync, Total dots and Picture Position of some computers can be fully adjusted with this operation, manual adjustments are memorized, the setting can be operated when 480i, 575i, 480p, 575p, 720p,1035i, or 1080i is provided to automatically adjust Fine sync, Total...
Owners Manual
Page 27
... flicker from the image displayed. Press the Point 7 8 button and adjust number to adjust the value. The projector has 5 independent memory areas to match those parameters manually adjusted. Press the Point 7 8 button to move the red frame PC Adjust Menu PC Adjust Menu icon pointer...H-Freq. Shows status Selected Mode (Stored / Free) of the connected computer. When the image has dark bars, try this projector. Computer Input Manual PC Adjustment Some computers employ special signal formats which may not be tuned by Multi-scan system of the connected computer. It ...
... flicker from the image displayed. Press the Point 7 8 button and adjust number to adjust the value. The projector has 5 independent memory areas to match those parameters manually adjusted. Press the Point 7 8 button to move the red frame PC Adjust Menu PC Adjust Menu icon pointer...H-Freq. Shows status Selected Mode (Stored / Free) of the connected computer. When the image has dark bars, try this projector. Computer Input Manual PC Adjustment Some computers employ special signal formats which may not be tuned by Multi-scan system of the connected computer. It ...

Owners Manual
Page 30
... and the Point 8 button to adjust image brighter. (From 0 to the Store icon and press the SELECT button. Store To store the image data adjusted manually, move the red frame pointer to the item that you want to select. (XLow, Low, Mid, or High) White balance (Red) Press the Point 7 button...
... and the Point 8 button to adjust image brighter. (From 0 to the Store icon and press the SELECT button. Store To store the image data adjusted manually, move the red frame pointer to the item that you want to select. (XLow, Low, Mid, or High) White balance (Red) Press the Point 7 button...

Owners Manual
Page 33
PAL / SECAM / NTSC / NTSC4.43 / PAL-M / PAL-N If the projector cannot reproduce proper video image, it is PAL-M or PAL-N, select system manually. Move the pointer to select a specific broadcast signal format among 480i, 575i, 480p, 575p, 720p, 1035i, and 1080i. ...Video Input 33 When Video System is necessary to a system and press the SELECT button. Component Auto The projector automatically detects incoming video signal...
PAL / SECAM / NTSC / NTSC4.43 / PAL-M / PAL-N If the projector cannot reproduce proper video image, it is PAL-M or PAL-N, select system manually. Move the pointer to select a specific broadcast signal format among 480i, 575i, 480p, 575p, 720p, 1035i, and 1080i. ...Video Input 33 When Video System is necessary to a system and press the SELECT button. Component Auto The projector automatically detects incoming video signal...
Owners Manual
Page 49
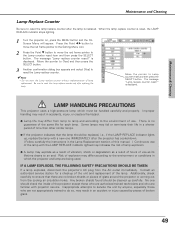
... hazard. ● Lamp life may result in the Lamp Replacement section of this manual. ) Continuous use of the lamp. Additionally, check carefully to ensure that the lamp should check the inside of the projector except those who are no guarantee of the same life for a checkup of the...to reset the Lamp replace counter. ✔Note: • Do not reset the Lamp replace counter without implementation of glass around the projector or coming out from the AC outlet immediately. is replaced. Maintenance & Cleaning Maintenance and Cleaning Lamp Replace Counter Be sure to reset the...
... hazard. ● Lamp life may result in the Lamp Replacement section of this manual. ) Continuous use of the lamp. Additionally, check carefully to ensure that the lamp should check the inside of the projector except those who are no guarantee of the same life for a checkup of the...to reset the Lamp replace counter. ✔Note: • Do not reset the Lamp replace counter without implementation of glass around the projector or coming out from the AC outlet immediately. is replaced. Maintenance & Cleaning Maintenance and Cleaning Lamp Replace Counter Be sure to reset the...
Owners Manual
Page 50
...indicator. Check the projection lamp. (See page 48.) - See your computer's instruction manual for the projector in the Setting Menu. (See page 42.) - It takes about 20 seconds to display an image after the projector is corresponding with a computer and it needs cleaning. (See page 47.) - ... page 24, 32) - Make sure the temperature is Top/Bottom reversed. Adjust the audio source. - When you have properly connected the projector to peripheral equipment as described in moisture condensation on page 18.) - Image is not out of focus. Unlock Key lock for the setting....
...indicator. Check the projection lamp. (See page 48.) - See your computer's instruction manual for the projector in the Setting Menu. (See page 42.) - It takes about 20 seconds to display an image after the projector is corresponding with a computer and it needs cleaning. (See page 47.) - ... page 24, 32) - Make sure the temperature is Top/Bottom reversed. Adjust the audio source. - When you have properly connected the projector to peripheral equipment as described in moisture condensation on page 18.) - Image is not out of focus. Unlock Key lock for the setting....
Owners Manual
Page 56
... Dimensions (W x H x D) Net Weight Feet Adjustment Multi-media Projector 10.63" x 3.07" x 7.48" (270mm x 78mm x 190mm) (not including Adjustable Feet) 4.8lbs (2.2 kg) 0˚ to 8,0˚ Panel Resolution LCD Panel System Panel Resolution Number of Pixels 0.5" TFT Active Matrix type, 3 panels 800 x 600 dots 1,440,000 ...15 ~ 80 KHz, V-sync. 50 ~ 100 Hz Adjustable from 34" to 200" F 1.6 ~ 1.8 lens with f 18.3 mm ~ 21.9 mm with manual zoom and focus 4.3' ~ 21.2' (1.3m ~ 6.5m) 160W Interface Video Input Jack Audio Input Jack Monitor Out Terminal Computer / S-Video / Component Input Terminal ...
... Dimensions (W x H x D) Net Weight Feet Adjustment Multi-media Projector 10.63" x 3.07" x 7.48" (270mm x 78mm x 190mm) (not including Adjustable Feet) 4.8lbs (2.2 kg) 0˚ to 8,0˚ Panel Resolution LCD Panel System Panel Resolution Number of Pixels 0.5" TFT Active Matrix type, 3 panels 800 x 600 dots 1,440,000 ...15 ~ 80 KHz, V-sync. 50 ~ 100 Hz Adjustable from 34" to 200" F 1.6 ~ 1.8 lens with f 18.3 mm ~ 21.9 mm with manual zoom and focus 4.3' ~ 21.2' (1.3m ~ 6.5m) 160W Interface Video Input Jack Audio Input Jack Monitor Out Terminal Computer / S-Video / Component Input Terminal ...
Owners Manual
Page 57
Appendix Accessories Owner's Manual AC Power Cord Remote Control and Batteries VGA Cable Lens Cover with String Soft Carrying Bag PIN Code Label ● The specifications are subject to change without notice. ● LCD panels are optionally available. COMPONENT-VGA Cable SCART-VGA Cable S-Video-VGA Cable MAC Adapter Presentation Kit : ...Even though 99.99% of the pixels are effective, a tiny fraction of the pixels (0.01% or less) may be ineffective by the characteristics of the LCD panels. ● The On-Screen Menu and figures in this manual may differ slightly from the product.
Appendix Accessories Owner's Manual AC Power Cord Remote Control and Batteries VGA Cable Lens Cover with String Soft Carrying Bag PIN Code Label ● The specifications are subject to change without notice. ● LCD panels are optionally available. COMPONENT-VGA Cable SCART-VGA Cable S-Video-VGA Cable MAC Adapter Presentation Kit : ...Even though 99.99% of the pixels are effective, a tiny fraction of the pixels (0.01% or less) may be ineffective by the characteristics of the LCD panels. ● The On-Screen Menu and figures in this manual may differ slightly from the product.
Owners Manual
Page 59
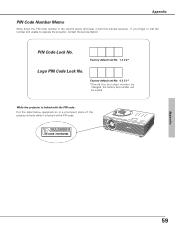
... four-digit number be invalid. Factory default set number will be changed, the factory set No: 1 2 3 4* Logo PIN Code Lock No. Appendix 59 While the projector is locked with the PIN code... Appendix PIN Code Number Memo Write down the PIN code number in a prominent place of the...
... four-digit number be invalid. Factory default set number will be changed, the factory set No: 1 2 3 4* Logo PIN Code Lock No. Appendix 59 While the projector is locked with the PIN code... Appendix PIN Code Number Memo Write down the PIN code number in a prominent place of the...


