Owners Manual
Page 1
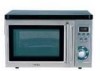
25941_EM_Z2100GS manual.qxd 7/7/05 8:32 AM Page 1 INSTRUCTION MANUAL AND COOKING GUIDE EM-Z2100GS Microwave Oven Read these instructions carefully before using your oven will provide you with many years of good service. If you follow the instructions, your microwave oven. SAVE THESE INSTRUCTIONS
25941_EM_Z2100GS manual.qxd 7/7/05 8:32 AM Page 1 INSTRUCTION MANUAL AND COOKING GUIDE EM-Z2100GS Microwave Oven Read these instructions carefully before using your oven will provide you with many years of good service. If you follow the instructions, your microwave oven. SAVE THESE INSTRUCTIONS
Owners Manual
Page 2
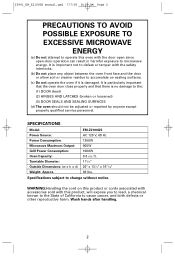
... or tamper with the door open since open-door operation can result in harmful exposure to microwave energy. SPECIFICATIONS Model: Power Source: Power Consumption: Microwave Maximum Output: Grill Power Consumption: Oven Capacity: Turntable Diameter: Outside Dimensions: (w x h x d) Weight: Approx. Specifications subject to the: (1) DOOR (bent) (2) HINGES AND LATCHES (broken or loosened) (3) DOOR SEALS AND SEALING SURFACES (d) The oven should not be adjusted or repaired by anyone except properly qualified service personnel. 25941_EM_Z2100GS manual.qxd 7/7/05 8:32 AM...
... or tamper with the door open since open-door operation can result in harmful exposure to microwave energy. SPECIFICATIONS Model: Power Source: Power Consumption: Microwave Maximum Output: Grill Power Consumption: Oven Capacity: Turntable Diameter: Outside Dimensions: (w x h x d) Weight: Approx. Specifications subject to the: (1) DOOR (bent) (2) HINGES AND LATCHES (broken or loosened) (3) DOOR SEALS AND SEALING SURFACES (d) The oven should not be adjusted or repaired by anyone except properly qualified service personnel. 25941_EM_Z2100GS manual.qxd 7/7/05 8:32 AM...
Owners Manual
Page 3
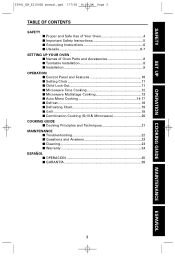
... 25941_EM_Z2100GS manual.qxd 7/7/05 8:32 AM Page 3 TABLE OF CONTENTS SAFETY ■ Proper and Safe Use of Your Oven 4 ■ Important Safety Instructions 5 ■ Grounding Instructions 6 ■ Utensils 6-7 SETTING UP YOUR OVEN ■ Names of Oven Parts and Accessories 8 ■ Turntable Installation 8 ■ Installation 9 OPERATION ■ Control Panel and Features 10 ■ Setting Clock 11 ■ Child Lock-Out 11 ■ Microwave Time Cooking 12 ■ Microwave Multistage Cooking 13 ■ Auto Menu Cooking 14-17 ■ Defrost...
... 25941_EM_Z2100GS manual.qxd 7/7/05 8:32 AM Page 3 TABLE OF CONTENTS SAFETY ■ Proper and Safe Use of Your Oven 4 ■ Important Safety Instructions 5 ■ Grounding Instructions 6 ■ Utensils 6-7 SETTING UP YOUR OVEN ■ Names of Oven Parts and Accessories 8 ■ Turntable Installation 8 ■ Installation 9 OPERATION ■ Control Panel and Features 10 ■ Setting Clock 11 ■ Child Lock-Out 11 ■ Microwave Time Cooking 12 ■ Microwave Multistage Cooking 13 ■ Auto Menu Cooking 14-17 ■ Defrost...

Owners Manual
Page 4
... liquid before carefully removing the container. • The oven cavity, door, turntable, Grill Rack and cookware become very hot when using Auto Menu Popcorn. • The oven has several built-in safety switches to break. • Do not remove feet from oven. 4 This microwave oven is made for household use only. • Liquids, such as it to ensure that the power remains off when the door is open. Uneven heating may cause the turntable to avoid...
... liquid before carefully removing the container. • The oven cavity, door, turntable, Grill Rack and cookware become very hot when using Auto Menu Popcorn. • The oven has several built-in safety switches to break. • Do not remove feet from oven. 4 This microwave oven is made for household use only. • Liquids, such as it to ensure that the power remains off when the door is open. Uneven heating may cause the turntable to avoid...
Owners Manual
Page 5
... use . 7. As with the provided installation instructions. 5. Keep cord away from paper or plastic bags before using electrical appliances, basic safety precautions should not be serviced only by children. 8. for example, closed , turn oven off, and disconnect the power cord, or shut off power at the fuse or circuit breaker panel. (d) Do not use the cavity for industrial or laboratory use as described in this manual. Do not cover...
... use . 7. As with the provided installation instructions. 5. Keep cord away from paper or plastic bags before using electrical appliances, basic safety precautions should not be serviced only by children. 8. for example, closed , turn oven off, and disconnect the power cord, or shut off power at the fuse or circuit breaker panel. (d) Do not use the cavity for industrial or laboratory use as described in this manual. Do not cover...
Owners Manual
Page 6
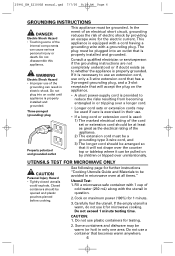
... circuit, grounding reduces the risk of electric shock by children or tripped over the counter top or tabletop where it will accept the plug on the appliance. • A short power-supply cord is properly installed and grounded. CAUTION: 1. Do not use plastic containers for the electric current. 25941_EM_Z2100GS manual.qxd 7/7/05 8:32 AM Page 6 GROUNDING INSTRUCTIONS DANGER Electric Shock Hazard • Touching...
... circuit, grounding reduces the risk of electric shock by children or tripped over the counter top or tabletop where it will accept the plug on the appliance. • A short power-supply cord is properly installed and grounded. CAUTION: 1. Do not use plastic containers for the electric current. 25941_EM_Z2100GS manual.qxd 7/7/05 8:32 AM Page 6 GROUNDING INSTRUCTIONS DANGER Electric Shock Hazard • Touching...
Owners Manual
Page 7
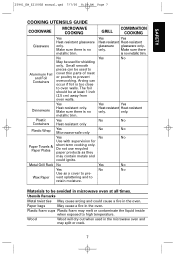
... oven walls. Make sure there is no metallic trim. Plastic Yes No No Containers Heat-resistant only Plastic Wrap Yes Microwave-safe only No No Yes No No Use with supervision for shielding only. Utensils Remarks Metal twist ties May cause arcing and could ignite. 25941_EM_Z2100GS manual.qxd 7/7/05 8:32 AM Page 7 SAFETY COOKING UTENSILS GUIDE COOKWARE MICROWAVE COOKING COMBINATION GRILL COOKING Glassware Yes Heat...
... oven walls. Make sure there is no metallic trim. Plastic Yes No No Containers Heat-resistant only Plastic Wrap Yes Microwave-safe only No No Yes No No Use with supervision for shielding only. Utensils Remarks Metal twist ties May cause arcing and could ignite. 25941_EM_Z2100GS manual.qxd 7/7/05 8:32 AM Page 7 SAFETY COOKING UTENSILS GUIDE COOKWARE MICROWAVE COOKING COMBINATION GRILL COOKING Glassware Yes Heat...
Owners Manual
Page 8
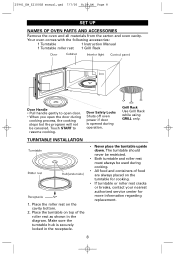
Touch START to open door. • When you open the door during cooking process, the cooking stops but the program will not be used during operation. 25941_EM_Z2100GS manual.qxd 7/7/05 8:32 AM Page 8 SET UP NAMES OF OVEN PARTS AND ACCESSORIES Remove the oven and all materials from the carton and oven cavity. Place the turntable on the turntable for cooking. • If turntable or roller rest cracks or breaks, contact your nearest authorized...
Touch START to open door. • When you open the door during cooking process, the cooking stops but the program will not be used during operation. 25941_EM_Z2100GS manual.qxd 7/7/05 8:32 AM Page 8 SET UP NAMES OF OVEN PARTS AND ACCESSORIES Remove the oven and all materials from the carton and oven cavity. Place the turntable on the turntable for cooking. • If turntable or roller rest cracks or breaks, contact your nearest authorized...
Owners Manual
Page 9
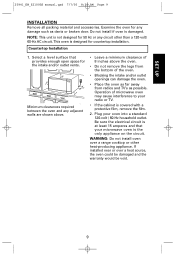
... cabinet is not designed for any damage such as possible. This oven is at least 15 amperes and that provides enough open space for countertop installation. Countertop Installation 1. Be sure the electrical circuit is designed for the intake and/or outlet vents. WARNING: Do not install oven over a heat source, the oven could be damaged and the warranty would be void. 9 Select a level surface that your microwave oven...
... cabinet is not designed for any damage such as possible. This oven is at least 15 amperes and that provides enough open space for countertop installation. Countertop Installation 1. Be sure the electrical circuit is designed for the intake and/or outlet vents. WARNING: Do not install oven over a heat source, the oven could be damaged and the warranty would be void. 9 Select a level surface that your microwave oven...
Owners Manual
Page 10
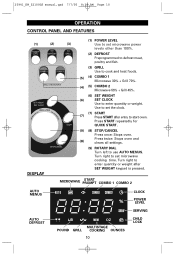
... all settings. DISPLAY (9) ROTARY DIAL Turn left to enter quantity or weight. MICROWAVE START PROMPT COMBO 1 COMBO 2 AUTO MENUS CLOCK POWER LEVEL SERVING AUTO DEFROST MULTISTAGE POUND GRILL COOKING OUNCES 10 CHILD LOCK Press START repeatedly for QUICK START. (9) (8) STOP/CANCEL Press once: Stops oven. 25941_EM_Z2100GS manual.qxd 7/7/05 8:32 AM Page 10 OPERATION CONTROL PANEL AND FEATURES (1) (2) (3) (1) POWER LEVEL Use to set microwave power levels other than 100%. (2) DEFROST Preprogrammed to defrost meat, poultry and fish. (3) GRILL Use to cook and heat foods...
... all settings. DISPLAY (9) ROTARY DIAL Turn left to enter quantity or weight. MICROWAVE START PROMPT COMBO 1 COMBO 2 AUTO MENUS CLOCK POWER LEVEL SERVING AUTO DEFROST MULTISTAGE POUND GRILL COOKING OUNCES 10 CHILD LOCK Press START repeatedly for QUICK START. (9) (8) STOP/CANCEL Press once: Stops oven. 25941_EM_Z2100GS manual.qxd 7/7/05 8:32 AM Page 10 OPERATION CONTROL PANEL AND FEATURES (1) (2) (3) (1) POWER LEVEL Use to set microwave power levels other than 100%. (2) DEFROST Preprogrammed to defrost meat, poultry and fish. (3) GRILL Use to cook and heat foods...
Owners Manual
Page 12
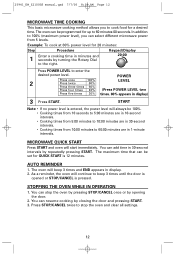
... beep 3 times until the door is opened or STOP/CANCEL is 12 minutes. Press once 100% 2 Press twice 80% Press three times 60% Press four times 40% Press five times 20% POWER LEVEL (Press POWER LEVEL two times. 80% appears in minutes and seconds by repeatedly pressing START. MICROWAVE QUICK START Press START and oven will beep 3 times and END appears in display. 2. 25941_EM_Z2100GS manual.qxd 7/7/05 8:32 AM Page 12 MICROWAVE TIME COOKING This basic microwave cooking...
... beep 3 times until the door is opened or STOP/CANCEL is 12 minutes. Press once 100% 2 Press twice 80% Press three times 60% Press four times 40% Press five times 20% POWER LEVEL (Press POWER LEVEL two times. 80% appears in minutes and seconds by repeatedly pressing START. MICROWAVE QUICK START Press START and oven will beep 3 times and END appears in display. 2. 25941_EM_Z2100GS manual.qxd 7/7/05 8:32 AM Page 12 MICROWAVE TIME COOKING This basic microwave cooking...
Owners Manual
Page 13
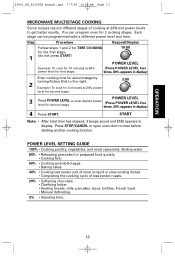
...; Heating breads, rolls, pancakes, tacos, tortillas, French toast. • Manual defrosting. 0% • Standing time. 13 You can be programmed with a different power level and time. START Note: • After total time has elapsed, 3 beeps sound and END appears in display) 4 Press START. Each stage can program oven for second stage. 3:00 POWER LEVEL 3 Press POWER LEVEL to clear before starting another cooking function. Boiling water. 80% • Reheating precooked or prepared food quickly. • Cooking...
...; Heating breads, rolls, pancakes, tacos, tortillas, French toast. • Manual defrosting. 0% • Standing time. 13 You can be programmed with a different power level and time. START Note: • After total time has elapsed, 3 beeps sound and END appears in display) 4 Press START. Each stage can program oven for second stage. 3:00 POWER LEVEL 3 Press POWER LEVEL to clear before starting another cooking function. Boiling water. 80% • Reheating precooked or prepared food quickly. • Cooking...
Owners Manual
Page 18
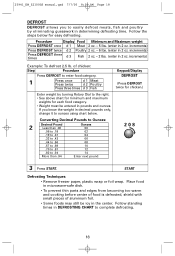
... food category. • Weight must be icy in the center. Follow standing times in DEFROSTING CHART to ounces using chart below for easy defrosting. increments) Example: To defrost 2.5 lb. START Defrosting Techniques: • Remove freezer paper, plastic wrap or foil wrap. Follow the steps below . Place food in microwave-safe dish. • To prevent thin parts and edges from becoming too warm and cooking...
... food category. • Weight must be icy in the center. Follow standing times in DEFROSTING CHART to ounces using chart below for easy defrosting. increments) Example: To defrost 2.5 lb. START Defrosting Techniques: • Remove freezer paper, plastic wrap or foil wrap. Follow the steps below . Place food in microwave-safe dish. • To prevent thin parts and edges from becoming too warm and cooking...
Owners Manual
Page 19
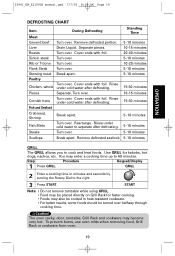
Rearrange. Turn over halfway through cooking time. START Note: • Do not remove turntable while using GRILL. • Food may enter a cooking time up to cook and heat foods. Caution! To prevent burns, use oven mitts when removing food, Grill Rack or cookware from oven. 19 25941_EM_Z2100GS manual.qxd 7/7/05 8:32 AM Page 19 OPERATION DEFROSTING CHART Item Meat Ground beef During Defrosting Standing Time Turn over . Stewing meat Break apart. 5 -10 minutes 5 -10 minutes Poultry Turn over . Cover ends...
Rearrange. Turn over halfway through cooking time. START Note: • Do not remove turntable while using GRILL. • Food may enter a cooking time up to cook and heat foods. Caution! To prevent burns, use oven mitts when removing food, Grill Rack or cookware from oven. 19 25941_EM_Z2100GS manual.qxd 7/7/05 8:32 AM Page 19 OPERATION DEFROSTING CHART Item Meat Ground beef During Defrosting Standing Time Turn over . Stewing meat Break apart. 5 -10 minutes 5 -10 minutes Poultry Turn over . Cover ends...
Owners Manual
Page 20
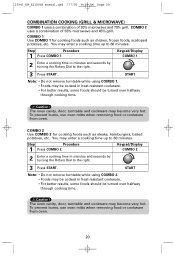
... very hot. START Note: • Do not remove turntable while using COMBO 1. • Foods may be cooked in minutes and seconds by turning the Rotary Dial to the right. 3 Press START. Keypad/Display COMBO 2 2 Enter a cooking time in heat-resistant cookware. • For better results, some foods should be turned over halfway through cooking time. COMBO 1 Use COMBO 1 for cooking foods such as chicken, frozen foods, scalloped potatoes, etc. Caution! COMBO 2 uses a combination...
... very hot. START Note: • Do not remove turntable while using COMBO 1. • Foods may be cooked in minutes and seconds by turning the Rotary Dial to the right. 3 Press START. Keypad/Display COMBO 2 2 Enter a cooking time in heat-resistant cookware. • For better results, some foods should be turned over halfway through cooking time. COMBO 1 Use COMBO 1 for cooking foods such as chicken, frozen foods, scalloped potatoes, etc. Caution! COMBO 2 uses a combination...
Owners Manual
Page 21
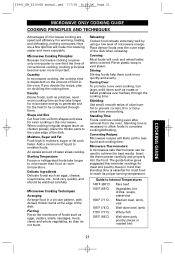
... the cooking time. Guide to vent steam. Moisture, Sugar and Fat Food high in the microwave. Turning Over: To promote more cooking time as eggs, cheese, mayonnaise, etc., cook very quickly, and should be watched carefully. Converting Recipes: Microwave recipes will cook and reheat better when covered. Insert the thermometer carefully and properly into uniform shapes and sizes for even cooking in moisture, sugar or fat cook faster. Starting Temperature...
... the cooking time. Guide to vent steam. Moisture, Sugar and Fat Food high in the microwave. Turning Over: To promote more cooking time as eggs, cheese, mayonnaise, etc., cook very quickly, and should be watched carefully. Converting Recipes: Microwave recipes will cook and reheat better when covered. Insert the thermometer carefully and properly into uniform shapes and sizes for even cooking in moisture, sugar or fat cook faster. Starting Temperature...
Owners Manual
Page 22
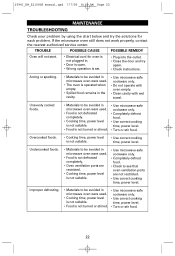
... not operate with oven empty. • Clean cavity with wet towel. TROUBLE POSSIBLE CAUSE POSSIBLE REMEDY Oven will not start. • Electrical cord for each problem. Unevenly cooked foods. • Materials to be avoided in microwave oven were used . • Food is not defrosted completely. • Cooking time, power level is not suitable. • Food is not turned or stirred. • Use microwave-safe cookware only. • Use correct cooking time, power level. • Turn or stir food. 22 Improper defrosting. •...
... not operate with oven empty. • Clean cavity with wet towel. TROUBLE POSSIBLE CAUSE POSSIBLE REMEDY Oven will not start. • Electrical cord for each problem. Unevenly cooked foods. • Materials to be avoided in microwave oven were used . • Food is not defrosted completely. • Cooking time, power level is not suitable. • Food is not turned or stirred. • Use microwave-safe cookware only. • Use correct cooking time, power level. • Turn or stir food. 22 Improper defrosting. •...
Owners Manual
Page 23
...? The microcomputer used in the sink. The light bulb has burned out or START has not been pressed. SPECIAL CARE For best performance and safety, the inner door panel and the oven front frame should be cleaned in the oven control may also be done on and off. Q. Q. If you open the oven door or touch STOP/CANCEL, the food will then reset for the first time, it . This...
...? The microcomputer used in the sink. The light bulb has burned out or START has not been pressed. SPECIAL CARE For best performance and safety, the inner door panel and the oven front frame should be cleaned in the oven control may also be done on and off. Q. Q. If you open the oven door or touch STOP/CANCEL, the food will then reset for the first time, it . This...
Owners Manual
Page 24
... 25941_EM_Z2100GS manual.qxd 7/7/05 8:32 AM Page 24 SANYO MICROWAVE OVEN LIMITED WARRANTY MODEL OBLIGATIONS EM-Z2100GS In order to obtain warranty service, the product must be obtained by calling the toll-free number listed below. The names and addresses of all other Acts of LABOR and PARTS specified below , SANYO FISHER COMPANY (SFC) warrants this warranty. For product operation, authorized service center referral, service assistance or problem resolution, call PARTS...
... 25941_EM_Z2100GS manual.qxd 7/7/05 8:32 AM Page 24 SANYO MICROWAVE OVEN LIMITED WARRANTY MODEL OBLIGATIONS EM-Z2100GS In order to obtain warranty service, the product must be obtained by calling the toll-free number listed below. The names and addresses of all other Acts of LABOR and PARTS specified below , SANYO FISHER COMPANY (SFC) warrants this warranty. For product operation, authorized service center referral, service assistance or problem resolution, call PARTS...
Owners Manual
Page 40
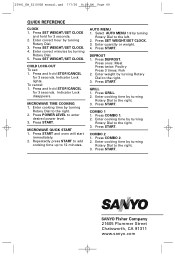
... 1. 2. Enter correct minutes by turning Rotary Dial. 3. To cancel: 1. Press and hold STOP/CANCEL for 3 seconds. 2. Repeatedly press START to add cooking time up to enter desired power level. 3. GRILL 1. Press SET WEIGHT/SET CLOCK. 3. Press START. 21605 Plummer Street Chatsworth, CA 91311 www.sanyo.com Press POWER LEVEL to 12 minutes. Press START. Press COMBO 2. 2. 25941_EM_Z2100GS manual.qxd 7/7/05 8:32 AM Page 40 QUICK REFERENCE CLOCK 1. CHILD LOCK-OUT To set: 1. AUTO MENU 1.
... 1. 2. Enter correct minutes by turning Rotary Dial. 3. To cancel: 1. Press and hold STOP/CANCEL for 3 seconds. 2. Repeatedly press START to add cooking time up to enter desired power level. 3. GRILL 1. Press SET WEIGHT/SET CLOCK. 3. Press START. 21605 Plummer Street Chatsworth, CA 91311 www.sanyo.com Press POWER LEVEL to 12 minutes. Press START. Press COMBO 2. 2. 25941_EM_Z2100GS manual.qxd 7/7/05 8:32 AM Page 40 QUICK REFERENCE CLOCK 1. CHILD LOCK-OUT To set: 1. AUTO MENU 1.


