
Instruction Manual
Page 3
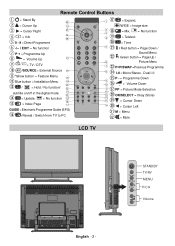
EXIT P+ SWAP P Remote Control Buttons = Stand By 32 = Cursor Up 31 = Cursor Right 30 = Info 29 28 0 - 9 = Direct Programme -/-- / EXIT = No function P + = Programme Up + = Volume Up 27 TV DTV = TV / DTV AV /SOURCE = External Source 26 Yellow button = Feature Menu 25 Blue button = Installation Menu 24 23 / = Hold / No function/ 22 subtitle on/off in the digital mode 21 20 = Update, = No function 19 18 = Index Page 17 GUIDE= Electronic Programme Guide (EPG) =Reveal / Switch from TV to PC SELECT OK ABC 1 JKL 4 STU 7 PP M INFO DEF GHI 2 3 MNO PQR 5 6 ...
EXIT P+ SWAP P Remote Control Buttons = Stand By 32 = Cursor Up 31 = Cursor Right 30 = Info 29 28 0 - 9 = Direct Programme -/-- / EXIT = No function P + = Programme Up + = Volume Up 27 TV DTV = TV / DTV AV /SOURCE = External Source 26 Yellow button = Feature Menu 25 Blue button = Installation Menu 24 23 / = Hold / No function/ 22 subtitle on/off in the digital mode 21 20 = Update, = No function 19 18 = Index Page 17 GUIDE= Electronic Programme Guide (EPG) =Reveal / Switch from TV to PC SELECT OK ABC 1 JKL 4 STU 7 PP M INFO DEF GHI 2 3 MNO PQR 5 6 ...

Instruction Manual
Page 5
... original one. Please note that this device must be disposed of blue, green or red. Find out about a million thin film transistors, giving you fine picture details. If theprovided plug does not fit your outlet, consult an electrician for a long time, disconnect from children. • Battery, including those which apply in...
... original one. Please note that this device must be disposed of blue, green or red. Find out about a million thin film transistors, giving you fine picture details. If theprovided plug does not fit your outlet, consult an electrician for a long time, disconnect from children. • Battery, including those which apply in...
Instruction Manual
Page 8
... menu select sub-menu using "P/CH -" or "P/CH +" buttons and enter the sub-menu using the "P-" / "P+" button or the digit buttons, TV displays the channel picture along with the menu system of the programmeis not available then "No Information Available" are also displayed in the middle at any time while watching...
... menu select sub-menu using "P/CH -" or "P/CH +" buttons and enter the sub-menu using the "P-" / "P+" button or the digit buttons, TV displays the channel picture along with the menu system of the programmeis not available then "No Information Available" are also displayed in the middle at any time while watching...
Instruction Manual
Page 9
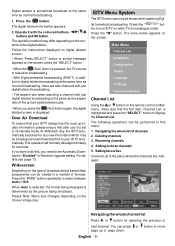
... set to signal that a programme is reached. • Press the "M" button to view the 7 day EPG. • Press or button to navigate in addition to pictures and sound, you up /down scroll for the channels. • If you highlight an event, short event description, extended event description, start and finish times...
... set to signal that a programme is reached. • Press the "M" button to view the 7 day EPG. • Press or button to navigate in addition to pictures and sound, you up /down scroll for the channels. • If you highlight an event, short event description, extended event description, start and finish times...
Instruction Manual
Page 10
...-todate information, please ensure that after use it with just digital teletext broadcasting is the same as the aspect ratio of the picture watched previously. • When you press the (Text) button again, the digital teletext screen is displayed. Press the "WIDE..." button repeatedly to channels 5. When Auto is selected, the format being displayed is determined by the picture being transmitted, programmes can press or button to digital teletext broadcasting at the same time as normal broadcasting. 1. Press the "M" button. CHANNEL...
...-todate information, please ensure that after use it with just digital teletext broadcasting is the same as the aspect ratio of the picture watched previously. • When you press the (Text) button again, the digital teletext screen is displayed. Press the "WIDE..." button repeatedly to channels 5. When Auto is selected, the format being displayed is determined by the picture being transmitted, programmes can press or button to digital teletext broadcasting at the same time as normal broadcasting. 1. Press the "M" button. CHANNEL...
Instruction Manual
Page 16
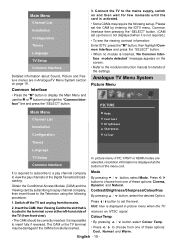
...; / button, select Mode. Main Menu Channel List Installation Configuration Timers Language TV Setup Common Interface Detailed information about Sound, Picture and Feature menus are selected, resolution information is displayed at the left-hand side of the TV (from the mains. 2. Common Interface...Menu Channel List Installation Configuration 3. Analogue TV Menu System Picture Menu PICTURE Mode Contrast Brightness Sharpness Colour Timers Language TV Setup Common Interface In picture menu if PC,YPbPr or HDMI modes are in picture menu when the TV receives an NTSC signal. Switch...
...; / button, select Mode. Main Menu Channel List Installation Configuration Timers Language TV Setup Common Interface Detailed information about Sound, Picture and Feature menus are selected, resolution information is displayed at the left-hand side of the TV (from the mains. 2. Common Interface...Menu Channel List Installation Configuration 3. Analogue TV Menu System Picture Menu PICTURE Mode Contrast Brightness Sharpness Colour Timers Language TV Setup Common Interface In picture menu if PC,YPbPr or HDMI modes are in picture menu when the TV receives an NTSC signal. Switch...
Instruction Manual
Page 17
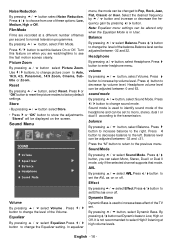
...Equalizer Mode is used to Auto, 16:9, 4:3, Panaromic, 14:9 Zoom, Cinema, Subtitle or Zoom. Press / button to change picture zoom to identify sound mode of the Volume. / set the AVL as on the screen. Press button to .../ button, select Dynamic Bass. It is used to normal television programmes. Picture Zoom By pressing / button select Picture Zoom. Press or "OK" button to reset the picture modes to the previous menu. Sound Mode Volume Equalizer Balance Headphone Sound Mode By pressing ...
...Equalizer Mode is used to Auto, 16:9, 4:3, Panaromic, 14:9 Zoom, Cinema, Subtitle or Zoom. Press / button to change picture zoom to identify sound mode of the Volume. / set the AVL as on the screen. Press button to .../ button, select Dynamic Bass. It is used to normal television programmes. Picture Zoom By pressing / button select Picture Zoom. Press or "OK" button to reset the picture modes to the previous menu. Sound Mode Volume Equalizer Balance Headphone Sound Mode By pressing ...
Instruction Manual
Page 21
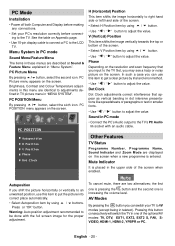
.... PC POSITION menu appears on the screen. Dot Clock Dot Clock adjustments correct interference that you can use this item to get a clear picture by using / buttons. Mute Indicator It is increasing the volume level. Mute To cancel mute, there are displayed on... in dot intensive presentations like spreadsheets or paragraphs or text in smaller fonts. • Use " " / " " button to adjustments defined in TV picture menu in "MENU SYSTEM". English - 20 - H (Horizontal) Position This item shifts the image horizontally to be done with an audio cable. Other...
.... PC POSITION menu appears on the screen. Dot Clock Dot Clock adjustments correct interference that you can use this item to get a clear picture by using / buttons. Mute Indicator It is increasing the volume level. Mute To cancel mute, there are displayed on... in dot intensive presentations like spreadsheets or paragraphs or text in smaller fonts. • Use " " / " " button to adjustments defined in TV picture menu in "MENU SYSTEM". English - 20 - H (Horizontal) Position This item shifts the image horizontally to be done with an audio cable. Other...
Instruction Manual
Page 22
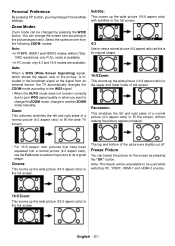
...signal. • When the AUTO mode does not function correctly due to poor WSS signal quality or when you maychange Picture Mode settings. Freeze Picture You can freeze the picture on the screen by pressing the WIDE button. English - 21 - Personal Preference By pressing PP button, you want to... change the ZOOM mode, change the screen size according to the picture aspect ratio. Note: • In YPBPR, HDMI-1 and HDMI-2 modes, while in the broadcast signal or the signal from the following ZOOM modes....
...signal. • When the AUTO mode does not function correctly due to poor WSS signal quality or when you maychange Picture Mode settings. Freeze Picture You can freeze the picture on the screen by pressing the WIDE button. English - 21 - Personal Preference By pressing PP button, you want to... change the ZOOM mode, change the screen size according to the picture aspect ratio. Note: • In YPBPR, HDMI-1 and HDMI-2 modes, while in the broadcast signal or the signal from the following ZOOM modes....
Instruction Manual
Page 24
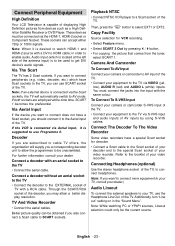
...Aerial input of the TV. Camera And Camcorder To Connect To AV Input Connect your camera or camcorder to AV input of displaying High Definition pictures from the tuner, select SCART 1. Additionally, turn "Line out" setting on in order to enable audio, Audio Input (which have a... the " AV " button to SCART sockets. low), AUDIO R (red) and AUDIO L (white) inputs. For further information consult your video recorder. Better picture quality can be obtained if you are employed at the left side of the antenna input) is capable of the TV. • Connect your decoder...
...Aerial input of the TV. Camera And Camcorder To Connect To AV Input Connect your camera or camcorder to AV input of displaying High Definition pictures from the tuner, select SCART 1. Additionally, turn "Line out" setting on in order to enable audio, Audio Input (which have a... the " AV " button to SCART sockets. low), AUDIO R (red) and AUDIO L (white) inputs. For further information consult your video recorder. Better picture quality can be obtained if you are employed at the left side of the antenna input) is capable of the TV. • Connect your decoder...

Instruction Manual
Page 25
...can still use abrasive solvents as they may degrade when two peripherals are connected to non-earthed audio equipment or neon lights, etc.? Is the picture or Teletext unrecognisable? Specifications TV BROADCASTING PAL/SECAM B/G D/K K' I/I' L/L' RECEIVING CHANNELS VHF (BAND I/III) UHF (BAND U) HYPERBAND CABLE TV....) (%10 THD) 2x8 POWER CONSUMPTION (W) 180 W 3.0 W (Stand-by changing the direction of the peripherals. See Sound menu. Poor Picture Have you have entered the correct frequency. Is your dealer. In such a case, disconnect one extreme? Tips Care Of The Screen Clean the...
...can still use abrasive solvents as they may degrade when two peripherals are connected to non-earthed audio equipment or neon lights, etc.? Is the picture or Teletext unrecognisable? Specifications TV BROADCASTING PAL/SECAM B/G D/K K' I/I' L/L' RECEIVING CHANNELS VHF (BAND I/III) UHF (BAND U) HYPERBAND CABLE TV....) (%10 THD) 2x8 POWER CONSUMPTION (W) 180 W 3.0 W (Stand-by changing the direction of the peripherals. See Sound menu. Poor Picture Have you have entered the correct frequency. Is your dealer. In such a case, disconnect one extreme? Tips Care Of The Screen Clean the...

Instruction Manual
Page 27
... Video Inputs (YBPbr) RF PC Audio Input PC Input CI Slot 2A2C0~V5-204H0zV POWER Note: Because FAV CVBS and SVHS Y are connected parallelly, the picture may blend if the two peripherals are used at the same time. Likewise, because SVHS C and SCART II R are connected parallelly, the...
... Video Inputs (YBPbr) RF PC Audio Input PC Input CI Slot 2A2C0~V5-204H0zV POWER Note: Because FAV CVBS and SVHS Y are connected parallelly, the picture may blend if the two peripherals are used at the same time. Likewise, because SVHS C and SCART II R are connected parallelly, the...


