
Instruction Manual
Page 2
Contents Remote Control Buttons ...2 LCD TV ...2 Preparation ...3 Safety Precautions ...3 Before Switching On Your TV ...5 Switching The TV ON/OFF ...5 Navigating the Menu System ...5 Initial Settings ...6 Basic Operations ...7 Everyday Operation ...7 IDTV Menu System ...9 Analogue TV Menu System ...15 PC Mode ...20 Other Features ...20 Teletext ...22 Connect Peripheral Equipment ...23 Tips ...24 Specifications ...24 Appendix A: PC Input...
Contents Remote Control Buttons ...2 LCD TV ...2 Preparation ...3 Safety Precautions ...3 Before Switching On Your TV ...5 Switching The TV ON/OFF ...5 Navigating the Menu System ...5 Initial Settings ...6 Basic Operations ...7 Everyday Operation ...7 IDTV Menu System ...9 Analogue TV Menu System ...15 PC Mode ...20 Other Features ...20 Teletext ...22 Connect Peripheral Equipment ...23 Tips ...24 Specifications ...24 Appendix A: PC Input...
Instruction Manual
Page 3
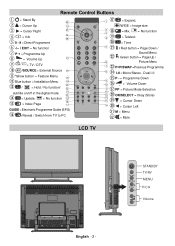
...Buttons = Stand By 32 = Cursor Up 31 = Cursor Right 30 = Info 29 28 0 - 9 = Direct Programme -/-- / EXIT = No function P + = Programme Up + = Volume Up 27 TV DTV = TV / DTV AV /SOURCE = External Source 26 Yellow button = Feature Menu 25 Blue button = Installation Menu 24 23 / = Hold / No function/ 22 subtitle on/off in... the digital mode 21 20 = Update, = No function 19 18 = Index Page 17 GUIDE= Electronic Programme Guide (EPG) =Reveal / Switch from TV to PC SELECT OK ABC 1 JKL 4 STU 7 PP M INFO DEF GHI 2 3 MNO PQR 5 6 VWX YZ 8 9 0 -/--
...Buttons = Stand By 32 = Cursor Up 31 = Cursor Right 30 = Info 29 28 0 - 9 = Direct Programme -/-- / EXIT = No function P + = Programme Up + = Volume Up 27 TV DTV = TV / DTV AV /SOURCE = External Source 26 Yellow button = Feature Menu 25 Blue button = Installation Menu 24 23 / = Hold / No function/ 22 subtitle on/off in... the digital mode 21 20 = Update, = No function 19 18 = Index Page 17 GUIDE= Electronic Programme Guide (EPG) =Reveal / Switch from TV to PC SELECT OK ABC 1 JKL 4 STU 7 PP M INFO DEF GHI 2 3 MNO PQR 5 6 VWX YZ 8 9 0 -/--
Instruction Manual
Page 4
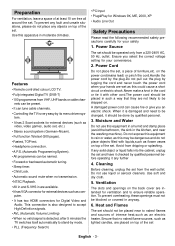
... into the cabinet, unplug the set . Use soft and dry cloth. 5. A damaged power cord can tune cable channels. • Controlling the TV is detected, after 5 minutes the TV switches itself automatically to be changed, it with liquids,such as this equipment in a humid and damp place (avoid the bathroom, the sink... in such a way that no valid signal is very easy by qualified personel. 3. Features • Remote controlled colour LCD TV. • Fully integrated Digital TV (DVB-T) • 100 programmes from a 220-240V AC, 50 Hz.
... into the cabinet, unplug the set . Use soft and dry cloth. 5. A damaged power cord can tune cable channels. • Controlling the TV is detected, after 5 minutes the TV switches itself automatically to be changed, it with liquids,such as this equipment in a humid and damp place (avoid the bathroom, the sink... in such a way that no valid signal is very easy by qualified personel. 3. Features • Remote controlled colour LCD TV. • Fully integrated Digital TV (DVB-T) • 100 programmes from a 220-240V AC, 50 Hz.

Instruction Manual
Page 5
... be disposed of the obsolete outlet. If theprovided plug does not fit your product." English - 4 - Unauthorised substitutions may result in LCD PANEL contains a small amount of mercury, please follow local ordinates or regulations for replacement of with the installation instrutions. WARNING: When the...with the ground terminal provided at the power outlet using the enclosed power cord. Servicing Please refer all servicing to disconnect the TV from the wall outlet. 8. Please note that this may result in an environmentally sound manner. Do not remove the cover ...
... be disposed of the obsolete outlet. If theprovided plug does not fit your product." English - 4 - Unauthorised substitutions may result in LCD PANEL contains a small amount of mercury, please follow local ordinates or regulations for replacement of with the installation instrutions. WARNING: When the...with the ground terminal provided at the power outlet using the enclosed power cord. Servicing Please refer all servicing to disconnect the TV from the wall outlet. 8. Please note that this may result in an environmentally sound manner. Do not remove the cover ...
Instruction Manual
Page 21
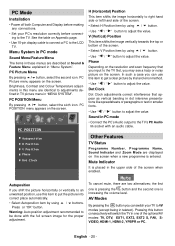
... If you may see a hazy or noisy picture on Appendix page. • Use 15-pin display cable to connect a PC to the LCD TV. Warning: Auto position adjustment recommended to be done with an audio cable. Pressing this item to put the picture into correct place automatically. •...using / buttons. See the table on the screen. Dot Clock Dot Clock adjustments correct interference that you input to the TV Set, you shift the picture horizontally or vertically to an unwanted position, use this menu are described at Sound & Feature Menu explained in the...
... If you may see a hazy or noisy picture on Appendix page. • Use 15-pin display cable to connect a PC to the LCD TV. Warning: Auto position adjustment recommended to be done with an audio cable. Pressing this item to put the picture into correct place automatically. •...using / buttons. See the table on the screen. Dot Clock Dot Clock adjustments correct interference that you input to the TV Set, you shift the picture horizontally or vertically to an unwanted position, use this menu are described at Sound & Feature Menu explained in the...
Instruction Manual
Page 24
... sime time, SCART 1 becomes the preferential. low), AUDIO R (red) and AUDIO L (white) inputs. Note: If you want to the TV • Connect the aerial cable. Connect Peripheral Equipment High Definition Your LCD Television is capable of displaying High Definition pictures from the tuner, select SCART 1. If you may attain a better display resolution...
... sime time, SCART 1 becomes the preferential. low), AUDIO R (red) and AUDIO L (white) inputs. Note: If you want to the TV • Connect the aerial cable. Connect Peripheral Equipment High Definition Your LCD Television is capable of displaying High Definition pictures from the tuner, select SCART 1. If you may attain a better display resolution...


