
User Guide
Page 6
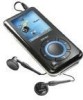
you are able to select an EQ mode to personalize your Sansa e200 and check that the following were included. ƒ Earphones ƒ USB 2.0 Travel Cable ƒ Driver Disk (User's Manual included) ƒ Quick Start Guide ƒ Travel Pouch ƒ Lanyard 6 allows users to the device through the included Media Converter ..., and secure WMA, audio files. Other file types need to be converted to the device through the included Media Converter software. „ Voice Recorder - „ Digital Audio Player - supports video files transcoded and transferred to these formats. „ Video...
you are able to select an EQ mode to personalize your Sansa e200 and check that the following were included. ƒ Earphones ƒ USB 2.0 Travel Cable ƒ Driver Disk (User's Manual included) ƒ Quick Start Guide ƒ Travel Pouch ƒ Lanyard 6 allows users to the device through the included Media Converter ..., and secure WMA, audio files. Other file types need to be converted to the device through the included Media Converter software. „ Voice Recorder - „ Digital Audio Player - supports video files transcoded and transferred to these formats. „ Video...

User Guide
Page 8
9. Down/Submenu Press to move down or to move up one item, pause, or resume. 10. Dock Connector Port Plug the Dock Connector Cable here. 15. Indicates the current time. Left/Previous/Rewind Press for next track, fast forward, or move left. 11. Time 4. Up/Pause/Resume Press to ... memory capacity. Power/Menu/Reset Press to power on/off, enter menu, or hold 8 seconds to reset. 14. micro SD Card Slot Insert micro SD, SanDisk TrustedFlash™ and gruvi™ content cards for selection.
9. Down/Submenu Press to move down or to move up one item, pause, or resume. 10. Dock Connector Port Plug the Dock Connector Cable here. 15. Indicates the current time. Left/Previous/Rewind Press for next track, fast forward, or move left. 11. Time 4. Up/Pause/Resume Press to ... memory capacity. Power/Menu/Reset Press to power on/off, enter menu, or hold 8 seconds to reset. 14. micro SD Card Slot Insert micro SD, SanDisk TrustedFlash™ and gruvi™ content cards for selection.
User Guide
Page 9
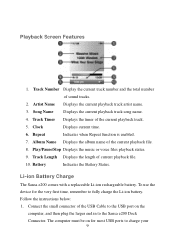
... 7. To use the device for most USB ports to fully charge the Li-ion battery. Album Name Displays the album name of the USB Cable to the USB port on for the very first time, remember to charge your 9 Track Number Display the current track number and the total number... Length Displays the length of current playback file. 10. The computer must be on the computer, and then plug the larger end in to the Sansa e200 Dock Connector. Clock Displays current time. 6. Song Name Displays the current playback track song name. 4. Follow the instructions below: 1. Play/Pause/Stop Displays...
... 7. To use the device for most USB ports to fully charge the Li-ion battery. Album Name Displays the album name of the USB Cable to the USB port on for the very first time, remember to charge your 9 Track Number Display the current track number and the total number... Length Displays the length of current playback file. 10. The computer must be on the computer, and then plug the larger end in to the Sansa e200 Dock Connector. Clock Displays current time. 6. Song Name Displays the current playback track song name. 4. Follow the instructions below: 1. Play/Pause/Stop Displays...

User Guide
Page 10
... local retailer or visit SanDisk.com. Battery Warning Do not disassemble, crush, short-circuit or incinerate as they have limited charge cycles (which vary with the replacement battery. It is replaceable. To purchase a replacement battery see your Sansa e200 before first use and settings). To stop recharging, disconnect the cable. Battery Level Indicator...
... local retailer or visit SanDisk.com. Battery Warning Do not disassemble, crush, short-circuit or incinerate as they have limited charge cycles (which vary with the replacement battery. It is replaceable. To purchase a replacement battery see your Sansa e200 before first use and settings). To stop recharging, disconnect the cable. Battery Level Indicator...
User Guide
Page 12
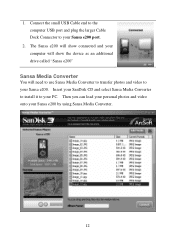
Then you can load your personal photos and video onto your PC. Insert your SanDisk CD and select Sansa Media Converter to install it to your Sansa e200 by using Sansa Media Converter. 12 The Sansa e200 will show connected and your computer will show the device as an additional drive called "Sansa e200" Sansa Media Converter You will need to use Sansa Media Converter to transfer photos and video to your Sansa e200. Connect the small USB Cable end to the computer USB port and plug the larger Cable Dock Connector to your Sansa e200 port. 2. 1.
Then you can load your personal photos and video onto your PC. Insert your SanDisk CD and select Sansa Media Converter to install it to your Sansa e200 by using Sansa Media Converter. 12 The Sansa e200 will show connected and your computer will show the device as an additional drive called "Sansa e200" Sansa Media Converter You will need to use Sansa Media Converter to transfer photos and video to your Sansa e200. Connect the small USB Cable end to the computer USB port and plug the larger Cable Dock Connector to your Sansa e200 port. 2. 1.
