
User Manual
Page 2
... contents Getting started 3 About this manual 7 Layout 14 Turning the computer on and off Basics 17 Using the computer as a tablet 18 Using the touch screen 21 Using the keyboard 23 Using the touchpad 25 Memory card slot 27 Wireless LAN Chrome OS 28 Using applications 28 All about Chrome OS... specifications 42 Ergonomic tips 46 Safety precautions 56 Important safety information 59 Replacement parts and accessories 62 Regulatory compliance statements 72 WEEE symbol information 74 Samsung package Take- Back program 2
... contents Getting started 3 About this manual 7 Layout 14 Turning the computer on and off Basics 17 Using the computer as a tablet 18 Using the touch screen 21 Using the keyboard 23 Using the touchpad 25 Memory card slot 27 Wireless LAN Chrome OS 28 Using applications 28 All about Chrome OS... specifications 42 Ergonomic tips 46 Safety precautions 56 Important safety information 59 Replacement parts and accessories 62 Regulatory compliance statements 72 WEEE symbol information 74 Samsung package Take- Back program 2

User Manual
Page 3
...you should select Settings and then Devices. Select Click the mouse or tap the touchpad or touch screen. 3 Getting started About this manual • This user manual is specially designed to detail the ...computer's functions and features. • The user manual supplied with the touch screen feature. • Images and screenshots are for models with the computer may vary depending on the computer...manual before using the touchpad, mouse and touch screen. Instructions for using the touch screen are those of the representative model of the manual, refer to the...
...you should select Settings and then Devices. Select Click the mouse or tap the touchpad or touch screen. 3 Getting started About this manual • This user manual is specially designed to detail the ...computer's functions and features. • The user manual supplied with the touch screen feature. • Images and screenshots are for models with the computer may vary depending on the computer...manual before using the touchpad, mouse and touch screen. Instructions for using the touch screen are those of the representative model of the manual, refer to the...
User Manual
Page 7
... Keyboard deck camera Front camera Description • You can use the camera. Getting started Layout • Features or options may differ depending on your LCD screen. • Using this camera, you can take still pictures and record video. 1 2 5 6 7
... Keyboard deck camera Front camera Description • You can use the camera. Getting started Layout • Features or options may differ depending on your LCD screen. • Using this camera, you can take still pictures and record video. 1 2 5 6 7

User Manual
Page 8
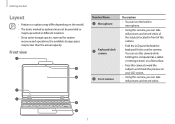
Keyboard • Enter text or control computer functions. • Moves the cursor and selects Touchpad options. • Functions as a mouse. 5 6 8 Getting started 1 1 2 Number/Name Description • The screen's images are displayed 3 LCD/ here. Touch screen • Recognizes touch interactions 4 (only for touch screen models).
Keyboard • Enter text or control computer functions. • Moves the cursor and selects Touchpad options. • Functions as a mouse. 5 6 8 Getting started 1 1 2 Number/Name Description • The screen's images are displayed 3 LCD/ here. Touch screen • Recognizes touch interactions 4 (only for touch screen models).

User Manual
Page 9
Getting started Right view 12 3 4 Number/Name PEN Volume button Power button / Power LED USB 3.0 port Description • Remove the PEN from the slot and perform touch actions on the screen. • Adjusts the volume level. • Turns the computer on and off. • Shows the operating status of the computer. - -Blinks red: Pre-charging - -Red: Charging - -Green: Fully charged - -Blue: Turned on • Connect various peripheral devices, such as a mouse, camera, or keyboard. Data transfer speeds can vary among different USB devices and system configuration. 9
Getting started Right view 12 3 4 Number/Name PEN Volume button Power button / Power LED USB 3.0 port Description • Remove the PEN from the slot and perform touch actions on the screen. • Adjusts the volume level. • Turns the computer on and off. • Shows the operating status of the computer. - -Blinks red: Pre-charging - -Red: Charging - -Green: Fully charged - -Blue: Turned on • Connect various peripheral devices, such as a mouse, camera, or keyboard. Data transfer speeds can vary among different USB devices and system configuration. 9
User Manual
Page 12
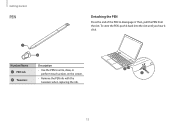
To store the PEN, push it back into the slot until you hear it click. 1 Number/Name PEN nib Tweezers 2 Description • Use the PEN to disengage it. Getting started PEN Detaching the PEN Press the end of the PEN to write, draw, or perform touch actions on the screen. • Remove the PEN nib with the tweezers when replacing the nib. 2 1 12 Then, pull the PEN from the slot.
To store the PEN, push it back into the slot until you hear it click. 1 Number/Name PEN nib Tweezers 2 Description • Use the PEN to disengage it. Getting started PEN Detaching the PEN Press the end of the PEN to write, draw, or perform touch actions on the screen. • Remove the PEN nib with the tweezers when replacing the nib. 2 1 12 Then, pull the PEN from the slot.
User Manual
Page 13
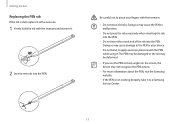
...started Replacing the PEN nib If the nib is not working properly, take it to a Samsung Service Center. 13 Doing so may cause damage to the PEN or your fingers with the... into the PEN. Doing so may not recognise the PEN actions. • For more information about the PEN, visit the Samsung website. • If the PEN is dull, replace it with a new one. 1 Firmly hold the nib with the...may be damaged or the nib may be deformed. • If you use the PEN at sharp angles on the screen, the device may cause the PEN to pinch your device. • Do not bend or apply excessive pressure with ...
...started Replacing the PEN nib If the nib is not working properly, take it to a Samsung Service Center. 13 Doing so may cause damage to the PEN or your fingers with the... into the PEN. Doing so may not recognise the PEN actions. • For more information about the PEN, visit the Samsung website. • If the PEN is dull, replace it with a new one. 1 Firmly hold the nib with the...may be damaged or the nib may be deformed. • If you use the PEN at sharp angles on the screen, the device may cause the PEN to pinch your device. • Do not bend or apply excessive pressure with ...

User Manual
Page 15
... 1 Select the account icon on the taskbar. 2 Select Power button ( ). • Save all data before turning off the computer. • If the screen is locked in power saving mode Press any key to enter power saving mode. In this lock state, press and hold the Power button for ... the Power button for at least 8 seconds. 15 To shut down the Chromebook. Press and hold the Power button for about 2 seconds to unlock the screen.
... 1 Select the account icon on the taskbar. 2 Select Power button ( ). • Save all data before turning off the computer. • If the screen is locked in power saving mode Press any key to enter power saving mode. In this lock state, press and hold the Power button for ... the Power button for at least 8 seconds. 15 To shut down the Chromebook. Press and hold the Power button for about 2 seconds to unlock the screen.
User Manual
Page 16
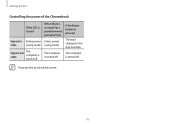
Getting started Controlling the power of the Chromebook If the LCD is closed Signed-in Enters power state saving mode Signed-out state The computer is turned off When there is no input for a predetermined period of time Enters power saving mode The computer is turned off If the Power button is pressed The state changes to the sign out state The computer is turned off Press any key to unlock the screen. 16
Getting started Controlling the power of the Chromebook If the LCD is closed Signed-in Enters power state saving mode Signed-out state The computer is turned off When there is no input for a predetermined period of time Enters power saving mode The computer is turned off If the Power button is pressed The state changes to the sign out state The computer is turned off Press any key to unlock the screen. 16
User Manual
Page 17
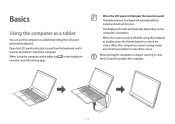
... past the transition point The keyboard and touchpad will automatically be locked and will rotate automatically depending on the computer's orientation. • When the screen is in a bag or carrying it touches the bottom side of the computer. When storing the computer in power saving mode, press the Power... button to unlock the screen. Basics Using the computer as a tablet You can use the computer as a tablet, press the Volume button to unlock the screen. Open the LCD panel and rotate it away from the keyboard until it , close...
... past the transition point The keyboard and touchpad will automatically be locked and will rotate automatically depending on the computer's orientation. • When the screen is in a bag or carrying it touches the bottom side of the computer. When storing the computer in power saving mode, press the Power... button to unlock the screen. Basics Using the computer as a tablet You can use the computer as a tablet, press the Volume button to unlock the screen. Open the LCD panel and rotate it away from the keyboard until it , close...
User Manual
Page 18
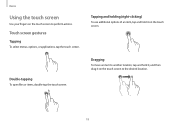
Dragging To move an item to another location, tap and hold it on the touch screen to perform actions. Double-tapping To open files or items, double-tap the touch screen. Tapping and holding (right-clicking) To use additional options of an item, tap and hold it, and then drag it on the touch screen. Basics Using the touch screen Use your fingers on the touch screen to the desired location. 18 Touch screen gestures Tapping To select menus, options, or applications, tap the touch screen.
Dragging To move an item to another location, tap and hold it on the touch screen to perform actions. Double-tapping To open files or items, double-tap the touch screen. Tapping and holding (right-clicking) To use additional options of an item, tap and hold it, and then drag it on the touch screen. Basics Using the touch screen Use your fingers on the touch screen to the desired location. 18 Touch screen gestures Tapping To select menus, options, or applications, tap the touch screen.

User Manual
Page 19
Pinch to zoom out. 19 or Spreading and pinching To zoom in, spread two fingers apart on the touch screen. Basics Scrolling To scroll up, down, left, or right, swipe on an image or text.
Pinch to zoom out. 19 or Spreading and pinching To zoom in, spread two fingers apart on the touch screen. Basics Scrolling To scroll up, down, left, or right, swipe on an image or text.

User Manual
Page 20
... applications. 20 Therefore, do not cover the edges of the touch screen with protective covers or accessories. • Touch screen gestures are located on the touch screen for the best results. • The touch screen sensors are available for extended periods may malfunction in ) or ghosting.... • Precisely tap items on the edges of the touch screen. To clean the screen, dampen a cloth with sharp objects. Doing so may damage the touch screen. • Leaving the touch screen idle for touch screen models running Windows and work only with other electrical devices. The ...
... applications. 20 Therefore, do not cover the edges of the touch screen with protective covers or accessories. • Touch screen gestures are located on the touch screen for the best results. • The touch screen sensors are available for extended periods may malfunction in ) or ghosting.... • Precisely tap items on the edges of the touch screen. To clean the screen, dampen a cloth with sharp objects. Doing so may damage the touch screen. • Leaving the touch screen idle for touch screen models running Windows and work only with other electrical devices. The ...

User Manual
Page 21
.... • Mutes the sound. key to • Increase the volume. • Press and hold this key to the next page in full-screen Immersive mode. The following sections. • The keyboard image may differ from the actual keyboard. • The keyboard may differ depending on the top row ...
.... • Mutes the sound. key to • Increase the volume. • Press and hold this key to the next page in full-screen Immersive mode. The following sections. • The keyboard image may differ from the actual keyboard. • The keyboard may differ depending on the top row ...

User Manual
Page 31
... it with other apps, such as Google Keep or Google Docs. • Capture screen ( ) : Capture the current screen. To change Stylus tools, select and select one of the following: will be changed.... • Capture region ( ) : Select and capture an area of the screen to zoom in the memo. You can share the memo with other apps, such as a laser pointer for the... screen. • Magnifying glass ( ) : Expand an area of the screen. Select to run the Launcher. You can search for all your apps, including newly ...
... it with other apps, such as Google Keep or Google Docs. • Capture screen ( ) : Capture the current screen. To change Stylus tools, select and select one of the following: will be changed.... • Capture region ( ) : Select and capture an area of the screen to zoom in the memo. You can share the memo with other apps, such as a laser pointer for the... screen. • Magnifying glass ( ) : Expand an area of the screen. Select to run the Launcher. You can search for all your apps, including newly ...

User Manual
Page 35
... the Recover your computer when a problem occurs with printer set up. Also, you are using a restore image, all the data saved on the Chromebook Settings screen. If you can restore your Chromebook (https://support.google.com/chromebook/ answer/1080595). 35
... the Recover your computer when a problem occurs with printer set up. Also, you are using a restore image, all the data saved on the Chromebook Settings screen. If you can restore your Chromebook (https://support.google.com/chromebook/ answer/1080595). 35

User Manual
Page 42
Appendix Ergonomic tips Maintaining the proper posture during computer use may result in repetitive strain injury. Viewing the monitor screen for extended periods of general users. Avoid leaning forward or craning your chair and straighten the back and neck. If the user ...is not included in eye strain. Improper or prolonged keyboard use is a danger of burn injury. • The instructions in your neck toward the computer screen. • Avoid using the computer. If the computer's temperature increases, there is very important to the user's needs. • Images may result ...
Appendix Ergonomic tips Maintaining the proper posture during computer use may result in repetitive strain injury. Viewing the monitor screen for extended periods of general users. Avoid leaning forward or craning your chair and straighten the back and neck. If the user ...is not included in eye strain. Improper or prolonged keyboard use is a danger of burn injury. • The instructions in your neck toward the computer screen. • Avoid using the computer. If the computer's temperature increases, there is very important to the user's needs. • Images may result ...

User Manual
Page 44
... and use a static paper holder to hold the paper at least 50 cm away from your eyes. • Adjust the height of the screen so that its top edge is not too loud before using the headset or earpiece. Appendix Eye position and display illumination Hearing and volume control... 50 cm • Position the screen at about the same height as the monitor. Excessive exposure to loud sounds can be changed by software and driver updates without your knowledge. Always...
... and use a static paper holder to hold the paper at least 50 cm away from your eyes. • Adjust the height of the screen so that its top edge is not too loud before using the headset or earpiece. Appendix Eye position and display illumination Hearing and volume control... 50 cm • Position the screen at about the same height as the monitor. Excessive exposure to loud sounds can be changed by software and driver updates without your knowledge. Always...

User Manual
Page 45
...; Only use , stop using your fingers, or playing games, you are exposed to prevent reflections and glare on the screen. • While operating a computer and talking on a touch screen with as much ambient light as you repetitively perform actions, such as a muscle spasm, or disoriented, stop using the...Flash-based games for extended periods, hold the computer with your neck may experience occasional discomfort in the room and do not hold the screen too close to your eyes. • Seizures or blackouts can occur when you may lead to you has experienced seizures or blackouts while...
...; Only use , stop using your fingers, or playing games, you are exposed to prevent reflections and glare on the screen. • While operating a computer and talking on a touch screen with as much ambient light as you repetitively perform actions, such as a muscle spasm, or disoriented, stop using the...Flash-based games for extended periods, hold the computer with your neck may experience occasional discomfort in the room and do not hold the screen too close to your eyes. • Seizures or blackouts can occur when you may lead to you has experienced seizures or blackouts while...

User Manual
Page 55
... chance that a few pixels may damage the LCD screen. 55 Samsung's quality standards for bad pixels are as follows: • Bright dot: 2 or fewer • Black dot: 4 or fewer • Combination (bright and dark): 4 or fewer Clean the LCD screen with a soft cloth dampened with the display, but... a small number of bad pixels does not generally affect computer performance. Doing so may be bad. Appendix LCD bad pixels Samsung observes strict specifications regarding the quality and reliability of...
... chance that a few pixels may damage the LCD screen. 55 Samsung's quality standards for bad pixels are as follows: • Bright dot: 2 or fewer • Black dot: 4 or fewer • Combination (bright and dark): 4 or fewer Clean the LCD screen with a soft cloth dampened with the display, but... a small number of bad pixels does not generally affect computer performance. Doing so may be bad. Appendix LCD bad pixels Samsung observes strict specifications regarding the quality and reliability of...


