User Manual
Page 4
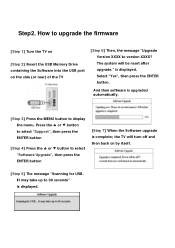
... menu. And then software is displayed. Select "Yes", then press the ENTER button. It may take up to 30 seconds" is upgraded automatically. [Step 3] Press the MENU button to upgrade the firmware [Step 1] Turn the TV on [Step 2] Insert the USB Memory Drive containing the Software into the USB port on by itself. [Step 5] The message "Scanning for USB. Press the ▲ or ▼ button to select "Support...
... menu. And then software is displayed. Select "Yes", then press the ENTER button. It may take up to 30 seconds" is upgraded automatically. [Step 3] Press the MENU button to upgrade the firmware [Step 1] Turn the TV on [Step 2] Insert the USB Memory Drive containing the Software into the USB port on by itself. [Step 5] The message "Scanning for USB. Press the ▲ or ▼ button to select "Support...
User Manual (user Manual) (ver.1.0) (English)
Page 3
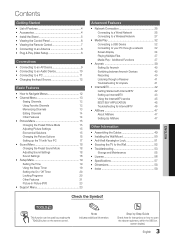
... 17 yy Sound Menu 18 Changing the Preset Sound Mode 18 Adjusting Sound Settings 18 Sound Settings 18 yy Setup Menu 19 Setting the Time 19 Using the Sleep Timer 19 Setting the On / Off Timer 20 Locking Programs 20 Other Features 21 Picture In Picture (PIP) 23 yy Support Menu 23 Advanced Features yy Network Connection 25 Connecting to a Wired Network 25 Connecting to a Wireless Network 27 yy Media Play 32 Connecting a USB Device 32 Connecting to open the relevant submenu within the OSD (on screen display). 3 English Step...
... 17 yy Sound Menu 18 Changing the Preset Sound Mode 18 Adjusting Sound Settings 18 Sound Settings 18 yy Setup Menu 19 Setting the Time 19 Using the Sleep Timer 19 Setting the On / Off Timer 20 Locking Programs 20 Other Features 21 Picture In Picture (PIP) 23 yy Support Menu 23 Advanced Features yy Network Connection 25 Connecting to a Wired Network 25 Connecting to a Wireless Network 27 yy Media Play 32 Connecting a USB Device 32 Connecting to open the relevant submenu within the OSD (on screen display). 3 English Step...
User Manual (user Manual) (ver.1.0) (English)
Page 4
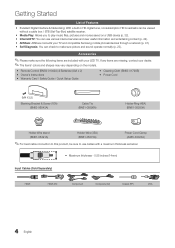
...;For best cable connection to this product, be viewed without a cable box / STB (Set-Top-Box) satellite receiver. If any items are included with a maximum thickness as below: yy Maximum thickness - 0.55 inches (14mm) Input Cables (Sold Separately) HDMI HDMI-DVI Component Composite (AV) Coaxial (RF) VGA 4 English Getting Started List of Features yy Excellent Digital Interface & Networking: With a built-in HD digital tuner, nonsubscription HD broadcasts can use cables with your LED...
...;For best cable connection to this product, be viewed without a cable box / STB (Set-Top-Box) satellite receiver. If any items are included with a maximum thickness as below: yy Maximum thickness - 0.55 inches (14mm) Input Cables (Sold Separately) HDMI HDMI-DVI Component Composite (AV) Coaxial (RF) VGA 4 English Getting Started List of Features yy Excellent Digital Interface & Networking: With a built-in HD digital tuner, nonsubscription HD broadcasts can use cables with your LED...
User Manual (user Manual) (ver.1.0) (English)
Page 15
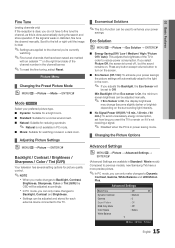
... / Low / Medium / High / Picture Off / Auto): This adjusts the brightness of the channel number in Standard / Movie mode) Compared to previous models, new Samsung TVs have to reduce power consumption. Press any button except volume button to turn on if it's not receiving a signal. ✎✎ Disabled when the PC is in order to fine tune the channel, as this is weak or distorted, fine tune the channel manually.
... / Low / Medium / High / Picture Off / Auto): This adjusts the brightness of the channel number in Standard / Movie mode) Compared to previous models, new Samsung TVs have to reduce power consumption. Press any button except volume button to turn on if it's not receiving a signal. ✎✎ Disabled when the PC is in order to fine tune the channel, as this is weak or distorted, fine tune the channel manually.

User Manual (user Manual) (ver.1.0) (English)
Page 16
...:9 wide mode. BD/DVD player) connected to the HDMI or Component IN jacks. ✎✎ Available when the picture mode is set to Custom. ■■ White Balance: Adjust the color temperature for a more natural picture. Zoom1: Use for a stronger magnification. Reset: Resets the White Balance to it's default settings. ■■ 10p White Balance (Off / On): Controls the white balance in 4:3 format for making fine adjustments to the Color Tone, Size and Auto Protection Time. Picture Options OO...
...:9 wide mode. BD/DVD player) connected to the HDMI or Component IN jacks. ✎✎ Available when the picture mode is set to Custom. ■■ White Balance: Adjust the color temperature for a more natural picture. Zoom1: Use for a stronger magnification. Reset: Resets the White Balance to it's default settings. ■■ 10p White Balance (Off / On): Controls the white balance in 4:3 format for making fine adjustments to the Color Tone, Size and Auto Protection Time. Picture Options OO...

User Manual (user Manual) (ver.1.0) (English)
Page 17
... is displayed. The screen saver prevents the formation of ghost images on and off modes. Press the ENTERE button. 3. Press the ENTERE button. 5. Press the ◄ or ► button to its default settings. ¦¦ Setting up or down. 4. Picture Reset (OK / Cancel) Resets your TV displays the resolution and frequency of movement to maximize picture clarity. Auto Visualization: When changing analog channels, displays signal strength. ✎✎ Only available for analog channels. ✎...
... is displayed. The screen saver prevents the formation of ghost images on and off modes. Press the ENTERE button. 3. Press the ENTERE button. 5. Press the ◄ or ► button to its default settings. ¦¦ Setting up or down. 4. Picture Reset (OK / Cancel) Resets your TV displays the resolution and frequency of movement to maximize picture clarity. Auto Visualization: When changing analog channels, displays signal strength. ✎✎ Only available for analog channels. ✎...
User Manual (user Manual) (ver.1.0) (English)
Page 19
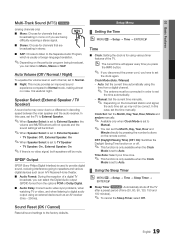
... improved sound experience compared to Normal mode, making almost no video signal, both speakers will appear every time you press the INFO button. ✎✎ If you disconnect the power cord, you are having difficulty receiving a stereo signal. ■■ Stereo: Choose for channels that are broadcasting in stereo. Clock Mode (Auto / Manual) -- Auto: Set the current time automatically using an external device such as an A/V Receiver/Home theater. ■■ Audio Format...
... improved sound experience compared to Normal mode, making almost no video signal, both speakers will appear every time you press the INFO button. ✎✎ If you disconnect the power cord, you are having difficulty receiving a stereo signal. ■■ Stereo: Choose for channels that are broadcasting in stereo. Clock Mode (Auto / Manual) -- Auto: Set the current time automatically using an external device such as an A/V Receiver/Home theater. ■■ Audio Format...
User Manual (user Manual) (ver.1.0) (English)
Page 20
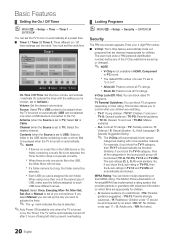
... you select Manual, you can set up or changed. ✎✎ NOTE xx V-Chip is only one of the same type of being left idle to prevent overheating. ¦¦ Locking Programs OO MENUm → Setup → Security → ENTERE Security The PIN input screen appears, Enter your children are appropriate for children. Contents (when the Source is set to USB): Select...
... you select Manual, you can set up or changed. ✎✎ NOTE xx V-Chip is only one of the same type of being left idle to prevent overheating. ¦¦ Locking Programs OO MENUm → Setup → Security → ENTERE Security The PIN input screen appears, Enter your children are appropriate for children. Contents (when the Source is set to USB): Select...

User Manual (user Manual) (ver.1.0) (English)
Page 22
...Theater products which supports Wireless Remote Control. Default / Service1~Service6 / CC1~CC4 / Text1~Text4: (digital channels only) The Digital Captions function works with digital channels). xx The Default setting follows the standards set Game Mode to the "Network Connection" instructions (p. 25). Network (Network Type / Network Setup / Network Test / SWL (Samsung Wireless Link) / SWL connect) For details on quickly with this feature. Unfortunately, you display the TV menu in the setup menu. -- Background Color: Options include Default, White, Black, Red, Green, Blue, Yellow...
...Theater products which supports Wireless Remote Control. Default / Service1~Service6 / CC1~CC4 / Text1~Text4: (digital channels only) The Digital Captions function works with digital channels). xx The Default setting follows the standards set Game Mode to the "Network Connection" instructions (p. 25). Network (Network Type / Network Setup / Network Test / SWL (Samsung Wireless Link) / SWL connect) For details on quickly with this feature. Unfortunately, you display the TV menu in the setup menu. -- Background Color: Options include Default, White, Black, Red, Green, Blue, Yellow...
User Manual (user Manual) (ver.1.0) (English)
Page 23
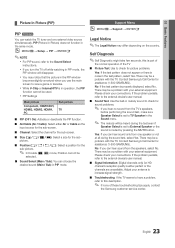
... one external video source simultaneously. Contact Samsung's Call Center for assistance (1-800-SAMSUNG). Yes: If you hear no sound from the speakers, select No. Please check your connections. If the problem persists, refer to the external device's user manual. ■■ Sound Test: Use the built-in melody sound to External Speaker or the sound is either Air or Cable as the input source for the sub-screen. ■■ Channel: Select the channel...
... one external video source simultaneously. Contact Samsung's Call Center for assistance (1-800-SAMSUNG). Yes: If you hear no sound from the speakers, select No. Please check your connections. If the problem persists, refer to the external device's user manual. ■■ Sound Test: Use the built-in melody sound to External Speaker or the sound is either Air or Cable as the input source for the sub-screen. ■■ Channel: Select the channel...
User Manual (user Manual) (ver.1.0) (English)
Page 28
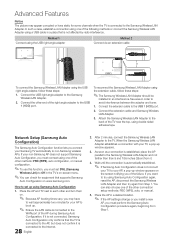
... angle adapter to the USB 1 (HDD) port. 2. Connect the extension cable to the Samsung Wireless LAN Adapter. 2. If your non-Samsung AP does not support Samsung Auto Configuraton, you must connect using one of the failure. Place the AP and TV next to each other methods: PBC (WPS), auto configuration, or manual configuration. ✎✎To use this function, you of the other and turn them on the screen...
... angle adapter to the USB 1 (HDD) port. 2. Connect the extension cable to the Samsung Wireless LAN Adapter. 2. If your non-Samsung AP does not support Samsung Auto Configuraton, you must connect using one of the failure. Place the AP and TV next to each other methods: PBC (WPS), auto configuration, or manual configuration. ✎✎To use this function, you of the other and turn them on the screen...
User Manual (user Manual) (ver.1.0) (English)
Page 31
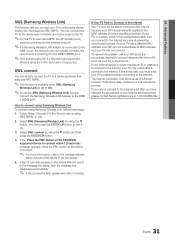
... (Samsung Wireless Link) is set up using the 5 Ghz band are supported. How to the Internet. If the "Press the PBC button on the device to connect. ✎✎ For more information, refer to the wireless network setup manual of your TV) to connect using Samsung Wireless Link To connect using the 2.4 Ghz band are not supported. If this problem, ask your ISP about the procedures required to the USB 1 (HDD) port...
... (Samsung Wireless Link) is set up using the 5 Ghz band are supported. How to the Internet. If the "Press the PBC button on the device to connect. ✎✎ For more information, refer to the wireless network setup manual of your TV) to connect using Samsung Wireless Link To connect using the 2.4 Ghz band are not supported. If this problem, ask your ISP about the procedures required to the USB 1 (HDD) port...
User Manual (user Manual) (ver.1.0) (English)
Page 39
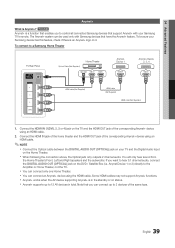
.... Some HDMI cables may not support Anynet+ functions. Note that enables you want to 12 AV devices in the standby or on it. The Anynet+ system can connect up to hear 5.1 channel audio, connect the DIGITAL AUDIO OUT (OPTICAL) jack on the TV and the HDMI OUT jack of the same type. 39 English Anynet Device 1 or 2) directly to a Samsung Home Theater TV Rear Panel Optical Cable (Not Supplied...
.... Some HDMI cables may not support Anynet+ functions. Note that enables you want to 12 AV devices in the standby or on it. The Anynet+ system can connect up to hear 5.1 channel audio, connect the DIGITAL AUDIO OUT (OPTICAL) jack on the TV and the HDMI OUT jack of the same type. 39 English Anynet Device 1 or 2) directly to a Samsung Home Theater TV Rear Panel Optical Cable (Not Supplied...
User Manual (user Manual) (ver.1.0) (English)
Page 40
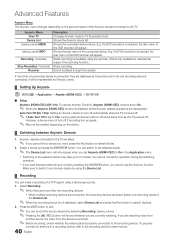
... is connected, they are currently watching. Anynet+ Menu View TV Device List (device_name) MENU (device_name) INFO Recording: (*recorder) Stop Recording: (*recorder) Receiver Description Changes Anynet+ mode to the TV. Shows the Anynet+ device list. Auto Turn Off (No / Yes): Setting an Anynet+ Device to turn off at the same time as the TV powers off if recording is not displayed, select Device List and press the Red button to...
... is connected, they are currently watching. Anynet+ Menu View TV Device List (device_name) MENU (device_name) INFO Recording: (*recorder) Stop Recording: (*recorder) Receiver Description Changes Anynet+ mode to the TV. Shows the Anynet+ device list. Auto Turn Off (No / Yes): Setting an Anynet+ Device to turn off at the same time as the TV powers off if recording is not displayed, select Device List and press the Red button to...
User Manual (user Manual) (ver.1.0) (English)
Page 43
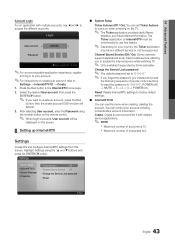
... be supported. Change the Service Lock password ✎✎ The default password set Ticker Autorun to create an account, press the Red button; Settings ▪ System setup ▪ Internet@TV ID ▪ Service Manager ▪ Properties ▪ Ticker Autorun : Off ▪ Channel Bound Service : Off ▪ Change the Service Lock password ▪ Reset R Return 43 English After selecting User account, enter the Password using the ▲ and ▼ buttons and press the ENTERE button. Channel Bound Service (Off...
... be supported. Change the Service Lock password ✎✎ The default password set Ticker Autorun to create an account, press the Red button; Settings ▪ System setup ▪ Internet@TV ID ▪ Service Manager ▪ Properties ▪ Ticker Autorun : Off ▪ Channel Bound Service : Off ▪ Change the Service Lock password ▪ Reset R Return 43 English After selecting User account, enter the Password using the ▲ and ▼ buttons and press the ENTERE button. Channel Bound Service (Off...
User Manual (user Manual) (ver.1.0) (English)
Page 48
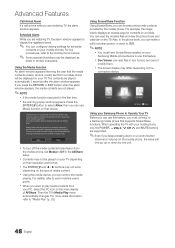
... to play media contents from a mobile phone will be displayed on your Samsung Mobile phone/device to use this feature. You can control the media playing. xx The ENTERE and ◄ / ► buttons may differ depending on a mobile. Then the TV's Media Play menu automatically changes. Using ScreenShare Function Using ScreenShare, you can also change the setting (or resetting) of AllShare. For the procedures, refer to each mobile's user's guide...
... to play media contents from a mobile phone will be displayed on your Samsung Mobile phone/device to use this feature. You can control the media playing. xx The ENTERE and ◄ / ► buttons may differ depending on a mobile. Then the TV's Media Play menu automatically changes. Using ScreenShare Function Using ScreenShare, you can also change the setting (or resetting) of AllShare. For the procedures, refer to each mobile's user's guide...
User Manual (user Manual) (ver.1.0) (English)
Page 53
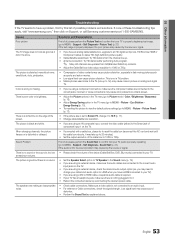
... view the default picture settings (go to MENU - at 1-800-SAMSUNG. Picture - Picture Reset) (p. 17). There is set top box. There is no sound. • Set the Speaker Select option to TV Speaker in picture on the edge of component input 1 on the TV. HD Box Use HDMI or Component cables to deliver HD (high definition) picture quality. • Cable/Satellite subscribers: Try HD stations from the channel line up. • Antenna connection: Try HD stations after performing Auto program...
... view the default picture settings (go to MENU - at 1-800-SAMSUNG. Picture - Picture Reset) (p. 17). There is set top box. There is no sound. • Set the Speaker Select option to TV Speaker in picture on the edge of component input 1 on the TV. HD Box Use HDMI or Component cables to deliver HD (high definition) picture quality. • Cable/Satellite subscribers: Try HD stations from the channel line up. • Antenna connection: Try HD stations after performing Auto program...
User Manual (user Manual) (ver.1.0) (English)
Page 54
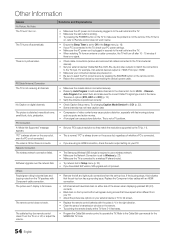
... window on digital channels. • Check Caption Setup menu. Replace the Component video cables with Component cable connection. • Remove the left and right audio connections from the set to Wireless (p. 27). • Make sure the TV is connected to the Cable/Set user manual for the SAMSUNG TV code. 54 English There are using an HDMI connection, check the audio output setting on your external device or TV to select the TV's correct source by pressing the SOURCE button on the remote control. • Reboot...
... window on digital channels. • Check Caption Setup menu. Replace the Component video cables with Component cable connection. • Remove the left and right audio connections from the set to Wireless (p. 27). • Make sure the TV is connected to the Cable/Set user manual for the SAMSUNG TV code. 54 English There are using an HDMI connection, check the audio output setting on your external device or TV to select the TV's correct source by pressing the SOURCE button on the remote control. • Reboot...
User Manual (user Manual) (ver.1.0) (English)
Page 55
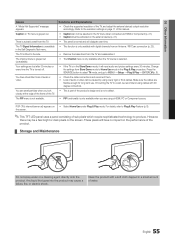
... on the screen. • Select Home Use under Plug & Play mode. You see small particles when you are using a HDMI, PC or Component source. Change the settings from the TV and reassemble it will dissipate over time. • This function is only available with digital channels from an Antenna / RF/Coax connection (p. 23). • Remove the base stand from Store Demo mode to Home Use mode in the Self Diagnostic Test menu. POP (TV...
... on the screen. • Select Home Use under Plug & Play mode. You see small particles when you are using a HDMI, PC or Component source. Change the settings from the TV and reassemble it will dissipate over time. • This function is only available with digital channels from an Antenna / RF/Coax connection (p. 23). • Remove the base stand from Store Demo mode to Home Use mode in the Self Diagnostic Test menu. POP (TV...

User Manual (user Manual) (ver.1.0) (English)
Page 59
... Network Connection Network Setup O ON/OFF button Optimal resolution P Password Photos Picture Size PIP (Picture in Picture) Plug & Play Power Indicator 7, 13 13 17 15 16 11 R Receiver Recording Remote Control Repeat Mode RGB Only Mode Rotate 9, 39 10, 39 2 42 21 55 32 22 22 19 36 12 25 26 7 11 43 37 16, 38 23 8 6 S Self Diagnosis Sharpness Signal Information Sleep Timer Slide Show Software Upgrade Source List Speaker Select Specifications Standby mode Symbol T Timer Title Tools Troubleshooting TV Speaker U USB Drive V Video Formats Videos Volume W Wall Mount Warm White...
... Network Connection Network Setup O ON/OFF button Optimal resolution P Password Photos Picture Size PIP (Picture in Picture) Plug & Play Power Indicator 7, 13 13 17 15 16 11 R Receiver Recording Remote Control Repeat Mode RGB Only Mode Rotate 9, 39 10, 39 2 42 21 55 32 22 22 19 36 12 25 26 7 11 43 37 16, 38 23 8 6 S Self Diagnosis Sharpness Signal Information Sleep Timer Slide Show Software Upgrade Source List Speaker Select Specifications Standby mode Symbol T Timer Title Tools Troubleshooting TV Speaker U USB Drive V Video Formats Videos Volume W Wall Mount Warm White...


