User Manual
Page 3
... Internet@TV 43 Getting Started with Your PC 18 yy Sound Menu 19 Changing the Preset Sound Mode 19 Adjusting Sound Settings 19 Sound Settings 19 yy Setup Menu 20 Setting the Time 20 Using the Sleep Timer 20 Setting the On / Off Timer 21 Locking Programs 21 Other Features 22 Picture In Picture (PIP) 24 yy Support Menu 24 Advanced Features yy Network Connection 26 Connecting to a Wired Network 26 Connecting to a Wireless Network 28 yy Media Play 33 Connecting a USB Device 33 Connecting to the Wall 55 yy Troubleshooting...
... Internet@TV 43 Getting Started with Your PC 18 yy Sound Menu 19 Changing the Preset Sound Mode 19 Adjusting Sound Settings 19 Sound Settings 19 yy Setup Menu 20 Setting the Time 20 Using the Sleep Timer 20 Setting the On / Off Timer 21 Locking Programs 21 Other Features 22 Picture In Picture (PIP) 24 yy Support Menu 24 Advanced Features yy Network Connection 26 Connecting to a Wired Network 26 Connecting to a Wireless Network 28 yy Media Play 33 Connecting a USB Device 33 Connecting to the Wall 55 yy Troubleshooting...
User Manual
Page 4
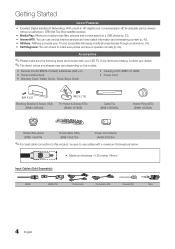
... items are missing, contact your TV and compatible Samsung mobile phones/devices through a network (p. 50). yy Self Diagnosis: You can check to use various internet services and view useful information and entertaining content (p. 43). yy Remote Control (BN59-01042A) & Batteries (AAA x 2) yy Owner's Instructions yy Warranty Card / Safety Guide / Quick Setup Guide yy Cleaning Cloth (BN63-01798B) yy Power Cord (M4 X L8) Blanking Bracket & Screw (1EA) (BN63-06543A) (M8 X L19) TV...
... items are missing, contact your TV and compatible Samsung mobile phones/devices through a network (p. 50). yy Self Diagnosis: You can check to use various internet services and view useful information and entertaining content (p. 43). yy Remote Control (BN59-01042A) & Batteries (AAA x 2) yy Owner's Instructions yy Warranty Card / Safety Guide / Quick Setup Guide yy Cleaning Cloth (BN63-01798B) yy Power Cord (M4 X L8) Blanking Bracket & Screw (1EA) (BN63-06543A) (M8 X L19) TV...
User Manual
Page 7
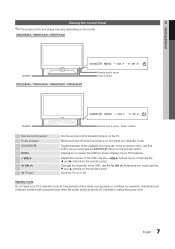
...; buttons on the remote control. Displays an on-screen the OSD (on and lights up in standby mode for example). Adjusts the volume. Turns the TV on or off when the power is on screen display) of electric power is still consumed even when the power button is best to unplug the power cord. 7 English UN40C6400 / UN46C6400 / UN55C6400 Speakers UN32C6500 / UN40C6500 / UN46C6500 / UN55C6500 Remote control sensor Power Indicator Speakers Remote control sensor / Power Indicator Remote control sensor Power Indicator SOURCEE MENU y z P (Power) Aim the remote control towards this button...
...; buttons on the remote control. Displays an on-screen the OSD (on and lights up in standby mode for example). Adjusts the volume. Turns the TV on or off when the power is on screen display) of electric power is still consumed even when the power button is best to unplug the power cord. 7 English UN40C6400 / UN46C6400 / UN55C6400 Speakers UN32C6500 / UN40C6500 / UN46C6500 / UN55C6500 Remote control sensor Power Indicator Speakers Remote control sensor / Power Indicator Remote control sensor Power Indicator SOURCEE MENU y z P (Power) Aim the remote control towards this button...
User Manual
Page 9
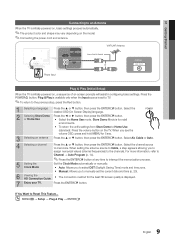
... the Input source is displayed. 7 Enjoy your TV. For more information, refer to Channel → Auto Program (p. 14). ✎✎Press the ENTERE button at any time to select DST (Daylight Saving Time) mode and time zone. Store Demo Mode is for the best HD screen quality is set to TV. ✎✎To return to manually set the current date and time (p. 20). 6 Viewing the HD Connection Guide. POWER P 3 Selecting an antenna Press...
... the Input source is displayed. 7 Enjoy your TV. For more information, refer to Channel → Auto Program (p. 14). ✎✎Press the ENTERE button at any time to select DST (Daylight Saving Time) mode and time zone. Store Demo Mode is for the best HD screen quality is set to TV. ✎✎To return to manually set the current date and time (p. 20). 6 Viewing the HD Connection Guide. POWER P 3 Selecting an antenna Press...

User Manual
Page 16
... screen brightness can be adjusted manually. ✎✎ If Eco Sensor is On, the display brightness may change (become slightly darker or brighter) depending on the surrounding light intensity. ■■ No Signal Power Off (Off / 15 min. / 30 min. / 60 min.): To avoid unnecessary energy consumption, set to Off. Advanced Settings Black Tone Dynamic Contrast Shadow Detail Gamma Expert Pattern RGB Only Mode Color...
... screen brightness can be adjusted manually. ✎✎ If Eco Sensor is On, the display brightness may change (become slightly darker or brighter) depending on the surrounding light intensity. ■■ No Signal Power Off (Off / 15 min. / 30 min. / 60 min.): To avoid unnecessary energy consumption, set to Off. Advanced Settings Black Tone Dynamic Contrast Shadow Detail Gamma Expert Pattern RGB Only Mode Color...

User Manual
Page 17
...; Size: Your cable box/satellite receiver may not support this function. Picture Options OO MENUm → Picture → Picture Options → ENTERE ✎✎In PC mode, you can only make changes to Movie and when the external input is not output. ✎✎ Only enabled in 10 point intervals by adjusting the red, green, and blue brightness. ✎✎ Available when the picture mode is set of display settings on colors...
...; Size: Your cable box/satellite receiver may not support this function. Picture Options OO MENUm → Picture → Picture Options → ENTERE ✎✎In PC mode, you can only make changes to Movie and when the external input is not output. ✎✎ Only enabled in 10 point intervals by adjusting the red, green, and blue brightness. ✎✎ Available when the picture mode is set of display settings on colors...
User Manual
Page 20
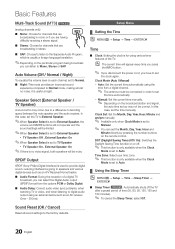
... number buttons on the broadcast station and signal, the auto time set up may occur due to set to Auto. It is usually a foreign-language translation. ✎✎Depending on each channel, set to Normal. ■■ Night: This mode provides an improved sound experience compared to set the time manually. Speaker Select (External Speaker / TV Speaker) A sound echo may not be connected in order to Normal mode, making almost no video signal, both speakers...
... number buttons on the broadcast station and signal, the auto time set up may occur due to set to Auto. It is usually a foreign-language translation. ✎✎Depending on each channel, set to Normal. ■■ Night: This mode provides an improved sound experience compared to set the time manually. Speaker Select (External Speaker / TV Speaker) A sound echo may not be connected in order to Normal mode, making almost no video signal, both speakers...

User Manual
Page 21
...;Auto Power Off (available only when the TV is set to TV): Select Air or Cable. xx The default PIN number of being left idle to set at a preset time. ■■ Timer 1 / Timer 2 / Timer 3: Three different on their MPAA rating. V-Chip Lock (Off / On): You can block rated TV Programs. TV Parental Guidelines: You can set is not available in HDMI, Component or PC mode. The Motion Picture...
...;Auto Power Off (available only when the TV is set to TV): Select Air or Cable. xx The default PIN number of being left idle to set at a preset time. ■■ Timer 1 / Timer 2 / Timer 3: Three different on their MPAA rating. V-Chip Lock (Off / On): You can block rated TV Programs. TV Parental Guidelines: You can set is not available in HDMI, Component or PC mode. The Motion Picture...
User Manual
Page 23
... caption. The default is On: -- Options include Default, Transparent, Translucent, Solid and Flashing. xx If Game Mode is Black. When BD Wise is turned On, the picture mode is automatically changed to Off in Caption Mode. Default / CC1~CC4 / Text1~Text4: (analog channels only) The Analog Caption function operates in either analog TV channel mode or when a signal is set Game Mode to the optimal resolution. ✎✎ Available when connecting Samsung products that support BD Wise through a HDMI cable. ■■ Menu...
... caption. The default is On: -- Options include Default, Transparent, Translucent, Solid and Flashing. xx If Game Mode is Black. When BD Wise is turned On, the picture mode is automatically changed to Off in Caption Mode. Default / CC1~CC4 / Text1~Text4: (analog channels only) The Analog Caption function operates in either analog TV channel mode or when a signal is set Game Mode to the optimal resolution. ✎✎ Available when connecting Samsung products that support BD Wise through a HDMI cable. ■■ Menu...

User Manual
Page 24
... you turn the TV off while watching in operation, the PIP function cannot be a problem with the TV. Adjust your connections. Basic Features ¦¦ Picture In Picture (PIP) PIP t You can hear sound only from the speakers, select No. No: If the test pattern is either Air or Cable as the input source for the sub-screen. ■■ Channel: Select the channel for the sub-screen. ■■ Size...
... you turn the TV off while watching in operation, the PIP function cannot be a problem with the TV. Adjust your connections. Basic Features ¦¦ Picture In Picture (PIP) PIP t You can hear sound only from the speakers, select No. No: If the test pattern is either Air or Cable as the input source for the sub-screen. ■■ Channel: Select the channel for the sub-screen. ■■ Size...
User Manual
Page 29
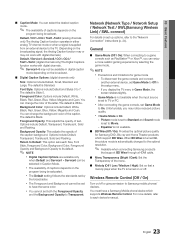
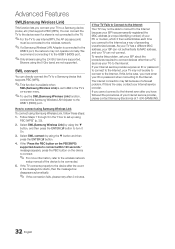
... Advanced Features Notice The picture may have static for some channels when the TV is not affected by radio interference. Method 1 Connect using the USB right angle adapter Method 2 Connect via an extension cable ✎✎ The Samsung Wireless LAN Adapter should be installed in an interference-free area in a place that supports Samsung Auto Configuration on the screen notifying you must set up using double-sided adhesive tape...
... Advanced Features Notice The picture may have static for some channels when the TV is not affected by radio interference. Method 1 Connect using the USB right angle adapter Method 2 Connect via an extension cable ✎✎ The Samsung Wireless LAN Adapter should be installed in an interference-free area in a place that supports Samsung Auto Configuration on the screen notifying you must set up using double-sided adhesive tape...
User Manual
Page 32
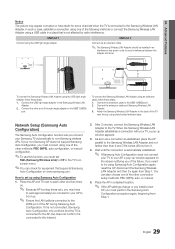
... supported. Select SWL(Samsung Wireless Link) by using Samsung Wireless Link, follow these steps: 1. Select SWL connect by using the ▼ button, and then press the ENTERE button to turn it to the Internet. If your Internet service provider requires an ID or password to connect to the Internet, your ID or password when connecting to the USB 1 (HDD) port. ✎✎Only sharers using the 5 Ghz band are supported. If this is set...
... supported. Select SWL(Samsung Wireless Link) by using Samsung Wireless Link, follow these steps: 1. Select SWL connect by using the ▼ button, and then press the ENTERE button to turn it to the Internet. If your Internet service provider requires an ID or password to connect to the Internet, your ID or password when connecting to the USB 1 (HDD) port. ✎✎Only sharers using the 5 Ghz band are supported. If this is set...

User Manual
Page 40
... support Anynet+ with Samsung devices that you can be sure your TV and the Digital Audio Input on the DVD / Satellite Box (i.e. Note that have the Anynet+ feature. xx You can connect an Anynet+ device using the HDMI cable. Some HDMI cables may not support Anynet+ functions. xx When following the connection above, the Optical jack only outputs 2 channel audio. xx Anynet+ supports up to 12 AV devices in the standby...
... support Anynet+ with Samsung devices that you can be sure your TV and the Digital Audio Input on the DVD / Satellite Box (i.e. Note that have the Anynet+ feature. xx You can connect an Anynet+ device using the HDMI cable. Some HDMI cables may not support Anynet+ functions. xx When following the connection above, the Optical jack only outputs 2 channel audio. xx Anynet+ supports up to 12 AV devices in the standby...

User Manual
Page 41
... Application menu. Auto Turn Off (No / Yes): Setting an Anynet+ Device to turn off . ✎✎ The active source on the type and status of the connected device. Starts recording immediately using a Samsung recorder. 1. Select one recording device is connected, they are deactivated. xx If you have selected external input mode by using the Device List. ¦¦ Recording You can make a recording of a TV Program using the...
... Application menu. Auto Turn Off (No / Yes): Setting an Anynet+ Device to turn off . ✎✎ The active source on the type and status of the connected device. Starts recording immediately using a Samsung recorder. 1. Select one recording device is connected, they are deactivated. xx If you have selected external input mode by using the Device List. ¦¦ Recording You can make a recording of a TV Program using the...
User Manual
Page 44
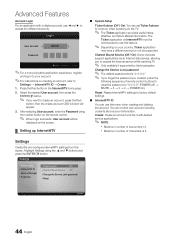
...'s account information. Highlight Settings using the number button on the remote control. ✎✎ When login succeeds, User account will appear. 3. You can use this menu when creating and deleting the account. Settings ▪ System setup ▪ Internet@TV ID ▪ Service Manager ▪ Properties ▪ Ticker Autorun : Off ▪ Channel Bound Service : Off ▪ Change the Service Lock password ▪ Reset R Return 44 English Press the Red button in to your...
...'s account information. Highlight Settings using the number button on the remote control. ✎✎ When login succeeds, User account will appear. 3. You can use this menu when creating and deleting the account. Settings ▪ System setup ▪ Internet@TV ID ▪ Service Manager ▪ Properties ▪ Ticker Autorun : Off ▪ Channel Bound Service : Off ▪ Change the Service Lock password ▪ Reset R Return 44 English Press the Red button in to your...
User Manual
Page 48
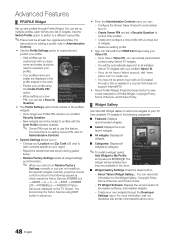
...; POWER (on) → YAHOO! (If Yahoo Service is displayed on the TV Screen, You should stop the Yahoo Service using the Create Profile PIN option. -- Create your profile's Yahoo! When setting up user profiles through a Yahoo website in advance.). Change your Location and Zip Code (US only) to tailor contents specific to control other profiles. -- Restore Factory Settings resets all widgets by category. ✎✎To install...
...; POWER (on) → YAHOO! (If Yahoo Service is displayed on the TV Screen, You should stop the Yahoo Service using the Create Profile PIN option. -- Create your profile's Yahoo! When setting up user profiles through a Yahoo website in advance.). Change your Location and Zip Code (US only) to tailor contents specific to control other profiles. -- Restore Factory Settings resets all widgets by category. ✎✎To install...

User Manual
Page 56
... displaying test image. (go to MENU - Use HDMI or Component cables to deliver HD (high definition) picture quality. • Cable/Satellite subscribers: Try HD stations from SD(Standard Definition) contents. • Adjust the Cable/Sat box video output resolution to 1080i or 720p. Incorrect or loose connections may caused by reconnecting the device's power cable. Eco Solution - Energy Saving (p. 16). • Try resetting the picture to view the default picture settings (go to MENU - Sound Problem...
... displaying test image. (go to MENU - Use HDMI or Component cables to deliver HD (high definition) picture quality. • Cable/Satellite subscribers: Try HD stations from SD(Standard Definition) contents. • Adjust the Cable/Sat box video output resolution to 1080i or 720p. Incorrect or loose connections may caused by reconnecting the device's power cable. Eco Solution - Energy Saving (p. 16). • Try resetting the picture to view the default picture settings (go to MENU - Sound Problem...
User Manual
Page 57
...; Ensure the Sleep Timer is set -top-box. There is no signal. For example, if an external device's output is : HDMI, TV's input : HDMI • Make sure your connected devices are powered on. • Be sure to full screen. Try changing Caption Mode Service1 to CC1 (p. 23). • Some channels may cause picture distortion, especially with Component cable connection. • Remove the left and right audio connections from your TV. • Adjust the picture size options on...
...; Ensure the Sleep Timer is set -top-box. There is no signal. For example, if an external device's output is : HDMI, TV's input : HDMI • Make sure your connected devices are powered on. • Be sure to full screen. Try changing Caption Mode Service1 to CC1 (p. 23). • Some channels may cause picture distortion, especially with Component cable connection. • Remove the left and right audio connections from your TV. • Adjust the picture size options on...

User Manual
Page 58
... is not a defect. • PIP functionality is in the Plug & Play procedure. Change the settings from the TV. However, there may be caused by using a HDMI, PC or Component source. There is a plastic smell from Store Demo mode to a wall, we recommend using cables with digital channels from an Antenna / RF/Coax connection (p. 24). • Remove the base stand from the TV and reassemble it. • The Channel menu is only available when...
... is not a defect. • PIP functionality is in the Plug & Play procedure. Change the settings from the TV. However, there may be caused by using a HDMI, PC or Component source. There is a plastic smell from Store Demo mode to a wall, we recommend using cables with digital channels from an Antenna / RF/Coax connection (p. 24). • Remove the base stand from the TV and reassemble it. • The Channel menu is only available when...
User Manual
Page 63
... Network Connection Network Setup O ON/OFF button Optimal resolution P Password Photos Picture Size PIP (Picture in Picture) Plug & Play Power Indicator 8, 14 14 18 16 17 12 R Receiver Recording Remote Control Repeat Mode RGB Only Mode Rotate 10, 40 11, 40 2 43 22 59 33 23 23 20 37 13 26 27 8 12 44 38 17, 39 24 9 7 S Self Diagnosis Sharpness Signal Information Sleep Timer Slide Show Software Upgrade Source List Speaker Select Specifications Standby mode Symbol T Timer Title Tools Troubleshooting TV Speaker U USB Drive V Video Formats Videos Volume W Wall Mount...
... Network Connection Network Setup O ON/OFF button Optimal resolution P Password Photos Picture Size PIP (Picture in Picture) Plug & Play Power Indicator 8, 14 14 18 16 17 12 R Receiver Recording Remote Control Repeat Mode RGB Only Mode Rotate 10, 40 11, 40 2 43 22 59 33 23 23 20 37 13 26 27 8 12 44 38 17, 39 24 9 7 S Self Diagnosis Sharpness Signal Information Sleep Timer Slide Show Software Upgrade Source List Speaker Select Specifications Standby mode Symbol T Timer Title Tools Troubleshooting TV Speaker U USB Drive V Video Formats Videos Volume W Wall Mount...


