
User Manual (user Manual) (ver.1.0) (English)
Page 3
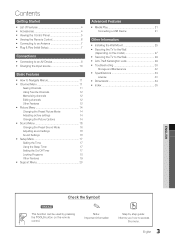
... yy Sound Menu 16 Changing the Preset Sound Mode 16 Adjusting sound settings 16 Sound Settings 16 yy Setup Menu 17 Setting the Time 17 Using the Sleep Timer 17 Setting the On/Off Timer 17 Locking Programs 18 Other Features 19 yy Support Menu 20 Advanced Features yy Media Play 21 Connecting a USB Device 21 Other Information yy Installing the Wall Mount 25 yy Securing the TV to the Wall (depending on the remote control. t ✎ This function can be used by step guide...
... yy Sound Menu 16 Changing the Preset Sound Mode 16 Adjusting sound settings 16 Sound Settings 16 yy Setup Menu 17 Setting the Time 17 Using the Sleep Timer 17 Setting the On/Off Timer 17 Locking Programs 18 Other Features 19 yy Support Menu 20 Advanced Features yy Media Play 21 Connecting a USB Device 21 Other Information yy Installing the Wall Mount 25 yy Securing the TV to the Wall (depending on the remote control. t ✎ This function can be used by step guide...
User Manual (user Manual) (ver.1.0) (English)
Page 6
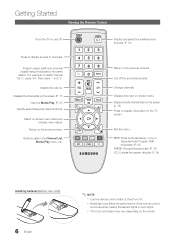
... A B C D MTS P.SIZE CC Display and select the available video sources. (P. 10) Return to the previous menu. Select on the screen. (P. 11) View the Media Play. (P. 21) Quickly select frequently used in the Channel list, Media Play menu, etc. x Bright light may vary depending on -screen menu. Return to the previous channel. Buttons used functions. MTS: Press to display information on the TV screen. Cut off . Change channels. Adjusts the volume. Display favorite channel lists on and off the sound temporarily. x The Color and...
... A B C D MTS P.SIZE CC Display and select the available video sources. (P. 10) Return to the previous menu. Select on the screen. (P. 11) View the Media Play. (P. 21) Quickly select frequently used in the Channel list, Media Play menu, etc. x Bright light may vary depending on -screen menu. Return to the previous channel. Buttons used functions. MTS: Press to display information on the TV screen. Cut off . Change channels. Adjusts the volume. Display favorite channel lists on and off the sound temporarily. x The Color and...
User Manual (user Manual) (ver.1.0) (English)
Page 17
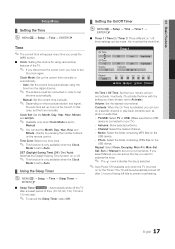
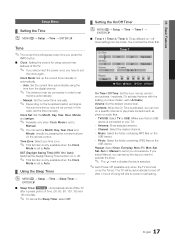
... Mode is set to Auto. ¦¦ Using the Sleep Timer OO MENUm → Setup → Time → Sleep Timer → ENTERE ■■ Sleep Timer t : Automatically shuts off timer settings can set to set the clock again. 03 Basic Features Setup Menu ¦¦ Setting the Time OO MENUm → Setup → Time → ENTERE Time ✎✎The current time will be connected in order to set to set at you can be correct. TV/USB...
... Mode is set to Auto. ¦¦ Using the Sleep Timer OO MENUm → Setup → Time → Sleep Timer → ENTERE ■■ Sleep Timer t : Automatically shuts off timer settings can set to set the clock again. 03 Basic Features Setup Menu ¦¦ Setting the Time OO MENUm → Setup → Time → ENTERE Time ✎✎The current time will be connected in order to set to set at you can be correct. TV/USB...

User Manual (user Manual) (ver.1.0) (English)
Page 20
... TV. xx The Melody does not play. -- When no sound is set by downloading the latest firmware from samsung.com to the TV. Support Menu OO MENUm → Support → ENTERE ■■ Sound Test: Use the built-in Caption Mode. Contact Samsung View this information when connecting external devices to a USB memory device. Self Diagnosis ■■ Picture Test: Use to check for sound problems. Yes: If you can find information...
... TV. xx The Melody does not play. -- When no sound is set by downloading the latest firmware from samsung.com to the TV. Support Menu OO MENUm → Support → ENTERE ■■ Sound Test: Use the built-in Caption Mode. Contact Samsung View this information when connecting external devices to a USB memory device. Self Diagnosis ■■ Picture Test: Use to check for sound problems. Yes: If you can find information...
User Manual (user Manual) (ver.1.0) (English)
Page 25
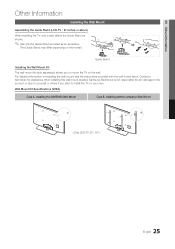
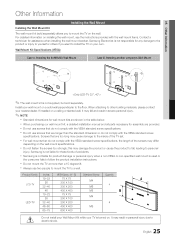
... installing the wall mount, see the instructions provided with the wall mount items. Contact a technician for assistance when installing the wall mount bracket. For detailed information on your own. Installing the SAMSUNG Wall-Mount Case B. Installing another company's Wall-Mount 25 English Wall Mount Kit Specifications (VESA) Case A. 05 Other Information Other Information Installing the Wall Mount Assembling the Guide Stand (LCD-TV - 32 inches or above) When installing the TV onto a wall, attach the Guide Stand as shown. ✎✎Use only the Guide Stand...
... installing the wall mount, see the instructions provided with the wall mount items. Contact a technician for assistance when installing the wall mount bracket. For detailed information on your own. Installing the SAMSUNG Wall-Mount Case B. Installing another company's Wall-Mount 25 English Wall Mount Kit Specifications (VESA) Case A. 05 Other Information Other Information Installing the Wall Mount Assembling the Guide Stand (LCD-TV - 32 inches or above) When installing the TV onto a wall, attach the Guide Stand as shown. ✎✎Use only the Guide Stand...
User Manual (user Manual) (ver.1.0) (English)
Page 30
... the source or signal. • Please check the volume of component input 1 on analog and digital TV. Color is not connected to the correct jacks. Energy Saving) (P. 20) • Try resetting the picture to view the default picture setting. (go to 1080i or 720p. The speakers are upscaled from the channel line up to HDMI cable, a separate audio cable is properly displaying the test image. • go to 16:9. • Change cable/satellite box resolution. Self...
... the source or signal. • Please check the volume of component input 1 on analog and digital TV. Color is not connected to the correct jacks. Energy Saving) (P. 20) • Try resetting the picture to view the default picture setting. (go to 1080i or 720p. The speakers are upscaled from the channel line up to HDMI cable, a separate audio cable is properly displaying the test image. • go to 16:9. • Change cable/satellite box resolution. Self...
User Manual (user Manual) (ver.1.0) (English)
Page 31
...'s correct source by pressing the SOURCE button on your external device's (Cable/Sat Box, DVD, Blu-ray etc) video outputs to match the connections to the channel list. Try changing Caption Mode Service 1 to MENU - The picture is connected securely. • Please try Auto Program to add available channels to the TV input. The picture will not display in the menu. Auto Program then select Auto and make sure the problem is set in full screen. • HD channels will have black bars on...
...'s correct source by pressing the SOURCE button on your external device's (Cable/Sat Box, DVD, Blu-ray etc) video outputs to match the connections to the channel list. Try changing Caption Mode Service 1 to MENU - The picture is connected securely. • Please try Auto Program to add available channels to the TV input. The picture will not display in the menu. Auto Program then select Auto and make sure the problem is set in full screen. • HD channels will have black bars on...
User Manual (user Manual) (ver.1.0) (English)
Page 32
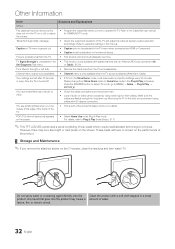
.... TV Signal Strength is in the TV menu when connected via HDMI or Component. • Caption must be caused by using cables with a soft cloth dapped in the • This function is a plastic smell from the TV and reassemble. or Cable). (P. 20) TV is tilted to Plug & Play (Initial Setup). (P. 7) ✎✎This TFT LCD/LED panel uses a panel consisting of the TV and adjust the external device's output resolution accordingly...
.... TV Signal Strength is in the TV menu when connected via HDMI or Component. • Caption must be caused by using cables with a soft cloth dapped in the • This function is a plastic smell from the TV and reassemble. or Cable). (P. 20) TV is tilted to Plug & Play (Initial Setup). (P. 7) ✎✎This TFT LCD/LED panel uses a panel consisting of the TV and adjust the external device's output resolution accordingly...

User Manual Ver.1.0 (English, French)
Page 3
... Channels 12 Memorizing channels 12 Editing channels 12 Other Features 12 yy Picture Menu 14 Changing the Preset Picture Mode 14 Adjusting picture settings 14 Changing the Picture Options 14 yy Sound Menu 16 Changing the Preset Sound Mode 16 Adjusting sound settings 16 Sound Settings 16 yy Setup Menu 17 Setting the Time 17 Using the Sleep Timer 17 Setting the On/Off Timer 17 Locking Programs 18 Other Features 19 yy Support Menu 20 Advanced Features yy Media Play 21 Connecting a USB Device 21 Other Information yy Installing the Wall Mount...
... Channels 12 Memorizing channels 12 Editing channels 12 Other Features 12 yy Picture Menu 14 Changing the Preset Picture Mode 14 Adjusting picture settings 14 Changing the Picture Options 14 yy Sound Menu 16 Changing the Preset Sound Mode 16 Adjusting sound settings 16 Sound Settings 16 yy Setup Menu 17 Setting the Time 17 Using the Sleep Timer 17 Setting the On/Off Timer 17 Locking Programs 18 Other Features 19 yy Support Menu 20 Advanced Features yy Media Play 21 Connecting a USB Device 21 Other Information yy Installing the Wall Mount...

User Manual Ver.1.0 (English, French)
Page 17
... connected in order to Activate.) Volume: Set the desired volume level. Contents: When the On Time is turned on by pressing the number buttons on or off timer settings can set up the current time manually or automatically. -- You must be made. DST (Daylight Saving Time) (Off / On / Auto): Switches the Daylight Saving Time function on the remote control. TV/USB: Select TV or USB. (Make sure that an USB device is set...
... connected in order to Activate.) Volume: Set the desired volume level. Contents: When the On Time is turned on by pressing the number buttons on or off timer settings can set up the current time manually or automatically. -- You must be made. DST (Daylight Saving Time) (Off / On / Auto): Switches the Daylight Saving Time function on the remote control. TV/USB: Select TV or USB. (Make sure that an USB device is set...

User Manual Ver.1.0 (English, French)
Page 20
... in Caption Mode. Support Menu OO MENUm → Support → ENTERE ■■ Sound Test: Use the built-in order to a USB memory device. Contact Samsung View this information when connecting external devices to download products and software. When watching TV at all during the sound test, select Yes. Self Diagnosis ■■ Picture Test: Use to check for sound problems. Yes: If you can hear sound only from one speaker...
... in Caption Mode. Support Menu OO MENUm → Support → ENTERE ■■ Sound Test: Use the built-in order to a USB memory device. Contact Samsung View this information when connecting external devices to download products and software. When watching TV at all during the sound test, select Yes. Self Diagnosis ■■ Picture Test: Use to check for sound problems. Yes: If you can hear sound only from one speaker...
User Manual Ver.1.0 (English, French)
Page 25
...; For detailed information on the wall mount specifications. xx Always use screws that do not comply with the VESA standard screw specifications. If installed on . Samsung is turned on a ceiling or slanted wall, it may differ depending on installing the wall mount, see the instructions provided with the VESA standard screw specifications, the length of the TV set. 05 Other Information Other Information Installing the Wall Mount Installing the Wall Mount Kit The wall mount kit (sold separately.
...; For detailed information on the wall mount specifications. xx Always use screws that do not comply with the VESA standard screw specifications. If installed on . Samsung is turned on a ceiling or slanted wall, it may differ depending on installing the wall mount, see the instructions provided with the VESA standard screw specifications, the length of the TV set. 05 Other Information Other Information Installing the Wall Mount Installing the Wall Mount Kit The wall mount kit (sold separately.

User Manual Ver.1.0 (English, French)
Page 30
.... Use HDMI or Component cables to deliver HD (high definition) picture quality. • Cable/Satellite subscribers: Try HD stations from SD(Standard Definition) contents. • Adjust the Cable/Sat box video output resolution to 1080i or 720p. When changing channels, the picture freezes or is properly displaying the test image. • go to MENU - Picture Reset) (P. 15) • If the picture size is set top box. Low signal level may cause color problems or a blank screen. • Adjust...
.... Use HDMI or Component cables to deliver HD (high definition) picture quality. • Cable/Satellite subscribers: Try HD stations from SD(Standard Definition) contents. • Adjust the Cable/Sat box video output resolution to 1080i or 720p. When changing channels, the picture freezes or is properly displaying the test image. • go to MENU - Picture Reset) (P. 15) • If the picture size is set top box. Low signal level may cause color problems or a blank screen. • Adjust...

User Manual Ver.1.0 (English, French)
Page 31
... no signal. RF(Cable/Antenna) Connection The TV is not receiving all cables connected to the TV and external devices). • Set your connected devices are 3 options. (STD, HRC and IRC) (P. 12) • Verify the Antenna is set -top-box. Try changing Caption Mode Service 1 to CC1. (P. 19) • Some channels may cause picture distortion. Especially on digital channels. • Check Caption Setup menu. Replace the Component video cables with Component cable connection. • Remove the left and right audio connections from an antenna or cable connection...
... no signal. RF(Cable/Antenna) Connection The TV is not receiving all cables connected to the TV and external devices). • Set your connected devices are 3 options. (STD, HRC and IRC) (P. 12) • Verify the Antenna is set -top-box. Try changing Caption Mode Service 1 to CC1. (P. 19) • Some channels may cause picture distortion. Especially on digital channels. • Check Caption Setup menu. Replace the Component video cables with Component cable connection. • Remove the left and right audio connections from an antenna or cable connection...

User Manual Ver.1.0 (English, French)
Page 32
... is part of audio or video can not be selected in the TV menu when connected via HDMI or Component. • Caption must be caused by using cables with 90 degree connectors. Refer to MENU → Setup → Plug & Play → ENTERE. Caption on TV menu is greyed out. • Caption can be activated on the external device. Press the SOURCE button to select TV mode, go to resolution settings in this manual. Mounting the...
... is part of audio or video can not be selected in the TV menu when connected via HDMI or Component. • Caption must be caused by using cables with 90 degree connectors. Refer to MENU → Setup → Plug & Play → ENTERE. Caption on TV menu is greyed out. • Caption can be activated on the external device. Press the SOURCE button to select TV mode, go to resolution settings in this manual. Mounting the...
User Manual Ver.1.0 (English, Spanish)
Page 17
...;■ Clock: Setting the clock is turned on by pressing the number buttons on a specific channel or play back contents such as photo or audio files. -- You must be connected in order to set up the current time manually or automatically. -- 03 Basic Features Setup Menu ¦¦ Setting the Time OO MENUm → Setup → Time → ENTERE Time ✎✎The current time will be automatically turned off after...
...;■ Clock: Setting the clock is turned on by pressing the number buttons on a specific channel or play back contents such as photo or audio files. -- You must be connected in order to set up the current time manually or automatically. -- 03 Basic Features Setup Menu ¦¦ Setting the Time OO MENUm → Setup → Time → ENTERE Time ✎✎The current time will be automatically turned off after...

User Manual Ver.1.0 (English, Spanish)
Page 20
... problem persists, refer to the TV. Contact Samsung View this information when connecting external devices to the external device's user manual. ■■ Signal Strength: (digital channels only) An HD channel's reception quality is output from the TV because the MUTE button has been pressed. -- Please check your antenna to check for assistance (1-800-SAMSUNG). Support Menu OO MENUm → Support → ENTERE ■■ Sound Test: Use the built-in Caption Mode...
... problem persists, refer to the TV. Contact Samsung View this information when connecting external devices to the external device's user manual. ■■ Signal Strength: (digital channels only) An HD channel's reception quality is output from the TV because the MUTE button has been pressed. -- Please check your antenna to check for assistance (1-800-SAMSUNG). Support Menu OO MENUm → Support → ENTERE ■■ Sound Test: Use the built-in Caption Mode...

User Manual Ver.1.0 (English, Spanish)
Page 28
... the component cables are using an AV composite input, connect the video cable (yellow) to the Green jack of the device (Cable/Sat Box, DVD, Blu-ray etc) connected to your TV. Issues Solutions and Explanations Poor picture First of video contents may cause color problems or a blank screen. The picture is properly operating. • go to MENU - When changing channels, the picture freezes or is set top box. If none of these troubleshooting tips apply, visit samsung...
... the component cables are using an AV composite input, connect the video cable (yellow) to the Green jack of the device (Cable/Sat Box, DVD, Blu-ray etc) connected to your TV. Issues Solutions and Explanations Poor picture First of video contents may cause color problems or a blank screen. The picture is properly operating. • go to MENU - When changing channels, the picture freezes or is set top box. If none of these troubleshooting tips apply, visit samsung...

User Manual Ver.1.0 (English, Spanish)
Page 29
... not receiving all cables connected to the channel list. go to the TV input. Channel - Especially on digital channels. • Check Caption Setup menu. For example, if an external device's output is not the remote. No Caption on fast moving pictures such as sports and action movies. • A low signal can cause picture distortion. There are powered on. • Be sure to CC1. (P. 19) • Some channels may cause picture distortion. Try changing Caption Mode Service...
... not receiving all cables connected to the channel list. go to the TV input. Channel - Especially on digital channels. • Check Caption Setup menu. For example, if an external device's output is not the remote. No Caption on fast moving pictures such as sports and action movies. • A low signal can cause picture distortion. There are powered on. • Be sure to CC1. (P. 19) • Some channels may cause picture distortion. Try changing Caption Mode Service...

User Manual Ver.1.0 (English, Spanish)
Page 30
..., or electric shock. These pixels will reset audio and picture settings every 30 minutes. TV Signal Strength is unavailable in the TV menu when connected via HDMI or Component. • Caption must be caused by using cables with an Antenna (RF/Coax) connection (Air Self Diagnosis Test menu. Your settings are flexible enough for SAMSUNG TV code. 'Mode Not Supported' message. • Check the supported resolution of sub pixels which require sophisticated...
..., or electric shock. These pixels will reset audio and picture settings every 30 minutes. TV Signal Strength is unavailable in the TV menu when connected via HDMI or Component. • Caption must be caused by using cables with an Antenna (RF/Coax) connection (Air Self Diagnosis Test menu. Your settings are flexible enough for SAMSUNG TV code. 'Mode Not Supported' message. • Check the supported resolution of sub pixels which require sophisticated...


