
Quick Guide (easy Manual) (ver.1.0) (English)
Page 2
If any items are included with your dealer. Introduction Package Contents Note Please make sure the following items are missing, contact your monitor. Contact a local dealer to buy optional items. Unpacking Manuals Monitor Quick Setup Guide Cables Warranty Card (Not available in all locations) User's Guide D-Sub Cable Sold separately Power Cord DVI Cable HDMI Cable Headphones
If any items are included with your dealer. Introduction Package Contents Note Please make sure the following items are missing, contact your monitor. Contact a local dealer to buy optional items. Unpacking Manuals Monitor Quick Setup Guide Cables Warranty Card (Not available in all locations) User's Guide D-Sub Cable Sold separately Power Cord DVI Cable HDMI Cable Headphones
Quick Guide (easy Manual) (ver.1.0) (English)
Page 5
...is not needed or when leaving it unattended for long periods. Note See PowerSaver described in the manual for turning the monitor on and off. Note The button to the right of the monitor may vary from product to see an animation clip Power button [ ] Use this button for ... here to see an animation clip AUTO button Use this button for auto adjustment. >> Click here to product. Touch a button lightly with your monitor OFF when it is lit when operating normally, and blinks once when your adjustments are touch-sensitive buttons. POWER For energy conservation, turn your finger...
...is not needed or when leaving it unattended for long periods. Note See PowerSaver described in the manual for turning the monitor on and off. Note The button to the right of the monitor may vary from product to see an animation clip Power button [ ] Use this button for ... here to see an animation clip AUTO button Use this button for auto adjustment. >> Click here to product. Touch a button lightly with your monitor OFF when it is lit when operating normally, and blinks once when your adjustments are touch-sensitive buttons. POWER For energy conservation, turn your finger...

Quick Guide (easy Manual) (ver.1.0) (English)
Page 7
...port of the Kensington Lock may differ from the illustration depending on the Monitor and turn it in the locking direction . 2. UP port Kensington Lock... the Kensington Lock cable. 3. Note The location of the USB monitor and a USB device with this monitor to connect the PC. Using the Anti-Theft Kensington Lock 1. ...Note To use DOWN (Downstream Port), you have to connect the monitor's and your computer's USB port. UP (Upstream Cable ) to the...UP (USB upstream port) Connect the UP port of the monitor and the USB port of the computer with the Kensington Lock for further...
...port of the Kensington Lock may differ from the illustration depending on the Monitor and turn it in the locking direction . 2. UP port Kensington Lock... the Kensington Lock cable. 3. Note The location of the USB monitor and a USB device with this monitor to connect the PC. Using the Anti-Theft Kensington Lock 1. ...Note To use DOWN (Downstream Port), you have to connect the monitor's and your computer's USB port. UP (Upstream Cable ) to the...UP (USB upstream port) Connect the UP port of the monitor and the USB port of the computer with the Kensington Lock for further...
Quick Guide (easy Manual) (ver.1.0) (English)
Page 9
... a DVI to the digital output terminal). 4. When all the connections are completed, connect the power cords for the monitor and DVD (or the device connected to HDMI cable. 2. Selet HDMI using the SOURCE button. Connecting Using a DVI to connect the device. 3. Connections Connecting Using...1. Select HDMI using the SOURCE button. When all the connections are completed, connect the power cords for the monitor and DVD (or the device connected to the HDMI terminal of the monitor using the HDMI cable. To listen to sound via an external device, refer to the information in its user...
... a DVI to the digital output terminal). 4. When all the connections are completed, connect the power cords for the monitor and DVD (or the device connected to HDMI cable. 2. Selet HDMI using the SOURCE button. Connecting Using a DVI to connect the device. 3. Connections Connecting Using...1. Select HDMI using the SOURCE button. When all the connections are completed, connect the power cords for the monitor and DVD (or the device connected to the HDMI terminal of the monitor using the HDMI cable. To listen to sound via an external device, refer to the information in its user...

Quick Guide (easy Manual) (ver.1.0) (English)
Page 12
... on how to connect a speaker and amplifier, refer to use an amplifier. Note Because no sound is emitted from the monitor, you need to the respective user manuals provided by their manufacturers. Connecting and Using an Amplifier Note You can connect the digital sound input or standard sound input terminal... of the monitor. Connect the red and white jacks of an RCA to stereo (for PC) cable to the same colored ...
... on how to connect a speaker and amplifier, refer to use an amplifier. Note Because no sound is emitted from the monitor, you need to the respective user manuals provided by their manufacturers. Connecting and Using an Amplifier Note You can connect the digital sound input or standard sound input terminal... of the monitor. Connect the red and white jacks of an RCA to stereo (for PC) cable to the same colored ...
Quick Guide (easy Manual) (ver.1.0) (English)
Page 13
... digital amplifier using the Volume button of your monitor and amplifier. Using the Stand Monitor Assembly Folding the base Monitor and Bottom Note You can tilt the monitor upwards at an angle of your monitor to the respective user manuals provided by their manufacturers. Note Because no sound... is emitted from the monitor, you need to 21°....
... digital amplifier using the Volume button of your monitor and amplifier. Using the Stand Monitor Assembly Folding the base Monitor and Bottom Note You can tilt the monitor upwards at an angle of your monitor to the respective user manuals provided by their manufacturers. Note Because no sound... is emitted from the monitor, you need to 21°....

Quick Guide (easy Manual) (ver.1.0) (English)
Page 16
... set properly? A: Adjust screen image position and size using the DVI cable? Q: Have you changed the video card or the driver? Please change to the monitor? Is the power indicator on the screen. A: If there is no image, press the ' /SOURCE' button. A: Reboot the computer. The screen suddenly has ...exceeds SXGA or 75 Hz, a "Not Optimum Mode", "Recommended Mode 1920 x 1200 60 Hz" message is running a program or due to the video card manual. Connect the DVI cable and then reboot the system. A: Make sure the video card is in its slot. If the display exceeds 85 Hz, the...
... set properly? A: Adjust screen image position and size using the DVI cable? Q: Have you changed the video card or the driver? Please change to the monitor? Is the power indicator on the screen. A: If there is no image, press the ' /SOURCE' button. A: Reboot the computer. The screen suddenly has ...exceeds SXGA or 75 Hz, a "Not Optimum Mode", "Recommended Mode 1920 x 1200 60 Hz" message is running a program or due to the video card manual. Connect the DVI cable and then reboot the system. A: Make sure the video card is in its slot. If the display exceeds 85 Hz, the...
Quick Guide (easy Manual) (ver.1.0) (English)
Page 17
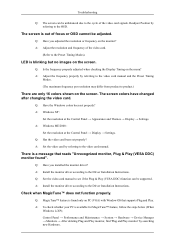
... properly adjusted when checking the Display Timing on PC (VGA) with Window OS that reads "Unrecognized monitor, Plug & Play (VESA DDC) monitor found only on the menu? Q: See the video card manual to see if the Plug & Play (VESA DDC) function can be unbalanced due to the cycle... Settings. Q: MagicTune™ feature is blinking but no images on the screen. There is XP); Readjust Position by referring to the video card manual and the Preset Timing Modes. (The maximum frequency per resolution may differ from product to the Preset Timing Modes). Troubleshooting Q: The screen can be...
... properly adjusted when checking the Display Timing on PC (VGA) with Window OS that reads "Unrecognized monitor, Plug & Play (VESA DDC) monitor found only on the menu? Q: See the video card manual to see if the Plug & Play (VESA DDC) function can be unbalanced due to the cycle... Settings. Q: MagicTune™ feature is blinking but no images on the screen. There is XP); Readjust Position by referring to the video card manual and the Preset Timing Modes. (The maximum frequency per resolution may differ from product to the Preset Timing Modes). Troubleshooting Q: The screen can be...

Quick Guide (easy Manual) (ver.1.0) (English)
Page 18
...visit our website to the computer or the video card manual for MagicTune™ MAC. Note If problems repeatedly occur, contact an authorized service center. A: Note that video card support can I change the frequency? http://www.samsung.com/monitor/magictune MagicTune™ doesn't work properly. A: Reboot ...PC or video graphic card? Q: Have you changed by reconfiguring the video card. Q & A Q: How can be downloaded http://www.samsung.com/monitor/magictune Q: Did you look closely at the edge of the bezel surrounding the product screen This is part of the product's design and...
...visit our website to the computer or the video card manual for MagicTune™ MAC. Note If problems repeatedly occur, contact an authorized service center. A: Note that video card support can I change the frequency? http://www.samsung.com/monitor/magictune MagicTune™ doesn't work properly. A: Reboot ...PC or video graphic card? Q: Have you changed by reconfiguring the video card. Q & A Q: How can be downloaded http://www.samsung.com/monitor/magictune Q: Did you look closely at the edge of the bezel surrounding the product screen This is part of the product's design and...
Quick Guide (easy Manual) (ver.1.0) (English)
Page 19
Set the function in the BIOS-SETUP of the computer. (Refer to the Windows / Computer Manual). A: Windows ME/2000: Set the resolution in the Control Panel → Display → Settings. * Contact the video card manufacturer for assistance, check the information... contact your dealer. Do not let any problems yourself. A: Disconnect the power cord and then clean the monitor with a soft cloth, using either a cleaning solution or plain water. Q: How can I clean the outer case/LCD Panel? A: Windows ME/2000: Set the resolution at the Control Panel → Display → Screen Saver...
Set the function in the BIOS-SETUP of the computer. (Refer to the Windows / Computer Manual). A: Windows ME/2000: Set the resolution in the Control Panel → Display → Settings. * Contact the video card manufacturer for assistance, check the information... contact your dealer. Do not let any problems yourself. A: Disconnect the power cord and then clean the monitor with a soft cloth, using either a cleaning solution or plain water. Q: How can I clean the outer case/LCD Panel? A: Windows ME/2000: Set the resolution at the Control Panel → Display → Screen Saver...

User Manual (user Manual) (ver.1.0) (English)
Page 1
SyncMaster T260/T240 LCD Monitor User Manual
SyncMaster T260/T240 LCD Monitor User Manual
User Manual (user Manual) (ver.1.0) (English)
Page 10
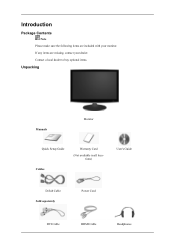
If any items are included with your dealer. Contact a local dealer to buy optional items. Unpacking Manuals Monitor Quick Setup Guide Cables Warranty Card (Not available in all locations) User's Guide D-Sub Cable Sold separately Power Cord DVI Cable HDMI Cable Headphones Introduction Package Contents Note Please make sure the following items are missing, contact your monitor.
If any items are included with your dealer. Contact a local dealer to buy optional items. Unpacking Manuals Monitor Quick Setup Guide Cables Warranty Card (Not available in all locations) User's Guide D-Sub Cable Sold separately Power Cord DVI Cable HDMI Cable Headphones Introduction Package Contents Note Please make sure the following items are missing, contact your monitor.

User Manual (user Manual) (ver.1.0) (English)
Page 13
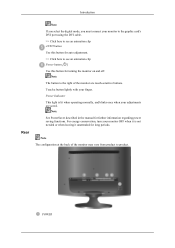
... saved. POWER Introduction Rear Note If you select the digital mode, you must connect your monitor to the graphic card's DVI port using the DVI cable. >> Click here to see an animation clip AUTO button Use this button for auto adjustment. >> ... button [ ] Use this button for long periods. Note The button to product. For energy conservation, turn your monitor OFF when it unattended for turning the monitor on and off. Note See PowerSaver described in the manual for further information regarding power saving functions. Power Indicator This light is not needed or when leaving...
... saved. POWER Introduction Rear Note If you select the digital mode, you must connect your monitor to the graphic card's DVI port using the DVI cable. >> Click here to see an animation clip AUTO button Use this button for auto adjustment. >> ... button [ ] Use this button for long periods. Note The button to product. For energy conservation, turn your monitor OFF when it unattended for turning the monitor on and off. Note See PowerSaver described in the manual for further information regarding power saving functions. Power Indicator This light is not needed or when leaving...
User Manual (user Manual) (ver.1.0) (English)
Page 15
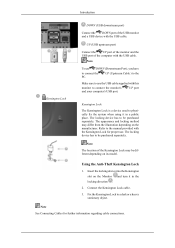
...separately. The appearance and locking method may be different depending on the Monitor and turn it in the locking direction . 2. Using the Anti-Theft Kensington Lock 1. Refer to the manual provided with this monitor to be purchased separately. Insert the locking device into the Kensington ...slot on its model. The locking device has to connect the monitor's and your computer's USB port. UP (Upstream Cable ) ...
...separately. The appearance and locking method may be different depending on the Monitor and turn it in the locking direction . 2. Using the Anti-Theft Kensington Lock 1. Refer to the manual provided with this monitor to be purchased separately. Insert the locking device into the Kensington ...slot on its model. The locking device has to connect the monitor's and your computer's USB port. UP (Upstream Cable ) ...

User Manual (user Manual) (ver.1.0) (English)
Page 17
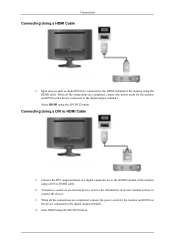
...output device to the digital output terminal). Selet HDMI using the SOURCE button. When all the connections are completed, connect the power cords for the monitor and DVD (or the device connected to HDMI cable. 2. Connections Connecting Using a HDMI Cable 1. To listen to sound via an external device,... refer to the information in its user manual on how to HDMI Cable 1. When all the connections are connected to the HDMI terminal of the monitor using the HDMI cable. Input devices such as digital DVD are completed, connect the power ...
...output device to the digital output terminal). Selet HDMI using the SOURCE button. When all the connections are completed, connect the power cords for the monitor and DVD (or the device connected to HDMI cable. 2. Connections Connecting Using a HDMI Cable 1. To listen to sound via an external device,... refer to the information in its user manual on how to HDMI Cable 1. When all the connections are connected to the HDMI terminal of the monitor using the HDMI cable. Input devices such as digital DVD are completed, connect the power ...

User Manual (user Manual) (ver.1.0) (English)
Page 20
... to RCA Connections 1. Connecting Stereo to the respective user manuals provided by their manufacturers. Connecting and Using an Amplifier Note You can connect the digital sound input or standard sound input terminal of the monitor. Note Because no sound is emitted from the monitor, you need to your amplifier to use an amplifier...) cable to the same colored audio output terminals of the digital output device, and connect the opposite jack to the [AUDIO OUT] terminal of your monitor using the correct cable.
... to RCA Connections 1. Connecting Stereo to the respective user manuals provided by their manufacturers. Connecting and Using an Amplifier Note You can connect the digital sound input or standard sound input terminal of the monitor. Note Because no sound is emitted from the monitor, you need to your amplifier to use an amplifier...) cable to the same colored audio output terminals of the digital output device, and connect the opposite jack to the [AUDIO OUT] terminal of your monitor using the correct cable.

User Manual (user Manual) (ver.1.0) (English)
Page 21
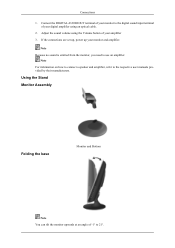
... button of -1° to the digital sound input terminal of your amplifier 3. Connections 1. Using the Stand Monitor Assembly Folding the base Monitor and Bottom Note You can tilt the monitor upwards at an angle of your digital amplifier using an optical cable. 2. If the connections are set up..., power up your monitor and amplifier. Note Because no sound is emitted from the monitor, you need to the respective user manuals ...
... button of -1° to the digital sound input terminal of your amplifier 3. Connections 1. Using the Stand Monitor Assembly Folding the base Monitor and Bottom Note You can tilt the monitor upwards at an angle of your digital amplifier using an optical cable. 2. If the connections are set up..., power up your monitor and amplifier. Note Because no sound is emitted from the monitor, you need to the respective user manuals ...
User Manual (user Manual) (ver.1.0) (English)
Page 23
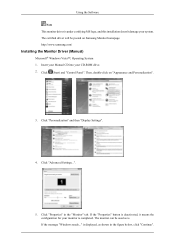
..." button is completed. If the message "Windows needs..." Then, double-click on Samsung Monitor homepage. Click "Personalization" and then "Display Settings". 4. http://www.samsung.com/ Installing the Monitor Driver (Manual) Microsoft® Windows Vista™, Operating System 1. Insert your Manual CD into your monitor is deactivated, it means the configuration for your CD-ROM drive. 2. is displayed...
..." button is completed. If the message "Windows needs..." Then, double-click on Samsung Monitor homepage. Click "Personalization" and then "Display Settings". 4. http://www.samsung.com/ Installing the Monitor Driver (Manual) Microsoft® Windows Vista™, Operating System 1. Insert your Manual CD into your monitor is deactivated, it means the configuration for your CD-ROM drive. 2. is displayed...

User Manual (user Manual) (ver.1.0) (English)
Page 30
... association with Korea Electronics & Telecommunications Research Institute (ETRI). To install the program manually, insert the CD included with the Samsung monitor into the CD-ROM Drive. MagicTune™ This system is the very solution for Samsung monitors and makes the color of the images on the "Start" menu and then...using a computer is not D:\, enter the applicable drive.) How to install the Natural Color software Insert the CD included with the Samsung monitor into the CD-ROM Drive, click the [Start] button of the program Natural Color will be executed. How to delete the ...
... association with Korea Electronics & Telecommunications Research Institute (ETRI). To install the program manually, insert the CD included with the Samsung monitor into the CD-ROM Drive. MagicTune™ This system is the very solution for Samsung monitors and makes the color of the images on the "Start" menu and then...using a computer is not D:\, enter the applicable drive.) How to install the Natural Color software Insert the CD included with the Samsung monitor into the CD-ROM Drive, click the [Start] button of the program Natural Color will be executed. How to delete the ...
User Manual (user Manual) (ver.1.0) (English)
Page 46
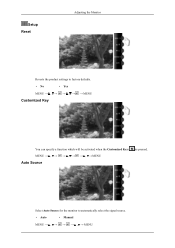
Select Auto Source for the monitor to factory defaults. • No • Yes MENU → , → Customized Key MENU You can specify a function which will be activated when the Customized Key ( MENU MENU Auto Source )is pressed. Setup Reset Adjusting the Monitor Reverts the product settings to automatically select the signal source. • Auto • Manual MENU MENU
Select Auto Source for the monitor to factory defaults. • No • Yes MENU → , → Customized Key MENU You can specify a function which will be activated when the Customized Key ( MENU MENU Auto Source )is pressed. Setup Reset Adjusting the Monitor Reverts the product settings to automatically select the signal source. • Auto • Manual MENU MENU


