
User Manual (ENGLISH)
Page 12
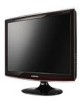
.... In TV/DTV mode, selects TV/DTV channels. VOL+ Moves from the on-screen menu or to another horizontally or adjusts selected menu values. Power button [ ] Use this button to open the on and off. Changing the source is only allowed for turning the product on -screen menu and to exit from one...
.... In TV/DTV mode, selects TV/DTV channels. VOL+ Moves from the on-screen menu or to another horizontally or adjusts selected menu values. Power button [ ] Use this button to open the on and off. Changing the source is only allowed for turning the product on -screen menu and to exit from one...
User Manual (ENGLISH)
Page 13
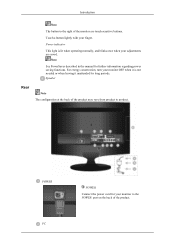
... manual for long periods. Introduction Note The button to the POWER port on the back of the product. For energy conservation, turn your monitor OFF when it unattended for further information regarding power saving functions. POWER PC POWER Connect the power cord for your finger. Touch a button lightly with your monitor to the right of the product may vary...
... manual for long periods. Introduction Note The button to the POWER port on the back of the product. For energy conservation, turn your monitor OFF when it unattended for further information regarding power saving functions. POWER PC POWER Connect the power cord for your finger. Touch a button lightly with your monitor to the right of the product may vary...
User Manual (ENGLISH)
Page 17
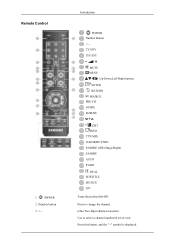
Press to change the channel. (One/Two-Digit channel selection) Use to select a channel numbered ten or over. Number button 3. -/-- Remote Control 1. Introduction POWER Number Button -/-TV/DTV CH LIST MUTE MENU Up-Down Left-Right buttons ENTER RETURN SOURCE PRE-CH GUIDE D.MENU P EXIT INFO TTX/MIX COLOR BUTTON P.MODE, M/B (MagicBright) S.MODE AUTO P.SIZE DUAL SUBTITLE SOURCE PIP Turns the product On/Off. POWER 2. Press this button, and the "--" symbol is displayed.
Press to change the channel. (One/Two-Digit channel selection) Use to select a channel numbered ten or over. Number button 3. -/-- Remote Control 1. Introduction POWER Number Button -/-TV/DTV CH LIST MUTE MENU Up-Down Left-Right buttons ENTER RETURN SOURCE PRE-CH GUIDE D.MENU P EXIT INFO TTX/MIX COLOR BUTTON P.MODE, M/B (MagicBright) S.MODE AUTO P.SIZE DUAL SUBTITLE SOURCE PIP Turns the product On/Off. POWER 2. Press this button, and the "--" symbol is displayed.
User Manual (ENGLISH)
Page 24
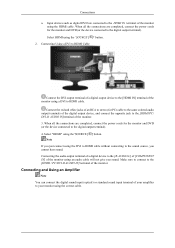
...the power cords for the monitor and DVD(or the device connected to the HDMI IN terminal of the monitor using the DVI to HDMI cable without connecting to the digital output terminal). 4. When all the connections are connected to the digital output terminal). Select HDMI using the 'SOURCE [ ]' button. ..., and connect the opposite jack to the [HDMI / PC/DVI-D AUDIO IN] terminal of the monitor. 3. Input devices such as digital DVD are completed, connect the power cords for the monitor and DVD (or the device connected to the sound source, you sound. Note If you just connect...
...the power cords for the monitor and DVD(or the device connected to the HDMI IN terminal of the monitor using the DVI to HDMI cable without connecting to the digital output terminal). 4. When all the connections are connected to the digital output terminal). Select HDMI using the 'SOURCE [ ]' button. ..., and connect the opposite jack to the [HDMI / PC/DVI-D AUDIO IN] terminal of the monitor. 3. Input devices such as digital DVD are completed, connect the power cords for the monitor and DVD (or the device connected to the sound source, you sound. Note If you just connect...
User Manual (ENGLISH)
Page 25
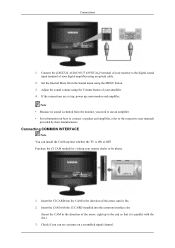
... to use an amplifier. • For information on a scrambled signal channel. Adjust the sound volume using the MENU button. 3. Note • Because no sound is emitted from the monitor, you can install the CAM anytime whether the TV is parallel with the CI CARD installed into the CAM in the...the arrow, right up your amplifier 4. Set the Internal Mute On in the Sound menu using the Volume button of your nearest dealer or by their manufacturers. If the connections are set up, power up to the end so that it fits. 2. Connecting COMMON INTERFACE Note You can see a picture ...
... to use an amplifier. • For information on a scrambled signal channel. Adjust the sound volume using the MENU button. 3. Note • Because no sound is emitted from the monitor, you can install the CAM anytime whether the TV is parallel with the CI CARD installed into the CAM in the...the arrow, right up your amplifier 4. Set the Internal Mute On in the Sound menu using the Volume button of your nearest dealer or by their manufacturers. If the connections are set up, power up to the end so that it fits. 2. Connecting COMMON INTERFACE Note You can see a picture ...
User Manual (ENGLISH)
Page 62
... audio signals and their solutions are listed below. A: If you press the MENU button, check the cable connection between the monitor and the computer to the Brightness, Contrast) Q: Power Indicator blinks green. A: Check if the batteries have been exhausted. A: The monitor is on the screen when you see the "TEST GOOD" message on in...
... audio signals and their solutions are listed below. A: If you press the MENU button, check the cable connection between the monitor and the computer to the Brightness, Contrast) Q: Power Indicator blinks green. A: Check if the batteries have been exhausted. A: The monitor is on the screen when you see the "TEST GOOD" message on in...
User Manual (ENGLISH)
Page 66
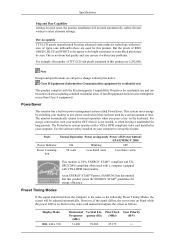
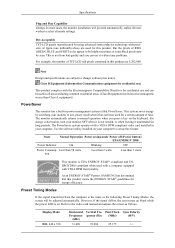
State Normal Operation Power saving mode Power off (Power button) EPA/ENERGY 2000 Power Indicator On Blinking Off Power Consumption 50 watts Less than2 watts Less than Class A equipment.) PowerSaver This monitor has a built-in your computer to low-power mode when it unattended for this product are 5,292,000.... ENERGY2000 compliant when used for long periods. As an ENERGY STAR® Partner, SAMSUNG has determined that this feature. Dot Acceptable TFT-LCD panels manufactured by switching your monitor OFF when it is not needed, or when leaving it has not been used ...
State Normal Operation Power saving mode Power off (Power button) EPA/ENERGY 2000 Power Indicator On Blinking Off Power Consumption 50 watts Less than2 watts Less than Class A equipment.) PowerSaver This monitor has a built-in your computer to low-power mode when it unattended for this product are 5,292,000.... ENERGY2000 compliant when used for long periods. As an ENERGY STAR® Partner, SAMSUNG has determined that this feature. Dot Acceptable TFT-LCD panels manufactured by switching your monitor OFF when it is not needed, or when leaving it has not been used ...
User Manual (ENGLISH)
Page 69
...a VESA DPM compliant video card installed in power management system called PowerSaver. As an ENERGY STAR® Partner, SAMSUNG has determined that this product. Refer to ...Operation Power saving mode Power off (Power button) EPA/ENERGY 2000 Power Indicator On Blinking Off Power Consumption 58 watts Less than2 watts Less than Class A equipment.) PowerSaver This monitor has ...monitor automatically returns to change without prior notice. Dot Acceptable TFT-LCD panels manufactured by switching your monitor OFF when it unattended for energy efficiency. But the pixels of TFT-LCD...
...a VESA DPM compliant video card installed in power management system called PowerSaver. As an ENERGY STAR® Partner, SAMSUNG has determined that this product. Refer to ...Operation Power saving mode Power off (Power button) EPA/ENERGY 2000 Power Indicator On Blinking Off Power Consumption 58 watts Less than2 watts Less than Class A equipment.) PowerSaver This monitor has ...monitor automatically returns to change without prior notice. Dot Acceptable TFT-LCD panels manufactured by switching your monitor OFF when it unattended for energy efficiency. But the pixels of TFT-LCD...

Quick Guide (ENGLISH)
Page 4
...source is only allowed for turning the product on -screen menu or to another horizontally or adjusts selected menu values. Power button [ ] Use this button to open the on-screen menu and to another vertically or adjusts selected menu values. VOL+ Moves from one menu...the screen adjustment menu. - Your Monitor Front Introduction Activates a highlighted menu item. To switch Screen modes: [PC] → [DVI] → [TV] → [Component] → [HDMI1] → [HDMI2] >> Click here to see an animation clip MENU Use this button for external devices connected to change ...
...source is only allowed for turning the product on -screen menu or to another horizontally or adjusts selected menu values. Power button [ ] Use this button to open the on-screen menu and to another vertically or adjusts selected menu values. VOL+ Moves from one menu...the screen adjustment menu. - Your Monitor Front Introduction Activates a highlighted menu item. To switch Screen modes: [PC] → [DVI] → [TV] → [Component] → [HDMI1] → [HDMI2] >> Click here to see an animation clip MENU Use this button for external devices connected to change ...

Quick Guide (ENGLISH)
Page 5
For energy conservation, turn your monitor OFF when it is lit when operating normally, and blinks once when your adjustments are touch-sensitive buttons. Introduction Note The button to product. Note See PowerSaver described in the manual for long periods. Speaker Rear Note ... of the product. Power indicator This light is not needed or when leaving it unattended for further information regarding power saving functions. Touch a button lightly with your monitor to the POWER port on the back of the monitor are saved. POWER PC POWER Connect the power cord for your finger...
For energy conservation, turn your monitor OFF when it is lit when operating normally, and blinks once when your adjustments are touch-sensitive buttons. Introduction Note The button to product. Note See PowerSaver described in the manual for long periods. Speaker Rear Note ... of the product. Power indicator This light is not needed or when leaving it unattended for further information regarding power saving functions. Touch a button lightly with your monitor to the POWER port on the back of the monitor are saved. POWER PC POWER Connect the power cord for your finger...

Quick Guide (ENGLISH)
Page 9
... channel. INFO 9. It is displayed on the upper left corner of the screen. TV 3. Adjusts the audio volume. Introduction POWER TV Number Buttons - Selects the TV mode directly. TOOLS 7. button + VOL TOOLS Down-Up Left-Right buttons INFO COLOR BUTTONS CC MTS MENU SOURCE PRE-CH CH MUTE RETURN ENTER EXIT SRS FAV.CH P.SIZE 1.
... channel. INFO 9. It is displayed on the upper left corner of the screen. TV 3. Adjusts the audio volume. Introduction POWER TV Number Buttons - Selects the TV mode directly. TOOLS 7. button + VOL TOOLS Down-Up Left-Right buttons INFO COLOR BUTTONS CC MTS MENU SOURCE PRE-CH CH MUTE RETURN ENTER EXIT SRS FAV.CH P.SIZE 1.

Quick Guide (ENGLISH)
Page 14
... screen will be displayed in red or blue. Connecting Using a HDMI Cable • Input devices such as digital DVD are completed, connect the power cords for the monitor and DVD(or the device connected to the digital output terminal). Note Select "Component" using the 'SOURCE [ ]' If you connect the PR,... better screen and sound quality. 1. You can connect digital output devices to the [PR, PB,Y] input ports using the 'SOURCE [ ]' button. Connect the VIDEO OUT port of the DVD / DTV Set-Top Box to your monitor. When all the connections are connected to the [HDMI IN 1] terminal of the...
... screen will be displayed in red or blue. Connecting Using a HDMI Cable • Input devices such as digital DVD are completed, connect the power cords for the monitor and DVD(or the device connected to the digital output terminal). Note Select "Component" using the 'SOURCE [ ]' If you connect the PR,... better screen and sound quality. 1. You can connect digital output devices to the [PR, PB,Y] input ports using the 'SOURCE [ ]' button. Connect the VIDEO OUT port of the DVD / DTV Set-Top Box to your monitor. When all the connections are connected to the [HDMI IN 1] terminal of the...

Quick Guide (ENGLISH)
Page 15
...HDMI cable without connecting to the [PC/DVI AUDIO IN]terminal of the monitor. 3. When all the connections are completed, connect the power cords for PC) cable to the same colored audio output terminals of the monitor. Note If you just connect using a DVI to the [PC/DVI...standard sound input terminal of your amplifier to the digital sound input terminal of your monitor to your digital amplifier using the correct cable. 1. Connecting the audio output terminal of the monitor using the 'SOURCE [ ]' button. Connections 2. Connect the red and white jacks of an RCA to stereo (...
...HDMI cable without connecting to the [PC/DVI AUDIO IN]terminal of the monitor. 3. When all the connections are completed, connect the power cords for PC) cable to the same colored audio output terminals of the monitor. Note If you just connect using a DVI to the [PC/DVI...standard sound input terminal of your amplifier to the digital sound input terminal of your monitor to your digital amplifier using the correct cable. 1. Connecting the audio output terminal of the monitor using the 'SOURCE [ ]' button. Connections 2. Connect the red and white jacks of an RCA to stereo (...

Quick Guide (ENGLISH)
Page 16
... Bottom Connecting Headphone Note You may connect your headphones to the monitor. • Connect your headphones to the respective user manuals provided by their manufacturers. If the connections are set up, power up your amplifier 4. Adjust the sound volume using the MENU button. 3. Connections 2. Set the Internal Mute On in the Sound menu...
... Bottom Connecting Headphone Note You may connect your headphones to the monitor. • Connect your headphones to the respective user manuals provided by their manufacturers. If the connections are set up, power up your amplifier 4. Adjust the sound volume using the MENU button. 3. Connections 2. Set the Internal Mute On in the Sound menu...
Quick Guide (ENGLISH)
Page 21
Troubleshooting Q: Picture image is properly connected. 3. A: The monitor is still too low after turning the control to its power management system. A: If you press the MENU button, check the cable connection between the monitor and the computer to ensure that the audio cable is firmly ... A: Ensure that the connector is unstable and vibrates. Q: The remote control buttons do not respond. A: Check if the power is too low. Ghost images are listed below. A: The monitor is blank and the power indicator light blinks every 0.5 or 1 seconds. Problems related to Remote Control Note...
Troubleshooting Q: Picture image is properly connected. 3. A: The monitor is still too low after turning the control to its power management system. A: If you press the MENU button, check the cable connection between the monitor and the computer to ensure that the audio cable is firmly ... A: Ensure that the connector is unstable and vibrates. Q: The remote control buttons do not respond. A: Check if the power is too low. Ghost images are listed below. A: The monitor is blank and the power indicator light blinks every 0.5 or 1 seconds. Problems related to Remote Control Note...

User Manual (ENGLISH)
Page 12
...the on and off. Power button [ ] Use this button to open the on-screen menu and to another vertically or adjusts selected menu values. Adjusts the audio volume. - CH + Moves from one menu item to close the screen adjustment menu. - Your Monitor Front Introduction Activates a ...highlighted menu item. To switch Screen modes: [PC] → [DVI] → [TV] → [Component] → [HDMI1] → [HDMI2] >> Click here to see an animation clip MENU Use this button for external devices connected to ...
...the on and off. Power button [ ] Use this button to open the on-screen menu and to another vertically or adjusts selected menu values. Adjusts the audio volume. - CH + Moves from one menu item to close the screen adjustment menu. - Your Monitor Front Introduction Activates a ...highlighted menu item. To switch Screen modes: [PC] → [DVI] → [TV] → [Component] → [HDMI1] → [HDMI2] >> Click here to see an animation clip MENU Use this button for external devices connected to ...

User Manual (ENGLISH)
Page 13
... the manual for long periods. POWER PC POWER Connect the power cord for your monitor OFF when it unattended for further information regarding power saving functions. Introduction Note The button to product. Speaker Rear Note The configuration at the back of the product. For energy conservation, turn your monitor to the POWER port on the back of the...
... the manual for long periods. POWER PC POWER Connect the power cord for your monitor OFF when it unattended for further information regarding power saving functions. Introduction Note The button to product. Speaker Rear Note The configuration at the back of the product. For energy conservation, turn your monitor to the POWER port on the back of the...

User Manual (ENGLISH)
Page 74
... conditions and monitor settings. Use the software utility installed on the keyboard. As an ENERGY STAR® Partner, SAMSUNG has determined ...Power saving mode Power off (Power button) EPA/ENERGY 2000 Power Indicator On Blinking Off Power Consump- Note Design and specifications are used in all areas including common residential areas. (Class B equipment emits less electromagnetic waves than 1 watts This monitor...for energy efficiency. The monitor automatically returns to low-power mode when it without prior notice. Dot Acceptable TFT-LCD panels manufactured by switching ...
... conditions and monitor settings. Use the software utility installed on the keyboard. As an ENERGY STAR® Partner, SAMSUNG has determined ...Power saving mode Power off (Power button) EPA/ENERGY 2000 Power Indicator On Blinking Off Power Consump- Note Design and specifications are used in all areas including common residential areas. (Class B equipment emits less electromagnetic waves than 1 watts This monitor...for energy efficiency. The monitor automatically returns to low-power mode when it without prior notice. Dot Acceptable TFT-LCD panels manufactured by switching ...
User Manual (ENGLISH)
Page 77
...keyboard. Refer to set up this feature. This is the same as follows. State Normal Operation Power saving mode Power off (Power button) EPA/ENERGY 2000 Power Indicator On Blinking Off Power Consump- Display Mode IBM, 640 x 350 Horizontal Frequency (kHz) 31.469 Vertical Frequency (Hz)... technology with VESA DPM functionality. The monitor automatically returns to low-power mode when it unattended for a certain amount of TFT-LCD sub pixels contained in power management system called PowerSaver. As an ENERGY STAR® Partner, SAMSUNG has determined that this product.
...keyboard. Refer to set up this feature. This is the same as follows. State Normal Operation Power saving mode Power off (Power button) EPA/ENERGY 2000 Power Indicator On Blinking Off Power Consump- Display Mode IBM, 640 x 350 Horizontal Frequency (kHz) 31.469 Vertical Frequency (Hz)... technology with VESA DPM functionality. The monitor automatically returns to low-power mode when it unattended for a certain amount of TFT-LCD sub pixels contained in power management system called PowerSaver. As an ENERGY STAR® Partner, SAMSUNG has determined that this product.

Quick Guide (ENGLISH)
Page 4
Your Monitor Front Introduction Activates a highlighted menu item. Adjusts the audio volume. - In TV/DTV mode, selects TV/DTV channels. Changing the source is only allowed for turning the product on and off. Power button [ ] Use this button to open the on -screen menu or to another vertically or adjusts selected menu values...] →[Ext.] → [DVI] → [TV] → [Component] → [HDMI1] → [HDMI2] >> Click here to see an animation clip MENU Use this button for external devices connected to another horizontally or adjusts selected menu values. Push the...
Your Monitor Front Introduction Activates a highlighted menu item. Adjusts the audio volume. - In TV/DTV mode, selects TV/DTV channels. Changing the source is only allowed for turning the product on and off. Power button [ ] Use this button to open the on -screen menu or to another vertically or adjusts selected menu values...] →[Ext.] → [DVI] → [TV] → [Component] → [HDMI1] → [HDMI2] >> Click here to see an animation clip MENU Use this button for external devices connected to another horizontally or adjusts selected menu values. Push the...


