
User Manual Ver.1.0 (English)
Page 1
Basic troubleshooting Quick reference Basic functions Playback/Editing Appendixes Extended functions Wireless network (ST150F/ST151F/ST152F only) Index Contents Shooting options Settings Please read this manual thoroughly. USER MANUAL ST150F/ST151F/ST152F/ST72/ST73 Click a topic This user manual includes detailed usage instructions for your camera.
Basic troubleshooting Quick reference Basic functions Playback/Editing Appendixes Extended functions Wireless network (ST150F/ST151F/ST152F only) Index Contents Shooting options Settings Please read this manual thoroughly. USER MANUAL ST150F/ST151F/ST152F/ST72/ST73 Click a topic This user manual includes detailed usage instructions for your camera.

User Manual Ver.1.0 (English)
Page 2
This may cause a fire or electric shock. Small parts may cause a fire or explosion. Do not expose the camera to direct sunlight or high temperatures for an extended period of small children and animals. This may cause choking or serious injury if swallowed. Do not handle your camera away from small children and pets. Do not use the flash in electric shock or damage to sunlight or extreme temperatures can cause temporary or permanent eyesight damage. If you use your camera's internal components. 1 Moving parts and accessories may result in electric shock....
This may cause a fire or electric shock. Small parts may cause a fire or explosion. Do not expose the camera to direct sunlight or high temperatures for an extended period of small children and animals. This may cause choking or serious injury if swallowed. Do not handle your camera away from small children and pets. Do not use the flash in electric shock or damage to sunlight or extreme temperatures can cause temporary or permanent eyesight damage. If you use your camera's internal components. 1 Moving parts and accessories may result in electric shock....

User Manual Ver.1.0 (English)
Page 3
... camera near the charger during a thunderstorm. Your camera can interfere with any reason to avoid potential interference, as the battery or charger, and then contact a Samsung service center. Maintain the distance between this camera and all pacemakers to suspect that restrict the use of the pacemaker or medical device for guidance...
... camera near the charger during a thunderstorm. Your camera can interfere with any reason to avoid potential interference, as the battery or charger, and then contact a Samsung service center. Maintain the distance between this camera and all pacemakers to suspect that restrict the use of the pacemaker or medical device for guidance...
User Manual Ver.1.0 (English)
Page 4
...personal injury. When you use the AC charger, turn off the camera before you can cause batteries to your camera, or cause injury. • Samsung is very hot when fired and may cause a fire or electric shock. Exercise caution when you charge batteries. Use only... Samsung-approved batteries, chargers, cables and accessories. • Using unauthorized batteries, chargers, cables or accessories can damage ports, connectors, and accessories. 3 Do not use ....
...personal injury. When you use the AC charger, turn off the camera before you can cause batteries to your camera, or cause injury. • Samsung is very hot when fired and may cause a fire or electric shock. Exercise caution when you charge batteries. Use only... Samsung-approved batteries, chargers, cables and accessories. • Using unauthorized batteries, chargers, cables or accessories can damage ports, connectors, and accessories. 3 Do not use ....
User Manual Ver.1.0 (English)
Page 5
... repaired. Use your responsibilities • Data transferred via WLAN could be damaged or erased. Do not use only Samsung-approved devices or accessories. If the glass or acrylic parts are broken, visit a Samsung Electronics Service Center to malfunction. You must plug the small end of data. Avoid contact with other electronic devices...
... repaired. Use your responsibilities • Data transferred via WLAN could be damaged or erased. Do not use only Samsung-approved devices or accessories. If the glass or acrylic parts are broken, visit a Samsung Electronics Service Center to malfunction. You must plug the small end of data. Avoid contact with other electronic devices...
User Manual Ver.1.0 (English)
Page 6
...names used in this manual are the property of their respective owners. • The user manual covers the ST150F/ST151F/ST152F (Wi-Fi support) and ST72/ST73 models. • The illustrations and explanations of ST150F/ST151F/ST152F (Wi-Fi support) are used in the user manual. • Although some ...features of ST150F/ST151F/ST152F (Wi-Fi support) and ST72/ ST73 are not allowed to configure your camera's layout, icons, and basic functions for shooting. Shooting options 57 Learn how to set the options ...
...names used in this manual are the property of their respective owners. • The user manual covers the ST150F/ST151F/ST152F (Wi-Fi support) and ST72/ST73 models. • The illustrations and explanations of ST150F/ST151F/ST152F (Wi-Fi support) are used in the user manual. • Although some ...features of ST150F/ST151F/ST152F (Wi-Fi support) and ST72/ ST73 are not allowed to configure your camera's layout, icons, and basic functions for shooting. Shooting options 57 Learn how to set the options ...
User Manual Ver.1.0 (English)
Page 7
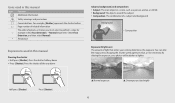
For example, [Shutter] represents the shutter button. ( ) Page number of related information The order of light that enters your photos will be darker or lighter. for → example: Select Face Detection → Normal (represents Select Face Detection, and then select Normal). * Annotation Expressions used in a scene, such as a person, animal, or still life • Background: The objects around the subject • Composition: The combination of a subject and background Background Subject Composition Exposure (Brightness) The amount of options or menus you must select to perform ...
For example, [Shutter] represents the shutter button. ( ) Page number of related information The order of light that enters your photos will be darker or lighter. for → example: Select Face Detection → Normal (represents Select Face Detection, and then select Normal). * Annotation Expressions used in a scene, such as a person, animal, or still life • Background: The objects around the subject • Composition: The combination of a subject and background Background Subject Composition Exposure (Brightness) The amount of options or menus you must select to perform ...
User Manual Ver.1.0 (English)
Page 8
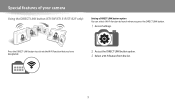
Special features of your camera Using the DIRECT LINK button (ST150F/ST151F/ST152F only) Setting a DIRECT LINK button option You can select a Wi-Fi function to activate the Wi-Fi function that you press the DIRECT LINK button. 1 Access Settings. Press the DIRECT LINK button to launch when you have designated. 2 Access the DIRECT LINK button option. 3 Select a Wi-Fi feature from the list. 7
Special features of your camera Using the DIRECT LINK button (ST150F/ST151F/ST152F only) Setting a DIRECT LINK button option You can select a Wi-Fi function to activate the Wi-Fi function that you press the DIRECT LINK button. 1 Access Settings. Press the DIRECT LINK button to launch when you have designated. 2 Access the DIRECT LINK button option. 3 Select a Wi-Fi feature from the list. 7

User Manual Ver.1.0 (English)
Page 9
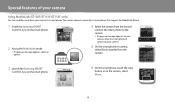
The camera connects to a smart phone wirelessly. 1 Install Samsung SMART CAMERA App on the smart phone. 4 Select the camera from the list and connect the smart phone to the camera. • If a pop-up .... Special features of your camera Using AutoShare (ST150F/ST151F/ST152F only) When you capture a photo with your camera. 2 Turn on the AutoShare feature. 3 Launch Samsung SMART CAMERA App on the smart phone. 5 Capture a photo. • The captured photo is saved to the smart phone. 8
The camera connects to a smart phone wirelessly. 1 Install Samsung SMART CAMERA App on the smart phone. 4 Select the camera from the list and connect the smart phone to the camera. • If a pop-up .... Special features of your camera Using AutoShare (ST150F/ST151F/ST152F only) When you capture a photo with your camera. 2 Turn on the AutoShare feature. 3 Launch Samsung SMART CAMERA App on the smart phone. 5 Capture a photo. • The captured photo is saved to the smart phone. 8
User Manual Ver.1.0 (English)
Page 10
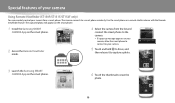
The camera connects wirelessly to smart phones that support the MobileLink feature. 1 Install the Samsung SMART CAMERA App on the smart phone. 2 Access the MobileLink mode. • If a pop-up message appears on your camera, allow the smart phone to ...connect to your camera to the camera. • If a pop-up message appears, select an option. 4 Select the camera from the camera. 3 Launch the Samsung SMART CAMERA App on the smart phone. 6 On the smart phone, touch the copy button or on the camera, select Share. 9 Special features...
The camera connects wirelessly to smart phones that support the MobileLink feature. 1 Install the Samsung SMART CAMERA App on the smart phone. 2 Access the MobileLink mode. • If a pop-up message appears on your camera, allow the smart phone to ...connect to your camera to the camera. • If a pop-up message appears, select an option. 4 Select the camera from the camera. 3 Launch the Samsung SMART CAMERA App on the smart phone. 6 On the smart phone, touch the copy button or on the camera, select Share. 9 Special features...
User Manual Ver.1.0 (English)
Page 11
Use the smart phone as a remote shutter release with the Remote Viewfinder feature. The captured photo will appear on the smart phone. 1 Install the Samsung SMART CAMERA App on the smart phone. 2 Access the Remote Viewfinder mode. 4 Select the camera from the list and connect the smart phone to the ... Viewfinder (ST150F/ST151F/ST152F only) You can remotely control your camera. 5 Touch and hold to focus, and then release it to capture a photo. 3 Launch the Samsung SMART CAMERA App on the smart phone. 6 Touch the thumbnail to a smart phone wirelessly.
Use the smart phone as a remote shutter release with the Remote Viewfinder feature. The captured photo will appear on the smart phone. 1 Install the Samsung SMART CAMERA App on the smart phone. 2 Access the Remote Viewfinder mode. 4 Select the camera from the list and connect the smart phone to the ... Viewfinder (ST150F/ST151F/ST152F only) You can remotely control your camera. 5 Touch and hold to focus, and then release it to capture a photo. 3 Launch the Samsung SMART CAMERA App on the smart phone. 6 Touch the thumbnail to a smart phone wirelessly.
User Manual Ver.1.0 (English)
Page 12
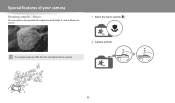
The example image may differ from the actual photo that you capture. 2 Capture a photo. 11 Special features of a subject or small subjects, such as flowers or insects. 1 Select the macro option ( ). Macro You can capture close up shots of your camera Shooting samples -
The example image may differ from the actual photo that you capture. 2 Capture a photo. 11 Special features of a subject or small subjects, such as flowers or insects. 1 Select the macro option ( ). Macro You can capture close up shots of your camera Shooting samples -
User Manual Ver.1.0 (English)
Page 13
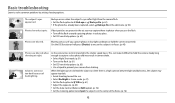
As the camera tries to solve common problems by setting shooting options. This can occur if you use the flash. • Turn off the flash or avoid capturing photos in a dusty place. • Set ISO sensitivity options. (p. 63) Photos are blurred. If dust particles are blurred when shooting at night. Basic troubleshooting Learn to let in more light, the shutter speed slows. Blurring can make it difficult to Spot if a subject is in focus. (p. 40) Photos are present in the air, you may capture them in photos when you capture photos in low light conditions or hold the camera ...
As the camera tries to solve common problems by setting shooting options. This can occur if you use the flash. • Turn off the flash or avoid capturing photos in a dusty place. • Set ISO sensitivity options. (p. 63) Photos are blurred. If dust particles are blurred when shooting at night. Basic troubleshooting Learn to let in more light, the shutter speed slows. Blurring can make it difficult to Spot if a subject is in focus. (p. 40) Photos are present in the air, you may capture them in photos when you capture photos in low light conditions or hold the camera ...
User Manual Ver.1.0 (English)
Page 14
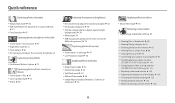
Quick reference Capturing photos of people • Beauty Shot mode 50 • Red-eye/Red-eye Fix (to prevent or correct red-eye) 61 • Face Detection 67 Capturing photos at night or in the dark • Scene mode > Sunset, Dawn 47 • Night Shot mode 51 • Flash options 61 • ISO sensitivity (to adjust the sensitivity to light) 63 Capturing action photos • Continuous, Motion Capture 73 Capturing photos of text, insects, or flowers • Scene mode > Text 47 • Close-up Shot mode ...
Quick reference Capturing photos of people • Beauty Shot mode 50 • Red-eye/Red-eye Fix (to prevent or correct red-eye) 61 • Face Detection 67 Capturing photos at night or in the dark • Scene mode > Sunset, Dawn 47 • Night Shot mode 51 • Flash options 61 • ISO sensitivity (to adjust the sensitivity to light) 63 Capturing action photos • Continuous, Motion Capture 73 Capturing photos of text, insects, or flowers • Scene mode > Text 47 • Close-up Shot mode ...
User Manual Ver.1.0 (English)
Page 15
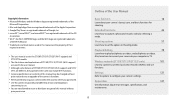
Contents Basic functions...18 Unpacking ...19 Camera layout ...20 Using the DIRECT LINK button (ST150F/ST151F/ST152F only 22 Inserting the battery and memory card 23 Charging the battery and turning on your camera 24 Charging the battery 24 Turning on your camera 24 Performing the initial setup 25 Learning icons ...27 Using the Home screen 28 Accessing the Home screen 28 Icons on the Home screen 29 Setting Wallpaper ...31 Selecting options or menus 32 Setting the display and sound 34 Setting the display type 34 Setting the sound ...35 Capturing photos ...36 Zooming ...37 Reducing ...
Contents Basic functions...18 Unpacking ...19 Camera layout ...20 Using the DIRECT LINK button (ST150F/ST151F/ST152F only 22 Inserting the battery and memory card 23 Charging the battery and turning on your camera 24 Charging the battery 24 Turning on your camera 24 Performing the initial setup 25 Learning icons ...27 Using the Home screen 28 Accessing the Home screen 28 Icons on the Home screen 29 Setting Wallpaper ...31 Selecting options or menus 32 Setting the display and sound 34 Setting the display type 34 Setting the sound ...35 Capturing photos ...36 Zooming ...37 Reducing ...

User Manual Ver.1.0 (English)
Page 16
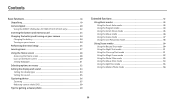
Contents Shooting options...57 Selecting a resolution and quality 58 Selecting a resolution 58 Selecting an image quality 59 Using the timer ...60 Shooting in the dark 61 Preventing red-eye 61 Using the flash ...61 Adjusting the ISO sensitivity 63 Changing the camera's focus 64 Using macro ...64 Changing the focus option 64 Adjusting the focus area 65 Using Face Detection 67 Detecting faces ...67 Capturing a smile shot 67 Detecting eye blinking 68 Tips for detecting faces 68 Adjusting brightness and color 69 Adjusting the exposure manually (EV 69 Compensating for ...
Contents Shooting options...57 Selecting a resolution and quality 58 Selecting a resolution 58 Selecting an image quality 59 Using the timer ...60 Shooting in the dark 61 Preventing red-eye 61 Using the flash ...61 Adjusting the ISO sensitivity 63 Changing the camera's focus 64 Using macro ...64 Changing the focus option 64 Adjusting the focus area 65 Using Face Detection 67 Detecting faces ...67 Capturing a smile shot 67 Detecting eye blinking 68 Tips for detecting faces 68 Adjusting brightness and color 69 Adjusting the exposure manually (EV 69 Compensating for ...

User Manual Ver.1.0 (English)
Page 17
Contents Playback/Editing...78 Viewing photos or videos in Playback mode 79 Starting Playback mode 79 Viewing photos ...84 Playing a video ...87 Editing a photo ...89 Resizing photos ...89 Rotating a photo ...89 Applying Smart Filter effects 90 Adjusting your photos 91 Viewing files on a TV 93 Transferring files to the computer 94 Transferring files to your Windows OS computer 94 Transferring files to your Mac OS computer 95 Using programs on a computer 96 Installing i-Launcher 96 Using i-Launcher ...97 Wireless network (ST150F/ST151F/ST152F only 101 Connecting to a...
Contents Playback/Editing...78 Viewing photos or videos in Playback mode 79 Starting Playback mode 79 Viewing photos ...84 Playing a video ...87 Editing a photo ...89 Resizing photos ...89 Rotating a photo ...89 Applying Smart Filter effects 90 Adjusting your photos 91 Viewing files on a TV 93 Transferring files to the computer 94 Transferring files to your Windows OS computer 94 Transferring files to your Mac OS computer 95 Using programs on a computer 96 Installing i-Launcher 96 Using i-Launcher ...97 Wireless network (ST150F/ST151F/ST152F only 101 Connecting to a...
User Manual Ver.1.0 (English)
Page 18
Contents Using photo or video sharing websites 115 Accessing a website 115 Uploading photos or videos 115 Using AllShare Play to send files 117 Uploading photos to online storage 117 Viewing photos or videos on devices that support AllShare Play 118 Sending photos using Wi-Fi Direct 120 Settings...121 Settings menu ...122 Accessing the settings menu 122 Sound ...123 Display ...123 Connectivity ...124 General ...125 Appendixes...127 Error messages ...128 Camera maintenance 129 Cleaning your camera 129 Using or storing the camera 130 About memory cards 131 About the ...
Contents Using photo or video sharing websites 115 Accessing a website 115 Uploading photos or videos 115 Using AllShare Play to send files 117 Uploading photos to online storage 117 Viewing photos or videos on devices that support AllShare Play 118 Sending photos using Wi-Fi Direct 120 Settings...121 Settings menu ...122 Accessing the settings menu 122 Sound ...123 Display ...123 Connectivity ...124 General ...125 Appendixes...127 Error messages ...128 Camera maintenance 129 Cleaning your camera 129 Using or storing the camera 130 About memory cards 131 About the ...

User Manual Ver.1.0 (English)
Page 19
Basic functions Learn about your camera 24 Performing the initial setup 25 Learning icons 27 Using the Home screen 28 Accessing the Home screen 28 Icons on the Home screen 29 Setting Wallpaper 31 Selecting options or menus 32 Setting the display and sound 34 Setting the display type 34 Setting the sound 35 Capturing photos 36 Zooming 37 Reducing camera shake (DIS 39 Tips for shooting. Unpacking 19 Camera layout 20 Using the DIRECT LINK button (ST150F/ST151F/ST152F only 22 Inserting the battery and memory card 23 Charging the battery and turning on your camera 24 ...
Basic functions Learn about your camera 24 Performing the initial setup 25 Learning icons 27 Using the Home screen 28 Accessing the Home screen 28 Icons on the Home screen 29 Setting Wallpaper 31 Selecting options or menus 32 Setting the display and sound 34 Setting the display type 34 Setting the sound 35 Capturing photos 36 Zooming 37 Reducing camera shake (DIS 39 Tips for shooting. Unpacking 19 Camera layout 20 Using the DIRECT LINK button (ST150F/ST151F/ST152F only 22 Inserting the battery and memory card 23 Charging the battery and turning on your camera 24 ...
User Manual Ver.1.0 (English)
Page 20
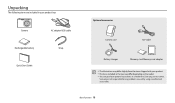
Basic functions 19 Samsung is not responsible for any problems caused by using unauthorized accessories. Camera Rechargeable battery Quick Start Guide AC adapter/USB cable Strap Optional accessories Camera case A/V cable Battery charger Memory card/Memory card adapter • The illustrations may differ slightly from the items shipped with your product box. Unpacking The following items are included in your product. • The items included in the box may differ depending on the model. • You can purchase optional accessories at a retailer or a Samsung service center.
Basic functions 19 Samsung is not responsible for any problems caused by using unauthorized accessories. Camera Rechargeable battery Quick Start Guide AC adapter/USB cable Strap Optional accessories Camera case A/V cable Battery charger Memory card/Memory card adapter • The illustrations may differ slightly from the items shipped with your product box. Unpacking The following items are included in your product. • The items included in the box may differ depending on the model. • You can purchase optional accessories at a retailer or a Samsung service center.
