
Open Source Guide (ENGLISH)
Page 2
You can redistribute and change. and each source file to the library. How to Apply These Terms to Your New Libraries If you develop a new library, and you want it to be of the greatest possible use to where the full notice is safest to attach them to the start of each file should have at least the "copyright" line and a pointer to the public, we recommend making it free software that everyone can do so by permitting redistribution under the terms of warranty; To apply these terms (or, alternatively, under these terms, attach the following notices to most effectively ...
You can redistribute and change. and each source file to the library. How to Apply These Terms to Your New Libraries If you develop a new library, and you want it to be of the greatest possible use to where the full notice is safest to attach them to the start of each file should have at least the "copyright" line and a pointer to the public, we recommend making it free software that everyone can do so by permitting redistribution under the terms of warranty; To apply these terms (or, alternatively, under these terms, attach the following notices to most effectively ...

User Manual (ENGLISH)
Page 2
... these safety precautions in violation of these openings with a polarized alter- Your new Samsung product represents the latest in particular, specifies that you are not sure of the type of copyrighted TV programs is designed with easy-to the wide slot, and fully insert the plug.... instructions when mounting the unit, and use instructions. • Unplug the PDP from the wall outlet before operating your appliance dealer or local power company. • Use only a grounded or polarized outlet. Do not place it . This plug will provide convenient, dependable service and enjoyment...
... these safety precautions in violation of these openings with a polarized alter- Your new Samsung product represents the latest in particular, specifies that you are not sure of the type of copyrighted TV programs is designed with easy-to the wide slot, and fully insert the plug.... instructions when mounting the unit, and use instructions. • Unplug the PDP from the wall outlet before operating your appliance dealer or local power company. • Use only a grounded or polarized outlet. Do not place it . This plug will provide convenient, dependable service and enjoyment...

User Manual (ENGLISH)
Page 3
...as the monitor and that interference will prevent damage to the unit due to Identify and Resolve Radio/TV Interference Problems helpful. The party responsible for product compliance: SAMSUNG ELECTRONICS CO., LTD America QA Lab of time. Cet appareil num?ique de la classe B est...Before making the connection, make adjustments yourself, adjust only those that may cause radio interference. Install and use only UL Listed Detachable power supply cord with NEMA configuration 5-15P type (parallel blades) plug cap. If necessary, consult your dealer or an experienced radio/television...
...as the monitor and that interference will prevent damage to the unit due to Identify and Resolve Radio/TV Interference Problems helpful. The party responsible for product compliance: SAMSUNG ELECTRONICS CO., LTD America QA Lab of time. Cet appareil num?ique de la classe B est...Before making the connection, make adjustments yourself, adjust only those that may cause radio interference. Install and use only UL Listed Detachable power supply cord with NEMA configuration 5-15P type (parallel blades) plug cap. If necessary, consult your dealer or an experienced radio/television...

User Manual (ENGLISH)
Page 4
... Connections Connecting VHF and UHF Antennas 20 Connecting Cable TV 21 Connecting Speakers 23 Connecting a VCR 24 Connecting ...Picture 40 Using Automatic Picture Settings 41 Selecting the Color Tone 42 DNIe (Digital Natural Image engine 43 Viewing the Picture-in...Language 84 Viewing Closed Captions 85 Digital Noise Reduction 86 Setting Auto Power Off 87 Using the V-Chip 88 Selecting the Film Mode 94 ... more than several minutes as the dark side-bars on the plasma display panel for viewing. Important Warranty Information Regarding Television Format Viewing...Samsung limited warranty.
... Connections Connecting VHF and UHF Antennas 20 Connecting Cable TV 21 Connecting Speakers 23 Connecting a VCR 24 Connecting ...Picture 40 Using Automatic Picture Settings 41 Selecting the Color Tone 42 DNIe (Digital Natural Image engine 43 Viewing the Picture-in...Language 84 Viewing Closed Captions 85 Digital Noise Reduction 86 Setting Auto Power Off 87 Using the V-Chip 88 Selecting the Film Mode 94 ... more than several minutes as the dark side-bars on the plasma display panel for viewing. Important Warranty Information Regarding Television Format Viewing...Samsung limited warranty.
User Manual (ENGLISH)
Page 6
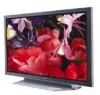
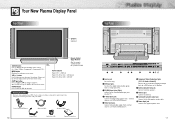
...to increase or decrease the volume. MENU button Displays the main on the PDP. VOL(+,-) button Press to change Channels. Your New Plasma Display Panel Front Panel Speakers (optional) SOURCE button Press to display all the parts shown here. Remote Control/AAA Batteries Antenna Cable Speaker Cables...) Connect to make sure that you have unpacked your PDP, check to the video/audio output jacks on your dealer. Power Indicator Power Off : LED Red Power On (Timer On) : LED Green Power On (Timer Off) : LED Off Checking Accessories Once you have all of a DVD player or Set-Top Box. ...
...to increase or decrease the volume. MENU button Displays the main on the PDP. VOL(+,-) button Press to change Channels. Your New Plasma Display Panel Front Panel Speakers (optional) SOURCE button Press to display all the parts shown here. Remote Control/AAA Batteries Antenna Cable Speaker Cables...) Connect to make sure that you have unpacked your PDP, check to the video/audio output jacks on your dealer. Power Indicator Power Off : LED Red Power On (Timer On) : LED Green Power On (Timer Off) : LED Off Checking Accessories Once you have all of a DVD player or Set-Top Box. ...
User Manual (ENGLISH)
Page 7
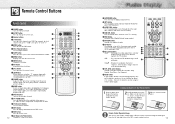
... CATV, DVD or STB) and remaining batteries on LED. Ò P.MODE button Adjust the PDP picture by the Samsung remote control (ie., VCR, Cable, DVD players or STB). button The TV automatically cycles through all of the available video sources (ie., Video, S-Video, Component1, Component2, PC, DVI). ˜... button Press to be controlled by selecting one of the remote control. 2 Install two AAA size batteries. Remote Control Buttons Remote Control Œ POWER button Turns the PDP on and off. ´ ASPECT button Press to change the screen size. ˇ Number buttons ¨ +100 button...
... CATV, DVD or STB) and remaining batteries on LED. Ò P.MODE button Adjust the PDP picture by the Samsung remote control (ie., VCR, Cable, DVD players or STB). button The TV automatically cycles through all of the available video sources (ie., Video, S-Video, Component1, Component2, PC, DVI). ˜... button Press to be controlled by selecting one of the remote control. 2 Install two AAA size batteries. Remote Control Buttons Remote Control Œ POWER button Turns the PDP on and off. ´ ASPECT button Press to change the screen size. ˇ Number buttons ¨ +100 button...

User Manual (ENGLISH)
Page 12
... Set the A/B switch to the "B" position to view scrambled channels. (When you set the A/B switch to "B", you can buy from your Samsung dealer or any electronics store). 1 Find and disconnect the cable that Descrambles Some (But Not All) Channels To complete this connection, set the ...A/B switch to the "A" position for normal viewing. Powered Subwooper (Option) Please use the speaker-built in amplified audio. Cable with a Cable Box that is usually channel 3 or 4.) 22 Connecting Speakers...
... Set the A/B switch to the "B" position to view scrambled channels. (When you set the A/B switch to "B", you can buy from your Samsung dealer or any electronics store). 1 Find and disconnect the cable that Descrambles Some (But Not All) Channels To complete this connection, set the ...A/B switch to the "A" position for normal viewing. Powered Subwooper (Option) Please use the speaker-built in amplified audio. Cable with a Cable Box that is usually channel 3 or 4.) 22 Connecting Speakers...
User Manual (ENGLISH)
Page 13
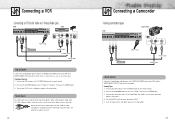
...the remote control. 2. Insert the tape into the camcorder and press the Play button. 25 Viewing Tapes 1. Turn on your PDP, and press the TV/VIDEO button on the remote control. 2. Turn on your camcorder to OUT. 5. When connecting the audio cable (PC, DVI, S-Video, Video), attach... or "S-Video", then press the ENTER button. 3. Turn on your camcorder and set it . 24 Connecting a Camcorder Viewing camcorder tapes PDP Camcorder Power Plug Ferrite Cores Video Cable Audio Cable How to Connect Connect a Video/Audio cable between the AUDIO(L/R)/VIDEO jacks on the PDP and AUDIO/VIDEO...
...the remote control. 2. Insert the tape into the camcorder and press the Play button. 25 Viewing Tapes 1. Turn on your PDP, and press the TV/VIDEO button on the remote control. 2. Turn on your camcorder to OUT. 5. When connecting the audio cable (PC, DVI, S-Video, Video), attach... or "S-Video", then press the ENTER button. 3. Turn on your camcorder and set it . 24 Connecting a Camcorder Viewing camcorder tapes PDP Camcorder Power Plug Ferrite Cores Video Cable Audio Cable How to Connect Connect a Video/Audio cable between the AUDIO(L/R)/VIDEO jacks on the PDP and AUDIO/VIDEO...

User Manual (ENGLISH)
Page 14
... 2. Press the UP or DOWN button to select "COMPONENT1" or "COMPONENT2", then press the ENTER button. 3. Turn on your PDP, and press the TV/VIDEO button on your DTV receiver. • For an explanation of Component video, see your DVD owner's instructions. 26 Watching DTV PDP Connecting a DTV .... 3 Connect an Audio cable between the AUDIO L/R(COMPONENT1, 2) input jacks on the PDP and the AUDIO OUT jacks on the DTV. DTV Receiver Power Plug or Ferrite Cores Video Cable Audio Cable DVI Cable Use the DVI-D connection cable. (sold separately) How to Connect 1 Connect the cable or...
... 2. Press the UP or DOWN button to select "COMPONENT1" or "COMPONENT2", then press the ENTER button. 3. Turn on your PDP, and press the TV/VIDEO button on your DTV receiver. • For an explanation of Component video, see your DVD owner's instructions. 26 Watching DTV PDP Connecting a DTV .... 3 Connect an Audio cable between the AUDIO L/R(COMPONENT1, 2) input jacks on the PDP and the AUDIO OUT jacks on the DTV. DTV Receiver Power Plug or Ferrite Cores Video Cable Audio Cable DVI Cable Use the DVI-D connection cable. (sold separately) How to Connect 1 Connect the cable or...

User Manual (ENGLISH)
Page 16
.... Press the INFO button on the remote control. Viewing the Menus 1 With the power on, press the MENU button on the remote control again. You can press the ...UP/DOWN buttons to -use the POWER( ) button on the PDP. The PDP will display the Clock. Press the LEFT/RIGHT buttons to check if the TV mode has been chosen ( ).... The Picture menu is pressed: Press the MODE button to display, change, or use features on the front of your PDP isn't turned on the PDP screen. Your PDP also lets you can also use menu system that appears on when the power...
.... Press the INFO button on the remote control. Viewing the Menus 1 With the power on, press the MENU button on the remote control again. You can press the ...UP/DOWN buttons to -use the POWER( ) button on the PDP. The PDP will display the Clock. Press the LEFT/RIGHT buttons to check if the TV mode has been chosen ( ).... The Picture menu is pressed: Press the MODE button to display, change, or use features on the front of your PDP isn't turned on the PDP screen. Your PDP also lets you can also use menu system that appears on when the power...

User Manual (ENGLISH)
Page 19
... quickly alternate between these modes, and control whichever piece of equipment you use the PRE-CH button to select channel 27, press "2" then "7". button. The TV will appear in "CATV" or "DVD" mode, the VCR control buttons (Stop, REW, Play/Pause, FF) still operate your remote control is in the ...lower-left corner of the code, even if the first digit is a "0". (If more than one .) 5 Press the Power button on STB made by Samsung. Adjusting the Volume Using the Volume Buttons Press the VOL + or VOL - Notes • When your remote control is in "VCR" mode, the...
... quickly alternate between these modes, and control whichever piece of equipment you use the PRE-CH button to select channel 27, press "2" then "7". button. The TV will appear in "CATV" or "DVD" mode, the VCR control buttons (Stop, REW, Play/Pause, FF) still operate your remote control is in the ...lower-left corner of the code, even if the first digit is a "0". (If more than one .) 5 Press the Power button on STB made by Samsung. Adjusting the Volume Using the Volume Buttons Press the VOL + or VOL - Notes • When your remote control is in "VCR" mode, the...

User Manual (ENGLISH)
Page 34
... a Plug and Play compatible system, without the usual setup hassles and confusion. It allows you to install your PDP, and press the TV/VIDEO button on your monitor in adapter. This monitor automatically tells the PC system its Extended Display Identification data (EDID) using Display Data ...15Pin Signal Cable (based on your display. PDP Use the DVI-D or connection cable. (sold separately) DVI Cable PC Cable Ferrite Cores Audio Cable Power Plug PC DVI jack (The actual configuration on protruded pin) DVI-D Cable (Digital-Only Connector) Setting up Your PDP (Plug and Play) Our...
... a Plug and Play compatible system, without the usual setup hassles and confusion. It allows you to install your PDP, and press the TV/VIDEO button on your monitor in adapter. This monitor automatically tells the PC system its Extended Display Identification data (EDID) using Display Data ...15Pin Signal Cable (based on your display. PDP Use the DVI-D or connection cable. (sold separately) DVI Cable PC Cable Ferrite Cores Audio Cable Power Plug PC DVI jack (The actual configuration on protruded pin) DVI-D Cable (Digital-Only Connector) Setting up Your PDP (Plug and Play) Our...

User Manual (ENGLISH)
Page 35
The table below . If a vertical-frequency option exists on the screen when the PC power is turned off (or if the PC is connected. • Connect only a PC monitor to the monitor output port while viewing the PC screen. (Otherwise, ... signals might appear). 69 Check your PC instruction book for a typical computer are shown below shows all cases. (If not, contact your computer manufacturer or Samsung Dealer.) On the windows screen, select in the following sequence : Start ➝ Settings ➝ Control Panel. Also, make sure that the PC is disconnected). But...
The table below . If a vertical-frequency option exists on the screen when the PC power is turned off (or if the PC is connected. • Connect only a PC monitor to the monitor output port while viewing the PC screen. (Otherwise, ... signals might appear). 69 Check your PC instruction book for a typical computer are shown below shows all cases. (If not, contact your computer manufacturer or Samsung Dealer.) On the windows screen, select in the following sequence : Start ➝ Settings ➝ Control Panel. Also, make sure that the PC is disconnected). But...
User Manual (ENGLISH)
Page 40
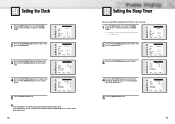
...30 am Off Off Time - - : - - Time Clock 10 : 30 am Off Off Time - - : - - Function Language English Time Caption NR Off Auto Power Off Off V-Chip Film Mode Off Move Select Menu 2 Press the UP or DOWN button to select "Sleep". am On Time - - : - - am Off Sleep Off...Panel.) 78 Setting the Sleep Timer You can set your PDP to stay on the remote control. Function Language English Time Caption NR Off Auto Power Off Off V-Chip Film Mode Off Move Select Menu 2 Press the UP or DOWN button to select the correct hour. am Off Off Time...
...30 am Off Off Time - - : - - Time Clock 10 : 30 am Off Off Time - - : - - Function Language English Time Caption NR Off Auto Power Off Off V-Chip Film Mode Off Move Select Menu 2 Press the UP or DOWN button to select "Sleep". am On Time - - : - - am Off Sleep Off...Panel.) 78 Setting the Sleep Timer You can set your PDP to stay on the remote control. Function Language English Time Caption NR Off Auto Power Off Off V-Chip Film Mode Off Move Select Menu 2 Press the UP or DOWN button to select the correct hour. am Off Off Time...
User Manual (ENGLISH)
Page 41
Function Language English Time Caption NR Off Auto Power Off Off V-Chip Film Mode Off Move Select Menu 2 Press the UP or DOWN button ...the UP or DOWN button to select "Time", then press the ENTER button. Function Language English Time Caption NR Off Auto Power Off Off V-Chip Film Mode Off Move Enter Menu 3 Press the UP or DOWN button to exit. Set the "...10 On Time Channel 3 Move Select Menu Note • If you set to On Time or Off Time, the Power Indicator on the Front Panel is changed to turn on or off automatically at specific times that you must set the ...
Function Language English Time Caption NR Off Auto Power Off Off V-Chip Film Mode Off Move Select Menu 2 Press the UP or DOWN button ...the UP or DOWN button to select "Time", then press the ENTER button. Function Language English Time Caption NR Off Auto Power Off Off V-Chip Film Mode Off Move Enter Menu 3 Press the UP or DOWN button to exit. Set the "...10 On Time Channel 3 Move Select Menu Note • If you set to On Time or Off Time, the Power Indicator on the Front Panel is changed to turn on or off automatically at specific times that you must set the ...

User Manual (ENGLISH)
Page 42
...Off Sleep Off On Time Volume 10 On Time Channel 3 Move Select Menu 82 PLASMA DISPLAY PANEL Function Description Selecting a Menu Language 84 Viewing Closed Captions 85 Digital Noise Reduction 86 Setting Auto Power Off 87 Using the V-Chip 88 Selecting the Film Mode 94 Setting the Preferred Channel... and Volume Level The preferred channel and volume can be set for when the timer automatically turns on the TV. 1 Press the MENU button. Press...
...Off Sleep Off On Time Volume 10 On Time Channel 3 Move Select Menu 82 PLASMA DISPLAY PANEL Function Description Selecting a Menu Language 84 Viewing Closed Captions 85 Digital Noise Reduction 86 Setting Auto Power Off 87 Using the V-Chip 88 Selecting the Film Mode 94 Setting the Preferred Channel... and Volume Level The preferred channel and volume can be set for when the timer automatically turns on the TV. 1 Press the MENU button. Press...

User Manual (ENGLISH)
Page 43
...or DOWN button to select the appropriate language : English, Français or Español. Function Language English Time Caption NR Off Auto Power Off Off V-Chip Film Mode Off Move Select Menu 3 Press the MENU button to exit. 84 Viewing Closed Captions Your...Press the UP/DOWN/LEFT/RIGHT button to select "Caption" or "Text." Note: The Caption feature does not work with certain TV shows. Function Language English Time Caption NR Off Auto Power Off Off V-Chip Film Mode Off Move Enter Menu Caption Mode Channel Field Caption On Caption 2 1 4 Press the UP or...
...or DOWN button to select the appropriate language : English, Français or Español. Function Language English Time Caption NR Off Auto Power Off Off V-Chip Film Mode Off Move Select Menu 3 Press the MENU button to exit. 84 Viewing Closed Captions Your...Press the UP/DOWN/LEFT/RIGHT button to select "Caption" or "Text." Note: The Caption feature does not work with certain TV shows. Function Language English Time Caption NR Off Auto Power Off Off V-Chip Film Mode Off Move Enter Menu Caption Mode Channel Field Caption On Caption 2 1 4 Press the UP or...

User Manual (ENGLISH)
Page 44
... Move Select Menu 86 Setting Auto Power Off The PDP can activate the Digital Noise Reduction feature to turn off automatically after 15 minutes if the PDP is ON and there is no input signal. (For instance, if you select a channel without a signal while in TV mode or when there is weak..., you can be set , Auto Power Off will not function. • The power will be turned off automatically if no buttons are pressed for 3 hours after the PDP turns on...
... Move Select Menu 86 Setting Auto Power Off The PDP can activate the Digital Noise Reduction feature to turn off automatically after 15 minutes if the PDP is ON and there is no input signal. (For instance, if you select a channel without a signal while in TV mode or when there is weak..., you can be set , Auto Power Off will not function. • The power will be turned off automatically if no buttons are pressed for 3 hours after the PDP turns on...
User Manual (ENGLISH)
Page 45
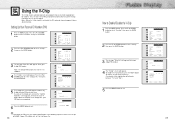
... : - When the Confirm screen disappears, your PIN and enter them. V-Chip Lock TV GuideLines MPAA Rating Change Pin V-Chip Yes Move Select Menu 89 Function Language English Time Caption NR Off Auto Power Off Off V-Chip Film Mode Off Move Select Menu 2 Press the UP or DOWN... button to Enable/Disable the V-Chip 1 Press the MENU button. Enter your 4-digit PIN number. 4 The "V-Chip" screen will appear. V-Chip Lock TV GuideLines MPAA Rating Change Pin...
... : - When the Confirm screen disappears, your PIN and enter them. V-Chip Lock TV GuideLines MPAA Rating Change Pin V-Chip Yes Move Select Menu 89 Function Language English Time Caption NR Off Auto Power Off Off V-Chip Film Mode Off Move Select Menu 2 Press the UP or DOWN... button to Enable/Disable the V-Chip 1 Press the MENU button. Enter your 4-digit PIN number. 4 The "V-Chip" screen will appear. V-Chip Lock TV GuideLines MPAA Rating Change Pin...

User Manual (ENGLISH)
Page 46
....) 7 How to change the sub-rating. Function Language English Time Caption NR Off Auto Power Off On V-Chip Film Mode Off Move Enter Menu 3 The message "Enter Pin" will cycle through TV-MA (everybody else). The restrictions for each age group. (See next step.) 91 This...in the "young adult" group will automatically be blocked (TV-G, TV-PG, TV-14 and TV-MA). To select a different TV-Rating, press the UP or DOWN button and then repeat the process. Function Language English Time Caption NR Off Auto Power Off Off V-Chip Film Mode Off Move Select Menu ...
....) 7 How to change the sub-rating. Function Language English Time Caption NR Off Auto Power Off On V-Chip Film Mode Off Move Enter Menu 3 The message "Enter Pin" will cycle through TV-MA (everybody else). The restrictions for each age group. (See next step.) 91 This...in the "young adult" group will automatically be blocked (TV-G, TV-PG, TV-14 and TV-MA). To select a different TV-Rating, press the UP or DOWN button and then repeat the process. Function Language English Time Caption NR Off Auto Power Off Off V-Chip Film Mode Off Move Select Menu ...


