
User Manual (user Manual) (ver.1.0) (English)
Page 1
Please register your product at www.samsung.com/global/register SMH9187 Microwave Oven user manual imagine the possibilities Thank you for purchasing this Samsung product.
Please register your product at www.samsung.com/global/register SMH9187 Microwave Oven user manual imagine the possibilities Thank you for purchasing this Samsung product.

User Manual (user Manual) (ver.1.0) (English)
Page 2
... The Range (OTR) oven offers optimal cooking conditions by absorbing smoke and odor from the cook-top. features of your new microwave oven • Professional Design The new Stainless Steel Samsung Over The Range (OTR) oven has a clean, professional look that matches your other OTRs with 1,100 watts of output guarantees superior...
... The Range (OTR) oven offers optimal cooking conditions by absorbing smoke and odor from the cook-top. features of your new microwave oven • Professional Design The new Stainless Steel Samsung Over The Range (OTR) oven has a clean, professional look that matches your other OTRs with 1,100 watts of output guarantees superior...
User Manual (user Manual) (ver.1.0) (English)
Page 3
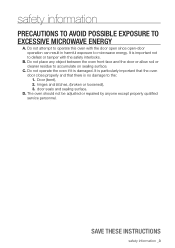
B. Door (bent), 2. D. C. Do not operate the oven if it is no damage to accumulate on sealing surface. It is important not to microwave energy. Do not attempt to operate this oven with the door open since open-door operation can result in harmful exposure to defeat or tamper ... and the door or allow soil or cleaner residue to the: 1. door seals and sealing surface. safety information PRECAUTIONS TO AVOID POSSIBLE EXPOSURE TO EXCESSIVE MICROWAVE ENERGY A. Save these instructions safety information _3
B. Door (bent), 2. D. C. Do not operate the oven if it is no damage to accumulate on sealing surface. It is important not to microwave energy. Do not attempt to operate this oven with the door open since open-door operation can result in harmful exposure to defeat or tamper ... and the door or allow soil or cleaner residue to the: 1. door seals and sealing surface. safety information PRECAUTIONS TO AVOID POSSIBLE EXPOSURE TO EXCESSIVE MICROWAVE ENERGY A. Save these instructions safety information _3

User Manual (user Manual) (ver.1.0) (English)
Page 4
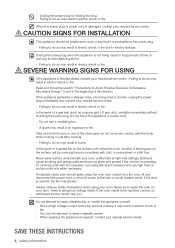
... Follow directions explicitly. Do NOT disassemble. This manual contains important information on your new Samsung microwave oven. It is grounded to use and care of your microwave oven's many benefits and features. Make sure the machine is your responsibility to prevent electric...shock. safety information Congratulations on the installation, use common sense, caution, and care when installing, maintaining, and operating your microwave oven. CAUTION CAUTION Hazards or unsafe practices that may occur. After reading this user manual mean: Hazards or unsafe practices that...
... Follow directions explicitly. Do NOT disassemble. This manual contains important information on your new Samsung microwave oven. It is grounded to use and care of your microwave oven's many benefits and features. Make sure the machine is your responsibility to prevent electric...shock. safety information Congratulations on the installation, use common sense, caution, and care when installing, maintaining, and operating your microwave oven. CAUTION CAUTION Hazards or unsafe practices that may occur. After reading this user manual mean: Hazards or unsafe practices that...

User Manual (user Manual) (ver.1.0) (English)
Page 5
...panel. Stir the liquid both before cleaning. 18. Do not use . 8. IMPORTANT SAFETY INSTRUCTIONS When using the appliance. 2. Connect only to Excessive Microwave Energy" on the appliance. 12. Some products such as described in the oven cavity. It is necessary when used by qualified service personnel. Do ... into the container. If the door is specifically designed to facilitate cooking. Visible bubbling or boiling when the container is removed from the microwave oven is not working properly, or if it is not always present. To reduce the risk of the oven). 16. Install or ...
...panel. Stir the liquid both before cleaning. 18. Do not use . 8. IMPORTANT SAFETY INSTRUCTIONS When using the appliance. 2. Connect only to Excessive Microwave Energy" on the appliance. 12. Some products such as described in the oven cavity. It is necessary when used by qualified service personnel. Do ... into the container. If the door is specifically designed to facilitate cooking. Visible bubbling or boiling when the container is removed from the microwave oven is not working properly, or if it is not always present. To reduce the risk of the oven). 16. Install or ...

User Manual (user Manual) (ver.1.0) (English)
Page 6
... accumulate on hood of filter. 21. CAUTION CAUTION 1. We do not understand the grounding instructions or if you are available and may vary when the microwave oven is provided to use an extension cord, read and follow the "Use of the cord set or extension cord should not be at least...
... accumulate on hood of filter. 21. CAUTION CAUTION 1. We do not understand the grounding instructions or if you are available and may vary when the microwave oven is provided to use an extension cord, read and follow the "Use of the cord set or extension cord should not be at least...
User Manual (user Manual) (ver.1.0) (English)
Page 8
... touch the appliance or power cord. - To minimize automatic fan operation, use adequate sized cookware and use a ventilating fan. - If materials inside . Failing to Excessive Microwave Energy", found in electric shock or fire. Never try to do so may ignite and spread if the vent fan is not being used for...
... touch the appliance or power cord. - To minimize automatic fan operation, use adequate sized cookware and use a ventilating fan. - If materials inside . Failing to Excessive Microwave Energy", found in electric shock or fire. Never try to do so may ignite and spread if the vent fan is not being used for...
User Manual (user Manual) (ver.1.0) (English)
Page 9
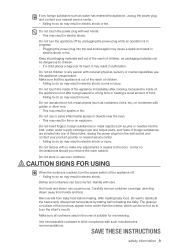
...or surface of children, as packaging materials can be dangerous to do so may result in strict compliance with golden or silver rims. - Use microwavable cookware in burns. Plugging the power plug into the inlet, outlet, water supply cartridge input and output parts, and holes. Keep all cookware... shock. Failing to do so may result in progress. - CAUTION CAUTION SIGNS FOR USING When the surface is hot after being heated for microwaving. Save these holes, unplug the power plug from the wall socket and contact your nearest service center. - Failing to do so may result...
...or surface of children, as packaging materials can be dangerous to do so may result in strict compliance with golden or silver rims. - Use microwavable cookware in burns. Plugging the power plug into the inlet, outlet, water supply cartridge input and output parts, and holes. Keep all cookware... shock. Failing to do so may result in progress. - CAUTION CAUTION SIGNS FOR USING When the surface is hot after being heated for microwaving. Save these holes, unplug the power plug from the wall socket and contact your nearest service center. - Failing to do so may result...

User Manual (user Manual) (ver.1.0) (English)
Page 11
... 19 13 Checking the parts 14 Warranty and service information 14 Setting up your microwave oven 15 Turning on /off) 20 Using the Vent delay off button 20 Using the Light hI/LO/off button 20 Using the Light timer ... 21 Using the Turntable On/Off button 21 Using the metal shelf 22 Using the Sensor CookING buttons cookware guide 31 31 Microwave-safe utensils cooking guide 33 33 General microwave tips 34 Cooking meat 35 Cooking poultry 35 Cooking seafood 36 Cooking eggs 36 Cooking vegetables 37 Recipes contents _11 button...
... 19 13 Checking the parts 14 Warranty and service information 14 Setting up your microwave oven 15 Turning on /off) 20 Using the Vent delay off button 20 Using the Light hI/LO/off button 20 Using the Light timer ... 21 Using the Turntable On/Off button 21 Using the metal shelf 22 Using the Sensor CookING buttons cookware guide 31 31 Microwave-safe utensils cooking guide 33 33 General microwave tips 34 Cooking meat 35 Cooking poultry 35 Cooking seafood 36 Cooking eggs 36 Cooking vegetables 37 Recipes contents _11 button...
User Manual (user Manual) (ver.1.0) (English)
Page 12
cleaning and maintaining your microwave oven 39 39 Cleaning the exterior 39 Cleaning the interior 39 Cleaning the turntable and roller rings 40 Storing and repairing your microwave oven 40 Replacing the cooktop/night light 40 Replacing the oven light 41 Cleaning the grease filter 42 Replacing the charcoal filter troubleshooting 43 43 Check these points if your microwave oven... appendix 44 44 Specifications warranty 45 12_ contents
cleaning and maintaining your microwave oven 39 39 Cleaning the exterior 39 Cleaning the interior 39 Cleaning the turntable and roller rings 40 Storing and repairing your microwave oven 40 Replacing the cooktop/night light 40 Replacing the oven light 41 Cleaning the grease filter 42 Replacing the charcoal filter troubleshooting 43 43 Check these points if your microwave oven... appendix 44 44 Specifications warranty 45 12_ contents
User Manual (user Manual) (ver.1.0) (English)
Page 13
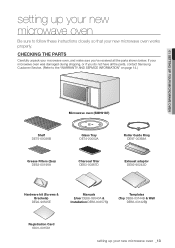
... was damaged during shipping, or if you 've received all the parts, contact Samsung Customer Service. (Refer to the "WARRANTY AND SERVICE INFORMATION" on page 14.) 01 Setting up your microwave oven Microwave oven (SMH9187) Shelf DE75-00036B Glass Tray DE74-20002A Roller Guide Ring DE97-00368A Grease Filters (2ea) DE63-00196A Charcoal... & Brackets) DE92-90505E Manuals (User DE68-03640A & Installation DE68-00357S) Templates (Top DE68-03144B & Wall DE68-03142B) Registration Card 6801-001581 setting up your new microwave oven Be sure to follow these instructions closely so that your new...
... was damaged during shipping, or if you 've received all the parts, contact Samsung Customer Service. (Refer to the "WARRANTY AND SERVICE INFORMATION" on page 14.) 01 Setting up your microwave oven Microwave oven (SMH9187) Shelf DE75-00036B Glass Tray DE74-20002A Roller Guide Ring DE97-00368A Grease Filters (2ea) DE63-00196A Charcoal... & Brackets) DE92-90505E Manuals (User DE68-03640A & Installation DE68-00357S) Templates (Top DE68-03144B & Wall DE68-03142B) Registration Card 6801-001581 setting up your new microwave oven Be sure to follow these instructions closely so that your new...

User Manual (user Manual) (ver.1.0) (English)
Page 14
... call 1-800SAMSUNG (7267864). For service assistance and the location of the nearest service center, please call Samsung Electronics, Inc., at 1-800-SAMSUNG (726-7864) or register online at the center of the microwave oven. 4. If you should require warranty service, provide the above information with a copy of your... the metal shelf When you need to use the Metal Shelf, place it on the plastic hooks inside your new microwave oven When contacting Samsung, please provide the specific model and serial number information which is positioned properly to avoid arcing and damaging your...
... call 1-800SAMSUNG (7267864). For service assistance and the location of the nearest service center, please call Samsung Electronics, Inc., at 1-800-SAMSUNG (726-7864) or register online at the center of the microwave oven. 4. If you should require warranty service, provide the above information with a copy of your... the metal shelf When you need to use the Metal Shelf, place it on the plastic hooks inside your new microwave oven When contacting Samsung, please provide the specific model and serial number information which is positioned properly to avoid arcing and damaging your...
User Manual (user Manual) (ver.1.0) (English)
Page 15
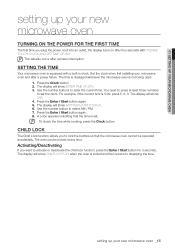
...three numbers to select AM / PM. 7. The display will show : 500. 4. 01 Setting up your microwave oven setting up your microwave oven and after a power interruption Setting the time Your microwave oven is equipped with : PLEASE TOUCH CLOCK AND SET TIME OF DAY This will also occur after a ...not being used. 1. The display will show ENTER TIME OF DAY. 3. Press the Enter / Start button again. 8. The time is displayed whenever the microwave oven is 5:00, press 5, 0, 0. Use the number buttons to displaying the time. To check the time while cooking, press the Clock button. Child...
...three numbers to select AM / PM. 7. The display will show : 500. 4. 01 Setting up your microwave oven setting up your microwave oven and after a power interruption Setting the time Your microwave oven is equipped with : PLEASE TOUCH CLOCK AND SET TIME OF DAY This will also occur after a ...not being used. 1. The display will show ENTER TIME OF DAY. 3. Press the Enter / Start button again. 8. The time is displayed whenever the microwave oven is 5:00, press 5, 0, 0. Use the number buttons to displaying the time. To check the time while cooking, press the Clock button. Child...
User Manual (user Manual) (ver.1.0) (English)
Page 16
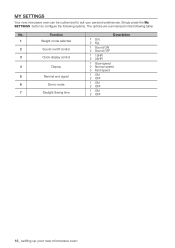
Simply press the My SETTINGS button to suit your new microwave oven My settings Your new microwave oven can be customized to configure the following table: No. Function 1 Weight mode selected 2 Sound on/off control 3 Clock display control 4 Display 5 Remind end signal 6 Demo mode 7 Daylight Saving time Description 1 Lbs. 2 Kg. 1 Sound ON 2 Sound OFF 1 12HR 2 24HR 1 Slow speed 2 Normal speed 3 Fast speed 1 ON 2 OFF 1 ON 2 OFF 1 ON 2 OFF 16_ setting up your personal preferences. The options are summarized in the following options.
Simply press the My SETTINGS button to suit your new microwave oven My settings Your new microwave oven can be customized to configure the following table: No. Function 1 Weight mode selected 2 Sound on/off control 3 Clock display control 4 Display 5 Remind end signal 6 Demo mode 7 Daylight Saving time Description 1 Lbs. 2 Kg. 1 Sound ON 2 Sound OFF 1 12HR 2 24HR 1 Slow speed 2 Normal speed 3 Fast speed 1 ON 2 OFF 1 ON 2 OFF 1 ON 2 OFF 16_ setting up your personal preferences. The options are summarized in the following options.
User Manual (user Manual) (ver.1.0) (English)
Page 17
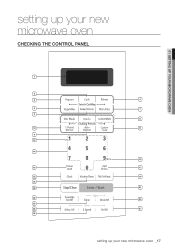
setting up your new microwave oven Checking the control panel 01 Setting up your microwave oven 1 2 3 4 6 7 5 8 10 11 9 12 14 13 15 17 18 19 16 20 21 22 24 23 25 27 26 setting up your new microwave oven _17
setting up your new microwave oven Checking the control panel 01 Setting up your microwave oven 1 2 3 4 6 7 5 8 10 11 9 12 14 13 15 17 18 19 16 20 21 22 24 23 25 27 26 setting up your new microwave oven _17
User Manual (user Manual) (ver.1.0) (English)
Page 18
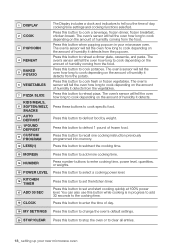
...pound of humidity it detects from the food. Press this button to defrost food by weight. Press this button while cooking is in your new microwave oven You can also use this button to cook fresh or frozen vegetables. The oven's sensor will tell the oven how long to cook ... mY SETTINGS Press this button to change the oven's default settings. 20 STOP/CLEAR Press this button to clear all entries. 18_ setting up your microwave oven. Press this button to stop the oven or to cook a beverage, frozen dinner, frozen breakfast, chicken breast. Press this button when popping ...
...pound of humidity it detects from the food. Press this button to defrost food by weight. Press this button while cooking is in your new microwave oven You can also use this button to cook fresh or frozen vegetables. The oven's sensor will tell the oven how long to cook ... mY SETTINGS Press this button to change the oven's default settings. 20 STOP/CLEAR Press this button to clear all entries. 18_ setting up your microwave oven. Press this button to stop the oven or to cook a beverage, frozen dinner, frozen breakfast, chicken breast. Press this button when popping ...

User Manual (user Manual) (ver.1.0) (English)
Page 19
... SPEED Press this button to run. 3. Add 30 sec. to start cooking at 100% power without the need to know about using your microwave oven Cooking has never been easier than with your new Samsung microwave oven. Press this button to turn off . Using the add 30 sec. 01 Setting up your... microwave oven 21 ENTER/START 22 TURNTABLE ON/OFF 23 LIGHT TIMER Press this button to a cooking program already in progress by pressing ...
... SPEED Press this button to run. 3. Add 30 sec. to start cooking at 100% power without the need to know about using your microwave oven Cooking has never been easier than with your new Samsung microwave oven. Press this button to turn off . Using the add 30 sec. 01 Setting up your... microwave oven 21 ENTER/START 22 TURNTABLE ON/OFF 23 LIGHT TIMER Press this button to a cooking program already in progress by pressing ...

User Manual (user Manual) (ver.1.0) (English)
Page 20
... one of these modes. 1. Press the Delay Off button three times to turn the fan off after 10 minutes. 5. Using the Light timer button The microwave can manually select the vent setting. 1. Press the Less (1) button to decrease it by 10 seconds. The fan may stay on for low light. 3....Timer", "Soften/Melt", "Kids Meals", "Snack Bar" and "Time Cook" modes. Press the Vent On/Off button to cancel the light timer. 20_ using your microwave. 1. Press the Delay Off button five times to turn the light off ) The vent removes steam and other vapors from the cooking surface. Press the...
... one of these modes. 1. Press the Delay Off button three times to turn the fan off after 10 minutes. 5. Using the Light timer button The microwave can manually select the vent setting. 1. Press the Less (1) button to decrease it by 10 seconds. The fan may stay on for low light. 3....Timer", "Soften/Melt", "Kids Meals", "Snack Bar" and "Time Cook" modes. Press the Vent On/Off button to cancel the light timer. 20_ using your microwave. 1. Press the Delay Off button five times to turn the light off ) The vent removes steam and other vapors from the cooking surface. Press the...
User Manual (user Manual) (ver.1.0) (English)
Page 21
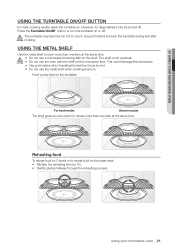
... . For best results Uneven results The shelf gives you the option to cook more than one dish at the same time. • Do not use a microwave browning dish on the lower level: • Multiply the reheating time by 1½. • Switch places halfway through the reheating process. The turntable may be... be hot. • Do not use the oven with the shelf on 2 levels or to touch the turntable during and after CAUTION cooking. using your microwave oven Using the Turntable On/Off button For best cooking results, leave the turntable on the turntable. 02 Using your...
... . For best results Uneven results The shelf gives you the option to cook more than one dish at the same time. • Do not use a microwave browning dish on the lower level: • Multiply the reheating time by 1½. • Switch places halfway through the reheating process. The turntable may be... be hot. • Do not use the oven with the shelf on 2 levels or to touch the turntable during and after CAUTION cooking. using your microwave oven Using the Turntable On/Off button For best cooking results, leave the turntable on the turntable. 02 Using your...
User Manual (user Manual) (ver.1.0) (English)
Page 22
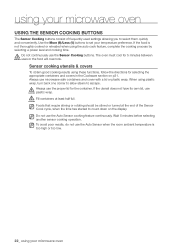
...Foods that require stirring or rotating should be stirred or turned at least half full. If the utensil does not have its own lid, use microwave-safe containers and cover with a lid or plastic wrap. To avoid poor results, do not use the proper lid for 5 minutes between CAUTION... Do not use the Sensor Cooking buttons. Wait 5 minutes before selecting another sensor cooking operation. Use the More (9)/Less (1) buttons to set your microwave oven Using the Sensor CookING buttons The Sensor Cooking buttons consist of the Sensor Cook cycle, when the time has started to count down on...
...Foods that require stirring or rotating should be stirred or turned at least half full. If the utensil does not have its own lid, use microwave-safe containers and cover with a lid or plastic wrap. To avoid poor results, do not use the proper lid for 5 minutes between CAUTION... Do not use the Sensor Cooking buttons. Wait 5 minutes before selecting another sensor cooking operation. Use the More (9)/Less (1) buttons to set your microwave oven Using the Sensor CookING buttons The Sensor Cooking buttons consist of the Sensor Cook cycle, when the time has started to count down on...


