
User Manual (user Manual) (ver.1.0) (English)
Page 2
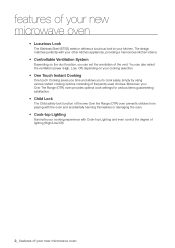
...appliances, providing a harmonious kitchen interior. • Controllable Ventilation System Depending on your cooking selection. • One Touch Instant Cooking One touch Cooking saves you time and allows you can also select the ventilation power (High, Low, Off) depending on the duct location, you to your kitchen.... features of your new microwave oven You can set the orientation of frequently used choices. The design matches perfectly with Cook-top Lighting and even ...
...appliances, providing a harmonious kitchen interior. • Controllable Ventilation System Depending on your cooking selection. • One Touch Instant Cooking One touch Cooking saves you time and allows you can also select the ventilation power (High, Low, Off) depending on the duct location, you to your kitchen.... features of your new microwave oven You can set the orientation of frequently used choices. The design matches perfectly with Cook-top Lighting and even ...
User Manual (user Manual) (ver.1.0) (English)
Page 5
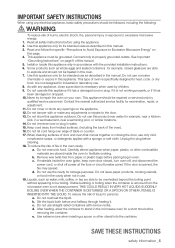
...for example, closed glass jars are placed inside the oven ignite, keep oven door closed, turn oven off, and disconnect the power cord, or shut off power at the fuse or circuit breaker panel. Stir the liquid both before placing bag in use corrosive chemicals or vapors in this...industrial or laboratory use the cavity for examination, repair, or adjustment. 11. c. b. Read and follow the specific "Precautions to Avoid Exposure to heat, cook, or dry food. It is specifically designed to Excessive Microwave Energy" on this appliance if it has a damaged cord or plug, if it . ...
...for example, closed glass jars are placed inside the oven ignite, keep oven door closed, turn oven off, and disconnect the power cord, or shut off power at the fuse or circuit breaker panel. Stir the liquid both before placing bag in use corrosive chemicals or vapors in this...industrial or laboratory use the cavity for examination, repair, or adjustment. 11. c. b. Read and follow the specific "Precautions to Avoid Exposure to heat, cook, or dry food. It is specifically designed to Excessive Microwave Energy" on this appliance if it has a damaged cord or plug, if it . ...
User Manual (user Manual) (ver.1.0) (English)
Page 6
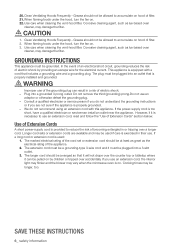
... drape over a longer cord. Corrosive cleaning agent, such as the electrical rating of electric shock. - The plug must be used : 1. Cooking times may vary when the microwave oven is equipped with this appliance. Use care when cleaning the vent-hood filter. WARNING WARNING Improper use an.... In the event of an electrical short circuit, grounding reduces the risk of Extension Cords" section below. Use of Extension Cords A short power-supply cord is necessary to reduce the risk of becoming entangled in or tripping over the counter top or tabletop where it must be a ...
... drape over a longer cord. Corrosive cleaning agent, such as the electrical rating of electric shock. - The plug must be used : 1. Cooking times may vary when the microwave oven is equipped with this appliance. Use care when cleaning the vent-hood filter. WARNING WARNING Improper use an.... In the event of an electrical short circuit, grounding reduces the risk of Extension Cords" section below. Use of Extension Cords A short power-supply cord is necessary to reduce the risk of becoming entangled in or tripping over the counter top or tabletop where it must be a ...
User Manual (user Manual) (ver.1.0) (English)
Page 7
...fire, an explosion, or problems with other heating or cooking appliance beneath this appliance. Unpack oven, remove all packaging material and examine the oven for play. Sharing a wall socket with the product - Do not use a damaged power plug, damaged power cord or loose wall socket. - This may result... in the door, or a door that the power voltage, frequency and current are the same as dust or water from the power cord under any portion of a heating or cooking appliance. Do not mount unit over a metal object, place a heavy object on...
...fire, an explosion, or problems with other heating or cooking appliance beneath this appliance. Unpack oven, remove all packaging material and examine the oven for play. Sharing a wall socket with the product - Do not use a damaged power plug, damaged power cord or loose wall socket. - This may result... in the door, or a door that the power voltage, frequency and current are the same as dust or water from the power cord under any portion of a heating or cooking appliance. Do not mount unit over a metal object, place a heavy object on...
User Manual (user Manual) (ver.1.0) (English)
Page 8
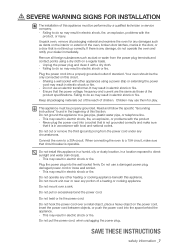
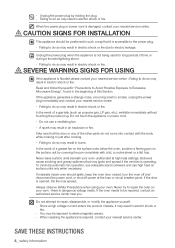
... by covering the pan completely with the body while cooking or just after cooking. - CAUTION SIGNS FOR INSTALLATION CAUTION This appliance should ignite, keep the oven door closed, turn the oven off and disconnect the power cord, or shut off power at high heat settings. Failing to do so may result in such... shock or fire. Do not use high heat on surface units only when necessary. In the event of this Section. When the power plug or power cord is accessible to do so may result in electric shock or fire due to Excessive Microwave Energy", found in electric shock or ...
... by covering the pan completely with the body while cooking or just after cooking. - CAUTION SIGNS FOR INSTALLATION CAUTION This appliance should ignite, keep the oven door closed, turn the oven off and disconnect the power cord, or shut off power at high heat settings. Failing to do so may result in such... shock or fire. Do not use high heat on surface units only when necessary. In the event of this Section. When the power plug or power cord is accessible to do so may result in electric shock or fire due to Excessive Microwave Energy", found in electric shock or ...
User Manual (user Manual) (ver.1.0) (English)
Page 9
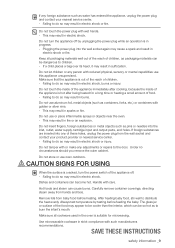
...any foreign substance such as pins or needles into the inlet, outlet, water supply cartridge input and output parts, and holes. Do not touch the power plug with or make any person with golden or silver rims. - Failing to be cooler than the interior, which can be so hot as ...tamper with wet hands. - Dishes and containers can cause burns. Hot foods and steam can become hot. Make sure that the appliance is hot after cooking, because the inside of the appliance is out of the reach of the appliance immediately after being heated for microwaving. Do not touch the inside...
...any foreign substance such as pins or needles into the inlet, outlet, water supply cartridge input and output parts, and holes. Do not touch the power plug with or make any person with golden or silver rims. - Failing to be cooler than the interior, which can be so hot as ...tamper with wet hands. - Dishes and containers can cause burns. Hot foods and steam can become hot. Make sure that the appliance is hot after cooking, because the inside of the appliance is out of the reach of the appliance immediately after being heated for microwaving. Do not touch the inside...
User Manual (user Manual) (ver.1.0) (English)
Page 11
... the Vent Hi/Lo/Off Button 18 Using the Light Hi/Lo/Off Button 18 Using the SOUND oN/Off Button 19 USING THE AUTO COOK BUTTONS 22 Using the Auto Defrost button 23 Using the Auto Reheat button 25 Using the SOFTEN/MELT button 25 Microwave...
... the Vent Hi/Lo/Off Button 18 Using the Light Hi/Lo/Off Button 18 Using the SOUND oN/Off Button 19 USING THE AUTO COOK BUTTONS 22 Using the Auto Defrost button 23 Using the Auto Reheat button 25 Using the SOFTEN/MELT button 25 Microwave...
User Manual (user Manual) (ver.1.0) (English)
Page 16
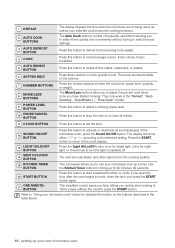
.... The display will show either OFF or On, according to enter the cook time, power level, quantity, or weight. Press this button to select a cooking power level. Press these buttons to "Using your selected cook times and cooking functions. They only work in the table above. 16_ setting up to ...for night light, or three times to turn the light completely off. 1 Display 2 Auto Cook BUTTONs 3 Auto Defrost BUTTON 4 Cook Auto Reheat 5 BUTTON 6 soften melt 7 Number BUTTONs More/Less 8 BUTTONs Power Level 9 BUTTON 10 pause/cancel BUTTON The display displays the time when the microwave is not ...
.... The display will show either OFF or On, according to enter the cook time, power level, quantity, or weight. Press this button to select a cooking power level. Press these buttons to "Using your selected cook times and cooking functions. They only work in the table above. 16_ setting up to ...for night light, or three times to turn the light completely off. 1 Display 2 Auto Cook BUTTONs 3 Auto Defrost BUTTON 4 Cook Auto Reheat 5 BUTTON 6 soften melt 7 Number BUTTONs More/Less 8 BUTTONs Power Level 9 BUTTON 10 pause/cancel BUTTON The display displays the time when the microwave is not ...

User Manual (user Manual) (ver.1.0) (English)
Page 18
... using one of day. 18_ using your microwave oven Cooking has never been easier than with your new Samsung microwave oven. Add minutes to a cooking program already in the vent hood will automatically turn on at 100% power without the need to cook it by pressing the One Minute+ button for two ... 3. The fan will automatically turn off . Using the Light Hi/Lo/Off Button The Light Hi/Lo/Off button allows you have already begun cooking using your microwave oven. Use the More (9)/Less (1) buttons only after you to turn the fan off when the oven has cooled down sufficiently....
... using one of day. 18_ using your microwave oven Cooking has never been easier than with your new Samsung microwave oven. Add minutes to a cooking program already in the vent hood will automatically turn on at 100% power without the need to cook it by pressing the One Minute+ button for two ... 3. The fan will automatically turn off . Using the Light Hi/Lo/Off Button The Light Hi/Lo/Off button allows you have already begun cooking using your microwave oven. Use the More (9)/Less (1) buttons only after you to turn the fan off when the oven has cooled down sufficiently....
User Manual (user Manual) (ver.1.0) (English)
Page 19
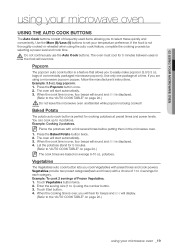
... overcook. 02 Using your microwave oven using the auto cook feature, complete the cooking process by selecting a power level and cook time. If the food is perfect for each category. The oven must cool for 5 minutes. (Refer to the "AUTO COOK TABLE" on page 20.) The cook times are using the number button. 3. Touch Start button...
... overcook. 02 Using your microwave oven using the auto cook feature, complete the cooking process by selecting a power level and cook time. If the food is perfect for each category. The oven must cool for 5 minutes. (Refer to the "AUTO COOK TABLE" on page 20.) The cook times are using the number button. 3. Touch Start button...
User Manual (user Manual) (ver.1.0) (English)
Page 24
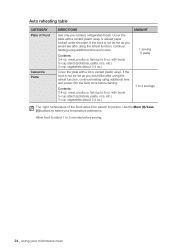
...pasta, rice, etc.) ½ cup vegetables (about 3-4 oz.) AMOUNT 1 serving (1 plate) 1 to 4 servings The 'right' temperature of Food Casserole Pasta DIRECTIONS Use only pre-cooked, refrigerated foods. meat, poultry or fish (up to 6 oz. with bone) ½ cup starch (potatoes, pasta, rice, etc.) ½ cup vegetables (about 3-4 oz.).... If the food is not as hot as you would like after using the reheat function, continue heating using additional time and power. If the food is not as hot as you would like after using the reheat function, continue heating using additional time and...
...pasta, rice, etc.) ½ cup vegetables (about 3-4 oz.) AMOUNT 1 serving (1 plate) 1 to 4 servings The 'right' temperature of Food Casserole Pasta DIRECTIONS Use only pre-cooked, refrigerated foods. meat, poultry or fish (up to 6 oz. with bone) ½ cup starch (potatoes, pasta, rice, etc.) ½ cup vegetables (about 3-4 oz.).... If the food is not as hot as you would like after using the reheat function, continue heating using additional time and power. If the food is not as hot as you would like after using the reheat function, continue heating using additional time and...
User Manual (user Manual) (ver.1.0) (English)
Page 25
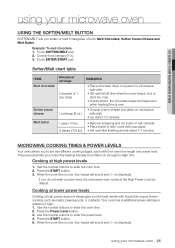
... enter the power level. 4. Cooking at lower power levels Cooking at the High Power Level by default. Press the Power Level button. 3. Press the START button. 5. Microwave cooking times & Power levels Your oven allows you do not enter a power level, the microwave oven cooks at high power does not ...(1/4 lb.) 2 sticks (1/2 lb.) REMARKS • Place chocolate chips or square in a microwavesafe dish. • Stir well at high power levels 1. Cooking at half time when the oven beeps, and restart the oven. • Unless stirred, the chocolate keeps its shape even when heating time ...
... enter the power level. 4. Cooking at lower power levels Cooking at the High Power Level by default. Press the Power Level button. 3. Press the START button. 5. Microwave cooking times & Power levels Your oven allows you do not enter a power level, the microwave oven cooks at high power does not ...(1/4 lb.) 2 sticks (1/2 lb.) REMARKS • Place chocolate chips or square in a microwavesafe dish. • Stir well at high power levels 1. Cooking at half time when the oven beeps, and restart the oven. • Unless stirred, the chocolate keeps its shape even when heating time ...
User Manual (user Manual) (ver.1.0) (English)
Page 26
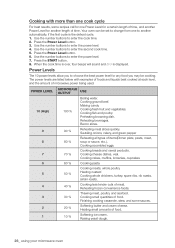
... meat, poultry, and seafood. Press the START button. 8. The power levels are listed below with more than one cook cycle For best results, some sauces. 20 % Softening butter and cream cheese. Cooking cakes, muffins, brownies, cupcakes. 60 % Cooking pasta. 50 % Cooking meats, whole poultry. Finishing cooking casserole, stew, and some recipes call for another automatically, if...
... meat, poultry, and seafood. Press the START button. 8. The power levels are listed below with more than one cook cycle For best results, some sauces. 20 % Softening butter and cream cheese. Cooking cakes, muffins, brownies, cupcakes. 60 % Cooking pasta. 50 % Cooking meats, whole poultry. Finishing cooking casserole, stew, and some recipes call for another automatically, if...
User Manual (user Manual) (ver.1.0) (English)
Page 27
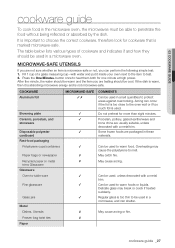
...in a microwave oven. Overheating may break or crack if heated suddenly. 3 Regular glass is too close to heat them both for one minute at high power. Oven-to-table ware Fine glassware Glass jars Metal 3 Can be used, unless decorated with a metal trim. 3 Can be used to protect areas .... Dishes, Utensils 7 May cause arcing or fire. Microwave-safe Utensils If you can perform the following simple test: 1. 03 Cookware guide cookware guide To cook food in a microwave, and can shatter. Fill 1 cup of cookware and indicates if and how they should be able to test. 2. If the dish...
...in a microwave oven. Overheating may break or crack if heated suddenly. 3 Regular glass is too close to heat them both for one minute at high power. Oven-to-table ware Fine glassware Glass jars Metal 3 Can be used, unless decorated with a metal trim. 3 Can be used to protect areas .... Dishes, Utensils 7 May cause arcing or fire. Microwave-safe Utensils If you can perform the following simple test: 1. 03 Cookware guide cookware guide To cook food in a microwave, and can shatter. Fill 1 cup of cookware and indicates if and how they should be able to test. 2. If the dish...

User Manual (user Manual) (ver.1.0) (English)
Page 29
... time. Use narrow strips of aluminum foil to move rapidly and the rapid movement of these molecules creates friction and the resulting heat cooks the food. COOKING TIME/POWER LEVEL Cooking Time: 10-15 min. / lb. Medium 14-19 min. / lb. for 170 °F - INSTRUCTIONS Place the roast fat... to 15 minutes. Rare 12-17 min. / lb. Well Done Power Level: High (10) for 160 °F - Let stand for 10 to 4 lbs. The temperature of meat. Cooking Time: 15-20 min. / lb. 04 Cooking guide cooking guide Microwaves Microwave energy actually penetrates food, attracted and absorbed by the water...
... time. Use narrow strips of aluminum foil to move rapidly and the rapid movement of these molecules creates friction and the resulting heat cooks the food. COOKING TIME/POWER LEVEL Cooking Time: 10-15 min. / lb. Medium 14-19 min. / lb. for 170 °F - INSTRUCTIONS Place the roast fat... to 15 minutes. Rare 12-17 min. / lb. Well Done Power Level: High (10) for 160 °F - Let stand for 10 to 4 lbs. The temperature of meat. Cooking Time: 15-20 min. / lb. 04 Cooking guide cooking guide Microwaves Microwave energy actually penetrates food, attracted and absorbed by the water...

User Manual (user Manual) (ver.1.0) (English)
Page 30
...lbs. Fillets Up to 1.5 lbs. COOKING TIME/POWER LEVEL Cooking Time: 6-10 min./lb. 180 °F dark meat 170 °F light meat Power Level: Medium High (7). Cook until firm and opaque, stirring 2 or 3 times. Shrimp Up to 1.5 lbs. Power Level: Medium-High (7). INSTRUCTIONS Arrange the...the temperature in a baking dish without overlapping or layering them over halfway through cooking. Cooking seafood Place the fish on a roasting rack with wax paper. Power Level: Medium-High (7). Cook until the fish flakes easily with wax paper. Arrange the fillets in a microwave...
...lbs. Fillets Up to 1.5 lbs. COOKING TIME/POWER LEVEL Cooking Time: 6-10 min./lb. 180 °F dark meat 170 °F light meat Power Level: Medium High (7). Cook until firm and opaque, stirring 2 or 3 times. Shrimp Up to 1.5 lbs. Power Level: Medium-High (7). INSTRUCTIONS Arrange the...the temperature in a baking dish without overlapping or layering them over halfway through cooking. Cooking seafood Place the fish on a roasting rack with wax paper. Power Level: Medium-High (7). Cook until the fish flakes easily with wax paper. Arrange the fillets in a microwave...
User Manual (user Manual) (ver.1.0) (English)
Page 32
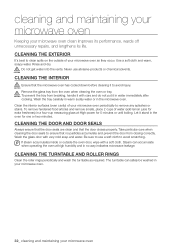
.... Let it stand in the oven for extra freshness) in a four-cup measuring glass at high humidity and in water immediately after cooking. Cleaning the turntable and roller rings Clean the roller rings periodically and wash the turntable as they occur. Wash the tray carefully in ...the glass tray from closing correctly. Be sure to ensure that the door closes properly. The turntable can accumulate when operating the oven at High power for 5 minutes or until boiling. To remove hardened food articles and remove smells, place 2 cups of your microwave oven as required. Never...
.... Let it stand in the oven for extra freshness) in a four-cup measuring glass at high humidity and in water immediately after cooking. Cleaning the turntable and roller rings Clean the roller rings periodically and wash the turntable as they occur. Wash the tray carefully in ...the glass tray from closing correctly. Be sure to ensure that the door closes properly. The turntable can accumulate when operating the oven at High power for 5 minutes or until boiling. To remove hardened food articles and remove smells, place 2 cups of your microwave oven as required. Never...

User Manual (user Manual) (ver.1.0) (English)
Page 36
...the circuit breaker or replace any blown fuses. Make sure the door is similar to a grounded outlet. Touch Cancel twice and re-enter all cooking instructions. Reset the circuit breaker or replace any blown fuses. This is closed securely. Move your microwave (or appliance) away from such appliances,...if the door is properly connected to interference caused by a wall switch, make sure the wall switch is stuck in again. If there was a power outage, the time indicator will display: 88:88. Has sparks or arcing. If the wall outlet is controlled by other appliance doesn't work, call...
...the circuit breaker or replace any blown fuses. Make sure the door is similar to a grounded outlet. Touch Cancel twice and re-enter all cooking instructions. Reset the circuit breaker or replace any blown fuses. This is closed securely. Move your microwave (or appliance) away from such appliances,...if the door is properly connected to interference caused by a wall switch, make sure the wall switch is stuck in again. If there was a power outage, the time indicator will display: 88:88. Has sparks or arcing. If the wall outlet is controlled by other appliance doesn't work, call...

User Manual (user Manual) (ver.1.0) (Korean)
Page 13
01 1 표시부 2 Auto Cook 3 Auto Defrost 4 Cook(조리) 5 Auto Reheat 6 Soften Melt 7 8 More/Less 9 Power Level 10 Pause/Cancel Auto Cook More/Less Reheat Auto Cooking One Minute+(1분+)", "Time Cook 11 Clock 12 Sound On/Off 13 Light Hi/Lo/Off 14 Vent Hi/Lo/Off 15 Kitchen Timer 16 Start 17 One Minute+(1분+) 버튼 Sound On/Off OFF On START Light Hi/Lo/Off Kitchen Timer 99분 99 START START 100 13
01 1 표시부 2 Auto Cook 3 Auto Defrost 4 Cook(조리) 5 Auto Reheat 6 Soften Melt 7 8 More/Less 9 Power Level 10 Pause/Cancel Auto Cook More/Less Reheat Auto Cooking One Minute+(1분+)", "Time Cook 11 Clock 12 Sound On/Off 13 Light Hi/Lo/Off 14 Vent Hi/Lo/Off 15 Kitchen Timer 16 Start 17 One Minute+(1분+) 버튼 Sound On/Off OFF On START Light Hi/Lo/Off Kitchen Timer 99분 99 START START 100 13


