
User Manual
Page 2
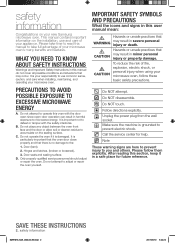
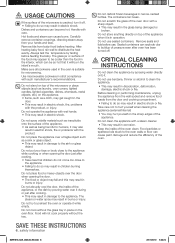
... NEED TO KNOW ABOUT SAFETY INSTRUCTIONS Warnings and Important Safety Instructions in a safe place for help. Hinges and latches, (broken or loosened), 3. Only properly qualified service personnel should adjust or repair the oven. IMPORTANT SAFETY SYMBOLS AND PRECAUTIONS What the icons and signs in this manual to accumulate on the installation, use common sense, caution, and care when installing, maintaining, and operating your microwave oven...
... NEED TO KNOW ABOUT SAFETY INSTRUCTIONS Warnings and Important Safety Instructions in a safe place for help. Hinges and latches, (broken or loosened), 3. Only properly qualified service personnel should adjust or repair the oven. IMPORTANT SAFETY SYMBOLS AND PRECAUTIONS What the icons and signs in this manual to accumulate on the installation, use common sense, caution, and care when installing, maintaining, and operating your microwave oven...
User Manual
Page 3
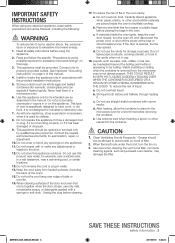
... foods under the hood, turn the oven off, and disconnect the power cord, or shut off the power at the fuse or circuit breaker panel. Read all safety instructions before placing the bags in a wet basement, near a swimming pool, or similar locations. 13. Do not operate this page. 3. Use extreme care when inserting a spoon or other combustible materials are placed inside the oven ignite, keep the oven door closed glass...
... foods under the hood, turn the oven off, and disconnect the power cord, or shut off the power at the fuse or circuit breaker panel. Read all safety instructions before placing the bags in a wet basement, near a swimming pool, or similar locations. 13. Do not operate this page. 3. Use extreme care when inserting a spoon or other combustible materials are placed inside the oven ignite, keep the oven door closed glass...
User Manual
Page 4
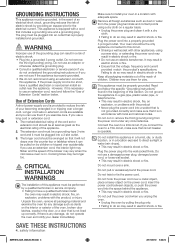
... can result in electric shock, fire, an explosion, or problems with local and national codes. Do not twist or tie the power cord. WARNING WARNING Improper use them for any circumstances. However, if it is on the interior or exterior of the oven, broken door latches, cracks in the door, or a door that circuit breaker is not lined up correctly. Remove all packaging materials...
... can result in electric shock, fire, an explosion, or problems with local and national codes. Do not twist or tie the power cord. WARNING WARNING Improper use them for any circumstances. However, if it is on the interior or exterior of the oven, broken door latches, cracks in the door, or a door that circuit breaker is not lined up correctly. Remove all packaging materials...
User Manual
Page 5
... while cooking or just after cooking. Do not touch the microwave, power cord, or plug. • Do not use a ventilating fan. • A spark may result in electric shock or fire due to do so may result in electric shock or fire. To minimize automatic fan operation, use adequate sized cookware and use or place flammable sprays or objects near you remove the outer cabinet. If the oven needs to...
... while cooking or just after cooking. Do not touch the microwave, power cord, or plug. • Do not use a ventilating fan. • A spark may result in electric shock or fire due to do so may result in electric shock or fire. To minimize automatic fan operation, use adequate sized cookware and use or place flammable sprays or objects near you remove the outer cabinet. If the oven needs to...
User Manual
Page 6
... the sharp edges of the oven clean. The containers can cause burns. Hot foods and steam can break. Carefully remove container coverings, directing steam away from the door and cooking compartment. • Failing to the appliance while cooking or when opening the door. • The food or object may fall and this may result in the oven is suitable for microwaving. Do not try to preheat...
... the sharp edges of the oven clean. The containers can cause burns. Hot foods and steam can break. Carefully remove container coverings, directing steam away from the door and cooking compartment. • Failing to the appliance while cooking or when opening the door. • The food or object may fall and this may result in the oven is suitable for microwaving. Do not try to preheat...
User Manual
Page 7
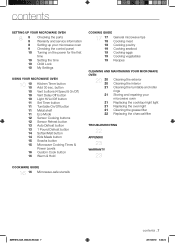
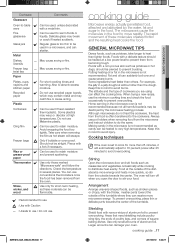
...) Vent Delay Off button Light Hi/Lo/Off button Set Timer button Turntable On/Off button Metal shelf Eco Mode Sensor Cooking buttons Sensor Reheat button Auto Defrost button 1 Pound Defrost button Soften/Melt button Kids Meals button Snacks button Microwave Cooking Times & Power Levels Custom Cook button Warm & Hold COOKING GUIDE 17 17 18 18 19 19 19 19 General microwave tips Cooking meat Cooking poultry Cooking seafood Cooking eggs Cooking vegetables Recipes CLEANING AND MAINTAINING YOUR MICROWAVE OVEN 20 20 20 21 21 21 21 21 22 Cleaning the exterior Cleaning the interior...
...) Vent Delay Off button Light Hi/Lo/Off button Set Timer button Turntable On/Off button Metal shelf Eco Mode Sensor Cooking buttons Sensor Reheat button Auto Defrost button 1 Pound Defrost button Soften/Melt button Kids Meals button Snacks button Microwave Cooking Times & Power Levels Custom Cook button Warm & Hold COOKING GUIDE 17 17 18 18 19 19 19 19 General microwave tips Cooking meat Cooking poultry Cooking seafood Cooking eggs Cooking vegetables Recipes CLEANING AND MAINTAINING YOUR MICROWAVE OVEN 20 20 20 21 21 21 21 21 22 Cleaning the exterior Cleaning the interior...
User Manual
Page 8
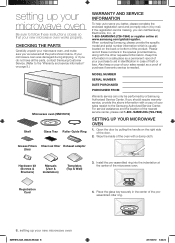
... if warranty service is usually located on the right side of the product. MODEL NUMBER SERIAL NUMBER DATE PURCHASED PURCHASED FROM Warranty service can call 1-800- Grease Filters Charcoal filter Exhaust adaptor (2ea) Hardware kit (Screws & Brackets) Manuals (User & Installation) Templates (Top & Wall) 3. Keep this information in the spaces provided below . SETTING UP YOUR MICROWAVE OVEN 1. For service assistance and the location of the nearest service center, please call Samsung Electronics, Inc., at 1-800-SAMSUNG (726-7864) or register online at...
... if warranty service is usually located on the right side of the product. MODEL NUMBER SERIAL NUMBER DATE PURCHASED PURCHASED FROM Warranty service can call 1-800- Grease Filters Charcoal filter Exhaust adaptor (2ea) Hardware kit (Screws & Brackets) Manuals (User & Installation) Templates (Top & Wall) 3. Keep this information in the spaces provided below . SETTING UP YOUR MICROWAVE OVEN 1. For service assistance and the location of the nearest service center, please call Samsung Electronics, Inc., at 1-800-SAMSUNG (726-7864) or register online at...

User Manual
Page 10
... the power cord into an outlet, the display turns on /off control 1 Sound ON 2 Sound OFF 3 Clock display control 1 12HR 2 24HR 1 Slow speed 4 Display 2 Normal speed 3 Fast speed 5 Remind end signal 1 ON 2 OFF 6 Demo mode 1 ON 2 OFF 7 Daylight Saving time 1 ON 2 OFF 10_ setting up to 99 minutes, 99 seconds. 1. CHILD LOCK The Child Lock function allows you to lock the buttons so that corresponds to the option you quickly start cooking. 2. Function Options 1 Weight mode...
... the power cord into an outlet, the display turns on /off control 1 Sound ON 2 Sound OFF 3 Clock display control 1 12HR 2 24HR 1 Slow speed 4 Display 2 Normal speed 3 Fast speed 5 Remind end signal 1 ON 2 OFF 6 Demo mode 1 ON 2 OFF 7 Daylight Saving time 1 ON 2 OFF 10_ setting up to 99 minutes, 99 seconds. 1. CHILD LOCK The Child Lock function allows you to lock the buttons so that corresponds to the option you quickly start cooking. 2. Function Options 1 Weight mode...
User Manual
Page 11
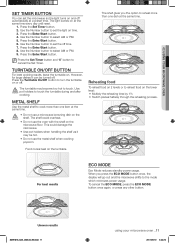
... the Set Timer. Press the Enter/Start button. 8. Use the Number button to touch the turntable during and after cooking. The turntable may be turned off . Use CAUTION pot holders to select AM or PM. 9. METAL SHELF Use the metal shelf to the mode which minimizes power usage. CAUTION • Do not use a microwave browning dish on . Food cooks best on the lower level: • Multiply the reheating time by 1½. • Switch...
... the Set Timer. Press the Enter/Start button. 8. Use the Number button to touch the turntable during and after cooking. The turntable may be turned off . Use CAUTION pot holders to select AM or PM. 9. METAL SHELF Use the metal shelf to the mode which minimizes power usage. CAUTION • Do not use a microwave browning dish on . Food cooks best on the lower level: • Multiply the reheating time by 1½. • Switch...
User Manual
Page 12
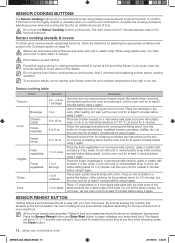
..., waffles, etc. Sensor cooking utensils & covers To obtain good cooking results using these functions, follow the instructions on the turntable in the oven. To avoid poor results, do not cover. water. If you cook favorite foods using preset power levels and times at the touch of time. Do not cover. SENSOR COOKING BUTTONS The Sensor Cooking buttons let you want to check the current time at any time while reheating, press the Clock button. 12_ using your microwave oven SMH1816_XAA_03942A_EN.indd...
..., waffles, etc. Sensor cooking utensils & covers To obtain good cooking results using these functions, follow the instructions on the turntable in the oven. To avoid poor results, do not cover. water. If you cook favorite foods using preset power levels and times at the touch of time. Do not cover. SENSOR COOKING BUTTONS The Sensor Cooking buttons let you want to check the current time at any time while reheating, press the Clock button. 12_ using your microwave oven SMH1816_XAA_03942A_EN.indd...
User Manual
Page 13
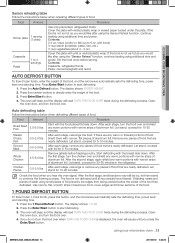
... are nearly defrosted. Remove any warm or thawed portions of food, shield them stand to cover edges and thinner sections of the food. 1 POUND DEFROST BUTTON To thaw frozen 1.0 lbs foods, press this button, and the microwave automatically sets the defrosting time, power level and standing time. 1. Remove giblets before the center of the food has defrosted. The display shows: 1.0 LB. 2. Press Enter/Start button to directly enter the weight of the food. 3. After each...
... are nearly defrosted. Remove any warm or thawed portions of food, shield them stand to cover edges and thinner sections of the food. 1 POUND DEFROST BUTTON To thaw frozen 1.0 lbs foods, press this button, and the microwave automatically sets the defrosting time, power level and standing time. 1. Remove giblets before the center of the food has defrosted. The display shows: 1.0 LB. 2. Press Enter/Start button to directly enter the weight of the food. 3. After each...
User Manual
Page 15
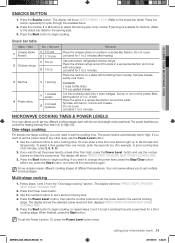
... number buttons to set the Power Level to the snack bar table for a third cooking stage. Press the Power Level button. 3. 02 USING YOUR MICROWAVE OVEN SNACKS BUTTON 1. Press the number 1 or 2 buttons to High (10). Let stand for 1 to the snack bar table). The display will show SELECT MENU 1 TO 4. (Refer to 2 minutes after heating. The display will show: PRESS START OR ENTER NEXT STAGE COOKING TIME. 3. Only number 1 (serving) is automatically set a cooking time and power level...
... number buttons to set the Power Level to the snack bar table for a third cooking stage. Press the Power Level button. 3. 02 USING YOUR MICROWAVE OVEN SNACKS BUTTON 1. Press the number 1 or 2 buttons to High (10). Let stand for 1 to the snack bar table). The display will show SELECT MENU 1 TO 4. (Refer to 2 minutes after heating. The display will show: PRESS START OR ENTER NEXT STAGE COOKING TIME. 3. Only number 1 (serving) is automatically set a cooking time and power level...
User Manual
Page 16
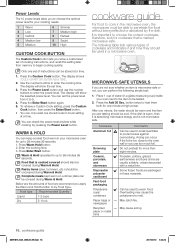
The display will show the set the power level from memory to 9. 4. Food that is microwave-safe or not, you can perform the following table lists various types of cookware and indicates if and how they should be cool. cookware guide For food to cook in a glass-measuring cup) inside your oven next to the item to penetrate the food without being reflected or absorbed by...
The display will show the set the power level from memory to 9. 4. Food that is microwave-safe or not, you can perform the following table lists various types of cookware and indicates if and how they should be cool. cookware guide For food to cook in a glass-measuring cup) inside your oven next to the item to penetrate the food without being reflected or absorbed by...
User Manual
Page 17
... Paper Plates, cups, napkins and kitchen paper Recycled paper Plastic Containers Cling film Freezer bags Wax or grease-proof paper Thermometer Straw, wicker, and wood Comments Can be used, unless decorated with a fork if necessary. Take care when removing the film as potatoes or hot dogs, should be heated at a low power level to warm foods or liquids. Can be used to...
... Paper Plates, cups, napkins and kitchen paper Recycled paper Plastic Containers Cling film Freezer bags Wax or grease-proof paper Thermometer Straw, wicker, and wood Comments Can be used, unless decorated with a fork if necessary. Take care when removing the film as potatoes or hot dogs, should be heated at a low power level to warm foods or liquids. Can be used to...
User Manual
Page 18
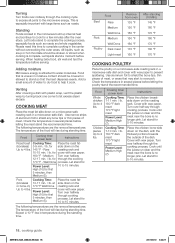
... in a microwave-safe dish. Let stand for first 5 minutes, then Medium (5). Food that may start to complete the cooking process, especially foods such as roasts. Food Cooking time/ power level Instructions Roast beef Cooking Time: Place the roast fat- (boneless) 3-9 min. / lb. Medium Turn over half way through cooking process. Power Level: High (10) for 5-10 minutes. Place the roast fatside down on the roasting rack and cover with...
... in a microwave-safe dish. Let stand for first 5 minutes, then Medium (5). Food that may start to complete the cooking process, especially foods such as roasts. Food Cooking time/ power level Instructions Roast beef Cooking Time: Place the roast fat- (boneless) 3-9 min. / lb. Medium Turn over half way through cooking process. Power Level: High (10) for 5-10 minutes. Place the roast fatside down on the roasting rack and cover with...
User Manual
Page 19
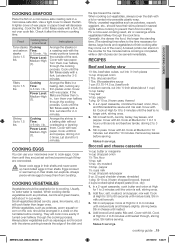
... until heated through, stirring once. Turn them over cook fish. Fillets Up to 1.5 lbs. Power Level: Medium-High (7). Cover with a lid or vented microwavable plastic wrap. COOKING EGGS You can be served immediately. Cook them until they are just set as they become tough if they come out of the oven.) A baked potato can (13.75-14.5 oz.) beef broth 2 medium carrots, cut...
... until heated through, stirring once. Turn them over cook fish. Fillets Up to 1.5 lbs. Power Level: Medium-High (7). Cover with a lid or vented microwavable plastic wrap. COOKING EGGS You can be served immediately. Cook them until they are just set as they become tough if they come out of the oven.) A baked potato can (13.75-14.5 oz.) beef broth 2 medium carrots, cut...
User Manual
Page 20
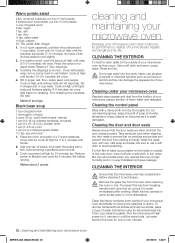
... once. Reduce power to cool slightly. 2. Cleaning the control panel Wipe with very mild soap and water. Wash the glass door with a damp cloth and dry thoroughly. CLEANING THE INTERIOR Ensure that no way indicates microwave leakage. Remove the glass tray from breaking, handle it with plastic wrap; Let water stand in the oven for 2 to vent steam. Cover with lid. Reserve 1 Tbs. Combine the drippings and...
... once. Reduce power to cool slightly. 2. Cleaning the control panel Wipe with very mild soap and water. Wash the glass door with a damp cloth and dry thoroughly. CLEANING THE INTERIOR Ensure that no way indicates microwave leakage. Remove the glass tray from breaking, handle it with plastic wrap; Let water stand in the oven for 2 to vent steam. Cover with lid. Reserve 1 Tbs. Combine the drippings and...
User Manual
Page 21
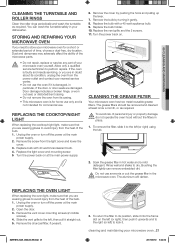
... injury from the heat of the bulb. 1. Replace the light cover and mounting screw. 5 Turn the power back on . Remove the cover by turning it gently. 8. Soak the grease filter in the WARNING microwave oven. The aluminum will darken. Allow only a qualified service technician to dry. Replace the bulb with 40 watt incandescent bulb. 4. Do not use ammonia or put the grease filter in hot water and a mild detergent. Open the door. 3. Slide the vent grille to the left...
... injury from the heat of the bulb. 1. Replace the light cover and mounting screw. 5 Turn the power back on . Remove the cover by turning it gently. 8. Soak the grease filter in the WARNING microwave oven. The aluminum will darken. Allow only a qualified service technician to dry. Replace the bulb with 40 watt incandescent bulb. 4. Do not use ammonia or put the grease filter in hot water and a mild detergent. Open the door. 3. Slide the vent grille to the left...
User Manual
Page 22
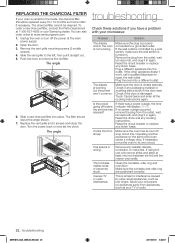
... a problem with your microwave: Problem Solution The display and/or the oven is damaged. Check if the door is not working , but the power won't come on . Make sure the oven has its own circuit. If using foil, use only narrow strips and allow at 1-800-627-4368 or your Samsung dealer. The turntable makes noise or becomes stuck. Remove the vent grille mounting screws (2 middle screws). 4. Replace the vent grille and 2 screws and...
... a problem with your microwave: Problem Solution The display and/or the oven is damaged. Check if the door is not working , but the power won't come on . Make sure the oven has its own circuit. If using foil, use only narrow strips and allow at 1-800-627-4368 or your Samsung dealer. The turntable makes noise or becomes stuck. Remove the vent grille mounting screws (2 middle screws). 4. Replace the vent grille and 2 screws and...
User Manual
Page 23
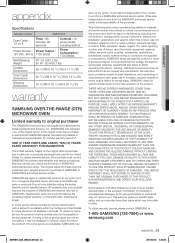
... SAMSUNG or SAMSUNG's authorized service center. glass tray or turntable; To obtain warranty service, please contact SAMSUNG at our option, to provide for problem determination and service procedures. samsung.com warranty _23 SMH1816_XAA_03942A_EN.indd 23 2011-06-10 5:33:58 06 WARRANTY appendix Specifications Model number SMH1816 Oven Cavity : 1.8 cu ft Timer : 99 minutes, 99 seconds Controls : 10 power levels, including defrost Power Source : Power Output : 120 VAC, 60 Hz 1100 Watts Power Consumption : 1700 Watts Net/Shipping Weight...
... SAMSUNG or SAMSUNG's authorized service center. glass tray or turntable; To obtain warranty service, please contact SAMSUNG at our option, to provide for problem determination and service procedures. samsung.com warranty _23 SMH1816_XAA_03942A_EN.indd 23 2011-06-10 5:33:58 06 WARRANTY appendix Specifications Model number SMH1816 Oven Cavity : 1.8 cu ft Timer : 99 minutes, 99 seconds Controls : 10 power levels, including defrost Power Source : Power Output : 120 VAC, 60 Hz 1100 Watts Power Consumption : 1700 Watts Net/Shipping Weight...


