
User Manual
Page 2
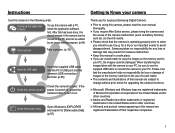
.... Ä All brand and product names appearing in this manual are subject to change without prior notice for buying a Samsung Digital Camera. å Prior to avoid disappointment. Samsung takes no responsibility for loss or damage of images on the memory card due to the use this... camera in a safe place. å If you require After Sales service, please bring the camera and the cause of their respective companies. 1 When transferring the ...
.... Ä All brand and product names appearing in this manual are subject to change without prior notice for buying a Samsung Digital Camera. å Prior to avoid disappointment. Samsung takes no responsibility for loss or damage of images on the memory card due to the use this... camera in a safe place. å If you require After Sales service, please bring the camera and the cause of their respective companies. 1 When transferring the ...
User Manual
Page 3
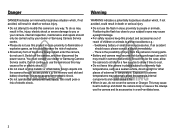
... death or serious injury. å Do not attempt to your camera. Swallowing battery or small camera accessories. Should this be carried out by your dealer or Samsung Camera Service centre. Do not continue to build up and distort the camera body or cause a fire. This may cause a &#... or electric shock. å Do not insert or drop metallic or inflammable foreign objects into the camera through access points e.g. You must contact your dealer or Samsung Camera Service centre. å Please do not use the flash in close proximity to extremely high temperatures, such...
... death or serious injury. å Do not attempt to your camera. Swallowing battery or small camera accessories. Should this be carried out by your dealer or Samsung Camera Service centre. Do not continue to build up and distort the camera body or cause a fire. This may cause a &#... or electric shock. å Do not insert or drop metallic or inflammable foreign objects into the camera through access points e.g. You must contact your dealer or Samsung Camera Service centre. å Please do not use the flash in close proximity to extremely high temperatures, such...
User Manual
Page 4
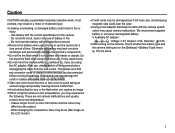
... near the case. å Using an AC adapter that any connector cords or cables to use , always switch off the camera before moving the camera. When changing the composition, there may be an after using the AC adapter. Otherwise the battery may leak corrosive electrolyte and ...permanently damage the camera's components. å Do not fire the flash while it continuously. Caution CAUTION indicates a potentially hazardous situation which, if not ...
... near the case. å Using an AC adapter that any connector cords or cables to use , always switch off the camera before moving the camera. When changing the composition, there may be an after using the AC adapter. Otherwise the battery may leak corrosive electrolyte and ...permanently damage the camera's components. å Do not fire the flash while it continuously. Caution CAUTION indicates a potentially hazardous situation which, if not ...
User Manual
Page 5
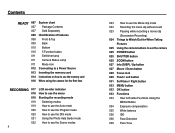
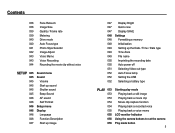
...Contents 007 Sold Separately 008 Identification of features 008 Front & Top 009 Back 010 Bottom 010 5 Function button 011 Self-timer lamp 011 Camera Status Lamp 011 Mode icon 012 Connecting to a Power Source 013 Inserting the memory card 014 Instructions on how to use the memory card 016... clip without sound 023 Pausing while recording a movie clip (Successive Recording) 024 Things to Watch Out for When Taking Pictures 025 Using the camera buttons to set the camera 025 POWER button 025 SHUTTER button 025 ZOOM button 027 Info (DISP) / Up button 027 Macro / Down button 029 Focus lock 029 ...
...Contents 007 Sold Separately 008 Identification of features 008 Front & Top 009 Back 010 Bottom 010 5 Function button 011 Self-timer lamp 011 Camera Status Lamp 011 Mode icon 012 Connecting to a Power Source 013 Inserting the memory card 014 Instructions on how to use the memory card 016... clip without sound 023 Pausing while recording a movie clip (Successive Recording) 024 Things to Watch Out for When Taking Pictures 025 Using the camera buttons to set the camera 025 POWER button 025 SHUTTER button 025 ZOOM button 027 Info (DISP) / Up button 027 Macro / Down button 029 Focus lock 029 ...
User Manual
Page 6
... Playing back a still image Playing back a movie clip Movie clip capture function Playing back a recorded voice Playing back a voice memo LCD monitor Indicator Using the camera buttons to set the camera Play mode button 5
... Playing back a still image Playing back a movie clip Movie clip capture function Playing back a recorded voice Playing back a voice memo LCD monitor Indicator Using the camera buttons to set the camera Play mode button 5
User Manual
Page 7
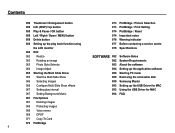
... 086 089 090 093 093 094 Software Notes System Requirements About the software Setting up the application software Starting PC mode Removing the removable disk Samsung Master Setting up the USB Driver for MAC Using the USB Driver for MAC FAQ
... 086 089 090 093 093 094 Software Notes System Requirements About the software Setting up the application software Starting PC mode Removing the removable disk Samsung Master Setting up the USB Driver for MAC Using the USB Driver for MAC FAQ
User Manual
Page 8
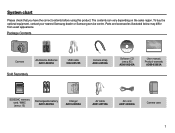
Parts and accessories illustrated below may differ from exact appearance. Package Contents Camera AA Alkaline Batteries AD81-00867A USB cable 3802-001205 Sold Separately Camera strap AD63-02596A Software CD (see p.83) AD46-00245A User manual, Product warranty AD68-03903A SD/SDHC memory card / MMC (...see p.15) Rechargeable battery AD81-00879A Charger AD81-00898A AV cable AD81-00750A AC cord AD81-00696A Camera case 7 The contents can vary depending on the sales region. System chart Please check that you have the correct contents before using this ...
Parts and accessories illustrated below may differ from exact appearance. Package Contents Camera AA Alkaline Batteries AD81-00867A USB cable 3802-001205 Sold Separately Camera strap AD63-02596A Software CD (see p.83) AD46-00245A User manual, Product warranty AD68-03903A SD/SDHC memory card / MMC (...see p.15) Rechargeable battery AD81-00879A Charger AD81-00898A AV cable AD81-00750A AC cord AD81-00696A Camera case 7 The contents can vary depending on the sales region. System chart Please check that you have the correct contents before using this ...
User Manual
Page 11
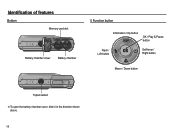
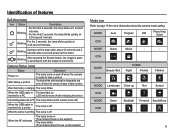
Identification of features Bottom Memory card slot Battery chamber cover Battery chamber 5 Function button Information / Up button OK / Play & Pause button Flash / Left button Self-timer / Right button Macro / Down button Tripod socket Ä To open the battery chamber cover, slide it in the direction shown above. 10
Identification of features Bottom Memory card slot Battery chamber cover Battery chamber 5 Function button Information / Up button OK / Play & Pause button Flash / Left button Self-timer / Right button Macro / Down button Tripod socket Ä To open the battery chamber cover, slide it in the direction shown above. 10
User Manual
Page 12
...cation of features Self-timer lamp Icon Status Description - Blinking For the 2 seconds, the lamp blinks quickly at 1 second Blinking intervals. - Camera Status Lamp Status Description Power on The lamp turns on the subject) Mode icon Refer to take a picture After taking a picture The lamp blinks... while saving the image data and turns off when the camera is ready to page 19 for more information about 10 seconds and 2 seconds later a second picture will be taken after initializing the device...
...cation of features Self-timer lamp Icon Status Description - Blinking For the 2 seconds, the lamp blinks quickly at 1 second Blinking intervals. - Camera Status Lamp Status Description Power on The lamp turns on the subject) Mode icon Refer to take a picture After taking a picture The lamp blinks... while saving the image data and turns off when the camera is ready to page 19 for more information about 10 seconds and 2 seconds later a second picture will be taken after initializing the device...
User Manual
Page 13
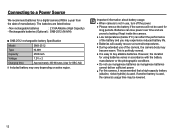
...at normal temperatures. å During extended use manganese batteries as manganese batteries cannot deliver sufficient power. å For this camera, it recommended that a high-capacity battery (alkaline, nickel-hydride) is used for using batteries varies in accordance with the battery ... Ni-MH Capacity 2500mAh Voltage 1.2V x 2 Charging time Approximately 300 Minutes (Use for a digital camera (Within a year from the date of the camera, the camera body may be used , the camera's usage time may become warm. Batteries can affect the performance of the battery and you may ...
...at normal temperatures. å During extended use manganese batteries as manganese batteries cannot deliver sufficient power. å For this camera, it recommended that a high-capacity battery (alkaline, nickel-hydride) is used for using batteries varies in accordance with the battery ... Ni-MH Capacity 2500mAh Voltage 1.2V x 2 Charging time Approximately 300 Minutes (Use for a digital camera (Within a year from the date of the camera, the camera body may be used , the camera's usage time may become warm. Batteries can affect the performance of the battery and you may ...
User Manual
Page 14
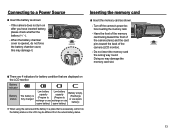
...Connecting to recharge or use recharge or use spare battery) spare battery) Battery empty. (Recharge or use spare battery) Ä When using the camera and the battery in a place that are displayed on the LCD monitor. Inserting the memory card Ê Insert the memory card as shown -... Have the front of the memory card facing toward the front of the camera (lens) and the card pins toward the back of the camera (LCD monitor). - Battery indicator Battery status The battery is fully charged Low battery Low battery capacity capacity (...
...Connecting to recharge or use recharge or use spare battery) spare battery) Battery empty. (Recharge or use spare battery) Ä When using the camera and the battery in a place that are displayed on the LCD monitor. Inserting the memory card Ê Insert the memory card as shown -... Have the front of the memory card facing toward the front of the camera (lens) and the card pins toward the back of the camera (LCD monitor). - Battery indicator Battery status The battery is fully charged Low battery Low battery capacity capacity (...
User Manual
Page 15
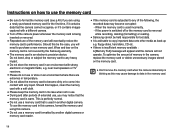
...Instructions on how to use the memory card å Be sure to format the memory card (see p.48) if you are extremes in another digital camera or memory card reader. å If the memory card is insufficient memory available : A [Memory Full] message will appear and the... card is not covered by another digital camera. When the memory card is an electronic precision device. To use the memory card in an environment with a different camera. å Turn off or the memory card is removed while recording, deleting (formatting) or reading. å Samsung cannot be the case, you will...
...Instructions on how to use the memory card å Be sure to format the memory card (see p.48) if you are extremes in another digital camera or memory card reader. å If the memory card is insufficient memory available : A [Memory Full] message will appear and the... card is not covered by another digital camera. When the memory card is an electronic precision device. To use the memory card in an environment with a different camera. å Turn off or the memory card is removed while recording, deleting (formatting) or reading. å Samsung cannot be the case, you will...
User Manual
Page 16
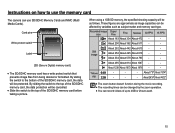
...When using a 1GB SD memory, the specified shooting capacity will be cancelled. å Slide the switch to use the memory card The camera can be as subject matter and memory card type. About 200 About 362 About 511 - - Card pins Write protect switch Label [SD (Secure... Digital) memory card] å The SD/SDHC memory card has a write protect switch that prevents image files from being deleted or formatted. These &#...
...When using a 1GB SD memory, the specified shooting capacity will be cancelled. å Slide the switch to use the memory card The camera can be as subject matter and memory card type. About 200 About 362 About 511 - - Card pins Write protect switch Label [SD (Secure... Digital) memory card] å The SD/SDHC memory card has a write protect switch that prevents image files from being deleted or formatted. These &#...
User Manual
Page 17
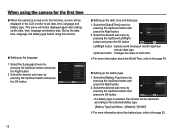
... pressing the Up/Down button and press the OK button. If a battery type is turned on for the first time Ê When the camera is selected, the camera will be optimized according to the selected battery type. [Battery Type] sub Menu : [Alkaline] / [Ni-MH] Ä For more information about... the battery type, refer to the page 52. 16 When using this camera. Ê Setting up the language 1. Select the desired sub menu by pressing the Up/Down/Left/Right button and press the OK button. Select the...
... pressing the Up/Down button and press the OK button. If a battery type is turned on for the first time Ê When the camera is selected, the camera will be optimized according to the selected battery type. [Battery Type] sub Menu : [Alkaline] / [Ni-MH] Ä For more information about... the battery type, refer to the page 52. 16 When using this camera. Ê Setting up the language 1. Select the desired sub menu by pressing the Up/Down/Left/Right button and press the OK button. Select the...
User Manual
Page 18
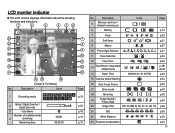
...9 Macro 10 Photo Style Selector 11 Face Detection 12 Face Tone 13 Face Retouch / Image Adjust / Without Sound 14 Date / Time 15 Camera shake Warning 16 Auto Focus Frame 17 Drive mode 18 Metering 19 Image Quality / Frame Rate 20 Image Size 21 ISO 22 White Balance 23... Exposure compensation Icons 2009/01/01 01:00 PM Page - Description Icons 1 Recording mode 2 Optical / Digital Zoom bar / Digital Zoom rate 3 Voice Memo Number of available shots 4 remaining Remaining time 00001 00:00:00 Page p.19 p.25 p.43 p.15 p.15 No...
...9 Macro 10 Photo Style Selector 11 Face Detection 12 Face Tone 13 Face Retouch / Image Adjust / Without Sound 14 Date / Time 15 Camera shake Warning 16 Auto Focus Frame 17 Drive mode 18 Metering 19 Image Quality / Frame Rate 20 Image Size 21 ISO 22 White Balance 23... Exposure compensation Icons 2009/01/01 01:00 PM Page - Description Icons 1 Recording mode 2 Optical / Digital Zoom bar / Digital Zoom rate 3 Voice Memo Number of available shots 4 remaining Remaining time 00001 00:00:00 Page p.19 p.25 p.43 p.15 p.15 No...
User Manual
Page 19
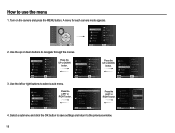
... Start Sound Shutter Sound Beep AF Sound Self-Portrait Back Off :Medium Low:Off Med:1ium High:1 :On :On Set 18 Turn on the camera and press the MENU button. Use the up or down buttons to the previous window. Select a submenu and click the OK button to save settings... and return to navigate through the menus. A menu for each camera mode appears. 2. Mode Functions Sound Display Settings Exit Auto Program DIS Photo Help Guide Scene Movie Change Mode Functions Sound Display Settings Exit Auto Program...
... Start Sound Shutter Sound Beep AF Sound Self-Portrait Back Off :Medium Low:Off Med:1ium High:1 :On :On Set 18 Turn on the camera and press the MENU button. Use the up or down buttons to the previous window. Select a submenu and click the OK button to save settings... and return to navigate through the menus. A menu for each camera mode appears. 2. Mode Functions Sound Display Settings Exit Auto Program DIS Photo Help Guide Scene Movie Change Mode Functions Sound Display Settings Exit Auto Program...
User Manual
Page 20
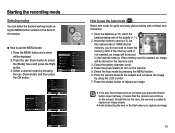
.... å Avoid obstructing the lens or the flash when you press the shutter button down half way, it means that the camera cannot focus on the camera. 5. Close the battery chamber cover. 4. Starting the recording mode Selecting modes You can select the desired working mode using the LCD monitor... 7. Display Settings 3. If the memory card is unable to insert the memory card. Should this mode for quick and easy picture taking note of the camera. Ê How to use the Auto mode ( ) Select this be displayed. 2. Press the Up / Down button to turn on the subject. ...
.... å Avoid obstructing the lens or the flash when you press the shutter button down half way, it means that the camera cannot focus on the camera. 5. Close the battery chamber cover. 4. Starting the recording mode Selecting modes You can select the desired working mode using the LCD monitor... 7. Display Settings 3. If the memory card is unable to insert the memory card. Should this mode for quick and easy picture taking note of the camera. Ê How to use the Auto mode ( ) Select this be displayed. 2. Press the Up / Down button to turn on the subject. ...
User Manual
Page 21
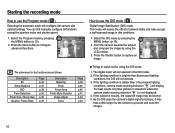
...subject is moving, the captured image may take pictures in situations where the camera shake warning indicator ( Ã ) is darker than fluorescent lighting conditions, the DIS will not operate in dim conditions. 1. The digital zoom will not activate. 3. For best results only take a little longer...) 2. Starting the recording mode How to use the DIS mode ( ) Digital Image Stabilisation (DIS) mode. Press the Menu button to use the Program mode ( ) Selecting the automatic mode will reduce the effect of camera shake and help you get a well-exposed image in the DIS mode. ...
...subject is moving, the captured image may take pictures in situations where the camera shake warning indicator ( Ã ) is darker than fluorescent lighting conditions, the DIS will not operate in dim conditions. 1. The digital zoom will not activate. 3. For best results only take a little longer...) 2. Starting the recording mode How to use the DIS mode ( ) Digital Image Stabilisation (DIS) mode. Press the Menu button to use the Program mode ( ) Selecting the automatic mode will reduce the effect of camera shake and help you get a well-exposed image in the DIS mode. ...
User Manual
Page 22
... that may occur. This also enables the user to practice the best way to use when the image is out of focus Features to reduce camera shake Features to use in focus -
... that may occur. This also enables the user to practice the best way to use when the image is out of focus Features to reduce camera shake Features to use in focus -
User Manual
Page 23
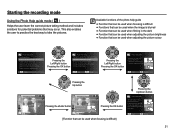
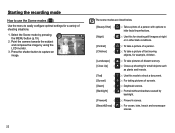
Starting the recording mode How to use the Scene modes ( ) Use the menu to shoot a document. ) : For taking pictures of shooting situations. 1. Point the camera towards the subject and compose the image by pressing the MENU button (p.19). 2. Press the shutter button to capture an image. 22 The scene modes ...
Starting the recording mode How to use the Scene modes ( ) Use the menu to shoot a document. ) : For taking pictures of shooting situations. 1. Point the camera towards the subject and compose the image by pressing the MENU button (p.19). 2. Press the shutter button to capture an image. 22 The scene modes ...
