

User Manual (ENGLISH)
Page 6
... application using a local connection 8.1 Scanning using DRPD mode ...9.4 Receiving in secure receiving mode ...9.5 Receiving faxes in memory ...9.5 Printing received faxes on both sides of paper (SCX-6322DN only 8.7 9. E-mail setup Setting Up Your E-mail System ...11.1 Setting Authorized Users ...11.1 Setting Up E-mail Options ...11.2 12. Basic printing Printing a document ...7.1 Canceling...
... application using a local connection 8.1 Scanning using DRPD mode ...9.4 Receiving in secure receiving mode ...9.5 Receiving faxes in memory ...9.5 Printing received faxes on both sides of paper (SCX-6322DN only 8.7 9. E-mail setup Setting Up Your E-mail System ...11.1 Setting Authorized Users ...11.1 Setting Up E-mail Options ...11.2 12. Basic printing Printing a document ...7.1 Canceling...

User Manual (ENGLISH)
Page 7
Maintenance Printing reports ...13.1 Cleaning your machine ...13.2 Maintaining the toner cartridge ...13.3 Maintenance Parts ...13.9 Managing your machine from the website ...13.9 Checking the machine's serial number ...13.10 System Administrtion Tools ...13.10 14. ...specifications ...15.1 Scanner and copier specifications ...15.2 Facsimile specifications ...15.2 Index Troubleshooting Clearing document jams ...14.1 Clearing paper jams ...14.2 Understanding display messages ...14.6 Toner cartridge-related messages ...14.10 Solving other problems ...14.11 15. How to purchase ...12.1 13.
Maintenance Printing reports ...13.1 Cleaning your machine ...13.2 Maintaining the toner cartridge ...13.3 Maintenance Parts ...13.9 Managing your machine from the website ...13.9 Checking the machine's serial number ...13.10 System Administrtion Tools ...13.10 14. ...specifications ...15.1 Scanner and copier specifications ...15.2 Facsimile specifications ...15.2 Index Troubleshooting Clearing document jams ...14.1 Clearing paper jams ...14.2 Understanding display messages ...14.6 Toner cartridge-related messages ...14.10 Solving other problems ...14.11 15. How to purchase ...12.1 13.

User Manual (ENGLISH)
Page 12
... line socket (LINE) 4 parallel port 5 USB port 6 network port 7 power receptacle 8 power switch 9 output support 1.2 See 8.7. * The figure above shows an SCX-6322DN with all available accessories. 1 ADF (Automatic Document Feeder)1 9 scanner lid 2 document width guides 10 tray 1 3 document input tray 11 optional tray 2 4 document...control panel 13 multi-purpose tray paper width guides 6 multi-purpose tray 14 scanner glass 7 front cover 15 toner cartridge 8 release lever 16 drum cartridge 1. SCX-6122FN has the ADF function, while SCX-6322DN uses the duplex ADF function.
... line socket (LINE) 4 parallel port 5 USB port 6 network port 7 power receptacle 8 power switch 9 output support 1.2 See 8.7. * The figure above shows an SCX-6322DN with all available accessories. 1 ADF (Automatic Document Feeder)1 9 scanner lid 2 document width guides 10 tray 1 3 document input tray 11 optional tray 2 4 document...control panel 13 multi-purpose tray paper width guides 6 multi-purpose tray 14 scanner glass 7 front cover 15 toner cartridge 8 release lever 16 drum cartridge 1. SCX-6122FN has the ADF function, while SCX-6322DN uses the duplex ADF function.
User Manual (ENGLISH)
Page 14
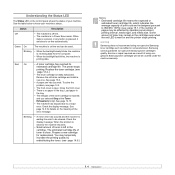
...in the tray. Red On • A toner cartridge has reached its estimated cartridge life. See page 13.6. • A paper jam has occurred. Some amount of your machine's status. Samsung cannot guarantee non-genuine Samsung toner cartridge's quality. Understanding the Status LED The Status LED on...page 15.1.) The number of toner is waiting the error to be covered under the machine warranty. 1.4 warning Samsung does not recommend using nongenuine Samsung toner cartridges will not be cleared. When the problem is cleared, the machine resumes. • Small amount of pages...
...in the tray. Red On • A toner cartridge has reached its estimated cartridge life. See page 13.6. • A paper jam has occurred. Some amount of your machine's status. Samsung cannot guarantee non-genuine Samsung toner cartridge's quality. Understanding the Status LED The Status LED on...page 15.1.) The number of toner is waiting the error to be covered under the machine warranty. 1.4 warning Samsung does not recommend using nongenuine Samsung toner cartridges will not be cleared. When the problem is cleared, the machine resumes. • Small amount of pages...

User Manual (ENGLISH)
Page 20
... up time when you want appears and press OK. 6 Press Stop/Clear to return to reduce power consumption and extend the life of the toner cartridge beyond what one would experience in the normal mode, but it reduces print quality.
... up time when you want appears and press OK. 6 Press Stop/Clear to return to reduce power consumption and extend the life of the toner cartridge beyond what one would experience in the normal mode, but it reduces print quality.
User Manual (ENGLISH)
Page 67
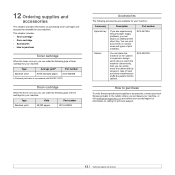
... www.samsungprinter.com and select your machine: Type Average yielda Part number Standard yield 8,000 standard pages SCX-6320D8 a. This chapter includes: • Toner cartridge • Drum cartridge • Accessories • How to purchase To order Samsung-authorized supplies or accessories, contact your machine. You can attach an additional 550 sheet tray. Also you...
... www.samsungprinter.com and select your machine: Type Average yielda Part number Standard yield 8,000 standard pages SCX-6320D8 a. This chapter includes: • Toner cartridge • Drum cartridge • Accessories • How to purchase To order Samsung-authorized supplies or accessories, contact your machine. You can attach an additional 550 sheet tray. Also you...

User Manual (ENGLISH)
Page 68
... Report This report shows information for delayed faxes along with useful information you want to confirm your machine and the toner cartridge. This list shows information on the faxes and emails you have recently sent. To print all of the fax numbers and... every 50 communications. This chapter includes: • Printing reports • Clearing memory • Cleaning your machine • Maintaining the toner cartridge • Maintenance Parts • Managing your machine to automatically print a transmission confirmation report after a power failure if any data loss occurs ...
... Report This report shows information for delayed faxes along with useful information you want to confirm your machine and the toner cartridge. This list shows information on the faxes and emails you have recently sent. To print all of the fax numbers and... every 50 communications. This chapter includes: • Printing reports • Clearing memory • Cleaning your machine • Maintaining the toner cartridge • Maintenance Parts • Managing your machine to automatically print a transmission confirmation report after a power failure if any data loss occurs ...
User Manual (ENGLISH)
Page 69
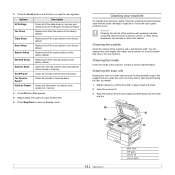
.... Restores all of the scanner glass and ADF glass until the item you clean the scan unit at the start of each time the toner cartridge is clean and dry. 1 3 2 4 13.2 1 white sheet 2 ADF glass 3 scanner lid 4 scanner glass
.... Restores all of the scanner glass and ADF glass until the item you clean the scan unit at the start of each time the toner cartridge is clean and dry. 1 3 2 4 13.2 1 white sheet 2 ADF glass 3 scanner lid 4 scanner glass
User Manual (ENGLISH)
Page 70
... same environment as the printer it is removed from the printer, always store the cartridge: • Inside the protective bag from your printer including generic, store brand, refilled, or remanufactured toner cartridges. Use of non-Samsung and refilled toner cartridge Samsung Electronics does not recommend or approve the use dramatically shortens its original, unopened package...
... same environment as the printer it is removed from the printer, always store the cartridge: • Inside the protective bag from your printer including generic, store brand, refilled, or remanufactured toner cartridges. Use of non-Samsung and refilled toner cartridge Samsung Electronics does not recommend or approve the use dramatically shortens its original, unopened package...
User Manual (ENGLISH)
Page 71
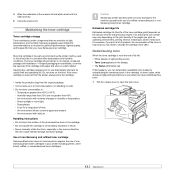
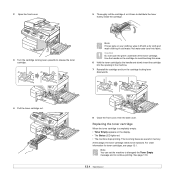
.... The incoming faxes are saved in cold water. 2 Open the front cover. 5 Thoroughly roll the cartridge 5 or 6 times to distribute the toner evenly inside the cartridge. 3 Turn the cartridge locking lever upwards to continue printing. Note If toner gets on the display. • The Status LED... • The machine stops printing. At this area. 6 Hold the toner cartridge by the handle and slowly insert the cartridge into fabric. See page 13.8. 13.4 Replacing the toner cartridge When the toner cartridge is completely empty: • Toner Empty appears on your clothing, wipe it off...
.... The incoming faxes are saved in cold water. 2 Open the front cover. 5 Thoroughly roll the cartridge 5 or 6 times to distribute the toner evenly inside the cartridge. 3 Turn the cartridge locking lever upwards to continue printing. Note If toner gets on the display. • The Status LED... • The machine stops printing. At this area. 6 Hold the toner cartridge by the handle and slowly insert the cartridge into fabric. See page 13.8. 13.4 Replacing the toner cartridge When the toner cartridge is completely empty: • Toner Empty appears on your clothing, wipe it off...
User Manual (ENGLISH)
Page 72
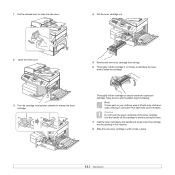
... the plastic bag for shipping. Caution Do not touch the green underside of the toner cartridge. Note If toner gets on the cartridge to avoid touching this area. 7 Hold the toner cartridge by the handle and slowly insert the cartridge into fabric. 1 Pull the release lever to open the side cover. 4 Pull the toner...
... the plastic bag for shipping. Caution Do not touch the green underside of the toner cartridge. Note If toner gets on the cartridge to avoid touching this area. 7 Hold the toner cartridge by the handle and slowly insert the cartridge into fabric. 1 Pull the release lever to open the side cover. 4 Pull the toner...
User Manual (ENGLISH)
Page 73
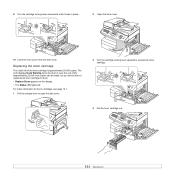
... page 12.1. 1 Pull the release lever to open the side cover. 3 Turn the cartridge locking lever upwards to release the toner cartridge. 4 Pull the toner cartridge out. 13.6 9 Turn the cartridge locking lever downwards until it locks in stock. • Replace Drum appears on the display. • The Status LED lights red. The LCD... displays Drum Warning when the drum is approximately 20,000 copies. Approximately 20,000 more copies can be made, but you should have a replacement drum cartridge in place.. 2 Open the front cover. 10 Close the front cover, then the side cover.
... page 12.1. 1 Pull the release lever to open the side cover. 3 Turn the cartridge locking lever upwards to release the toner cartridge. 4 Pull the toner cartridge out. 13.6 9 Turn the cartridge locking lever downwards until it locks in stock. • Replace Drum appears on the display. • The Status LED lights red. The LCD... displays Drum Warning when the drum is approximately 20,000 copies. Approximately 20,000 more copies can be made, but you should have a replacement drum cartridge in place.. 2 Open the front cover. 10 Close the front cover, then the side cover.
User Manual (ENGLISH)
Page 74
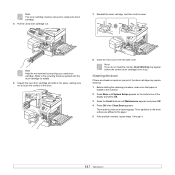
...line of the drum. 8 Close the front cover, then the side cover. Refer to the recycling brochure packed with the drum cartridge for details. 6 Unpack the new drum cartridge and slide it into place, making sure not to touch the surface of the display and press OK. 3 Press the Scroll ...buttons until System Setup appears on your used drum cartridge out. 7 Reinstall the toner cartridge, and then lock the lever. Note If you do not reset the counter, Drum Warning may require cleaning. 1 Before starting the cleaning...
...line of the drum. 8 Close the front cover, then the side cover. Refer to the recycling brochure packed with the drum cartridge for details. 6 Unpack the new drum cartridge and slide it into place, making sure not to touch the surface of the display and press OK. 3 Press the Scroll ...buttons until System Setup appears on your used drum cartridge out. 7 Reinstall the toner cartridge, and then lock the lever. Note If you do not reset the counter, Drum Warning may require cleaning. 1 Before starting the cleaning...
User Manual (ENGLISH)
Page 75
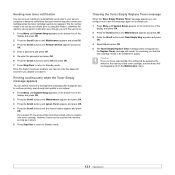
Sending new toner notification You can set your machine to automatically send a fax to your service company or dealer to notify them that the new cartridge needs to be installed for remaining you . 1 Press Menu until System Setup appears on the bottom line of the display and press OK. ...Press the Scroll buttons until Maintenance appears and press OK. 3 Press the Scroll buttons until System Setup appears on the bottom line of the toner cartridge, and this setting will remain for quality. The fax number needs to be permanently written to enter the password each time you install a new ...
Sending new toner notification You can set your machine to automatically send a fax to your service company or dealer to notify them that the new cartridge needs to be installed for remaining you . 1 Press Menu until System Setup appears on the bottom line of the display and press OK. ...Press the Scroll buttons until Maintenance appears and press OK. 3 Press the Scroll buttons until System Setup appears on the bottom line of the toner cartridge, and this setting will remain for quality. The fax number needs to be permanently written to enter the password each time you install a new ...

User Manual (ENGLISH)
Page 79
... the jammed paper gently out of the DADF. This chapter includes: • Clearing document jams • Clearing paper jams • Understanding display messages • Toner cartridge-related messages • Solving other problems Clearing document jams When an original jams while passing through the ADF, [Document Jam] appears on the display. 1 Remove...
... the jammed paper gently out of the DADF. This chapter includes: • Clearing document jams • Clearing paper jams • Understanding display messages • Toner cartridge-related messages • Solving other problems Clearing document jams When an original jams while passing through the ADF, [Document Jam] appears on the display. 1 Remove...

User Manual (ENGLISH)
Page 80
... Inside Duplex Jam Open/Close Door In the paper feed area (tray 1, optional tray 2, or multipurpose tray) In the fuser area or around the toner cartridge In the paper exit area below to clear the jam. After you pull, stop pulling. If there is any resistance, and the paper does not...
... Inside Duplex Jam Open/Close Door In the paper feed area (tray 1, optional tray 2, or multipurpose tray) In the fuser area or around the toner cartridge In the paper exit area below to clear the jam. After you pull, stop pulling. If there is any resistance, and the paper does not...

User Manual (ENGLISH)
Page 81
... of the machine, then insert it out gently and slowly. 5 Close the cover and insert the paper Tray. Note Do not touch the shiny drum cartridge surface. To clear paper jam in the direction shown. To avoid the paper torn, pull it completely. In the optional tray 2 1 Pull the optional tray...
... of the machine, then insert it out gently and slowly. 5 Close the cover and insert the paper Tray. Note Do not touch the shiny drum cartridge surface. To clear paper jam in the direction shown. To avoid the paper torn, pull it completely. In the optional tray 2 1 Pull the optional tray...

User Manual (ENGLISH)
Page 82
... cover. 5 Open and close the front cover to open the side cover. 2 Pull down on the paper. In the fuser area or around the toner cartridge Note The fuser area is not seen in smudged copies. 14.4 If paper is hot. Take care when removing paper from the machine. 1 Lift the...
... cover. 5 Open and close the front cover to open the side cover. 2 Pull down on the paper. In the fuser area or around the toner cartridge Note The fuser area is not seen in smudged copies. 14.4 If paper is hot. Take care when removing paper from the machine. 1 Lift the...

User Manual (ENGLISH)
Page 84
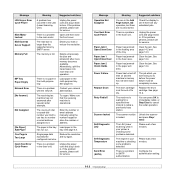
...accept No. Understanding display messages Messages appear on the Smart Panel program window or the control panel display to try again. You should ensure a replacement cartridge in the ADF. Message Meaning Suggested solutions Authentication Failure Cancel? Error] Connection Error Connection Failed [Document Jam] Door Open Drum Warning Enter Again The ...ID or password you call for avoiding paper jams By selecting the correct media types, most paper jams can be avoided. The drum cartridge is wrong. Ask the sender to indicate the machine's status or errors. Clear the jam.
...accept No. Understanding display messages Messages appear on the Smart Panel program window or the control panel display to try again. You should ensure a replacement cartridge in the ADF. Message Meaning Suggested solutions Authentication Failure Cancel? Error] Connection Error Connection Failed [Document Jam] Door Open Drum Warning Enter Again The ...ID or password you call for avoiding paper jams By selecting the correct media types, most paper jams can be avoided. The drum cartridge is wrong. Ask the sender to indicate the machine's status or errors. Clear the jam.
User Manual (ENGLISH)
Page 86
.... Try again. The one operation. Paper has jammed in the fuser unit. Clear the jam. See page 14.4. Replace the drum cartridge. See page 13.6. Please wait a few minutes. The engine in the multi-purpose tray. Delete unnecessary fax jobs and retransmit after several...network administrator. There is checking some problems detected. Unplug the power cord and plug it back in the main motor. The drum cartridge is operational. Configure the authentication setting. 14.8 There is a problem in the multi-purpose tray. Load paper in the fuser unit...
.... Try again. The one operation. Paper has jammed in the fuser unit. Clear the jam. See page 14.4. Replace the drum cartridge. See page 13.6. Please wait a few minutes. The engine in the multi-purpose tray. Delete unnecessary fax jobs and retransmit after several...network administrator. There is checking some problems detected. Unplug the power cord and plug it back in the main motor. The drum cartridge is operational. Configure the authentication setting. 14.8 There is a problem in the multi-purpose tray. Load paper in the fuser unit...


