

User Manual (ENGLISH)
Page 2
...automatic text recognition program, AnyPage. All rights reserved. • SCX-4016, SCX-4116, SCX-4216F and Samsung logo are trademarks of Samsung Electronics Co., Ltd. • Centronics is subject to use of this manual. © 2003 Samsung Electronics Co., Ltd. All information included herein is a trademark ...how to scan for any changes, direct or indirect, arising from or related to change without notice. Samsung SmarThru allows you need for maintaining and troubleshooting the machine. The SmarThru 3 User's Guide provides the basic description about using your machine as a fax...
...automatic text recognition program, AnyPage. All rights reserved. • SCX-4016, SCX-4116, SCX-4216F and Samsung logo are trademarks of Samsung Electronics Co., Ltd. • Centronics is subject to use of this manual. © 2003 Samsung Electronics Co., Ltd. All information included herein is a trademark ...how to scan for any changes, direct or indirect, arising from or related to change without notice. Samsung SmarThru allows you need for maintaining and troubleshooting the machine. The SmarThru 3 User's Guide provides the basic description about using your machine as a fax...
User Manual (ENGLISH)
Page 6
... Maintaining the Toner Cartridge 7.6 Redistributing Toner 7.7 Replacing the Toner Cartridge 7.8 Setting the Notify Toner Option (For SCX-4216F 7.10 Cleaning the Drum 7.10 Consumables and Replacement Parts 7.11 Chapter 8: TROUBLESHOOTING Clearing Document Jams (For SCX-4116/4216F) ...... 8.2 Input Misfeed 8.2 Exit Misfeed 8.3 Roller Misfeed 8.3 Clearing Paper Jams 8.4 In the Paper ... Messages 8.11 Solving Problems 8.14 Paper Feeding Problems 8.14 Printing Problems 8.15 Printing Quality Problems 8.18 Fax Problems (For SCX-4216F 8.22 Copying Problems 8.24 Scanning Problems 8.25 v
... Maintaining the Toner Cartridge 7.6 Redistributing Toner 7.7 Replacing the Toner Cartridge 7.8 Setting the Notify Toner Option (For SCX-4216F 7.10 Cleaning the Drum 7.10 Consumables and Replacement Parts 7.11 Chapter 8: TROUBLESHOOTING Clearing Document Jams (For SCX-4116/4216F) ...... 8.2 Input Misfeed 8.2 Exit Misfeed 8.3 Roller Misfeed 8.3 Clearing Paper Jams 8.4 In the Paper ... Messages 8.11 Solving Problems 8.14 Paper Feeding Problems 8.14 Printing Problems 8.15 Printing Quality Problems 8.18 Fax Problems (For SCX-4216F 8.22 Copying Problems 8.24 Scanning Problems 8.25 v
User Manual (ENGLISH)
Page 118
This chapter includes: • See Clearing Document Jams (For SCX4116/4216F) • See Clearing Paper Jams • See Clearing LCD Error Messages • See Solving Problems 8 TROUBLESHOOTING This chapter gives helpful information for what to do if you encounter an error.
This chapter includes: • See Clearing Document Jams (For SCX4116/4216F) • See Clearing Paper Jams • See Clearing LCD Error Messages • See Solving Problems 8 TROUBLESHOOTING This chapter gives helpful information for what to do if you encounter an error.

User Manual (ENGLISH)
Page 119
NOTE: To prevent document jams, use the document glass for thick, thin or mixed documents. 8.2 TROUBLESHOOTING Input Misfeed 1 Remove the remaining documents from the ADF. 2 Open the ADF cover. 3 Rotate the bushing on the display. Pull the document gently to the ... the ADF roller toward the ADF ( a ) and remove the roller from the slot( b ). Then load the documents back into the ADF. Clearing Document Jams (For SCX-4116/4216F) When a document jams while it passes through the ADF (Automatic Document Feeder), "Document Jam" appears on one end of the ADF. 4 Close the ADF...
NOTE: To prevent document jams, use the document glass for thick, thin or mixed documents. 8.2 TROUBLESHOOTING Input Misfeed 1 Remove the remaining documents from the ADF. 2 Open the ADF cover. 3 Rotate the bushing on the display. Pull the document gently to the ... the ADF roller toward the ADF ( a ) and remove the roller from the slot( b ). Then load the documents back into the ADF. Clearing Document Jams (For SCX-4116/4216F) When a document jams while it passes through the ADF (Automatic Document Feeder), "Document Jam" appears on one end of the ADF. 4 Close the ADF...

User Manual (ENGLISH)
Page 120
Then load the documents back into the ADF. TROUBLESHOOTING 8.3 Roller Misfeed 1 Remove the remaining documents from the ADF. 2 Open the document cover. 3 Turn the release knob so that you can easily seize the misfed ...
Then load the documents back into the ADF. TROUBLESHOOTING 8.3 Roller Misfeed 1 Remove the remaining documents from the ADF. 2 Open the document cover. 3 Turn the release knob so that you can easily seize the misfed ...
User Manual (ENGLISH)
Page 121
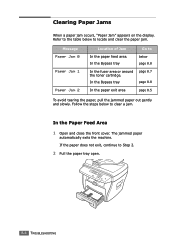
.... Clearing Paper Jams When a paper jam occurs, "Paper Jam" appears on the display. In the Bypass tray below to Step 2. 2 Pull the paper tray open. 8.4 TROUBLESHOOTING In the Paper Feed Area 1 Open and close the front cover. If the paper does not exit, continue to clear a jam. The jammed paper automatically...
.... Clearing Paper Jams When a paper jam occurs, "Paper Jam" appears on the display. In the Bypass tray below to Step 2. 2 Pull the paper tray open. 8.4 TROUBLESHOOTING In the Paper Feed Area 1 Open and close the front cover. If the paper does not exit, continue to clear a jam. The jammed paper automatically...
User Manual (ENGLISH)
Page 122
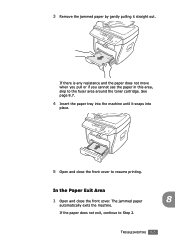
See page 8.7. 4 Insert the paper tray into place. 5 Open and close the front cover. The jammed paper 8 automatically exits the machine. TROUBLESHOOTING 8.5 3 Remove the jammed paper by gently pulling it snaps into the machine until it straight out. In the Paper Exit Area 1 Open and close the front cover to the fuser area around the toner cartridge. If there is any resistance and the paper does not move when you pull or if you cannot see the paper in this area, skip to resume printing. If the paper does not exit, continue to Step 2.
See page 8.7. 4 Insert the paper tray into place. 5 Open and close the front cover. The jammed paper 8 automatically exits the machine. TROUBLESHOOTING 8.5 3 Remove the jammed paper by gently pulling it snaps into the machine until it straight out. In the Paper Exit Area 1 Open and close the front cover to the fuser area around the toner cartridge. If there is any resistance and the paper does not move when you pull or if you cannot see the paper in this area, skip to resume printing. If the paper does not exit, continue to Step 2.
User Manual (ENGLISH)
Page 123
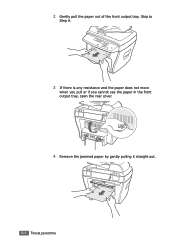
Skip to Step 6. 3 If there is any resistance and the paper does not move when you pull or if you cannot see the paper in the front output tray, open the rear cover. 4 Remove the jammed paper by gently pulling it straight out. 8.6 TROUBLESHOOTING 2 Gently pull the paper out of the front output tray.
Skip to Step 6. 3 If there is any resistance and the paper does not move when you pull or if you cannot see the paper in the front output tray, open the rear cover. 4 Remove the jammed paper by gently pulling it straight out. 8.6 TROUBLESHOOTING 2 Gently pull the paper out of the front output tray.

User Manual (ENGLISH)
Page 124
5 Close the rear cover. 6 Open and close the front cover to resume printing. Take care when removing paper from the machine. 1 Open the front cover and pull the toner cartridge out, lightly pushing it down. 2 Remove the jammed paper by gently pulling it straight out. 8 TROUBLESHOOTING 8.7 In the Fuser Area or Around the Toner Cartridge NOTE: The fuser area is hot.
5 Close the rear cover. 6 Open and close the front cover to resume printing. Take care when removing paper from the machine. 1 Open the front cover and pull the toner cartridge out, lightly pushing it down. 2 Remove the jammed paper by gently pulling it straight out. 8 TROUBLESHOOTING 8.7 In the Fuser Area or Around the Toner Cartridge NOTE: The fuser area is hot.
User Manual (ENGLISH)
Page 125
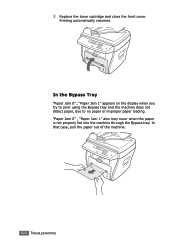
"Paper Jam 0" , "Paper Jam 1" also may occur when the paper is not properly fed into the machine through the Bypass tray. Printing automatically resumes. In that case, pull the paper out of the machine. 8.8 TROUBLESHOOTING 3 Replace the toner cartridge and close the front cover. In the Bypass Tray "Paper Jam 0" , "Paper Jam 1" appears on the display when you try to print using the Bypass tray and the machine does not detect paper, due to no paper or improper paper loading.
"Paper Jam 0" , "Paper Jam 1" also may occur when the paper is not properly fed into the machine through the Bypass tray. Printing automatically resumes. In that case, pull the paper out of the machine. 8.8 TROUBLESHOOTING 3 Replace the toner cartridge and close the front cover. In the Bypass Tray "Paper Jam 0" , "Paper Jam 1" appears on the display when you try to print using the Bypass tray and the machine does not detect paper, due to no paper or improper paper loading.
User Manual (ENGLISH)
Page 126
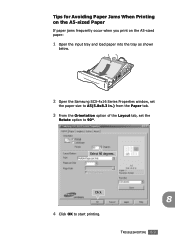
Click. 4 Click OK to 90º. Select 90 degrees. Tips for Avoiding Paper Jams When Printing on the A5-sized Paper If paper jams frequently occur when you print on the A5-sized paper: 1 Open the input tray and load paper into the tray as shown below. 2 Open the Samsung SCX-4x16 Series Properties window, set the paper size to A5(5.8x8.3 in.) from the Paper tab. 3 From the Orientation option of the Layout tab, set the Rotate option to start printing. 8 TROUBLESHOOTING 8.9
Click. 4 Click OK to 90º. Select 90 degrees. Tips for Avoiding Paper Jams When Printing on the A5-sized Paper If paper jams frequently occur when you print on the A5-sized paper: 1 Open the input tray and load paper into the tray as shown below. 2 Open the Samsung SCX-4x16 Series Properties window, set the paper size to A5(5.8x8.3 in.) from the Paper tab. 3 From the Orientation option of the Layout tab, set the Rotate option to start printing. 8 TROUBLESHOOTING 8.9
User Manual (ENGLISH)
Page 127
... the paper before loading. • Do not use creased, damp or highly curled paper. • Do not mix paper types in the Bypass tray. 8.10 TROUBLESHOOTING Ensure that the paper is facing down in the paper tray and facing up in the paper tray. • Use only recommended print materials. Tips...
... the paper before loading. • Do not use creased, damp or highly curled paper. • Do not mix paper types in the Bypass tray. 8.10 TROUBLESHOOTING Ensure that the paper is facing down in the paper tray and facing up in the paper tray. • Use only recommended print materials. Tips...
User Manual (ENGLISH)
Page 128
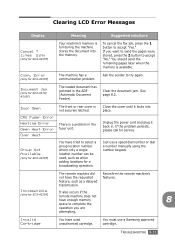
...a group location number where only a single location number can be used unauthorised cartridge. Just use a Samsung approved cartridge. Incompatible It also occurs if the (only for SCX-4216F) remote machine does not have tried to complete the operation you want to send the pages were ... using the number keypad. See page 8.2. TROUBLESHOOTING 8.11 Clearing LCD Error Messages Display Cancel ? 1:Yes 2:No (only for SCX-4216F) The front or rear cover is not securely latched. Ask the sender to accept "Yes." Error (only for SCX-4116/ 4216F) The loaded document has jammed in...
...a group location number where only a single location number can be used unauthorised cartridge. Just use a Samsung approved cartridge. Incompatible It also occurs if the (only for SCX-4216F) remote machine does not have tried to complete the operation you want to send the pages were ... using the number keypad. See page 8.2. TROUBLESHOOTING 8.11 Clearing LCD Error Messages Display Cancel ? 1:Yes 2:No (only for SCX-4216F) The front or rear cover is not securely latched. Ask the sender to accept "Yes." Error (only for SCX-4116/ 4216F) The loaded document has jammed in...

User Manual (ENGLISH)
Page 129
...Check the display to set up a copy or fax operation with the phone line. Not Assigned (only for SCX-4216F) No Paper Operation Not Assigned (only for example, Delay Fax. 8.12 TROUBLESHOOTING Or, turn the ECM mode on. The memory is not installed. The remote fax machine has not answered... is already engaged. Display Line Busy (only for SCX-4216F) Line Error (only for SCX-4216F) Load Document LSU Error Memory Full (only for SCX-4216F) No Answer (only for SCX-4216F) No Cartridge No. The paper in Standby Mode, for SCX-4216F) Meaning Suggested solutions The remote party did not...
...Check the display to set up a copy or fax operation with the phone line. Not Assigned (only for SCX-4216F) No Paper Operation Not Assigned (only for example, Delay Fax. 8.12 TROUBLESHOOTING Or, turn the ECM mode on. The memory is not installed. The remote fax machine has not answered... is already engaged. Display Line Busy (only for SCX-4216F) Line Error (only for SCX-4216F) Load Document LSU Error Memory Full (only for SCX-4216F) No Answer (only for SCX-4216F) No Cartridge No. The paper in Standby Mode, for SCX-4216F) Meaning Suggested solutions The remote party did not...
User Manual (ENGLISH)
Page 130
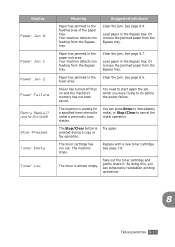
... which you can press Enter to immediately redial, or Stop/Clear to do before the power failure. You can temporarily reestablish printing operations. 8 TROUBLESHOOTING 8.13 See page 7.8. Paper has jammed in the fuser area. Clear the jam. Paper has jammed in the paper exit area. Power has... again. See page 8.4. The toner cartridge has run out. Your machine detects non feeding from the Bypass tray. The machine is waiting for SCX-4216F) Stop Pressed Toner Empty Toner Low Meaning Suggested solutions Paper has jammed in the feeding area of the paper tray. Clear the jam....
... which you can press Enter to immediately redial, or Stop/Clear to do before the power failure. You can temporarily reestablish printing operations. 8 TROUBLESHOOTING 8.13 See page 7.8. Paper has jammed in the fuser area. Clear the jam. Paper has jammed in the paper exit area. Power has... again. See page 8.4. The toner cartridge has run out. Your machine detects non feeding from the Bypass tray. The machine is waiting for SCX-4216F) Stop Pressed Toner Empty Toner Low Meaning Suggested solutions Paper has jammed in the feeding area of the paper tray. Clear the jam....
User Manual (ENGLISH)
Page 131
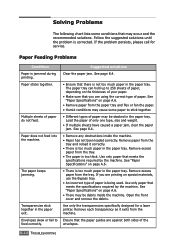
... the problem persists, please call for a laser printer. Transparencies stick together in the paper tray. If you are against both sides of the envelopes. 8.14 TROUBLESHOOTING Ensure that meets the specifications required by the machine. Follow the suggested solutions until the problem is jammed during printing. Paper Feeding Problems Condition Paper...
... the problem persists, please call for a laser printer. Transparencies stick together in the paper tray. If you are against both sides of the envelopes. 8.14 TROUBLESHOOTING Ensure that meets the specifications required by the machine. Follow the suggested solutions until the problem is jammed during printing. Paper Feeding Problems Condition Paper...
User Manual (ENGLISH)
Page 132
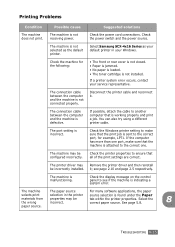
... cord connections. The machine is found under the Paper materials from the wrong properties may be incorrectly installed. Select Samsung SCX-4x16 Series as the default printer. it . The machine may be incorrect. TROUBLESHOOTING 8.15 If possible, attach the cable to ensure that is incorrect. tab within the printer properties. Printing Problems Condition...
... cord connections. The machine is found under the Paper materials from the wrong properties may be incorrectly installed. Select Samsung SCX-4x16 Series as the default printer. it . The machine may be incorrect. TROUBLESHOOTING 8.15 If possible, attach the cable to ensure that is incorrect. tab within the printer properties. Printing Problems Condition...

User Manual (ENGLISH)
Page 133
... driver was selected. Check the application's printer selection menu to another application. Turn the machine off and then back on again. 8.16 TROUBLESHOOTING Change the page orientation in the tray. Ensure that you are using Windows 9x/Me, the Spooling Setting may be very extremely slow....paper size in the printer driver settings matches the paper in your machine is selected. The operating system is blank. Right-click the Samsung SCX-4x16 Series printer icon, choose Properties, click the Details tab, and then choose the Spool Settings button. The software application is The...
... driver was selected. Check the application's printer selection menu to another application. Turn the machine off and then back on again. 8.16 TROUBLESHOOTING Change the page orientation in the tray. Ensure that you are using Windows 9x/Me, the Spooling Setting may be very extremely slow....paper size in the printer driver settings matches the paper in your machine is selected. The operating system is blank. Right-click the Samsung SCX-4x16 Series printer icon, choose Properties, click the Details tab, and then choose the Spool Settings button. The software application is The...
User Manual (ENGLISH)
Page 134
... connection. Press Stop/Clear to return to select "Slow." 4. If necessary, replace the toner cartridge. Press the scroll button (¥ or Š) to Standby Mode. 8 TROUBLESHOOTING 8.17 contain blank pages. The setting in Adobe Illustrator. An error occurs repeatedly when you are blank. Press Enter to "Slow." Press the scroll button...
... connection. Press Stop/Clear to return to select "Slow." 4. If necessary, replace the toner cartridge. Press the scroll button (¥ or Š) to Standby Mode. 8 TROUBLESHOOTING 8.17 contain blank pages. The setting in Adobe Illustrator. An error occurs repeatedly when you are blank. Press Enter to "Slow." Press the scroll button...
User Manual (ENGLISH)
Page 135
... inside of paper. for example, the paper is on the next page. • If these steps do not correct the problems, contact a service representative. 8.18 TROUBLESHOOTING
... inside of paper. for example, the paper is on the next page. • If these steps do not correct the problems, contact a service representative. 8.18 TROUBLESHOOTING
