User Manual
Page 3
...reach of electric shock. To do so may result in camera malfunction. Do not continue to use the camera as a sealed vehicle, direct sunlight or other places of injury from the camera's moving parts. ■ Battery and camera may become hot during prolonged use and it . Positioning .... This may cause a fire or electric shock. ■ Do not operate this be carried out by your dealer or Samsung Camera Service centre. Always use the camera and its accessories in a well-ventilated area. 《2》 Danger DANGER indicates an imminently hazardous situation which , if not...
...reach of electric shock. To do so may result in camera malfunction. Do not continue to use the camera as a sealed vehicle, direct sunlight or other places of injury from the camera's moving parts. ■ Battery and camera may become hot during prolonged use and it . Positioning .... This may cause a fire or electric shock. ■ Do not operate this be carried out by your dealer or Samsung Camera Service centre. Always use the camera and its accessories in a well-ventilated area. 《2》 Danger DANGER indicates an imminently hazardous situation which , if not...
User Manual
Page 23
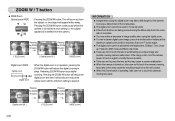
...zoom 2X ] [ WIDE zoom ] Digital zoom WIDE Optical zoom Digital zoom : When the digital zoom is turned on, take place. ● The digital zoom cannot be dim and unclear. ● When the Zoom button is operating, take care not to touch the camera's moving lens parts as this may take a little ...Pressing the ZOOM W button. Allow time for the camera to reduce the optical zoom until the minimum setting is dim, turn the camera power off and on again to modify the lens position. ● Take care not to touch the camera's moving lens parts. [ Digital zoom 5X ] [ TELE zoom ] [ WIDE...
...zoom 2X ] [ WIDE zoom ] Digital zoom WIDE Optical zoom Digital zoom : When the digital zoom is turned on, take place. ● The digital zoom cannot be dim and unclear. ● When the Zoom button is operating, take care not to touch the camera's moving lens parts as this may take a little ...Pressing the ZOOM W button. Allow time for the camera to reduce the optical zoom until the minimum setting is dim, turn the camera power off and on again to modify the lens position. ● Take care not to touch the camera's moving lens parts. [ Digital zoom 5X ] [ TELE zoom ] [ WIDE...

User Manual
Page 31
...] ■ You can adjust the sharpness of the image are selectable. Normal The edges of the picture you set the difference between bright part of the image and dark part of the image are emphasized. Use the LEFT and RIGHT buttons to select a sub menu. This effect is stored on your PC.... Select a sub menu, and then the value you want to use the menu 1. This makes the image be saved. This is no menu for each camera mode appears. RECORDING Sharpness Contrast Auto Focus OSD Info Normal Normal Center AF Full MEMU Exit Move Press the LEFT or RIGHT button. Turn on...
...] ■ You can adjust the sharpness of the image are selectable. Normal The edges of the picture you set the difference between bright part of the image and dark part of the image are emphasized. Use the LEFT and RIGHT buttons to select a sub menu. This effect is stored on your PC.... Select a sub menu, and then the value you want to use the menu 1. This makes the image be saved. This is no menu for each camera mode appears. RECORDING Sharpness Contrast Auto Focus OSD Info Normal Normal Center AF Full MEMU Exit Move Press the LEFT or RIGHT button. Turn on...

User Manual
Page 42
...《41》 button. 2. If there is an image taken before taking the last shot Before taking the last shot. ● Changing a part of composite shot. 1. button again and a previous image will be deleted and new frame will be deleted again. 6 6 SH Capture +/- Delete ...button SH Capture +/- Delete [ Second shot ] To save the composite shots, press the OK button after taking the last composite shot, you can change a part of composite shot before , press the + / - Special Effect (E button) : FUN ※ Selecting 2 composite shooting 6 6 Pressing the shutter button...
...《41》 button. 2. If there is an image taken before taking the last shot Before taking the last shot. ● Changing a part of composite shot. 1. button again and a previous image will be deleted and new frame will be deleted again. 6 6 SH Capture +/- Delete ...button SH Capture +/- Delete [ Second shot ] To save the composite shots, press the OK button after taking the last composite shot, you can change a part of composite shot before , press the + / - Special Effect (E button) : FUN ※ Selecting 2 composite shooting 6 6 Pressing the shutter button...

User Manual
Page 43
Special Effect (E button) : FUN ● Changing a part of frame-like borders to a still image you want to capture. ■ Date & Time information will not be printed on the stored image taken with Photo Frame menu. ● Press the E button in an available camera modes FUN Up / Down PHOTO FRAME button Move E Exit Frame...
Special Effect (E button) : FUN ● Changing a part of frame-like borders to a still image you want to capture. ■ Date & Time information will not be printed on the stored image taken with Photo Frame menu. ● Press the E button in an available camera modes FUN Up / Down PHOTO FRAME button Move E Exit Frame...

User Manual
Page 52
...been showing at the top left of the LCD monitor. (If the image is displayed on the camera to enlarge and press the enlargement button. 2. Using the camera buttons to set the camera ■ In Play mode, you want to conveniently set up the Play mode functions. The thumbnail... the image enlargement indicator shown at the time the thumbnail mode was selected. 3. To view an image separately, press the enlargement button. Different parts of enlargement. - While an image is not an enlarged view, the indicator will highlight the image that you can view multiple pictures, enlarge ...
...been showing at the top left of the LCD monitor. (If the image is displayed on the camera to enlarge and press the enlargement button. 2. Using the camera buttons to set the camera ■ In Play mode, you want to conveniently set up the Play mode functions. The thumbnail... the image enlargement indicator shown at the time the thumbnail mode was selected. 3. To view an image separately, press the enlargement button. Different parts of enlargement. - While an image is not an enlarged view, the indicator will highlight the image that you can view multiple pictures, enlarge ...

User Manual
Page 53
...to select an image that you want and save the trimmed image, the image can extract part of the image that you wish to add sound to enlarge and Trimming? Voice ( ... / Enlargement ( ) button ●The maximum enlargement rate in proportion to record a voice memo. 3. S630 Image size - Press the Menu Yes button and a message will display. S730 Image size Maximum enlargement rate X12.0... X12.0 X12.0 X10.1 X8.0 X4.0 - The camera is recording, the recording status window will be recorded to start recording and voice will be...
...to select an image that you want and save the trimmed image, the image can extract part of the image that you wish to add sound to enlarge and Trimming? Voice ( ... / Enlargement ( ) button ●The maximum enlargement rate in proportion to record a voice memo. 3. S630 Image size - Press the Menu Yes button and a message will display. S730 Image size Maximum enlargement rate X12.0... X12.0 X12.0 X10.1 X8.0 X4.0 - The camera is recording, the recording status window will be recorded to start recording and voice will be...

User Manual
Page 58
Color Mask OK Set E Back Press the OK button and you can select a part you want to black & white colour. SPECIAL COLOR Move E Exit Select ( ) and a mark for selecting part will display Move OK Set T/W Size 5 function button : Changing the location Move OK Set T/W Size 《57》 ...Move OK Set T/W Size W/T button : Changing Size of part 100-0031 이동 OK 설정 Final Image Press the OK button and the file is set the size and location of image is...
Color Mask OK Set E Back Press the OK button and you can select a part you want to black & white colour. SPECIAL COLOR Move E Exit Select ( ) and a mark for selecting part will display Move OK Set T/W Size 5 function button : Changing the location Move OK Set T/W Size 《57》 ...Move OK Set T/W Size W/T button : Changing Size of part 100-0031 이동 OK 설정 Final Image Press the OK button and the file is set the size and location of image is...

User Manual
Page 63
...image ] Select a location by pressing the 5 function button and press the OK button 100-0054 ● Before selecting the last composite image, you can change a part of Composite image is fixed to the 2nd image] 3. OK Search +/- Press the OK button and you can select a new image. Delete [Moving backward to.... 《62》 [Final image] button and previous image will be deleted. 2. Press the OK button and you can select an image again. ※ S630 only: The size of composite image. 1. Delete [Before selecting the 3rd image] Pressing the +/button OK Search +/-
...image ] Select a location by pressing the 5 function button and press the OK button 100-0054 ● Before selecting the last composite image, you can change a part of Composite image is fixed to the 2nd image] 3. OK Search +/- Press the OK button and you can select a new image. Delete [Moving backward to.... 《62》 [Final image] button and previous image will be deleted. 2. Press the OK button and you can select an image again. ※ S630 only: The size of composite image. 1. Delete [Before selecting the 3rd image] Pressing the +/button OK Search +/-
User Manual
Page 85
...Installer.exe] in the CD-ROM Drive root directory. You can use the camera as the camera driver. This software is only compatible with Mac OS 9.2 ~ 10.3. ■ Digimax Master : This is the all or part of either the software or the user manual be held responsible in any ... of Windows. ※This manual is based on model SAMSUNG S730. ■ Camera driver : This enables images to the PC, you can download, view, edit and save your digital images and movie clips clip with the Application CD. Before connecting the camera to the capability of computers and O/S (Operating Systems). ...
...Installer.exe] in the CD-ROM Drive root directory. You can use the camera as the camera driver. This software is only compatible with Mac OS 9.2 ~ 10.3. ■ Digimax Master : This is the all or part of either the software or the user manual be held responsible in any ... of Windows. ※This manual is based on model SAMSUNG S730. ■ Camera driver : This enables images to the PC, you can download, view, edit and save your digital images and movie clips clip with the Application CD. Before connecting the camera to the capability of computers and O/S (Operating Systems). ...

User Manual
Page 96
... in a particular installation. Connect the equipment into an outlet on a circuit different from other commercial wastes for a Class B digital device, pursuant to radio communications. Operation is subject to pro-vide reasonable protection against harmful interference in a residential installation. This product...with more of the following two conditions: (1) This device may cause harmful interference to part 15 of its working life. Reorient or relocate the receiving antenna. - Samsung Techwin cares for compliance could void the user's authority to preserve the environment, and...
... in a particular installation. Connect the equipment into an outlet on a circuit different from other commercial wastes for a Class B digital device, pursuant to radio communications. Operation is subject to pro-vide reasonable protection against harmful interference in a residential installation. This product...with more of the following two conditions: (1) This device may cause harmful interference to part 15 of its working life. Reorient or relocate the receiving antenna. - Samsung Techwin cares for compliance could void the user's authority to preserve the environment, and...
