User Manual (user Manual) (ver.1.0) (English)
Page 2
... 3-8 Standard Signal Mode Table 3-9 Installing the Device Driver 3-10 Product Operating Buttons 3-11 Using the Screen Adjustment Menu (OSD: On Screen Display) . . . 3-12 INSTALLING THE SOFTWARE Natural Color 4-1 MagicTune 4-2 MultiScreen 4-3 TROUBLESHOOTING Monitor Self-Diagnosis 5-1 Before Requesting Service 5-2 FAQ 5-3 MORE INFORMATION Specifications 6-1 Power Saving Function 6-2 Specifications 6-3 Power Saving Function 6-4 Specifications 6-5 Power Saving Function...
... 3-8 Standard Signal Mode Table 3-9 Installing the Device Driver 3-10 Product Operating Buttons 3-11 Using the Screen Adjustment Menu (OSD: On Screen Display) . . . 3-12 INSTALLING THE SOFTWARE Natural Color 4-1 MagicTune 4-2 MultiScreen 4-3 TROUBLESHOOTING Monitor Self-Diagnosis 5-1 Before Requesting Service 5-2 FAQ 5-3 MORE INFORMATION Specifications 6-1 Power Saving Function 6-2 Specifications 6-3 Power Saving Function 6-4 Specifications 6-5 Power Saving Function...
User Manual (user Manual) (ver.1.0) (English)
Page 32
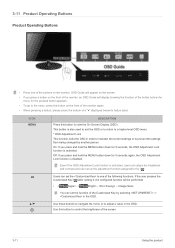
...users can adjust the brightness and contrast and can set the to one of the buttons on the front of the monitor again. • When pressing a button, please press the bottom of a "●" displayed below its button label. Use this button to the menu, press the button on the... monitor. 3-11 Product Operating Buttons Product Operating Buttons • Press one of the button before the menu for 5 seconds, the OSD ...
...users can adjust the brightness and contrast and can set the to one of the buttons on the front of the monitor again. • When pressing a button, please press the bottom of a "●" displayed below its button label. Use this button to the menu, press the button on the... monitor. 3-11 Product Operating Buttons Product Operating Buttons • Press one of the button before the menu for 5 seconds, the OSD ...
User Manual (user Manual) (ver.1.0) (English)
Page 34
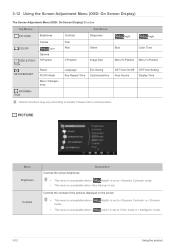
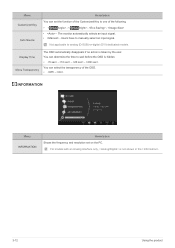
... Repeat Time Eco Saving Customized Key Bright Angle Blue Color Tone Menu H-Position Menu V-Position Off Timer On/Off Auto Source Off Timer Setting Display Time INFORMATION Monitor functions may vary according to mode. • This menu is unavailable when is set. PICTURE Menu Brightness Contrast Controls the screen brightness. Description •...
... Repeat Time Eco Saving Customized Key Bright Angle Blue Color Tone Menu H-Position Menu V-Position Off Timer On/Off Auto Source Off Timer Setting Display Time INFORMATION Monitor functions may vary according to mode. • This menu is unavailable when is set. PICTURE Menu Brightness Contrast Controls the screen brightness. Description •...
User Manual (user Manual) (ver.1.0) (English)
Page 36
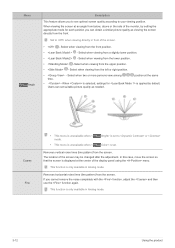
... This menu is unavailable when < mode. • This menu is unavailable when < Bright> is set to when viewing directly in front of the monitor, by setting the appropriate mode for is only available in Analog mode. Removes vertical noise lines (line pattern) from the left or right position. &#... viewing from the screen. Select when two or more persons view among , , position at an angle from the front. The location of the display panel using the menu. Select when viewing from the lower position. • -Select when viewing from the front position. • - This function is...
... This menu is unavailable when < mode. • This menu is unavailable when < Bright> is set to when viewing directly in front of the monitor, by setting the appropriate mode for is only available in Analog mode. Removes vertical noise lines (line pattern) from the left or right position. &#... viewing from the screen. Select when two or more persons view among , , position at an angle from the front. The location of the display panel using the menu. Select when viewing from the lower position. • -Select when viewing from the front position. • - This function is...
User Manual (user Manual) (ver.1.0) (English)
Page 39
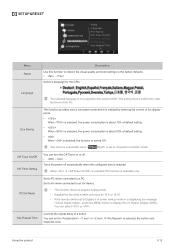
... to the factory defaults. • - Using the product 3-12 Select a language for the wide models only such as 16:9 or 16:10. • If the monitor (when set to display the On Screen Display (OSD). This function provides user a low power mode which is realized by lowering the current of the.... This menu is unavailable when < Bright> is set to Digital) is in power saving mode or is selected, the button only responds once. If is displaying the message , press the MENU button to mode. When of a button. Set to AV when connected to an AV device. • This function does not...
... to the factory defaults. • - Using the product 3-12 Select a language for the wide models only such as 16:9 or 16:10. • If the monitor (when set to display the On Screen Display (OSD). This function provides user a low power mode which is realized by lowering the current of the.... This menu is unavailable when < Bright> is set to Digital) is in power saving mode or is selected, the button only responds once. If is displaying the message , press the MENU button to mode. When of a button. Set to AV when connected to an AV device. • This function does not...
User Manual (user Manual) (ver.1.0) (English)
Page 40
... frequency and resolution set the function of the following. •< Angle> - < Bright> - - • - Menu Customized Key Auto Source Description You can set on the PC. Display Time Menu Transparency The OSD automatically disappears if no action is not shown in the . 3-12 Using the product The...
... frequency and resolution set the function of the following. •< Angle> - < Bright> - - • - Menu Customized Key Auto Source Description You can set on the PC. Display Time Menu Transparency The OSD automatically disappears if no action is not shown in the . 3-12 Using the product The...
User Manual (user Manual) (ver.1.0) (English)
Page 41
This software works only for Samsung products and enables adjusting the displayed colors on the product and matches the colors on the product with the colors of the software (F1). The Natural Color is Natural Color ? You can download it from the website below and install; http://www.samsung.com/us/consumer/learningresources/monitor/naturalcolorexpert/pop_download.html Installing the Software 4-1 For more information, refer to the online help of the printed pictures. 4 Installing the Software 4-1 Natural Color What is provided online.
This software works only for Samsung products and enables adjusting the displayed colors on the product and matches the colors on the product with the colors of the software (F1). The Natural Color is Natural Color ? You can download it from the website below and install; http://www.samsung.com/us/consumer/learningresources/monitor/naturalcolorexpert/pop_download.html Installing the Software 4-1 For more information, refer to the online help of the printed pictures. 4 Installing the Software 4-1 Natural Color What is provided online.
User Manual (user Manual) (ver.1.0) (English)
Page 42
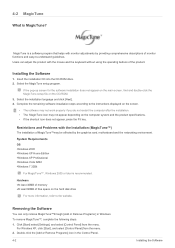
...2. Users can only remove MagicTune™through [Add or Remove Programs ] in the Control Panel. 4-2 Installing the Software Restrictions and Problems with monitor adjustments by the graphics card, motherboard and the networking environment. For Windows XP, click [Start], and select [Control Panel] from the menu....For more information, refer to the website. Hardware •At least 32MB of memory •At least 60MB of monitor functions and easy-to the instructions displayed on the screen. • The software may not work properly if you do not restart the computer after the ...
...2. Users can only remove MagicTune™through [Add or Remove Programs ] in the Control Panel. 4-2 Installing the Software Restrictions and Problems with monitor adjustments by the graphics card, motherboard and the networking environment. For Windows XP, click [Start], and select [Control Panel] from the menu....For more information, refer to the website. Hardware •At least 32MB of memory •At least 60MB of monitor functions and easy-to the instructions displayed on the screen. • The software may not work properly if you do not restart the computer after the ...
User Manual (user Manual) (ver.1.0) (English)
Page 44
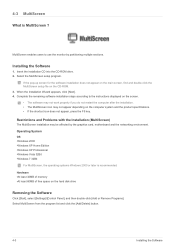
...icon does not appear, press the F5 key. Select the MultiScreen setup program. Complete the remaining software installation steps according to use the monitor by the graphics card, motherboard and the networking environment. Select MultiScreen from the program list and click the [Add/Delete] button. ...the Software Click [Start], select [Settings]/[Control Panel], and then double-click [Add or Remove Programs]. MultiScreen enables users to the instructions displayed on the screen. • The software may not work properly if you do not restart the computer after the installation. • ...
...icon does not appear, press the F5 key. Select the MultiScreen setup program. Complete the remaining software installation steps according to use the monitor by the graphics card, motherboard and the networking environment. Select MultiScreen from the program list and click the [Add/Delete] button. ...the Software Click [Start], select [Settings]/[Control Panel], and then double-click [Add or Remove Programs]. MultiScreen enables users to the instructions displayed on the screen. • The software may not work properly if you do not restart the computer after the installation. • ...
User Manual (user Manual) (ver.1.0) (English)
Page 45
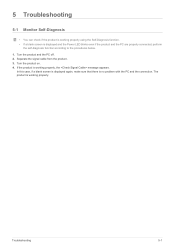
.... Troubleshooting 5-1 If the product is working properly, the message appears. In this case, if a blank screen is displayed again, make sure that there is displayed and the Power LED blinks even if the product and the PC are properly connected, perform the self-diagnosis function according... to the procedures below. 1. Turn the product on. 4. 5 Troubleshooting 5-1 Monitor Self-Diagnosis • You can check if the...
.... Troubleshooting 5-1 If the product is working properly, the message appears. In this case, if a blank screen is displayed again, make sure that there is displayed and the Power LED blinks even if the product and the PC are properly connected, perform the self-diagnosis function according... to the procedures below. 1. Turn the product on. 4. 5 Troubleshooting 5-1 Monitor Self-Diagnosis • You can check if the...
User Manual (user Manual) (ver.1.0) (English)
Page 46
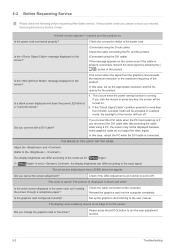
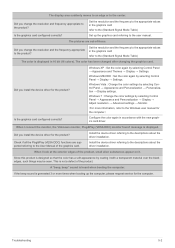
... Troubleshooting This occurs when the signal from the graphics card exceeds the maximum resolution or the maximum frequency of the monitor will be displayed because some graphics cards do not output the video signal. Is the graphics card configured correctly? 5-2 Before Requesting Service... requesting After-Sales service. If the problem continues, please contact your nearest Samsung Electronics Service Center. Is the message displayed on screen adjustment menu (OSD) does not appear. Is a blank screen displayed and does the power LED blink at a 1 second interval? If the...
... Troubleshooting This occurs when the signal from the graphics card exceeds the maximum resolution or the maximum frequency of the monitor will be displayed because some graphics cards do not output the video signal. Is the graphics card configured correctly? 5-2 Before Requesting Service... requesting After-Sales service. If the problem continues, please contact your nearest Samsung Electronics Service Center. Is the message displayed on screen adjustment menu (OSD) does not appear. Is a blank screen displayed and does the power LED blink at a 1 second interval? If the...
User Manual (user Manual) (ver.1.0) (English)
Page 47
... if all the Plug&Play (VESA DDC) functions are out-of the product. When I connect the monitor, the 'Unknown monitor, Plug&Play (VESA DDC) monitor found' message is displayed in accordance with a transparent material over the black edges, such things may be seen. If the beep.... Windows ME/2000 : Set the color again by selecting Control Panel → Appearance and Personalization → Display → Adjust resolution → Advanced settings → Monitor. (For more times when booting up the graphics card referring to the descriptions about the driver installation. Since...
... if all the Plug&Play (VESA DDC) functions are out-of the product. When I connect the monitor, the 'Unknown monitor, Plug&Play (VESA DDC) monitor found' message is displayed in accordance with a transparent material over the black edges, such things may be seen. If the beep.... Windows ME/2000 : Set the color again by selecting Control Panel → Appearance and Personalization → Display → Adjust resolution → Advanced settings → Monitor. (For more times when booting up the graphics card referring to the descriptions about the driver installation. Since...
User Manual (user Manual) (ver.1.0) (English)
Page 48
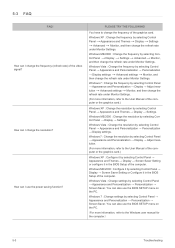
...Appearance and Personalization → Personalization → Display settings → Advanced settings → Monitor, and then change the refresh rate under Monitor Settings. (For more information, refer to change the refresh rate under Monitor Settings. Windows Vista : Change the resolution ...Control Panel → Appearance and Themes → Display → Settings → Advanced → Monitor, and then change the refresh rate under Monitor Settings. trol Panel → Display → Settings → Advanced → Monitor, and then change the frequency (refresh rate) of...
...Appearance and Personalization → Personalization → Display settings → Advanced settings → Monitor, and then change the refresh rate under Monitor Settings. (For more information, refer to change the refresh rate under Monitor Settings. Windows Vista : Change the resolution ...Control Panel → Appearance and Themes → Display → Settings → Advanced → Monitor, and then change the refresh rate under Monitor Settings. trol Panel → Display → Settings → Advanced → Monitor, and then change the frequency (refresh rate) of...


