
Quick Guide (easy Manual) (ver.1.0) (English)
Page 1
... 2 OPERATING INSTRUCTIONS 4 SETTING UP THE REFRIGERATOR 4 MAJOR FEATURES 4 CONTROL PANEL 5 DIGITAL PANEL 6 TEMPERATURE CONTROL 7 ICE and COLD WATER DISPENSER 7 SHELVES and BINS 8 FOOD STORAGE GUIDE 9 CoolSelect ZoneTM Drawer GUIDE 11 REMOVING THE FREEZER ACCESSORIES 13 REMOVING THE REFRIGERATOR ACCESSORIES 13 CLEANING THE ACCESSORIES 14 CHANGING THE INTERIOR LIGHT 15 WATER FILTER 16 DOORS ...16 INSTALLATION INSTRUCTIONS 17 INSTALLATION OF THE REFRIGERATOR 17 REMOVING THE REFRIGERATOR DOORS 18 REATTACHING THE REFRIGERATOR DOORS 21 LEVELING THE REFRIGERATOR 24 ADJUSTING THE...
... 2 OPERATING INSTRUCTIONS 4 SETTING UP THE REFRIGERATOR 4 MAJOR FEATURES 4 CONTROL PANEL 5 DIGITAL PANEL 6 TEMPERATURE CONTROL 7 ICE and COLD WATER DISPENSER 7 SHELVES and BINS 8 FOOD STORAGE GUIDE 9 CoolSelect ZoneTM Drawer GUIDE 11 REMOVING THE FREEZER ACCESSORIES 13 REMOVING THE REFRIGERATOR ACCESSORIES 13 CLEANING THE ACCESSORIES 14 CHANGING THE INTERIOR LIGHT 15 WATER FILTER 16 DOORS ...16 INSTALLATION INSTRUCTIONS 17 INSTALLATION OF THE REFRIGERATOR 17 REMOVING THE REFRIGERATOR DOORS 18 REATTACHING THE REFRIGERATOR DOORS 21 LEVELING THE REFRIGERATOR 24 ADJUSTING THE...
Quick Guide (easy Manual) (ver.1.0) (English)
Page 2
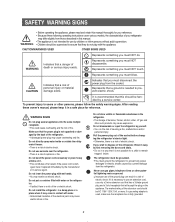
... following operating instructions cover various models, the characteristics of fire or electric shock. aged, have it replaced immediately by current leakage from the refrigerator. Do not put a container filled with water on the refrigerator. • If spilled, there is a risk of your reference. • Because these owner's manual, please keep it is necessary to ensure that a risk of the refrigerator . • A damaged power plug...
... following operating instructions cover various models, the characteristics of fire or electric shock. aged, have it replaced immediately by current leakage from the refrigerator. Do not put a container filled with water on the refrigerator. • If spilled, there is a risk of your reference. • Because these owner's manual, please keep it is necessary to ensure that a risk of the refrigerator . • A damaged power plug...
Quick Guide (easy Manual) (ver.1.0) (English)
Page 3
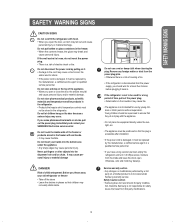
... planned, empty the refrigerator and turn it must be stored in the refrigerator. • Products that require strict temperature controls must be used for safety issues that the plug is accessible after installation. • If the power cord is a risk of child entrapment. Do not put fingers or other objects into the bottom area under Samsung warranty service Safety Caution section •...
... planned, empty the refrigerator and turn it must be stored in the refrigerator. • Products that require strict temperature controls must be used for safety issues that the plug is accessible after installation. • If the power cord is a risk of child entrapment. Do not put fingers or other objects into the bottom area under Samsung warranty service Safety Caution section •...
Quick Guide (easy Manual) (ver.1.0) (English)
Page 4
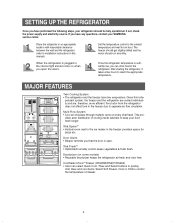
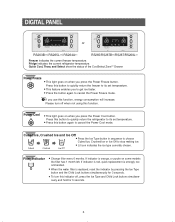
... questions, contact your SAMSUNG service center. Once the refrigerator temperature is plugged in the refrigerator. Given this manual) Set the temperature control to the ice maker in this inde- Deodorizer (on every shelf level. Door Alarm • Beeper reminds you can select Quick Cool, Thaw and Select buttons to quickly chill, thaw and cool items. Select Soft Freeze, Cool or Chill to control the temperature of cooling inside cabinets to installation instructions in the freezer provides space for...
... questions, contact your SAMSUNG service center. Once the refrigerator temperature is plugged in the refrigerator. Given this manual) Set the temperature control to the ice maker in this inde- Deodorizer (on every shelf level. Door Alarm • Beeper reminds you can select Quick Cool, Thaw and Select buttons to quickly chill, thaw and cool items. Select Soft Freeze, Cool or Chill to control the temperature of cooling inside cabinets to installation instructions in the freezer provides space for...
Quick Guide (easy Manual) (ver.1.0) (English)
Page 5
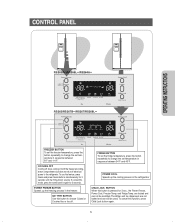
... Freeze, Power Cool, Freezer Temp. The Water and Ice dispensers are locked and can still be modified. and Fridge Temp. CONTROL PANEL OPERATING INSTRUCTIONS RS263B**/RS265L**/RS264A** RS265/RS267B**/RS267/RS269L** FREEZER BUTTON To set the freezer temperature, press the button repeatedly to change the set temperature in both the freezer and refrigerator compartments but does not shut off electrical power to the refrigerator. To use this function, press Child Lock button again. 5 ICE TYPE BUTTON Use this button to choose Cubed or Crushed Ice or Ice off stops cooling...
... Freeze, Power Cool, Freezer Temp. The Water and Ice dispensers are locked and can still be modified. and Fridge Temp. CONTROL PANEL OPERATING INSTRUCTIONS RS263B**/RS265L**/RS264A** RS265/RS267B**/RS267/RS269L** FREEZER BUTTON To set the freezer temperature, press the button repeatedly to change the set temperature in both the freezer and refrigerator compartments but does not shut off electrical power to the refrigerator. To use this function, press Child Lock button again. 5 ICE TYPE BUTTON Use this button to choose Cubed or Crushed Ice or Ice off stops cooling...
Quick Guide (easy Manual) (ver.1.0) (English)
Page 6
... use this button again to cancel the Power Freeze mode. Power Cool • This light goes on when you press the Power Cool button. Cubed Ice, Crushed Ice and Ice Off • Press the Ice Type button in sequence to choose Cubed Ice, Crushed Ice or Ice Off to its set temperature. • Press this function, energy consumption will increase. Press this button to quickly return the refrigerator to stop making ice. • Lit icon indicates the ice type currently chosen. Fridge indicates...
... use this button again to cancel the Power Freeze mode. Power Cool • This light goes on when you press the Power Cool button. Cubed Ice, Crushed Ice and Ice Off • Press the Ice Type button in sequence to choose Cubed Ice, Crushed Ice or Ice Off to its set temperature. • Press this function, energy consumption will increase. Press this button to quickly return the refrigerator to stop making ice. • Lit icon indicates the ice type currently chosen. Fridge indicates...
Quick Guide (easy Manual) (ver.1.0) (English)
Page 7
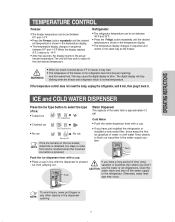
... 4°F in freezer, it back in line with the dispenser to prevent If you have just installed the refrigerator or installed a new water filter, throw away the first six glassfuls of water or until water flows cleanly to flush out impurities in cube form and is crushed when the Crushed ice button is approximately 0.3 gal. Ice stays in the water supply system. Cold Water • Push the water dispenser lever with a cup...
... 4°F in freezer, it back in line with the dispenser to prevent If you have just installed the refrigerator or installed a new water filter, throw away the first six glassfuls of water or until water flows cleanly to flush out impurities in cube form and is crushed when the Crushed ice button is approximately 0.3 gal. Ice stays in the water supply system. Cold Water • Push the water dispenser lever with a cup...
Quick Guide (easy Manual) (ver.1.0) (English)
Page 8
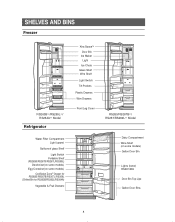
SHELVES AND BINS Freezer RS263B**/RS265L**/ RS264A** Model Refrigerator Water Filter Compartment Light (upper) Spill-proof glass Shelf Light Switch Foldable Shelf (RS265B/RS267B/RS267L/RS269L) Deodorizer(on some models) Egg Container(on some models) CoolSelect ZoneTM Drawer for RS265B/RS267B/RS267L/RS269L (Chilled Bin for RS263B/RS265L/RS264A) Vegetable & Fruit Drawers Xtra SpaceTM Door Bin Ice Maker Light Ice Chute Glass Shelf Wire Shelf Light Switch Tilt Pockets Plastic Drawers Wire Drawers Front Leg Cover RS265/RS267B**/ RS267/RS269L** Model Dairy Compartment Wine Shelf (on some...
SHELVES AND BINS Freezer RS263B**/RS265L**/ RS264A** Model Refrigerator Water Filter Compartment Light (upper) Spill-proof glass Shelf Light Switch Foldable Shelf (RS265B/RS267B/RS267L/RS269L) Deodorizer(on some models) Egg Container(on some models) CoolSelect ZoneTM Drawer for RS265B/RS267B/RS267L/RS269L (Chilled Bin for RS263B/RS265L/RS264A) Vegetable & Fruit Drawers Xtra SpaceTM Door Bin Ice Maker Light Ice Chute Glass Shelf Wire Shelf Light Switch Tilt Pockets Plastic Drawers Wire Drawers Front Leg Cover RS265/RS267B**/ RS267/RS269L** Model Dairy Compartment Wine Shelf (on some...
Quick Guide (easy Manual) (ver.1.0) (English)
Page 13
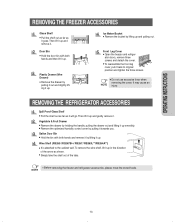
...; Remove the optimized humidity control cover by holding the handle, pulling the drawer out and lifting it up and gently remove it will go. Vegetable & Fruit Drawer • Remove the drawer by pulling it up . OPERATING INSTRUCTIONS REMOVING THE FREEZER ACCESSORIES Glass Shelf • Pull the shelf out as far as it back to the cabinet wall. Front Leg Cover • Open the freezer and refriger- REMOVING THE REFRIGERATOR ACCESSORIES Spill Proof Glass Shelf...
...; Remove the optimized humidity control cover by holding the handle, pulling the drawer out and lifting it up and gently remove it will go. Vegetable & Fruit Drawer • Remove the drawer by pulling it up . OPERATING INSTRUCTIONS REMOVING THE FREEZER ACCESSORIES Glass Shelf • Pull the shelf out as far as it back to the cabinet wall. Front Leg Cover • Open the freezer and refriger- REMOVING THE REFRIGERATOR ACCESSORIES Spill Proof Glass Shelf...
Quick Guide (easy Manual) (ver.1.0) (English)
Page 14
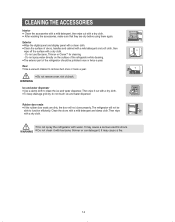
... of the refrigerator should be able to function efficiently. Clean the doors with benzene, thinner or car detergent. WARNING • Do not clean it out with water. Rear • Use a vacuum cleaner to clean the ice and water dispenser. It may cause a serious electric shock. WARNING Ice and water dispenser • Use a damp cloth to remove dust once or twice a year. • Do not remove cover, risk of...
... of the refrigerator should be able to function efficiently. Clean the doors with benzene, thinner or car detergent. WARNING • Do not clean it out with water. Rear • Use a vacuum cleaner to clean the ice and water dispenser. It may cause a serious electric shock. WARNING Ice and water dispenser • Use a damp cloth to remove dust once or twice a year. • Do not remove cover, risk of...

Quick Guide (easy Manual) (ver.1.0) (English)
Page 15
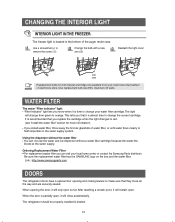
... the power supply. Use replacement bulb size E26, maximum 40 watts. E17 30W Replacement bulbs for both freezer and fridge are available from the cover and soak it in clean and warm water for at least 4 hrs. Upper Place a flat screwdriver under Change the bulb with a flat blade screw driver as shown. • Take out the cartridge from your service center. After changing the bulb, replace the light cover. If you have difficulty changing the light, contact...
... the power supply. Use replacement bulb size E26, maximum 40 watts. E17 30W Replacement bulbs for both freezer and fridge are available from the cover and soak it in clean and warm water for at least 4 hrs. Upper Place a flat screwdriver under Change the bulb with a flat blade screw driver as shown. • Take out the cartridge from your service center. After changing the bulb, replace the light cover. If you have difficulty changing the light, contact...
Quick Guide (easy Manual) (ver.1.0) (English)
Page 16
... refrigerator doors have a special door opening the door, it will change the current cartridge. Use replacement bulb size E26, maximum 40 watts. This tells you can not use the water and ice dispenser without a water filter cartridge because the water line blocks at the water supply. The refrigerator should be properly installed & leveled. 16 Ordering Replacement Water Filter • For replacement waster filter you that they close automatically. When opening and closing feature to change from your local home center or contact the Samsung Parts...
... refrigerator doors have a special door opening the door, it will change the current cartridge. Use replacement bulb size E26, maximum 40 watts. This tells you can not use the water and ice dispenser without a water filter cartridge because the water line blocks at the water supply. The refrigerator should be properly installed & leveled. 16 Ordering Replacement Water Filter • For replacement waster filter you that they close automatically. When opening and closing feature to change from your local home center or contact the Samsung Parts...
Quick Guide (easy Manual) (ver.1.0) (English)
Page 17
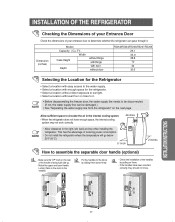
... top when installing the refrigerator. Fix the handles to the doors by pulling on the rear of the handle is facing right side up. - INSTALLATION INSTRUCTIONS 17 Make sure the "UP" mark on them down firmly. - INSTALLATION OF THE REFRIGERATOR Checking the Dimensions of your Entrance Door Check the dimensions of your entrance door to determine whether the refrigerator can be disconnected. (If not, the water supply line can...
... top when installing the refrigerator. Fix the handles to the doors by pulling on the rear of the handle is facing right side up. - INSTALLATION INSTRUCTIONS 17 Make sure the "UP" mark on them down firmly. - INSTALLATION OF THE REFRIGERATOR Checking the Dimensions of your Entrance Door Check the dimensions of your entrance door to determine whether the refrigerator can be disconnected. (If not, the water supply line can...
Quick Guide (easy Manual) (ver.1.0) (English)
Page 18
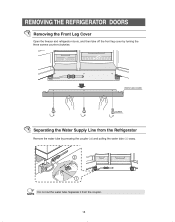
REMOVING THE REFRIGERATOR DOORS Removing the Front Leg Cover Open the freezer and refrigerator doors, and then take off the front leg cover by pressing the coupler (➁) and pulling the water tube (➀) away. FRONT LEG COVER SCREW Separating the Water Supply Line from the coupler. NOTE 18 Separate it from the Refrigerator Remove the water tube by turning the three screws counter-clockwise. Do not cut the water tube.
REMOVING THE REFRIGERATOR DOORS Removing the Front Leg Cover Open the freezer and refrigerator doors, and then take off the front leg cover by pressing the coupler (➁) and pulling the water tube (➀) away. FRONT LEG COVER SCREW Separating the Water Supply Line from the coupler. NOTE 18 Separate it from the Refrigerator Remove the water tube by turning the three screws counter-clockwise. Do not cut the water tube.
Quick Guide (easy Manual) (ver.1.0) (English)
Page 24
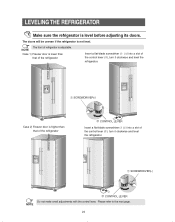
... the control lever (➁), turn it clockwise and level the refrigerator. LEVELING THE REFRIGERATOR Make sure the refrigerator is not level. DIFFERENCE OF HEIGHT ➀ SCREWDRIVER(-) Case 2) Freezer door is adjustable. DIFFERENCE OF HEIGHT ➀ SCREWDRIVER(-) NOTE ➁ CONTROL LEVER Do not make small adjustments with the control lever, Please refer to the next page. 24 The doors will be uneven if the refrigerator is level before adjusting its doors. NOTE Case 1) Freezer door is...
... the control lever (➁), turn it clockwise and level the refrigerator. LEVELING THE REFRIGERATOR Make sure the refrigerator is not level. DIFFERENCE OF HEIGHT ➀ SCREWDRIVER(-) Case 2) Freezer door is adjustable. DIFFERENCE OF HEIGHT ➀ SCREWDRIVER(-) NOTE ➁ CONTROL LEVER Do not make small adjustments with the control lever, Please refer to the next page. 24 The doors will be uneven if the refrigerator is level before adjusting its doors. NOTE Case 1) Freezer door is...
Quick Guide (easy Manual) (ver.1.0) (English)
Page 26
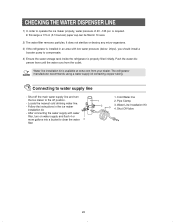
... water dis- Locate the nearest cold drinking water line. - Follow the instructions in 10 secs. 2) The water filter removes particles. penser lever until the water runs from your dealer. Connecting to the off position. - After connecting the water supply with low water pressure (below 20psi), you should install a booster pump to compensate. 4) Ensure the water storage tank inside the refrigerator is installed in an area with water filter, turn the Ice maker to water supply line - Water line installation kit is required. Shut Off Valve...
... water dis- Locate the nearest cold drinking water line. - Follow the instructions in 10 secs. 2) The water filter removes particles. penser lever until the water runs from your dealer. Connecting to the off position. - After connecting the water supply with low water pressure (below 20psi), you should install a booster pump to compensate. 4) Ensure the water storage tank inside the refrigerator is installed in an area with water filter, turn the Ice maker to water supply line - Water line installation kit is required. Shut Off Valve...
Quick Guide (easy Manual) (ver.1.0) (English)
Page 27
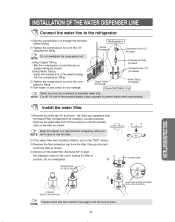
... installed in position. Remove the water filter from the Water Filter Compartment by rotating it counterclockwise. SEPARATION OF RED CAP (A) COVER FILTER INSTALLATION INSTRUCTIONS STICKER (MONTH INDICATION) Please check that the indication line aligns with the lock position. Refrigerator Ferrule (Purchased) Compression Nut (1/4 (Provided) Do not overtighten the compression nut. Using Plastic Tubing - Compression Fitting (Provided) Compression Nut (1/4 (Purchased) Copper Tubing (Purchased) Plastic Tubing (Purchased) Household Water Line Water line must be connected...
... installed in position. Remove the water filter from the Water Filter Compartment by rotating it counterclockwise. SEPARATION OF RED CAP (A) COVER FILTER INSTALLATION INSTRUCTIONS STICKER (MONTH INDICATION) Please check that the indication line aligns with the lock position. Refrigerator Ferrule (Purchased) Compression Nut (1/4 (Provided) Do not overtighten the compression nut. Using Plastic Tubing - Compression Fitting (Provided) Compression Nut (1/4 (Purchased) Copper Tubing (Purchased) Plastic Tubing (Purchased) Household Water Line Water line must be connected...
Quick Guide (easy Manual) (ver.1.0) (English)
Page 28
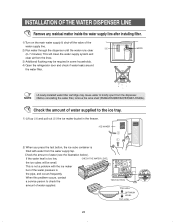
...;) the ice maker bucket in the pipe, and occurs frequently. If the water level is filled with the ice maker but of water supplied. WATER • A newly-installed water filter cartridge may cause water to briefly spurt from the lines. 3) Additional flushing may be small. TEST BUTTON TOO HIGH OPTIMUM LEVEL TOO LOW 28 INSTALLATION OF THE WATER DISPENSER LINE Remove any residual matter inside the water supply line after installing filter. 1) Turn on the main water supply & shut-off the valve of water (see...
...;) the ice maker bucket in the pipe, and occurs frequently. If the water level is filled with the ice maker but of water supplied. WATER • A newly-installed water filter cartridge may cause water to briefly spurt from the lines. 3) Additional flushing may be small. TEST BUTTON TOO HIGH OPTIMUM LEVEL TOO LOW 28 INSTALLATION OF THE WATER DISPENSER LINE Remove any residual matter inside the water supply line after installing filter. 1) Turn on the main water supply & shut-off the valve of water (see...
Quick Guide (easy Manual) (ver.1.0) (English)
Page 29
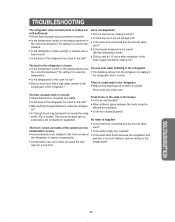
... comes from inside the refrig- • Is the door closed properly? You hear unusual noise or sounds • Check that it is airtight. No water is supplied • Is the water line connected and the shut-off valve open? • Is the refrigerator in the refrigerator is frozen • Is the temperature control on the display panel set to the correct temperature? INSTALLATION INSTRUCTIONS 29 condensation occurs. • Is the water supply line crushed? •...
... comes from inside the refrig- • Is the door closed properly? You hear unusual noise or sounds • Check that it is airtight. No water is supplied • Is the water line connected and the shut-off valve open? • Is the refrigerator in the refrigerator is frozen • Is the temperature control on the display panel set to the correct temperature? INSTALLATION INSTRUCTIONS 29 condensation occurs. • Is the water supply line crushed? •...
Quick Guide (easy Manual) (ver.1.0) (English)
Page 30
... of products, equipment, systems, utilities, services, parts, supplies, accessories, applications, installations, repairs, external plumbing and leaks, external wiring, circuit breakers, fuses or connectors not supplied and authorized by a SAMSUNG authorized service center. If in -home service repair cannot be necessary to remove, repair and return the product. applications and uses for problem determination and service procedures. consumable items including filters and light bulbs. THIS LIMITED WARRANTY SHALL NOT EXTEND TO ANYONE...
... of products, equipment, systems, utilities, services, parts, supplies, accessories, applications, installations, repairs, external plumbing and leaks, external wiring, circuit breakers, fuses or connectors not supplied and authorized by a SAMSUNG authorized service center. If in -home service repair cannot be necessary to remove, repair and return the product. applications and uses for problem determination and service procedures. consumable items including filters and light bulbs. THIS LIMITED WARRANTY SHALL NOT EXTEND TO ANYONE...


