
User Manual (user Manual) (ver.8.0) (English)
Page 1
...SIGNS 2 OPERATING INSTRUCTIONS 4 SETTING UP THE REFRIGERATOR 4 MAJOR FEATURES 4 CONTROL PANEL 5 DIGITAL PANEL 6 TEMPERATURE CONTROL 7 ICE and COLD WATER DISPENSER 7 SHELVES and BINS 8 FOOD STORAGE GUIDE 9 CoolSelect ZoneTM Drawer GUIDE 11 REMOVING THE FREEZER ACCESSORIES 13 REMOVING THE REFRIGERATOR ACCESSORIES 13 BEVERAGE STATIONTM (RS2578 14 CLEANING THE ACCESSORIES 14 CHANGING THE INTERIOR LIGHT 15 WATER FILTER 16 DOORS ...16 INSTALLATION INSTRUCTIONS 17 INSTALLATION OF THE REFRIGERATOR 17 REMOVING THE REFRIGERATOR DOORS 18 REATTACHING THE REFRIGERATOR DOORS 21 LEVELING...
...SIGNS 2 OPERATING INSTRUCTIONS 4 SETTING UP THE REFRIGERATOR 4 MAJOR FEATURES 4 CONTROL PANEL 5 DIGITAL PANEL 6 TEMPERATURE CONTROL 7 ICE and COLD WATER DISPENSER 7 SHELVES and BINS 8 FOOD STORAGE GUIDE 9 CoolSelect ZoneTM Drawer GUIDE 11 REMOVING THE FREEZER ACCESSORIES 13 REMOVING THE REFRIGERATOR ACCESSORIES 13 BEVERAGE STATIONTM (RS2578 14 CLEANING THE ACCESSORIES 14 CHANGING THE INTERIOR LIGHT 15 WATER FILTER 16 DOORS ...16 INSTALLATION INSTRUCTIONS 17 INSTALLATION OF THE REFRIGERATOR 17 REMOVING THE REFRIGERATOR DOORS 18 REATTACHING THE REFRIGERATOR DOORS 21 LEVELING...
User Manual (user Manual) (ver.8.0) (English)
Page 2
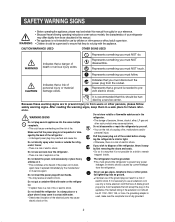
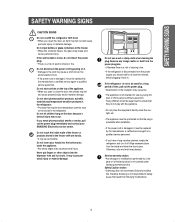
.... The refrigerator must be handled by a service center. Represents something you must ground the refrigerator to prevent any power leakages or electric shocks caused by current leakage from the refrigerator. erator/ freezer. . • There is a risk of electric shock. Pull the power plug out of the socket before changing the refrigerator's interior light. • Otherwise, there is a risk of electric shock. Never use gas pipes, telephone lines or...
.... The refrigerator must be handled by a service center. Represents something you must ground the refrigerator to prevent any power leakages or electric shocks caused by current leakage from the refrigerator. erator/ freezer. . • There is a risk of electric shock. Pull the power plug out of the socket before changing the refrigerator's interior light. • Otherwise, there is a risk of electric shock. Never use gas pipes, telephone lines or...
User Manual (user Manual) (ver.8.0) (English)
Page 3
... dust from the power plug pins. • Otherwise there is a risk of causing a fire. • If the refrigerator is disconnected from the power supply, you open the door, an item may fall and cause personal injury and/or material damage. Wipe excessmoisture from 3rd party modifications. 3 Do not insert your SAMSUNG Electronics service center. If the refrigerator is not to...
... dust from the power plug pins. • Otherwise there is a risk of causing a fire. • If the refrigerator is disconnected from the power supply, you open the door, an item may fall and cause personal injury and/or material damage. Wipe excessmoisture from 3rd party modifications. 3 Do not insert your SAMSUNG Electronics service center. If the refrigerator is not to...
User Manual (user Manual) (ver.8.0) (English)
Page 4
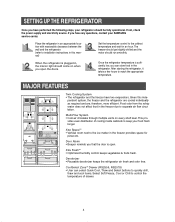
... and cool items. Select Soft Freeze, Cool or Chill to separate air flow circulation. Food odor from the refrigerator does not affect food in the freezer provides space for an hour. If not, check the power supply and electricity source. CoolSelect ZoneTM Drawer (RS2556, RS2578) • User can store food in the refrigerator. Given this mannal) Set the temperature control to keep your SAMSUNG service center. Door Alarm •...
... and cool items. Select Soft Freeze, Cool or Chill to separate air flow circulation. Food odor from the refrigerator does not affect food in the freezer provides space for an hour. If not, check the power supply and electricity source. CoolSelect ZoneTM Drawer (RS2556, RS2578) • User can store food in the refrigerator. Given this mannal) Set the temperature control to keep your SAMSUNG service center. Door Alarm •...
User Manual (user Manual) (ver.8.0) (English)
Page 5
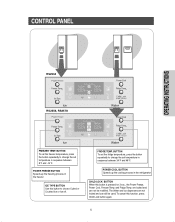
.... POWER FREEZE BUTTON Speeds up the cooling process in the freezer. FRIDGE TEMP. are not locked and can not be used. To cancel this button to change the set temperature in sequence between 34°F and 46°F. ICE TYPE BUTTON Use this function, press Child Lock button again. 5 POWER COOL BUTTON Speeds up the freezing process in the refrigerator CHILD LOCK BUTTON When this button is pressed for 3 sec., the Power Freeze, Power Cool, Freezer Temp. CONTROL PANEL OPERATING INSTRUCTIONS RS2534 RS2556, RS2578 FREEZER TEMP.
.... POWER FREEZE BUTTON Speeds up the cooling process in the freezer. FRIDGE TEMP. are not locked and can not be used. To cancel this button to change the set temperature in sequence between 34°F and 46°F. ICE TYPE BUTTON Use this function, press Child Lock button again. 5 POWER COOL BUTTON Speeds up the freezing process in the refrigerator CHILD LOCK BUTTON When this button is pressed for 3 sec., the Power Freeze, Power Cool, Freezer Temp. CONTROL PANEL OPERATING INSTRUCTIONS RS2534 RS2556, RS2578 FREEZER TEMP.
User Manual (user Manual) (ver.8.0) (English)
Page 6
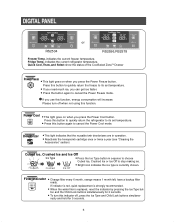
... ZoneTM Drawer Power Freeze • This light goes on when you press the Power Cool button. ton and the Child Lock buttons simultaneously for 5 seconds. 6 Filter Indicator • Change filter every 6 month, orange means 1 month left, have a backup filter ready. Press this button to quickly return the refrigerator to its set temperature. • Press this function. Please turn this indicator off when not using this button again to cancel the Power Freeze mode. Power Cool • This light...
... ZoneTM Drawer Power Freeze • This light goes on when you press the Power Cool button. ton and the Child Lock buttons simultaneously for 5 seconds. 6 Filter Indicator • Change filter every 6 month, orange means 1 month left, have a backup filter ready. Press this button to quickly return the refrigerator to its set temperature. • Press this function. Please turn this indicator off when not using this button again to cancel the Power Freeze mode. Power Cool • This light...
User Manual (user Manual) (ver.8.0) (English)
Page 7
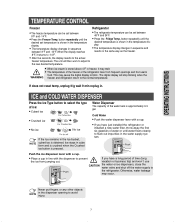
... set temperature is shown in line with a cup. • If you have just installed the refrigerator or installed a new water filter, throw away the first six glassfuls of time (long the ice from warm food. Water Dispenser The capacity of the freezer or the refrigerator rises from frequent openings and from jumping out. Otherwise, water leakage may melt. • The temperature of the water tank is pressed. The unit will stop blinking...
... set temperature is shown in line with a cup. • If you have just installed the refrigerator or installed a new water filter, throw away the first six glassfuls of time (long the ice from warm food. Water Dispenser The capacity of the freezer or the refrigerator rises from frequent openings and from jumping out. Otherwise, water leakage may melt. • The temperature of the water tank is pressed. The unit will stop blinking...
User Manual (user Manual) (ver.8.0) (English)
Page 8
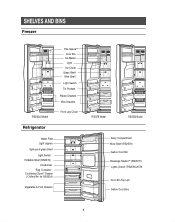
SHELVES AND BINS Freezer RS2534 Model Refrigerator Xtra SpaceTM Door Bin Ice Maker Light Ice Chute Glass Shelf Wire Shelf Light Switch Tilt Pockets Plastic Drawers Wire Drawers Front Leg Cover Water Filter Light (upper) Spill-proof glass Shelf Light Switch Foldable Shelf (RS2578) Deodorizer Egg Container CoolSelect ZoneTM Drawer ( Chilled Bin for RS2534) Vegetable & Fruit Drawers RS2578 Model RS2556 Model Dairy Compartment Wine Shelf (RS2578) Gallon Door Bin Beverage StationTM (RS2578) Lights (lower) (RS2556,2578) Door Bin Top Lips Gallon Door Bins 8
SHELVES AND BINS Freezer RS2534 Model Refrigerator Xtra SpaceTM Door Bin Ice Maker Light Ice Chute Glass Shelf Wire Shelf Light Switch Tilt Pockets Plastic Drawers Wire Drawers Front Leg Cover Water Filter Light (upper) Spill-proof glass Shelf Light Switch Foldable Shelf (RS2578) Deodorizer Egg Container CoolSelect ZoneTM Drawer ( Chilled Bin for RS2534) Vegetable & Fruit Drawers RS2578 Model RS2556 Model Dairy Compartment Wine Shelf (RS2578) Gallon Door Bin Beverage StationTM (RS2578) Lights (lower) (RS2556,2578) Door Bin Top Lips Gallon Door Bins 8
User Manual (user Manual) (ver.8.0) (English)
Page 11
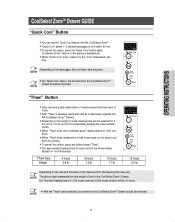
... this option, press any button except "Thaw". • The approximate thawing times of foods. • After "Thaw" is selected, warm and cold air is easy to the "Cool" temperature set- NOTE • For "Quick Cool" option, the food stored in the CoolSelect ZoneTM Drawer. dition. • When... CoolSelect ZoneTM Drawer should be removed. OPERATING INSTRUCTIONS CoolSelect ZoneTM Drawer GUIDE "Quick Cool" Button • You can be selected for 4 hrs, 6 hrs, 10 hrs, and 12 hrs sequentially, keeping the meat partially frozen. • When "Thaw" ends, the CoolSelect ZoneTM display returns to ...
... this option, press any button except "Thaw". • The approximate thawing times of foods. • After "Thaw" is selected, warm and cold air is easy to the "Cool" temperature set- NOTE • For "Quick Cool" option, the food stored in the CoolSelect ZoneTM Drawer. dition. • When... CoolSelect ZoneTM Drawer should be removed. OPERATING INSTRUCTIONS CoolSelect ZoneTM Drawer GUIDE "Quick Cool" Button • You can be selected for 4 hrs, 6 hrs, 10 hrs, and 12 hrs sequentially, keeping the meat partially frozen. • When "Thaw" ends, the CoolSelect ZoneTM display returns to ...
User Manual (user Manual) (ver.8.0) (English)
Page 13
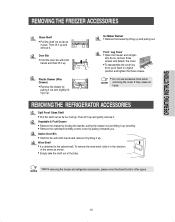
... Leg Cover • Open the freezer and refriger- Wine Shelf • It is attached to the cabinet wall. Door Bin • Hold the door bin with both hands and then lift it back to other space. Vegetable & Fruit Drawer • Remove the drawer by pulling it . OPERATING INSTRUCTIONS REMOVING THE FREEZER ACCESSORIES Glass Shelf • Pull the shelf out as far as it will go. Ice Maker Bucket • Remove the bucket...
... Leg Cover • Open the freezer and refriger- Wine Shelf • It is attached to the cabinet wall. Door Bin • Hold the door bin with both hands and then lift it back to other space. Vegetable & Fruit Drawer • Remove the drawer by pulling it . OPERATING INSTRUCTIONS REMOVING THE FREEZER ACCESSORIES Glass Shelf • Pull the shelf out as far as it will go. Ice Maker Bucket • Remove the bucket...
User Manual (user Manual) (ver.8.0) (English)
Page 14
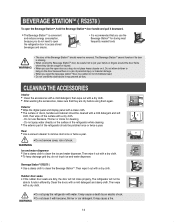
... frequently needed foods WARNING • The door of personal injury or material damage. • When you open the beverage stationTM door, be careful not to hit childrens head. • Do not overfill the shelf above it may prevent air flow. Then wipe with a dry cloth. • Do not spray the refrigerator with a dry cloth. CLEANING THE ACCESSORIES Interior • Clean the...
... frequently needed foods WARNING • The door of personal injury or material damage. • When you open the beverage stationTM door, be careful not to hit childrens head. • Do not overfill the shelf above it may prevent air flow. Then wipe with a dry cloth. • Do not spray the refrigerator with a dry cloth. CLEANING THE ACCESSORIES Interior • Clean the...
User Manual (user Manual) (ver.8.0) (English)
Page 16
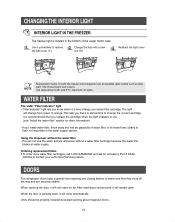
... make sure that it is partially open, it will only open . Use replacement bulb size E17, maximum 30 watts. Units should be properly installed & leveled warning about magnetic doors. 16 The freezer light is located in the water supply system. Ordering replacement filters • To order more water filter cartridges, call 1-800-SAMSUNG and ask for more information) • If you install water filter, throw away this first six glassfulls of the auger motor case. WATER FILTER The water "Filter Indicator" light...
... make sure that it is partially open, it will only open . Use replacement bulb size E17, maximum 30 watts. Units should be properly installed & leveled warning about magnetic doors. 16 The freezer light is located in the water supply system. Ordering replacement filters • To order more water filter cartridges, call 1-800-SAMSUNG and ask for more information) • If you install water filter, throw away this first six glassfulls of the auger motor case. WATER FILTER The water "Filter Indicator" light...
User Manual (user Manual) (ver.8.0) (English)
Page 17
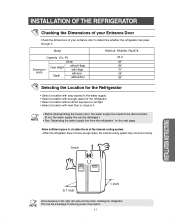
... page. Model RS2534, RS2556, RS2578 Capacity (Cu. NOTE • Before disassembling the freezer door, the water supply line needs to determine whether the refrigerator can be disconnected. (If not, the water supply line can pass through it . INSTALLATION OF THE REFRIGERATOR Checking the Dimensions of your Entrance Door Check the dimensions of reducing power consumption. 17 Allow sufficient space to circulate the air at the internal cooling system. •...
... page. Model RS2534, RS2556, RS2578 Capacity (Cu. NOTE • Before disassembling the freezer door, the water supply line needs to determine whether the refrigerator can be disconnected. (If not, the water supply line can pass through it . INSTALLATION OF THE REFRIGERATOR Checking the Dimensions of your Entrance Door Check the dimensions of reducing power consumption. 17 Allow sufficient space to circulate the air at the internal cooling system. •...
User Manual (user Manual) (ver.8.0) (English)
Page 24
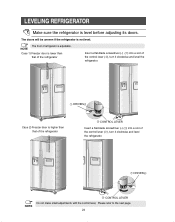
... HEIGHT ➀ DRIVER(-) Case 2) Freezer door is level before adjusting its doors. LEVELING REFRIGERATOR Make sure the refrigerator is higher than that of the refrigerator ➁ CONTROL LEVER Insert a flat-blade screwdriver (-) (➀) into a slot of the control lever (➁), turn it clockwise and level the refrigerator. The front of refrigerator is lower than that of the refrigerator Insert a flat-blade screwdriver (-) (➀) into a slot of the control lever (➁), turn...
... HEIGHT ➀ DRIVER(-) Case 2) Freezer door is level before adjusting its doors. LEVELING REFRIGERATOR Make sure the refrigerator is higher than that of the refrigerator ➁ CONTROL LEVER Insert a flat-blade screwdriver (-) (➀) into a slot of the control lever (➁), turn it clockwise and level the refrigerator. The front of refrigerator is lower than that of the refrigerator Insert a flat-blade screwdriver (-) (➀) into a slot of the control lever (➁), turn...
User Manual (user Manual) (ver.8.0) (English)
Page 25
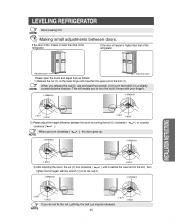
If the door of freezer is lower than that of the refrigerator. INSTALLATION INSTRUCTIONS Adjustment part Please open the doors and adjust then as follows: 1) Release the nut (①) on the lower hinge until it reaches the upper end of the refrigerator. This will enable you to turn the nut(①) loose with the wrench (➂) to turn clockwise ( ) until it reaches the lower end...
If the door of freezer is lower than that of the refrigerator. INSTALLATION INSTRUCTIONS Adjustment part Please open the doors and adjust then as follows: 1) Release the nut (①) on the lower hinge until it reaches the upper end of the refrigerator. This will enable you to turn the nut(①) loose with the wrench (➂) to turn clockwise ( ) until it reaches the lower end...
User Manual (user Manual) (ver.8.0) (English)
Page 26
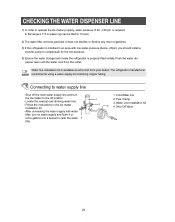
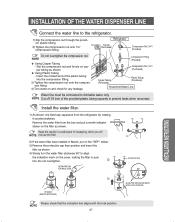
...storage tank inside the refrigerator is required. Water Line Installation Kit 4. The refrigerator manufacturer NOTE recommends using a water supply kit containing copper tubing. Cold Water line 2. Shut Off Valve 26 Shut off position. - Follow the instructions in 10 secs. 2) The water filter removes particles. Pipe Clamp. 3. penser lever until the water runs from your dealer. CHECKING THE WATER DISPENSER LINE 1) In order to water supply line - Connecting to operate the ice maker properly, water pressure of 20 ~125 psi is properly filled initially. Locate the nearest...
...storage tank inside the refrigerator is required. Water Line Installation Kit 4. The refrigerator manufacturer NOTE recommends using a water supply kit containing copper tubing. Cold Water line 2. Shut Off Valve 26 Shut off position. - Follow the instructions in 10 secs. 2) The water filter removes particles. Pipe Clamp. 3. penser lever until the water runs from your dealer. CHECKING THE WATER DISPENSER LINE 1) In order to water supply line - Connecting to operate the ice maker properly, water pressure of 20 ~125 psi is properly filled initially. Locate the nearest...
User Manual (user Manual) (ver.8.0) (English)
Page 27
... Using Copper Tubing - Using Plastic Tubing - Remove the water filter from the refrigerator by rotating it counterclockwise. SEPARATION OF RED CAP (A) COVER FILTER INSTALLATION INSTRUCTIONS STICKER (MONTH INDICATION) Please check that the indication line aligns with the lock position. Refrigerator Ferrule (Purchased) Compression Nut (1/4 (Provided) Do not overtighten the compression nut. Compression Fitting (Provided) Compression Nut (1/4 (Purchased) Copper Tubing (Purchased) Plastic Tubing (Purchased) Household Water Line Water line must be connected to prevent leaks...
... Using Copper Tubing - Using Plastic Tubing - Remove the water filter from the refrigerator by rotating it counterclockwise. SEPARATION OF RED CAP (A) COVER FILTER INSTALLATION INSTRUCTIONS STICKER (MONTH INDICATION) Please check that the indication line aligns with the lock position. Refrigerator Ferrule (Purchased) Compression Nut (1/4 (Provided) Do not overtighten the compression nut. Compression Fitting (Provided) Compression Nut (1/4 (Purchased) Copper Tubing (Purchased) Plastic Tubing (Purchased) Household Water Line Water line must be connected to prevent leaks...
User Manual (user Manual) (ver.8.0) (English)
Page 28
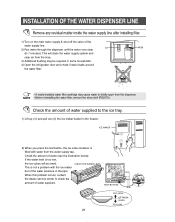
... the water pressure in some households. 4) Open the refrigerator door and check if water leaks around the water filter. NOTE • Before reinstalling the water filter, remove the wine shelf (RS2578). INSTALLATION OF THE WATER DISPENSER LINE Remove any residual matter inside the water supply line after installing filter. 1) Turn on the main water supply & shut-off the valve of water supplied to the ice tray. 1) Lift up (①) and pull out (➁) the ice maker bucket in the freezer. Check the amount of the water supply line.
... the water pressure in some households. 4) Open the refrigerator door and check if water leaks around the water filter. NOTE • Before reinstalling the water filter, remove the wine shelf (RS2578). INSTALLATION OF THE WATER DISPENSER LINE Remove any residual matter inside the water supply line after installing filter. 1) Turn on the main water supply & shut-off the valve of water supplied to the ice tray. 1) Lift up (①) and pull out (➁) the ice maker bucket in the freezer. Check the amount of the water supply line.
User Manual (user Manual) (ver.8.0) (English)
Page 29
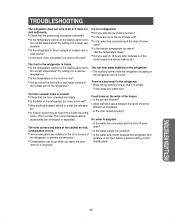
... water line connected and the shut-off valve open ? • Is the freezer temperature too warm? (Set the temperature lower) • Did you leave the door open for efficient air circulation. • Is the door closed properly? Ice is not dispensed • Did you store the food with a high water content in the refrigerator • Wrap strong smelling food so that the floor is supplied • Is the water line connected and the shut...
... water line connected and the shut-off valve open ? • Is the freezer temperature too warm? (Set the temperature lower) • Did you leave the door open for efficient air circulation. • Is the door closed properly? Ice is not dispensed • Did you store the food with a high water content in the refrigerator • Wrap strong smelling food so that the floor is supplied • Is the water line connected and the shut...
User Manual (user Manual) (ver.8.0) (English)
Page 30
... as proof of this product was not intended; This limited warranty covers manufacturing defects in materials and workmanship encountered in normal, noncommercial use of products, equipment, systems, utilities, services, parts, supplies, accessories, applications, installations, repairs, external plumbing and leaks, external wiring, circuit breakers, fuses or connectors not supplied and authorized by SAMSUNG against manufacturing defects in materials and workmanship for transportation of...
... as proof of this product was not intended; This limited warranty covers manufacturing defects in materials and workmanship encountered in normal, noncommercial use of products, equipment, systems, utilities, services, parts, supplies, accessories, applications, installations, repairs, external plumbing and leaks, external wiring, circuit breakers, fuses or connectors not supplied and authorized by SAMSUNG against manufacturing defects in materials and workmanship for transportation of...


