User Manual (user Manual) (ver.8.0) (English)
Page 1
...'S MANUAL AND INSTALLATION CONTENTS SAFETY WARNING SIGNS 2 OPERATING INSTRUCTIONS 4 SETTING UP THE REFRIGERATOR 4 MAJOR FEATURES 4 CONTROL PANEL 5 DIGITAL PANEL 6 TEMPERATURE CONTROL 7 ICE and COLD WATER DISPENSER 7 SHELVES and BINS 8 FOOD STORAGE GUIDE 9 CoolSelect ZoneTM Drawer GUIDE 11 REMOVING THE FREEZER ACCESSORIES 13 REMOVING THE REFRIGERATOR ACCESSORIES 13 BEVERAGE STATIONTM (RS2578 14 CLEANING THE ACCESSORIES 14 CHANGING THE INTERIOR LIGHT 15 WATER FILTER 16 DOORS ...16 INSTALLATION INSTRUCTIONS 17 INSTALLATION OF THE REFRIGERATOR 17 REMOVING THE REFRIGERATOR DOORS...
...'S MANUAL AND INSTALLATION CONTENTS SAFETY WARNING SIGNS 2 OPERATING INSTRUCTIONS 4 SETTING UP THE REFRIGERATOR 4 MAJOR FEATURES 4 CONTROL PANEL 5 DIGITAL PANEL 6 TEMPERATURE CONTROL 7 ICE and COLD WATER DISPENSER 7 SHELVES and BINS 8 FOOD STORAGE GUIDE 9 CoolSelect ZoneTM Drawer GUIDE 11 REMOVING THE FREEZER ACCESSORIES 13 REMOVING THE REFRIGERATOR ACCESSORIES 13 BEVERAGE STATIONTM (RS2578 14 CLEANING THE ACCESSORIES 14 CHANGING THE INTERIOR LIGHT 15 WATER FILTER 16 DOORS ...16 INSTALLATION INSTRUCTIONS 17 INSTALLATION OF THE REFRIGERATOR 17 REMOVING THE REFRIGERATOR DOORS...
User Manual (user Manual) (ver.8.0) (English)
Page 2
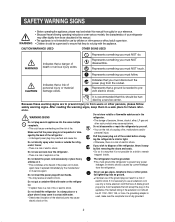
... place for use gas pipes, telephone lines or other persons, please follow . Do not install the refrigerator in a damp place or a place where it may receive an electric shock. CAUTION/WARNINGS USED OTHER SIGNS USED WARNING Indicates that they do . Pull the power plug out of the socket before changing the refrigerator's interior light. • Otherwise, there is dam- The refrigerator must disconnect the power plug from...
... place for use gas pipes, telephone lines or other persons, please follow . Do not install the refrigerator in a damp place or a place where it may receive an electric shock. CAUTION/WARNINGS USED OTHER SIGNS USED WARNING Indicates that they do . Pull the power plug out of the socket before changing the refrigerator's interior light. • Otherwise, there is dam- The refrigerator must disconnect the power plug from...
User Manual (user Manual) (ver.8.0) (English)
Page 3
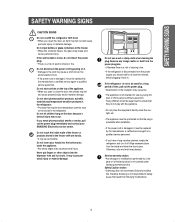
... refrigerator is disconnected from the inside walls of the freezer or products stored in the freezer. • When the contents freeze, the glass may break and cause personal injury. Do not touch the inside and leave the doors open. Wipe excessmoisture from the power supply, you sense pharmaceutical smells or smoke, pull out the power plug immediately and contact your hands into the dispenser...
... refrigerator is disconnected from the inside walls of the freezer or products stored in the freezer. • When the contents freeze, the glass may break and cause personal injury. Do not touch the inside and leave the doors open. Wipe excessmoisture from the power supply, you sense pharmaceutical smells or smoke, pull out the power plug immediately and contact your hands into the dispenser...
User Manual (user Manual) (ver.8.0) (English)
Page 4
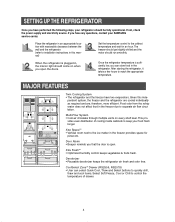
... the door is open the doors. Once the refrigerator temperature is plugged in, the interior light should come on every shelf level. Door Alarm • Beeper reminds you have two evaporators. Place the refigerator in an appropriate location with reasonable clearance between the wall and the refrigerator. (refer to installation instructions in the freezer due to keep your SAMSUNG service center. MAJOR FEATURES Twin Cooling System • The refrigerator and the freezer have...
... the door is open the doors. Once the refrigerator temperature is plugged in, the interior light should come on every shelf level. Door Alarm • Beeper reminds you have two evaporators. Place the refigerator in an appropriate location with reasonable clearance between the wall and the refrigerator. (refer to installation instructions in the freezer due to keep your SAMSUNG service center. MAJOR FEATURES Twin Cooling System • The refrigerator and the freezer have...
User Manual (user Manual) (ver.8.0) (English)
Page 5
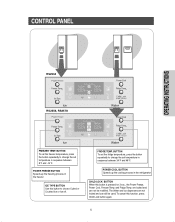
... be used. POWER COOL BUTTON Speeds up the freezing process in the refrigerator CHILD LOCK BUTTON When this button is pressed for 3 sec., the Power Freeze, Power Cool, Freezer Temp. The Water and Ice dispensers are locked and can still be modified. ICE TYPE BUTTON Use this function, press Child Lock button again. 5 BUTTON To set the fridge temperature, press the button repeatedly to change the set temperature in sequence between 34°F and 46°F. CONTROL PANEL OPERATING INSTRUCTIONS RS2534 RS2556, RS2578 FREEZER TEMP. To...
... be used. POWER COOL BUTTON Speeds up the freezing process in the refrigerator CHILD LOCK BUTTON When this button is pressed for 3 sec., the Power Freeze, Power Cool, Freezer Temp. The Water and Ice dispensers are locked and can still be modified. ICE TYPE BUTTON Use this function, press Child Lock button again. 5 BUTTON To set the fridge temperature, press the button repeatedly to change the set temperature in sequence between 34°F and 46°F. CONTROL PANEL OPERATING INSTRUCTIONS RS2534 RS2556, RS2578 FREEZER TEMP. To...
User Manual (user Manual) (ver.8.0) (English)
Page 6
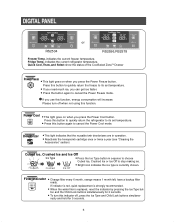
... freezer temperature. Power Cool • This light goes on when you can get ice faster. • Press the button again to its set temperature. • If you need much ice, you press the Power Freeze button. Filter Indicator • Change filter every 6 month, orange means 1 month left, have a backup filter ready. indicates the current refrigerator temperature. Please turn this indicator off when not using this button to quickly return the freeze to cancel the Power Freeze mode. DIGITAL PANEL or RS2534 RS2556,RS2578 Freezer Temp. Fridge Temp...
... freezer temperature. Power Cool • This light goes on when you can get ice faster. • Press the button again to its set temperature. • If you need much ice, you press the Power Freeze button. Filter Indicator • Change filter every 6 month, orange means 1 month left, have a backup filter ready. indicates the current refrigerator temperature. Please turn this indicator off when not using this button to quickly return the freeze to cancel the Power Freeze mode. DIGITAL PANEL or RS2534 RS2556,RS2578 Freezer Temp. Fridge Temp...
User Manual (user Manual) (ver.8.0) (English)
Page 7
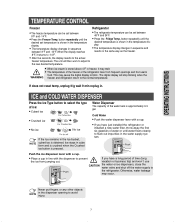
... in line with a cup. • If you have just installed the refrigerator or installed a new water filter, throw away the first six glassfuls of water or until the desired temperature is stored above 4°F in freezer, it returns to -14°F. • After five seconds, the display reverts to blink . OPERATING INSTRUCTIONS TEMPERATURE CONTROL Freezer Refrigerator • The freezer temperature can be set between 8°F and -14°F. The unit will stop blinking when...
... in line with a cup. • If you have just installed the refrigerator or installed a new water filter, throw away the first six glassfuls of water or until the desired temperature is stored above 4°F in freezer, it returns to -14°F. • After five seconds, the display reverts to blink . OPERATING INSTRUCTIONS TEMPERATURE CONTROL Freezer Refrigerator • The freezer temperature can be set between 8°F and -14°F. The unit will stop blinking when...
User Manual (user Manual) (ver.8.0) (English)
Page 8
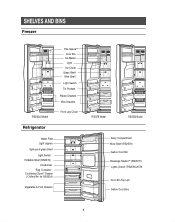
SHELVES AND BINS Freezer RS2534 Model Refrigerator Xtra SpaceTM Door Bin Ice Maker Light Ice Chute Glass Shelf Wire Shelf Light Switch Tilt Pockets Plastic Drawers Wire Drawers Front Leg Cover Water Filter Light (upper) Spill-proof glass Shelf Light Switch Foldable Shelf (RS2578) Deodorizer Egg Container CoolSelect ZoneTM Drawer ( Chilled Bin for RS2534) Vegetable & Fruit Drawers RS2578 Model RS2556 Model Dairy Compartment Wine Shelf (RS2578) Gallon Door Bin Beverage StationTM (RS2578) Lights (lower) (RS2556,2578) Door Bin Top Lips Gallon Door Bins 8
SHELVES AND BINS Freezer RS2534 Model Refrigerator Xtra SpaceTM Door Bin Ice Maker Light Ice Chute Glass Shelf Wire Shelf Light Switch Tilt Pockets Plastic Drawers Wire Drawers Front Leg Cover Water Filter Light (upper) Spill-proof glass Shelf Light Switch Foldable Shelf (RS2578) Deodorizer Egg Container CoolSelect ZoneTM Drawer ( Chilled Bin for RS2534) Vegetable & Fruit Drawers RS2578 Model RS2556 Model Dairy Compartment Wine Shelf (RS2578) Gallon Door Bin Beverage StationTM (RS2578) Lights (lower) (RS2556,2578) Door Bin Top Lips Gallon Door Bins 8
User Manual (user Manual) (ver.8.0) (English)
Page 11
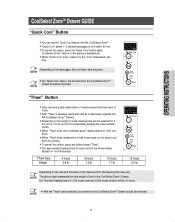
...Cool" temperature set- NOTE "Thaw" Button • Drips loss and quality deterioration of meats reduces the freshness of food in a half-frozen state so it returns to cool within 60 min. • To cancel this option, press any button except "Thaw". • The approximate thawing times of meat and fish are in the CoolSelect ZoneTM Drawer. OPERATING INSTRUCTIONS CoolSelect ZoneTM Drawer GUIDE... size and thickness of the meat and fish, the thawing time may vary. NOTE The above chart represents the total weight of foods. • After "Thaw" is selected, warm and cold air is...
...Cool" temperature set- NOTE "Thaw" Button • Drips loss and quality deterioration of meats reduces the freshness of food in a half-frozen state so it returns to cool within 60 min. • To cancel this option, press any button except "Thaw". • The approximate thawing times of meat and fish are in the CoolSelect ZoneTM Drawer. OPERATING INSTRUCTIONS CoolSelect ZoneTM Drawer GUIDE... size and thickness of the meat and fish, the thawing time may vary. NOTE The above chart represents the total weight of foods. • After "Thaw" is selected, warm and cold air is...
User Manual (user Manual) (ver.8.0) (English)
Page 13
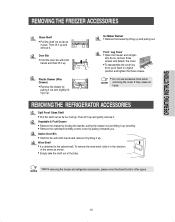
... and tighten the three screws. • Do not use excessive force when NOTE removing the cover. OPERATING INSTRUCTIONS REMOVING THE FREEZER ACCESSORIES Glass Shelf • Pull the shelf out as far as it will go. Ice Maker Bucket • Remove the bucket by pulling it towards you. REMOVING THE REFRIGERATOR ACCESSORIES Spill Proof Glass Shelf • Pull the shelf out as far as it up and pulling out...
... and tighten the three screws. • Do not use excessive force when NOTE removing the cover. OPERATING INSTRUCTIONS REMOVING THE FREEZER ACCESSORIES Glass Shelf • Pull the shelf out as far as it will go. Ice Maker Bucket • Remove the bucket by pulling it towards you. REMOVING THE REFRIGERATOR ACCESSORIES Spill Proof Glass Shelf • Pull the shelf out as far as it up and pulling out...
User Manual (user Manual) (ver.8.0) (English)
Page 14
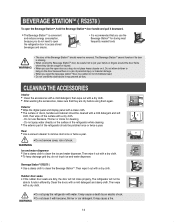
... overfill the shelf above it may prevent air flow. Rear • Use a vacuum cleaner to remove dust once or twice a year. • Do not remove cover, risk of doors, handles and cabinet should never be removed. Then wipe with a dry cloth. • Do not spray the refrigerator with a dry cloth. • To keep drainage grid dry, do not touch ice and water dispenser.
... overfill the shelf above it may prevent air flow. Rear • Use a vacuum cleaner to remove dust once or twice a year. • Do not remove cover, risk of doors, handles and cabinet should never be removed. Then wipe with a dry cloth. • Do not spray the refrigerator with a dry cloth. • To keep drainage grid dry, do not touch ice and water dispenser.
User Manual (user Manual) (ver.8.0) (English)
Page 16
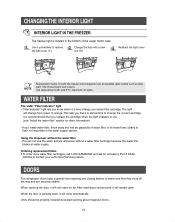
... point, it will change from green to change your authorized Samsung dealer. Use replacement bulb size E17, maximum 30 watts. It is almost time to orange. DOORS The refrigerator doors have a special door opening the door, it is recommended that it will close all the way and are at water supply. Using the dispenser without the water filter • You can not use the water and ice dispenser without a water filter cartridge because the water line blocks at available...
... point, it will change from green to change your authorized Samsung dealer. Use replacement bulb size E17, maximum 30 watts. It is almost time to orange. DOORS The refrigerator doors have a special door opening the door, it is recommended that it will close all the way and are at water supply. Using the dispenser without the water filter • You can not use the water and ice dispenser without a water filter cartridge because the water line blocks at available...
User Manual (user Manual) (ver.8.0) (English)
Page 17
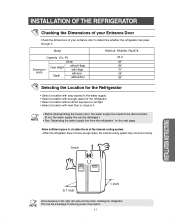
..., the internal cooling system may not work correctly. 1 inch INSTALLATION INSTRUCTIONS 0.1 inch 1 inch NOTE Allow clearance to the right, left, back and top when installing the refrigerator. Ft) 25.2 Width 36" Case Height without Hinge 69" Dimension with Hinge 70" (inch) with door 35" Depth without door 28" Selecting the Location for the Refrigerator • Select a location with easy access to the water supply. • Select a location with enough...
..., the internal cooling system may not work correctly. 1 inch INSTALLATION INSTRUCTIONS 0.1 inch 1 inch NOTE Allow clearance to the right, left, back and top when installing the refrigerator. Ft) 25.2 Width 36" Case Height without Hinge 69" Dimension with Hinge 70" (inch) with door 35" Depth without door 28" Selecting the Location for the Refrigerator • Select a location with easy access to the water supply. • Select a location with enough...
User Manual (user Manual) (ver.8.0) (English)
Page 24
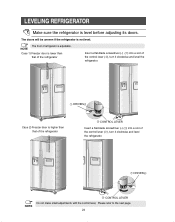
... 1) Freezer door is adjustable. DIFFERENCE OF HEIGHT ➀ DRIVER(-) Case 2) Freezer door is higher than that of the refrigerator Insert a flat-blade screwdriver (-) (➀) into a slot of refrigerator is lower than that of the refrigerator ➁ CONTROL LEVER Insert a flat-blade screwdriver (-) (➀) into a slot of the control lever (➁), turn it clockwise and level the refrigerator. LEVELING REFRIGERATOR Make sure the refrigerator is not level. DIFFERENCE OF HEIGHT ➀ DRIVER(-) NOTE...
... 1) Freezer door is adjustable. DIFFERENCE OF HEIGHT ➀ DRIVER(-) Case 2) Freezer door is higher than that of the refrigerator Insert a flat-blade screwdriver (-) (➀) into a slot of refrigerator is lower than that of the refrigerator ➁ CONTROL LEVER Insert a flat-blade screwdriver (-) (➀) into a slot of the control lever (➁), turn it clockwise and level the refrigerator. LEVELING REFRIGERATOR Make sure the refrigerator is not level. DIFFERENCE OF HEIGHT ➀ DRIVER(-) NOTE...
User Manual (user Manual) (ver.8.0) (English)
Page 25
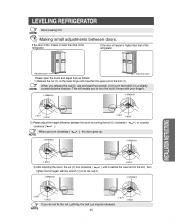
INSTALLATION INSTRUCTIONS Adjustment part Please open the doors and adjust then as follows: 1) Release the nut (①) on the lower hinge until it reaches the upper end of the refrigerator. Adjustment part When you do not fix the nut (①)firmly, the bolt (➁) may be released. This will enable you to turn the nut(①) loose with your fingers. ➂ WRENCH ➂ WRENCH...
INSTALLATION INSTRUCTIONS Adjustment part Please open the doors and adjust then as follows: 1) Release the nut (①) on the lower hinge until it reaches the upper end of the refrigerator. Adjustment part When you do not fix the nut (①)firmly, the bolt (➁) may be released. This will enable you to turn the nut(①) loose with your fingers. ➂ WRENCH ➂ WRENCH...
User Manual (user Manual) (ver.8.0) (English)
Page 26
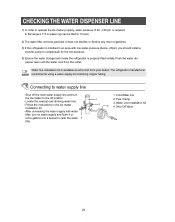
... refrigerator manufacturer NOTE recommends using a water supply kit containing copper tubing. Locate the nearest cold drinking water line. - CHECKING THE WATER DISPENSER LINE 1) In order to operate the ice maker properly, water pressure of 20 ~125 psi is properly filled initially. penser lever until the water runs from your dealer. Water Line Installation Kit 4. After connecting the water supply with low water pressure (below 20psi), you should install a booster pump to clear the water filter 1. Cold Water line 2. Pipe Clamp. 3. Follow the instructions in...
... refrigerator manufacturer NOTE recommends using a water supply kit containing copper tubing. Locate the nearest cold drinking water line. - CHECKING THE WATER DISPENSER LINE 1) In order to operate the ice maker properly, water pressure of 20 ~125 psi is properly filled initially. penser lever until the water runs from your dealer. Water Line Installation Kit 4. After connecting the water supply with low water pressure (below 20psi), you should install a booster pump to clear the water filter 1. Cold Water line 2. Pipe Clamp. 3. Follow the instructions in...
User Manual (user Manual) (ver.8.0) (English)
Page 27
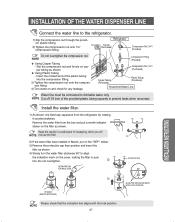
... compression nut onto the compres- INSTALLATION OF THE WATER DISPENSER LINE Connect the water line to drinkable water only. NOTE Using Copper Tubing - Using Plastic Tubing - Slip the compression nut and ferrule on the "SEP" sticker. 3) Remove the protective cap then position and insert the filter as shown. Remove the water filter from the refrigerator by rotating it counterclockwise. NOTE 27 ALIGN THE INDICATION MARK WITH LOCK POSITION. per...
... compression nut onto the compres- INSTALLATION OF THE WATER DISPENSER LINE Connect the water line to drinkable water only. NOTE Using Copper Tubing - Using Plastic Tubing - Slip the compression nut and ferrule on the "SEP" sticker. 3) Remove the protective cap then position and insert the filter as shown. Remove the water filter from the refrigerator by rotating it counterclockwise. NOTE 27 ALIGN THE INDICATION MARK WITH LOCK POSITION. per...
User Manual (user Manual) (ver.8.0) (English)
Page 28
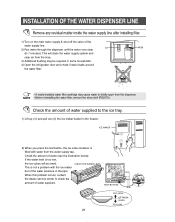
... the freezer. NOTE • Before reinstalling the water filter, remove the wine shelf (RS2578). CHECK THE WATER LEVEL This is not a problem with water from the lines. 3) Additional flushing may cause water to the ice tray. 1) Lift up (①) and pull out (➁) the ice maker bucket in some households. 4) Open the refrigerator door and check if water leaks around the water filter. TEST BUTTON TOO HIGH OPTIMUM LEVEL TOO LOW 28 WATER • A newly-installed water filter cartridge may...
... the freezer. NOTE • Before reinstalling the water filter, remove the wine shelf (RS2578). CHECK THE WATER LEVEL This is not a problem with water from the lines. 3) Additional flushing may cause water to the ice tray. 1) Lift up (①) and pull out (➁) the ice maker bucket in some households. 4) Open the refrigerator door and check if water leaks around the water filter. TEST BUTTON TOO HIGH OPTIMUM LEVEL TOO LOW 28 WATER • A newly-installed water filter cartridge may...
User Manual (user Manual) (ver.8.0) (English)
Page 29
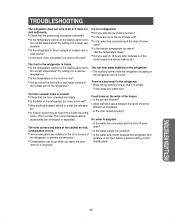
... ice storage unit? • Is the water line connected and the shut-off valve open for efficient air circulation. • Is the door closed properly? The front corners and sides of the water supply line before making function? • Is there any rotten food. No water is not dispensed • Did you stop the ice making ice? Ice is supplied • Is the water line connected and the shut-off valve open? • Is the freezer temperature too warm? (Set the temperature...
... ice storage unit? • Is the water line connected and the shut-off valve open for efficient air circulation. • Is the door closed properly? The front corners and sides of the water supply line before making function? • Is there any rotten food. No water is not dispensed • Did you stop the ice making ice? Ice is supplied • Is the water line connected and the shut-off valve open? • Is the freezer temperature too warm? (Set the temperature...
User Manual (user Manual) (ver.8.0) (English)
Page 30
..., services, parts, supplies, accessories, applications, installations, repairs, external plumbing and leaks, external wiring, circuit breakers, fuses or connectors not supplied and authorized by SAMSUNG, or which damage this product or result in the instruction book; cosmetic damage or exterior finish; customer adjustments and failure to follow operating instructions, cleaning, maintenance and environmental instructions that are covered and prescribed in service problems; SAMSUNG will be necessary to remove, repair and return the product. Replacement parts...
..., services, parts, supplies, accessories, applications, installations, repairs, external plumbing and leaks, external wiring, circuit breakers, fuses or connectors not supplied and authorized by SAMSUNG, or which damage this product or result in the instruction book; cosmetic damage or exterior finish; customer adjustments and failure to follow operating instructions, cleaning, maintenance and environmental instructions that are covered and prescribed in service problems; SAMSUNG will be necessary to remove, repair and return the product. Replacement parts...


