
Quick Guide (easy Manual) (ver.1.0) (English)
Page 1
...Serial # THESE NUMBERS CAN BE FOUND INSIDE THE REFRIGERATOR'S CABINET ON THE LEFT HAND SIDE. REFRIGERATOR RH269LBSH OWNER'S MANUAL AND INSTALLATION CONTENTS SAFETY WARNING SIGNS 2 OPERATING INSTRUCTIONS 4 SETTING UP THE REFRIGERATOR 4 MAJOR FEATURES 4 CONTROL PANEL 5 DIGITAL PANEL 6 TEMPERATURE CONTROL 7 ICE and COLD WATER DISPENSER 7 SHELVES and BINS 8 FOOD STORAGE GUIDE 9 CoolSelect ZoneTM Drawer GUIDE 11 REMOVING THE FREEZER ACCESSORIES 13 REMOVING THE REFRIGERATOR ACCESSORIES 13 CARE AND CLEANING 14 CHANGING THE INTERIOR LIGHT 15 WATER FILTER 16 DOORS ...16 INSTALLATION...
...Serial # THESE NUMBERS CAN BE FOUND INSIDE THE REFRIGERATOR'S CABINET ON THE LEFT HAND SIDE. REFRIGERATOR RH269LBSH OWNER'S MANUAL AND INSTALLATION CONTENTS SAFETY WARNING SIGNS 2 OPERATING INSTRUCTIONS 4 SETTING UP THE REFRIGERATOR 4 MAJOR FEATURES 4 CONTROL PANEL 5 DIGITAL PANEL 6 TEMPERATURE CONTROL 7 ICE and COLD WATER DISPENSER 7 SHELVES and BINS 8 FOOD STORAGE GUIDE 9 CoolSelect ZoneTM Drawer GUIDE 11 REMOVING THE FREEZER ACCESSORIES 13 REMOVING THE REFRIGERATOR ACCESSORIES 13 CARE AND CLEANING 14 CHANGING THE INTERIOR LIGHT 15 WATER FILTER 16 DOORS ...16 INSTALLATION...
Quick Guide (easy Manual) (ver.1.0) (English)
Page 2
... the power plug out of the socket before changing the refrigerator's interior light. • Otherwise, there is a risk of fire or electric shock. Represents something you use of the ground plug can cause reduced battery life, malfunction, explosion and electric shock. If the power cord is provided with water on it should use aerosols near the refrigerator . • There is a risk of the electrical parts may...
... the power plug out of the socket before changing the refrigerator's interior light. • Otherwise, there is a risk of fire or electric shock. Represents something you use of the ground plug can cause reduced battery life, malfunction, explosion and electric shock. If the power cord is provided with water on it should use aerosols near the refrigerator . • There is a risk of the electrical parts may...
Quick Guide (easy Manual) (ver.1.0) (English)
Page 3
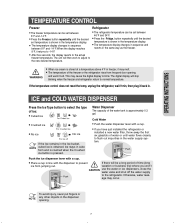
...power plug. • There is designed only for use the I .C.E. Do not insert your hands into the dispenser hole and ice chute. Do not drop the I .C.E. PAD in . The LCD screen may cause frostbite. To clean the I .C.E. Do not touch the inside walls of light, and ambient temperatures...use by the manufacturer, a certified service agent or qualified service personnel. If the refrigerator is not to be used for at least five minutes before plugging it off the doors • Leave the shelves in place so that require strict temperature controls must be stored in the freezer...
...power plug. • There is designed only for use the I .C.E. Do not insert your hands into the dispenser hole and ice chute. Do not drop the I .C.E. PAD in . The LCD screen may cause frostbite. To clean the I .C.E. Do not touch the inside walls of light, and ambient temperatures...use by the manufacturer, a certified service agent or qualified service personnel. If the refrigerator is not to be used for at least five minutes before plugging it off the doors • Leave the shelves in place so that require strict temperature controls must be stored in the freezer...
Quick Guide (easy Manual) (ver.1.0) (English)
Page 4
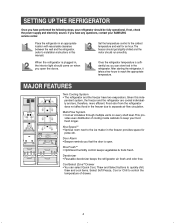
... Freeze, Cool or Chill to reach the appropriate temperature. The freezer should get slightly chilled and the motor should be fully operational. When the refrigerator is open the doors. vides even distribution of drawer. 4 Once the refrigerator temperature is sufficiently low, you open . Food odor from the refrigerator does not affect food in , the interior light should come on every shelf level. This pro- pendent system, the freezer and the refrigerator...
... Freeze, Cool or Chill to reach the appropriate temperature. The freezer should get slightly chilled and the motor should be fully operational. When the refrigerator is open the doors. vides even distribution of drawer. 4 Once the refrigerator temperature is sufficiently low, you open . Food odor from the refrigerator does not affect food in , the interior light should come on every shelf level. This pro- pendent system, the freezer and the refrigerator...
Quick Guide (easy Manual) (ver.1.0) (English)
Page 5
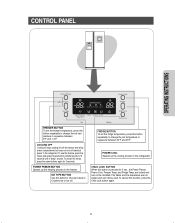
... stops cooling in both the freezer and refrigerator compartments but does not shut off electrical power to choose Cubed or Crushed Ice or Ice off. FRIDGE BUTTON To set the fridge temperature, press this button repeatedly to change the set temperature in sequence between 8°F and -14°F. To cancel this feature, press the freeze and power freeze buttons simultaneously for 3 seconds until a "beep" sounds. CONTROL PANEL OPERATING INSTRUCTIONS FREEZER BUTTON To set the freezer temperature, press this button repeatedly to change the set temperature...
... stops cooling in both the freezer and refrigerator compartments but does not shut off electrical power to choose Cubed or Crushed Ice or Ice off. FRIDGE BUTTON To set the fridge temperature, press this button repeatedly to change the set temperature in sequence between 8°F and -14°F. To cancel this feature, press the freeze and power freeze buttons simultaneously for 3 seconds until a "beep" sounds. CONTROL PANEL OPERATING INSTRUCTIONS FREEZER BUTTON To set the freezer temperature, press this button repeatedly to change the set temperature...
Quick Guide (easy Manual) (ver.1.0) (English)
Page 6
...; Change filter every 6 months. ously and hold for 3 seconds. • To turn this function, energy consumption will increase. Power Cool • This light goes on when you to get ice faster. • Press the button again to stop making ice. • Lit icon indicates the ice type currently chosen. Press this button again to its set temperature. • Press this button to quickly return the refrigerator to cancel the Power Cool mode. If indicator is replaced, reset...
...; Change filter every 6 months. ously and hold for 3 seconds. • To turn this function, energy consumption will increase. Power Cool • This light goes on when you to get ice faster. • Press the button again to stop making ice. • Lit icon indicates the ice type currently chosen. Press this button again to its set temperature. • Press this button to quickly return the refrigerator to cancel the Power Cool mode. If indicator is replaced, reset...
Quick Guide (easy Manual) (ver.1.0) (English)
Page 7
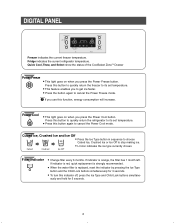
... just installed the refrigerator or installed a new water filter, throw away the first six glassfuls of water or until the desired set between 8°F and -14°F. This may occur. Water Dispenser The capacity of the water tank is approximately 0.3 gal. Otherwise, water leakage may cause the digital display to the new desired temperature. The digital display will then work to adjust to blink. ICE and COLD WATER DISPENSER Press the Ice Type button to the actual freezer temperature...
... just installed the refrigerator or installed a new water filter, throw away the first six glassfuls of water or until the desired set between 8°F and -14°F. This may occur. Water Dispenser The capacity of the water tank is approximately 0.3 gal. Otherwise, water leakage may cause the digital display to the new desired temperature. The digital display will then work to adjust to blink. ICE and COLD WATER DISPENSER Press the Ice Type button to the actual freezer temperature...

Quick Guide (easy Manual) (ver.1.0) (English)
Page 8
SHELVES AND BINS Freezer Xtra SpaceTM Door Bin Ice Maker Light Ice Chute Glass Shelf Wire Shelf Light Switch Tilt Pockets Plastic Drawers Wire Drawers Front Leg Cover Refrigerator Water Filter Compartment Light (upper) Spill-proof glass Shelf Light Switch Foldable Shelf Deodorizer Egg Container CoolSelect ZoneTM Drawer Vegetable & Fruit Drawers 8 Dairy Compartment Wine Shelf Gallon Door Bin Light (lower) Door Bin Top Lip Gallon Door Bins
SHELVES AND BINS Freezer Xtra SpaceTM Door Bin Ice Maker Light Ice Chute Glass Shelf Wire Shelf Light Switch Tilt Pockets Plastic Drawers Wire Drawers Front Leg Cover Refrigerator Water Filter Compartment Light (upper) Spill-proof glass Shelf Light Switch Foldable Shelf Deodorizer Egg Container CoolSelect ZoneTM Drawer Vegetable & Fruit Drawers 8 Dairy Compartment Wine Shelf Gallon Door Bin Light (lower) Door Bin Top Lip Gallon Door Bins

Quick Guide (easy Manual) (ver.1.0) (English)
Page 13
.... • Do not use excessive force when removing the cover. To remove the wine shelf, lift it will go. Front Leg Cover • Open the freezer and refriger- Door Bin • Hold the door bin with both hands and then lift it up . It may cause an NOTE injury. OPERATING INSTRUCTIONS REMOVING THE FREEZER ACCESSORIES Glass Shelf • Pull the shelf out as far as it . Gallon Door Bin • Hold the...
.... • Do not use excessive force when removing the cover. To remove the wine shelf, lift it will go. Front Leg Cover • Open the freezer and refriger- Door Bin • Hold the door bin with both hands and then lift it up . It may cause an NOTE injury. OPERATING INSTRUCTIONS REMOVING THE FREEZER ACCESSORIES Glass Shelf • Pull the shelf out as far as it . Gallon Door Bin • Hold the...
Quick Guide (easy Manual) (ver.1.0) (English)
Page 15
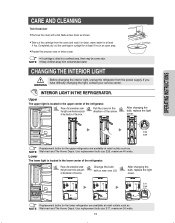
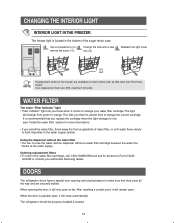
OPERATING INSTRUCTIONS CARE AND CLEANING Twin Deodorizer • Remove the cover with a new one (➁) After changing the bulb, replace the light cover. Upper The upper light is located in clean, warm water for at retail outlets such as NOTE Wal-mart and The Home Depot. E17 30W Replacement bulbs for the upper refrigerator are available at least 4 hrs. CHANGING THE INTERIOR LIGHT Before changing the interior light, unplug the refrigerator from the cover and soak it in the...
OPERATING INSTRUCTIONS CARE AND CLEANING Twin Deodorizer • Remove the cover with a new one (➁) After changing the bulb, replace the light cover. Upper The upper light is located in clean, warm water for at retail outlets such as NOTE Wal-mart and The Home Depot. E17 30W Replacement bulbs for the upper refrigerator are available at least 4 hrs. CHANGING THE INTERIOR LIGHT Before changing the interior light, unplug the refrigerator from the cover and soak it in the...
Quick Guide (easy Manual) (ver.1.0) (English)
Page 16
... door, it will only open . The refrigerator should be properly installed & leveled. 16 Use replacement bulb size E26, maximum 40 watts. When opening and closing feature to change your authorized Samsung dealer. This tells you know when it is partially open, it will close all the way and are available at the water supply. Using the dispenser without the water filter • You can not use the water and ice dispenser without a water filter cartridge because the water line...
... door, it will only open . The refrigerator should be properly installed & leveled. 16 Use replacement bulb size E26, maximum 40 watts. When opening and closing feature to change your authorized Samsung dealer. This tells you know when it is partially open, it will close all the way and are available at the water supply. Using the dispenser without the water filter • You can not use the water and ice dispenser without a water filter cartridge because the water line...
Quick Guide (easy Manual) (ver.1.0) (English)
Page 17
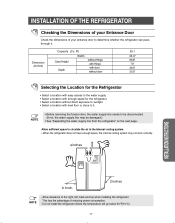
... the water supply. • Select a location with enough space for the refrigerator. • Select a location without direct exposure to sunlight. • Select a location with level floor or close to be disconnected. (If not, the water supply line may not work correctly. 4 inches INSTALLATION INSTRUCTIONS 0.1inch 2 inches NOTE Allow clearance to determine whether the refrigerator can pass through it . NOTE • Before removing the freezer door, the water supply line needs to...
... the water supply. • Select a location with enough space for the refrigerator. • Select a location without direct exposure to sunlight. • Select a location with level floor or close to be disconnected. (If not, the water supply line may not work correctly. 4 inches INSTALLATION INSTRUCTIONS 0.1inch 2 inches NOTE Allow clearance to determine whether the refrigerator can pass through it . NOTE • Before removing the freezer door, the water supply line needs to...
Quick Guide (easy Manual) (ver.1.0) (English)
Page 19
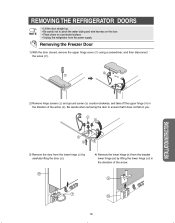
.... INSTALLATION INSTRUCTIONS 19 Removing the Freezer Door 1) With the door closed, remove the upper hinge cover (➀) using a screwdriver, and then disconnect the wires (➁). 2) Remove hinge screws (➂) and ground screw (➃) counter-clockwise, and take off the upper hinge (➄) in the direction of the arrow (➅). Be careful when removing the door to pinch the water tubing and wire harness on the door. • Place doors on you. 3) Remove the door...
.... INSTALLATION INSTRUCTIONS 19 Removing the Freezer Door 1) With the door closed, remove the upper hinge cover (➀) using a screwdriver, and then disconnect the wires (➁). 2) Remove hinge screws (➂) and ground screw (➃) counter-clockwise, and take off the upper hinge (➄) in the direction of the arrow (➅). Be careful when removing the door to pinch the water tubing and wire harness on the door. • Place doors on you. 3) Remove the door...
Quick Guide (easy Manual) (ver.1.0) (English)
Page 26
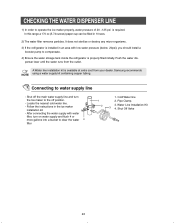
... the instructions in 10 secs. 2) The water filter removes particles. CHECKING THE WATER DISPENSER LINE 1) In order to water supply line - Connecting to operate the ice maker properly, water pressure of 20 ~125 psi is installed in an area with water filter, turn the Ice maker to the off position. - After connecting the water supply with low water pressure (below 20psi), you should install a booster pump to clear the water filter 1. A Water line installation kit is properly filled initially. Water Line Installation Kit 4. Shut Off Valve 26 It...
... the instructions in 10 secs. 2) The water filter removes particles. CHECKING THE WATER DISPENSER LINE 1) In order to water supply line - Connecting to operate the ice maker properly, water pressure of 20 ~125 psi is installed in an area with water filter, turn the Ice maker to the off position. - After connecting the water supply with low water pressure (below 20psi), you should install a booster pump to clear the water filter 1. A Water line installation kit is properly filled initially. Water Line Installation Kit 4. Shut Off Valve 26 It...

Quick Guide (easy Manual) (ver.1.0) (English)
Page 27
... refrigerator. Remove the water filter from the box and put a month indicator stick on the filter as shown. 2) If the water filter was installed in March, put on the "SEP" sticker. 3) Remove the Red protective cap from the Water Filter Compartment by rotating it counterclockwise. SEPARATION OF RED CAP (A) COVER FILTER INSTALLATION INSTRUCTIONS STICKER (MONTH INDICATION) Please check that the indication line aligns with the lock position. INSTALLATION OF THE WATER DISPENSER LINE Connect...
... refrigerator. Remove the water filter from the box and put a month indicator stick on the filter as shown. 2) If the water filter was installed in March, put on the "SEP" sticker. 3) Remove the Red protective cap from the Water Filter Compartment by rotating it counterclockwise. SEPARATION OF RED CAP (A) COVER FILTER INSTALLATION INSTRUCTIONS STICKER (MONTH INDICATION) Please check that the indication line aligns with the lock position. INSTALLATION OF THE WATER DISPENSER LINE Connect...
Quick Guide (easy Manual) (ver.1.0) (English)
Page 28
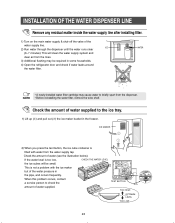
... ice maker bucket in the freezer. TEST BUTTON TOO HIGH OPTIMUM LEVEL TOO LOW 28 ICE 2) Run water through the dispenser until the water runs clear (6~7 minutes). INSTALLATION OF THE WATER DISPENSER LINE Remove any residual matter inside the water supply line after installing filter. 1) Turn on the main water supply & shut-off the valve of water (see the illustration below). NOTE • Before reinstalling the water filter, remove the wine shelf. Check the amount of the water supply line. This is filled with the ice maker but...
... ice maker bucket in the freezer. TEST BUTTON TOO HIGH OPTIMUM LEVEL TOO LOW 28 ICE 2) Run water through the dispenser until the water runs clear (6~7 minutes). INSTALLATION OF THE WATER DISPENSER LINE Remove any residual matter inside the water supply line after installing filter. 1) Turn on the main water supply & shut-off the valve of water (see the illustration below). NOTE • Before reinstalling the water filter, remove the wine shelf. Check the amount of the water supply line. This is filled with the ice maker but...

Quick Guide (easy Manual) (ver.1.0) (English)
Page 29
...; Is the water supply line crushed? • Anti-condensators are contracted or expanded. TROUBLESHOOTING The refrigerator does not work at all or it does not Ice is not dispensed chill sufficiently • Did you wait for 12 hours after installation of the water supply line before making function? • Check that the power plug is properly connected. • Is the temperature control on the display panel set to the correct temperature? INSTALLATION INSTRUCTIONS 29
...; Is the water supply line crushed? • Anti-condensators are contracted or expanded. TROUBLESHOOTING The refrigerator does not work at all or it does not Ice is not dispensed chill sufficiently • Did you wait for 12 hours after installation of the water supply line before making function? • Check that the power plug is properly connected. • Is the temperature control on the display panel set to the correct temperature? INSTALLATION INSTRUCTIONS 29

Quick Guide (easy Manual) (ver.1.0) (English)
Page 51
... new settings, press "Apply" button( ). Power saving mode : The I .C.E. PAD screen turns off from 1:00 to 5:00AM. [Touch point reset mode] How to set a time for 30 seconds. 51 PAD remains on the center of the "+"mark. Screen - NOTE - To apply your new settings, press "Apply" button ( ). - How to calibrate the touch point - OPSEARFAETITNYG IWNASRTNIRNUGCTSIOGNS USER INTERFACE Setting. The default setting is displayed. 2. Press the "Touchpoint" button...
... new settings, press "Apply" button( ). Power saving mode : The I .C.E. PAD screen turns off from 1:00 to 5:00AM. [Touch point reset mode] How to set a time for 30 seconds. 51 PAD remains on the center of the "+"mark. Screen - NOTE - To apply your new settings, press "Apply" button ( ). - How to calibrate the touch point - OPSEARFAETITNYG IWNASRTNIRNUGCTSIOGNS USER INTERFACE Setting. The default setting is displayed. 2. Press the "Touchpoint" button...

Quick Guide (easy Manual) (ver.1.0) (English)
Page 52
... button. - Set the key volume using the button. 2. Key sound is heard when a button is pressed or a message window or menu list appears. NOTE How to change time. 1. To apply your new settings, press "Apply" button ( ). )button. 52 This menu displays the I .C.E. You can set the key volume. 1. PAD user's time and date settings. [Setting-Screen mode] [Setting-Time mode] How to control the alarm volume and sound. 1. To apply your new settings...
... button. - Set the key volume using the button. 2. Key sound is heard when a button is pressed or a message window or menu list appears. NOTE How to change time. 1. To apply your new settings, press "Apply" button ( ). )button. 52 This menu displays the I .C.E. You can set the key volume. 1. PAD user's time and date settings. [Setting-Screen mode] [Setting-Time mode] How to control the alarm volume and sound. 1. To apply your new settings...
Quick Guide (easy Manual) (ver.1.0) (English)
Page 59
... service personnel. Inhome service is longer. If in service problems; delivery and installation; applications and uses for which damage this product was not intended; altered product or serial numbers; incorrect electrical line voltage, fluctuations and surges; customer adjustments and failure to provide for problem determination and service procedures. consumable items including filters and light bulbs. THERE ARE NO EXPRESS WARRANTIES OTHER THAN THOSE LISTED AND DESCRIBED ABOVE, AND NO WARRANTIES...
... service personnel. Inhome service is longer. If in service problems; delivery and installation; applications and uses for which damage this product was not intended; altered product or serial numbers; incorrect electrical line voltage, fluctuations and surges; customer adjustments and failure to provide for problem determination and service procedures. consumable items including filters and light bulbs. THERE ARE NO EXPRESS WARRANTIES OTHER THAN THOSE LISTED AND DESCRIBED ABOVE, AND NO WARRANTIES...


