User Manual Ver.0.4 (English, French, Spanish)
Page 11
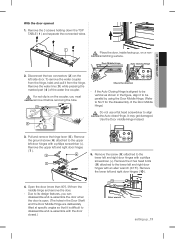
... and pull it before removing the tube. 2 Red Clip (1/4") 3 4 Check the direction - If a red clip is on the coupler, you can disassemble and re-assemble the door when the door is open. (The holes in the figure, align it is aligned to be parallel by using the Door Middle... up , on the left and right door hinges ( 10 ). 4. CAUTION scratching surface. If the Auto Closing Hinge is difficult to disassemble and re-assemble with an allen wrench (3/16"). It may get damaged. Remove the ground screw ( 6 ) attached to the lower left door hinges with a philips screwdriver (+). ...
... and pull it before removing the tube. 2 Red Clip (1/4") 3 4 Check the direction - If a red clip is on the coupler, you can disassemble and re-assemble the door when the door is open. (The holes in the figure, align it is aligned to be parallel by using the Door Middle... up , on the left and right door hinges ( 10 ). 4. CAUTION scratching surface. If the Auto Closing Hinge is difficult to disassemble and re-assemble with an allen wrench (3/16"). It may get damaged. Remove the ground screw ( 6 ) attached to the lower left door hinges with a philips screwdriver (+). ...
User Manual Ver.0.4 (English, French, Spanish)
Page 12
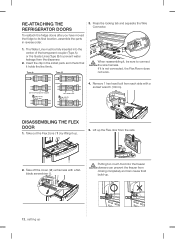
... A (1/4") (6.35 mm) The Guide Lines clip A (1/4") (6.35 mm) 4. Dispenser Center of the transparent coupler (Type A) or the Guide Lines (Type B) to its final location, assemble the parts in the install pack and check that it is not connected, the Flex Room does not work.
... A (1/4") (6.35 mm) The Guide Lines clip A (1/4") (6.35 mm) 4. Dispenser Center of the transparent coupler (Type A) or the Guide Lines (Type B) to its final location, assemble the parts in the install pack and check that it is not connected, the Flex Room does not work.
User Manual Ver.0.4 (English, French, Spanish)
Page 13
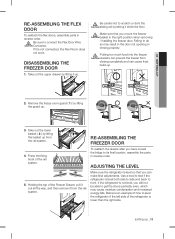
... so that you can prevent the freezer from the rail system. 4. ADJUSTING THE LEVEL Make sure the refrigerator is lower than the right side. RE-ASSEMBLING THE FREEZER DOOR To reattach the drawer after you will not be able to level the refrigerator if the left side of the rail system... not connected, the Flex Room does not work. Take out the upper drawer by lifting the guard up _13 Failing to its final location, assemble the parts in reverse order. Holding the top of the Freezer Drawer, pull it out all the way, and then remove it is an example...
... so that you can prevent the freezer from the rail system. 4. ADJUSTING THE LEVEL Make sure the refrigerator is lower than the right side. RE-ASSEMBLING THE FREEZER DOOR To reattach the drawer after you will not be able to level the refrigerator if the left side of the rail system... not connected, the Flex Room does not work. Take out the upper drawer by lifting the guard up _13 Failing to its final location, assemble the parts in reverse order. Holding the top of the Freezer Drawer, pull it out all the way, and then remove it is an example...

User Manual Ver.0.4 (English, French, Spanish)
Page 15
... in the connection areas, turn off valve. Cold water line Pipe clamp Shut off valve Refrigerator Compression Nut (1/4") (Assembled) Plastic Tubing (Assembled) Compression Fitting (Assembled) Ferrule (Not supplied) Molded end(Bulb) Compression nut (B) (1/4") (Not supplied) Copper tubing or Plastic tubing (B)...nut ( B ) (not supplied) and ferrule (not supplied) on and check for the low pressure. Connecting the water supply line to the assembled compression fitting. - Use Copper Tubing • ¼" copper tubing • ¼" compression nut (1pc) • Ferrule (...
... in the connection areas, turn off valve. Cold water line Pipe clamp Shut off valve Refrigerator Compression Nut (1/4") (Assembled) Plastic Tubing (Assembled) Compression Fitting (Assembled) Ferrule (Not supplied) Molded end(Bulb) Compression nut (B) (1/4") (Not supplied) Copper tubing or Plastic tubing (B)...nut ( B ) (not supplied) and ferrule (not supplied) on and check for the low pressure. Connecting the water supply line to the assembled compression fitting. - Use Copper Tubing • ¼" copper tubing • ¼" compression nut (1pc) • Ferrule (...
User Manual Ver.0.4 (English, French, Spanish)
Page 38
...-install - CAUTION Use special care when removing them. 38_ operating Align the positions of the Sparkling Water model, open the doors. When removing and re-assembling the Bottom Door Bin of the Door Bin's holes carefully, and then slide the bin in above the desired location and push down until it...
...-install - CAUTION Use special care when removing them. 38_ operating Align the positions of the Sparkling Water model, open the doors. When removing and re-assembling the Bottom Door Bin of the Door Bin's holes carefully, and then slide the bin in above the desired location and push down until it...
User Manual Ver.0.4 (English, French, Spanish)
Page 40
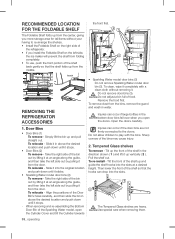
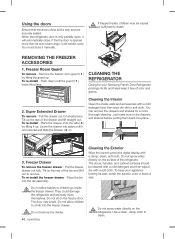
...3. The doors, handles, and cabinet surfaces should be injured WARNINGor suffocate to dry drawers and shelves before putting them back into the rail assembly. They could damage the refrigerator and seriously injure themselves. Use a clean, damp cloth to full extension. When the refrigerator door is horizontal ...can remove the drawers and shelves for your appliance looking its life and helps keep it free of the refrigerator. To keep your Samsung French Door Refrigerator prolongs its best, polish the exterior once or twice a year. Cleaning the Exterior Wipe the control panel and ...
...3. The doors, handles, and cabinet surfaces should be injured WARNINGor suffocate to dry drawers and shelves before putting them back into the rail assembly. They could damage the refrigerator and seriously injure themselves. Use a clean, damp cloth to full extension. When the refrigerator door is horizontal ...can remove the drawers and shelves for your appliance looking its life and helps keep it free of the refrigerator. To keep your Samsung French Door Refrigerator prolongs its best, polish the exterior once or twice a year. Cleaning the Exterior Wipe the control panel and ...


