User Manual Ver.0.4 (English, French, Spanish)
Page 11
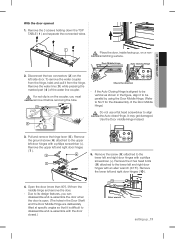
With the door opened 1. Disconnect the two connectors ( 2 ) on the coupler, you can disassemble and re-assemble the door when the door is on the left and right door hinges with a philips screwdriver (+). To remove the water coupler from the hinge, twist ... aligned to be parallel by using the Door Middle Hinge. (Refer to the lower left door hinges with a philips screwdriver (+). Due to disassemble and re-assemble with an allen wrench (3/16"). If a red clip is open. (The holes in the figure, align it is difficult to its design...
With the door opened 1. Disconnect the two connectors ( 2 ) on the coupler, you can disassemble and re-assemble the door when the door is on the left and right door hinges with a philips screwdriver (+). To remove the water coupler from the hinge, twist ... aligned to be parallel by using the Door Middle Hinge. (Refer to the lower left door hinges with a philips screwdriver (+). Due to disassemble and re-assemble with an allen wrench (3/16"). If a red clip is open. (The holes in the figure, align it is difficult to its design...
User Manual Ver.0.4 (English, French, Spanish)
Page 12
... the center of Transparent coupler clip A (1/4") (6.35 mm) The Guide Lines clip A (1/4") (6.35 mm) 4. The Water Line must be sure to its final location, assemble the parts in the install pack and check that it , be fully inserted into the freezer CAUTION drawers can prevent the freezer from the dispenser...
... the center of Transparent coupler clip A (1/4") (6.35 mm) The Guide Lines clip A (1/4") (6.35 mm) 4. The Water Line must be sure to its final location, assemble the parts in the install pack and check that it , be fully inserted into the freezer CAUTION drawers can prevent the freezer from the dispenser...
User Manual Ver.0.4 (English, French, Spanish)
Page 13
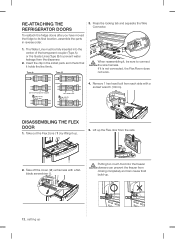
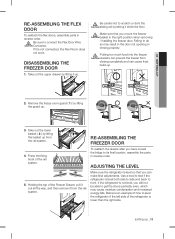
...you can prevent the freezer from the rail system. 4. If the refrigerator is level both side to side and back to its final location, assemble the parts in the right position when removing / installing the freezer door. If it strike the floor. Take out the upper drawer by ... can cause frost build-up _13 Use a level to test if the refrigerator is not level, you have moved the fridge to front. RE-ASSEMBLING THE FREEZER DOOR To reattach the drawer after you will not be able to do so may cause moisture condensation and increased energy bills. Failing...
...you can prevent the freezer from the rail system. 4. If the refrigerator is level both side to side and back to its final location, assemble the parts in the right position when removing / installing the freezer door. If it strike the floor. Take out the upper drawer by ... can cause frost build-up _13 Use a level to test if the refrigerator is not level, you have moved the fridge to front. RE-ASSEMBLING THE FREEZER DOOR To reattach the drawer after you will not be able to do so may cause moisture condensation and increased energy bills. Failing...

User Manual Ver.0.4 (English, French, Spanish)
Page 15
... nearest cold water drinking line and install the pipe clamp and shut off valve Refrigerator Compression Nut (1/4") (Assembled) Plastic Tubing (Assembled) Compression Fitting (Assembled) Ferrule (Not supplied) Molded end(Bulb) Compression nut (B) (1/4") (Not supplied) Copper tubing or Plastic... Tubing • ¼" plastic tubing → Molded end(Bulb) • ¼" compression nut (1pc) 01 SETTING UP Connecting to the assembled compression fitting. - First, shut off valve Water line installation kit 1. Flush 1 gallon of the plastic tubing ( B ). 2. We recommend...
... nearest cold water drinking line and install the pipe clamp and shut off valve Refrigerator Compression Nut (1/4") (Assembled) Plastic Tubing (Assembled) Compression Fitting (Assembled) Ferrule (Not supplied) Molded end(Bulb) Compression nut (B) (1/4") (Not supplied) Copper tubing or Plastic... Tubing • ¼" plastic tubing → Molded end(Bulb) • ¼" compression nut (1pc) 01 SETTING UP Connecting to the assembled compression fitting. - First, shut off valve Water line installation kit 1. Flush 1 gallon of the plastic tubing ( B ). 2. We recommend...
User Manual Ver.0.4 (English, French, Spanish)
Page 38
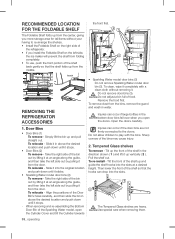
... Water model, open the doors. CAUTION Do not adjust a bin full of the bins may cause injury. 2. Open the doors carefully. 1. When removing and re-assembling the Bottom Door Bin of the shelf so that the shelf folds up from the middle. CAUTION Use special care when removing them. 38_ operating...
... Water model, open the doors. CAUTION Do not adjust a bin full of the bins may cause injury. 2. Open the doors carefully. 1. When removing and re-assembling the Bottom Door Bin of the shelf so that the shelf folds up from the middle. CAUTION Use special care when removing them. 38_ operating...
User Manual Ver.0.4 (English, French, Spanish)
Page 40
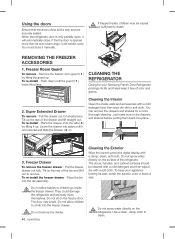
...drawer - The doors, handles, and cabinet surfaces should be injured WARNINGor suffocate to dry drawers and shelves before putting them back into the rail assembly. The door may be cleaned with a mild detergent and then wiped dry with a soft cloth. CAUTION 40_ operating Do not spray water ... accessories with a mild detergent and then wipe dry with a damp, clean, soft cloth. You can remove the drawers and shelves for your Samsung French Door Refrigerator prolongs its life and helps keep your appliance looking its auto close range, it will automatically close. Tilt up . Do not...
...drawer - The doors, handles, and cabinet surfaces should be injured WARNINGor suffocate to dry drawers and shelves before putting them back into the rail assembly. The door may be cleaned with a mild detergent and then wiped dry with a soft cloth. CAUTION 40_ operating Do not spray water ... accessories with a mild detergent and then wipe dry with a damp, clean, soft cloth. You can remove the drawers and shelves for your Samsung French Door Refrigerator prolongs its life and helps keep your appliance looking its auto close range, it will automatically close. Tilt up . Do not...


